Page 387 of 643

•To change the current directory, use the remote con-
trol’s PROG Up and Down buttons.
Disc Errors
If the DVD player is unable to read the disc, a �Disc Error�
message is displayed on the VES™ and Radio displays
and the disc is automatically ejected. A dirty, damaged, or
incompatible disc format are all potential causes for a
�Disc Error� message.
If a disc has a damaged track which results in audible or
visible errors that persists for 2.0 seconds, the DVD
player will attempt to continue playing the disc by skipping forward 1.0 to 3.0 seconds at a time. If the end
of the disc is reached, the DVD player will return to the
beginning of the disc and attempt to play the start of the
first track.
The DVD player may shut down during extremely hot
conditions, such as when the vehicle’s interior tempera-
ture is above 120°F. When this occurs, the DVD player
will display
�VES High Temp� and will shut off the VES™
displays until a safe temperature is reached. This shut-
down is necessary to protect the optics of the DVD
player.
384 UNDERSTANDING YOUR INSTRUMENT PANEL
Page 388 of 643
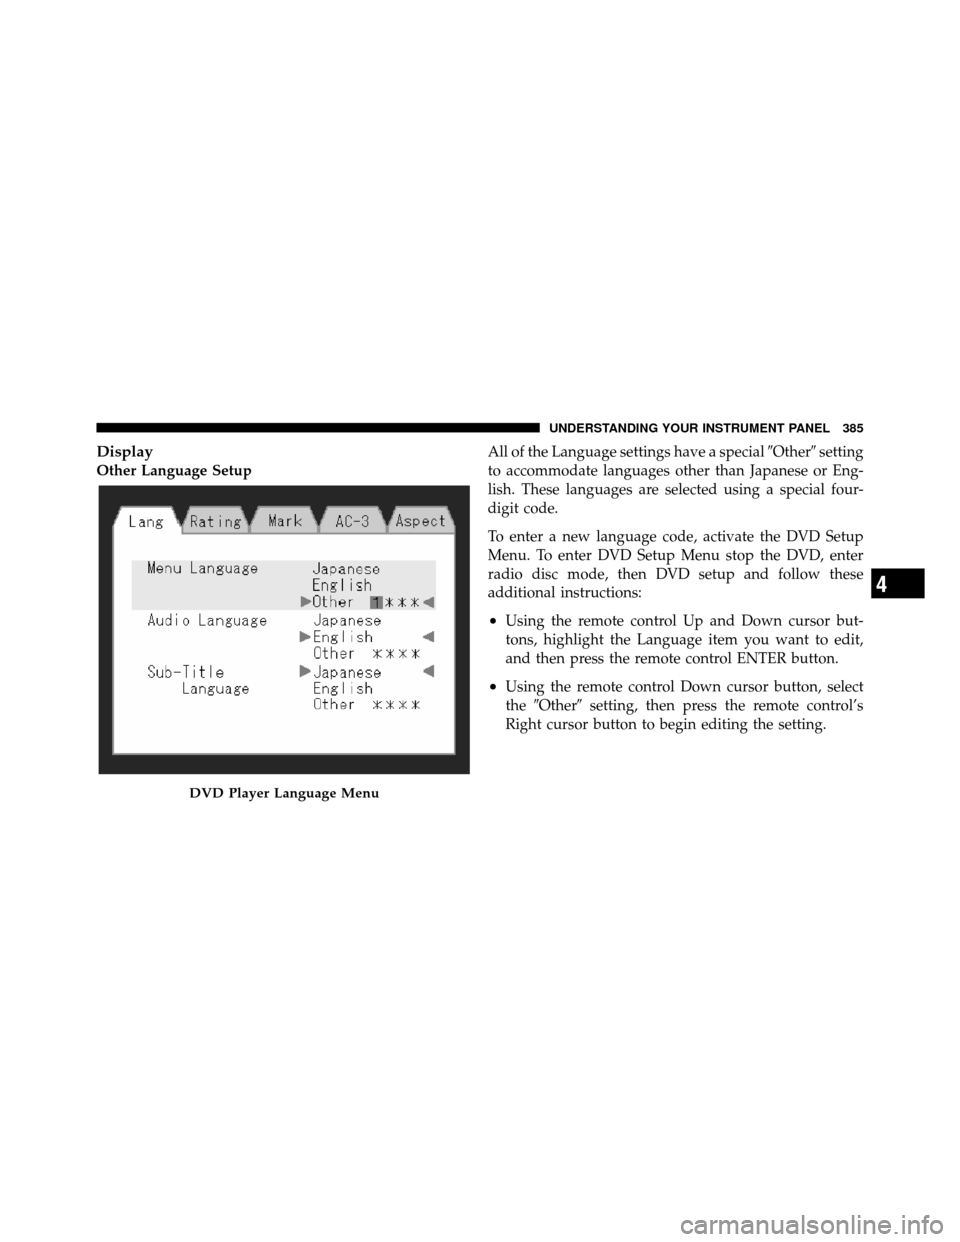
Display
Other Language SetupAll of the Language settings have a special
�Other�setting
to accommodate languages other than Japanese or Eng-
lish. These languages are selected using a special four-
digit code.
To enter a new language code, activate the DVD Setup
Menu. To enter DVD Setup Menu stop the DVD, enter
radio disc mode, then DVD setup and follow these
additional instructions:
•Using the remote control Up and Down cursor but-
tons, highlight the Language item you want to edit,
and then press the remote control ENTER button.
•Using the remote control Down cursor button, select
the �Other� setting, then press the remote control’s
Right cursor button to begin editing the setting.
DVD Player Language Menu
4
UNDERSTANDING YOUR INSTRUMENT PANEL 385
Page 394 of 643

The right-hand rocker switch has a pushbutton in the
center, and controls the volume and mode of the sound
system. Pressing the top of the rocker switch will increase
the volume. Pressing the bottom of the rocker switch will
decrease the volume. Pressing the center button changes
the operation of the radio from AM to FM, or to CD
mode, depending on which radio is in the vehicle.
The left-hand rocker switch has a pushbutton in the
center. The function of the left-hand switch is different,
depending on which mode you are in.
The following describes the left-hand rocker switch op-
eration in each mode.Radio Operation
Pressing the top of the switch will SEEK up for the next
listenable station, and pressing the bottom of the switch
will SEEK down for the next listenable station.
The button located in the center of the left-hand switch
will tune to the next preset station that you have pro-
grammed in the radio preset pushbutton.
CD Player
Pressing the top of the switch once will go to the next
track on the CD. Pressing the bottom of the switch once
will go to the beginning of the current track, or to the
beginning of the previous track if it is within one second
after the current track begins to play.
If you press the switch up or down twice it plays the
second track; three times, it will play the third, etc.
The button in the center of the left-hand switch has no
function in this mode.
4
UNDERSTANDING YOUR INSTRUMENT PANEL 391
Page 395 of 643

CD/DVD DISC MAINTENANCE
To keep a CD/DVD in good condition, take the following
precautions:
1. Handle the disc by its edge; avoid touching the
surface.
2. If the disc is stained, clean the surface with a soft cloth,
wiping from center to edge.
3. Do not apply paper or tape to the disc; avoid scratch-
ing the disc.
4. Do not use solvents such as benzene, thinner, cleaners,
or anti-static sprays.
5. Store the disc in its case after playing.
6. Do not expose the disc to direct sunlight.
7. Do not store the disc where temperatures may become
too high.NOTE:
If you experience difficulty in playing a particu-
lar disc, it may be damaged (i.e., scratched, reflective
coating removed, a hair, moisture or dew on the disc)
oversized, or have protection encoding. Try a known
good disc before considering disc player service.
RADIO OPERATION AND MOBILE PHONES
Under certain conditions, the mobile phone being on in
your vehicle can cause erratic or noisy performance from
your radio. This condition may be lessened or eliminated
by relocating the mobile phone antenna. This condition is
not harmful to the radio. If your radio performance does
not satisfactorily “clear” by the repositioning of the
antenna, it is recommended that the radio volume be
turned down or off during mobile phone operation when
not using Uconnect™ (if equipped).
392 UNDERSTANDING YOUR INSTRUMENT PANEL
Page 396 of 643

CLIMATE CONTROLS
The Climate Control system allows you to regulate the
temperature, amount, and direction of air circulating
throughout the vehicle. The controls are located on the
instrument panel, below the radio.
Manual Heating And Air Conditioning System —
If Equipped
The controls for the manual system in this vehicle contain
a series of outer rotary dials and inner push knobs. These
comfort controls can be set to obtain desired interior
conditions.
With the Three-Zone Temperature Control system, each
front seat occupant can independently control the Heat-
ing, Ventilation, and Air Conditioning operations coming
from the outlets on their side of the vehicle.
The primary control for the rear blower is on the front
climate control unit located on the instrument panel.
When the front control is in any position other than rear,
the front control operates all the rear functions.The rear airflow modes will mirror the front unit opera-
tion. Rear Panel mode is automatically selected when the
front control is in the Panel mode. When the front unit is
in Bi-Level mode, airflow will be emitted from both the
upper and lower rear outlets. When the front control is in
Floor, Defrost, or Mix modes, airflow will be directed out
of the rear floor outlets.
Manual Temperature Control
4
UNDERSTANDING YOUR INSTRUMENT PANEL 393
Page 445 of 643

•A slight drop or fall away of the brake pedal at the end
of the stop
WARNING!
•The Anti-Lock Brake System contains sophisti-
cated electronic equipment that may be suscep-
tible to interference caused by improperly in-
stalled, or high output radio transmitting
equipment. This interference can cause possible
loss of anti-lock braking capability. Installation of
such equipment should be performed by qualified
professionals.
•Pumping of the Anti-Lock Brakes will diminish
their effectiveness and may lead to a collision.
Pumping makes the stopping distance longer. Just
press firmly on your brake pedal when you need
to slow down or stop.(Continued)
WARNING! (Continued)
•The Anti-Lock Brake System cannot prevent colli-
sions, including those resulting from excessive
speed in turns, following another vehicle too
closely, or hydroplaning.
•The capabilities of an ABS-equipped vehicle must
never be exploited in a reckless or dangerous
manner, which could jeopardize the user ’s safety
or the safety of others.
All vehicle wheels and tires must be the same size and
type, and tires must be properly inflated to produce
accurate signals for the computer.
442 STARTING AND OPERATING
Page 480 of 643

The “Tire Pressure Monitoring Telltale Light” will flash
on and off for 75 seconds, and remain on solid when a
system fault is detected. The system fault will also sound
a chime. If the ignition switch is cycled, this sequence will
repeat, providing the system fault still exists. The “Tire
Pressure Monitoring Telltale Light” will turn off when
the fault condition no longer exists. A system fault can
occur with any of the following scenarios:
1. Jamming due to electronic devices or driving next to
facilities emitting the same radio frequencies as the TPMS
sensors.
2. Installing some form of aftermarket window tinting
that affects radio wave signals.
3. Accumulation of excessive snow and/or ice around
the wheels or wheel housings.
4. Using tire chains on the vehicle.
5. Using wheels/tires not equipped with TPMS sensors.Vehicles With Compact Spare
1. The compact spare tire (if equipped) does not have a
TPMS sensor. Therefore the TPMS will not monitor the
pressure in the compact spare tire.
2. If you install the compact spare tire in place of a road
tire that has a pressure below the low-pressure warning
limit, upon the next ignition switch cycle, a chime will
sound, a “LOW TIRE PRESSURE” message will be
displayed and the “Tire Pressure Monitoring Telltale
Light” will turn on.
3. After driving for up to 20 minutes above 15 mph
(24 km/h), the “Tire Pressure Monitoring Telltale Light”
will flash on and off for 75 seconds and then remain on
solid.
4. For each subsequent ignition switch cycle, a chime will
sound, the “Tire Pressure Monitoring Telltale Light” will
flash on and off for 75 seconds and then remain on solid.
5
STARTING AND OPERATING 477
Page 482 of 643
, you should stop as soon as possible,
and inflate the low tire(s) that is flashing on the graphic
display to the vehicle’s re")
Should a low tire condition occur on any of the four
active road tire(s), you should stop as soon as possible,
and inflate the low tire(s) that is flashing on the graphic
display to the vehicle’s recommended cold tire pressure
value. The system will automatically update, the graphic
display of the pressure value(s) will stop flashing, and
the “Tire Pressure Monitoring Telltale Light” will extin-
guish once the updated tire pressure(s) have been re-
ceived.
NOTE:The vehicle may need to be driven for up to
20 minutes above 15 mph (24 km/h) to receive this
information.
SERVICE TPM SYSTEM Message
The “Tire Pressure Monitoring Telltale Light” will flash
on and off for 75 seconds, and remain on solid when a
system fault is detected. The system fault will also sound
a chime. The EVIC will display a “SERVICE TPM SYS-
TEM” message for a minimum of five seconds. This text message is then followed by a graphic display, with
--in
place of the pressure value(s) indicating which TPMS
Sensor(s) is not being received.
If the ignition switch is cycled, this sequence will repeat,
providing the system fault still exists. If the system fault
no longer exists, the “Tire Pressure Monitoring Telltale
Light” will no longer flash, the “SERVICE TPM SYSTEM”
message will not be present, and a pressure value will be
displayed instead of dashes. A system fault can occur by
any of the following scenarios:
1. Jamming due to electronic devices or driving next to
facilities emitting the same radio frequencies as the TPMS
sensors.
2. Installing some form of aftermarket window tinting
that affects radio wave signals.
3. Accumulation of excessive snow and/or ice around
the wheels or wheel housings.
5
STARTING AND OPERATING 479