2012 DODGE DURANGO Speed limit
[x] Cancel search: Speed limitPage 29 of 140

ENGINE BREAK-IN RECOMMENDATIONS
• A long break-in period is not required for the engine and drivetrain (transmissionand axle) in your vehicle.
• Drive moderately during the first 300 miles (500 km). After the initial 60 miles (100 km), speeds up to 50 or 55 mph (80 or 90 km/h) are desirable.
• While cruising, brief full-throttle acceleration within the limits of local traffic laws contributes to a good break-in. Wide-open throttle acceleration in low gear can be
detrimental and should be avoided.
• The engine oil installed in the engine at the factory is a high-quality energy conserving type lubricant. Oil changes should be consistent with anticipated
climate conditions under which vehicle operations will occur. For the
recommended viscosity and quality grades, refer to “Maintaining Your Vehicle”.
NOTE: A new engine may consume some oil during its first few thousand miles
(kilometers) of operation. This should be considered a normal part of the break-in and
not interpreted as an indication of difficulty.
CAUTION!
Never use Non-Detergent Oil or Straight Mineral Oil in the engine or damage
may result.
HEADLIGHT SWITCH
Automatic Headlights/Parking
Lights/Headlights
• Rotate the headlight switch, located on the instrument panel to the left of the
steering wheel, to the first detent for
parking lights
andtothe
second detent for headlights.
• With the parking lights or low beam headlights on, push the headlight
switch once for fog lights.
• Rotate the headlight switch to “AUTO” for AUTO headlights.
• When set to AUTO, the system automatically turns the headlights on
or off based on ambient light levels.
SmartBeams™
• This system automatically controls the use of the headlight high beams. Refer toProgrammable Features in Electronics for further details.
OPERATING YOUR VEHICLE
27
Page 32 of 140

SPEED CONTROL
• The speed control switches are locatedon the steering wheel.
NOTE: The MODE button and DISTANCE
SETTING button are only available on
vehicles equipped with Adaptive Cruise
Control (ACC).
Cruise ON/OFF
• Push the ON/OFF button to activate the Speed Control.
• CRUISE READY
will appear on
the instrument cluster to indicate the
Speed Control is on.
• Push the ON/OFF button a second time to turn the system off.
Set
• With the Speed Control on, push and release the SET – button to set a desiredspeed.
Accel/Decel
• Once a speed is set, pushing the RES + button once or the SET – button once willincrease or decrease the set speed approximately 1 mph (2 km/h).
Resume
• To resume a previously selected set speed in memory, push the RES + button andrelease.
Cancel
• Push the CANCEL button, or apply the brakes to cancel the set speed andmaintain the set speed memory.
• Push the ON/OFF button to turn the system off and erase the set speed memory.
Adaptive Cruise Control (ACC)
• If your vehicle is equipped with adaptive cruise control the controls operate exactly the same as the standard cruise control with one difference. You can set a
specified distance you would like to maintain between you and the vehicle in front
of you.
• If the ACC sensor detects a vehicle ahead, ACC will apply limited braking or acceleration automatically to maintain a preset following distance, while matching
the speed of the vehicle ahead.
• If the sensor does not detect a vehicle directly ahead of you, it functions like a standard cruise control system, maintaining the speed you set.
OPERATING YOUR VEHICLE
30
Page 35 of 140

WARNING!(Continued)
The ACC system:
• Does not react to pedestrians, oncoming vehicles, and stationary objects (i.e.,a stopped vehicle in a traffic jam or a disabled vehicle).
• Cannot take street, traffic, and weather conditions into account, and may be limited upon adverse sight distance conditions.
• Does not predict the lane curvature or the movement of preceding vehicles and will not compensate for such changes.
• Does not always fully recognize complex driving conditions, which can result in wrong or missing distance warnings.
• Can only apply a maximum of 25% of the vehicle’s braking capability, and will not bring the vehicle to a complete stop.
You should switch off the ACC system:
• When driving in fog, heavy rain, heavy snow, sleet, heavy traffic, and complex driving situations (i.e., in highway construction zones).
• When entering a turn lane or highway off ramp; when driving on roads that are winding, icy, snow-covered, slippery, or have steep uphill or downhill
slopes; and when towing a trailer.
• When circumstances do not allow safe driving at a constant speed.
• Failure to follow these warnings can result in a collision.
• Forward Collision Warning (FCW) is not intended to avoid a collision on its own. The driver has the responsibility to avoid a collision by controlling the
vehicle via braking and steering. Failure to follow this warning could lead to
serious injury or death.
OPERATING YOUR VEHICLE
33
Page 36 of 140

ELECTRONIC RANGE SELECTION (ERS)
• Electronic Range Select (ERS) allowsyou to limit the highest available
transmission gear, and can be
activated during any driving condition.
When towing a trailer, using ERS shift
control will help you maximize both
performance and engine braking.
• To switch from DRIVE mode to ERS mode, tap the shift lever to the left (-) once. The instrument cluster will display the current gear and the transmission will not
upshift beyond that gear. Tapping the shift lever to the left (-) or right (+) will
decrease or increase the top available gear. To disable ERS, simply hold the shift
lever to the right (+) until “D” is again displayed in the instrument cluster.
• Switching between ERS and DRIVE mode can be done at any vehicle speed.
• Refer to your Owner's Manual on the DVD for further details.
OPERATING YOUR VEHICLE
34
Page 56 of 140

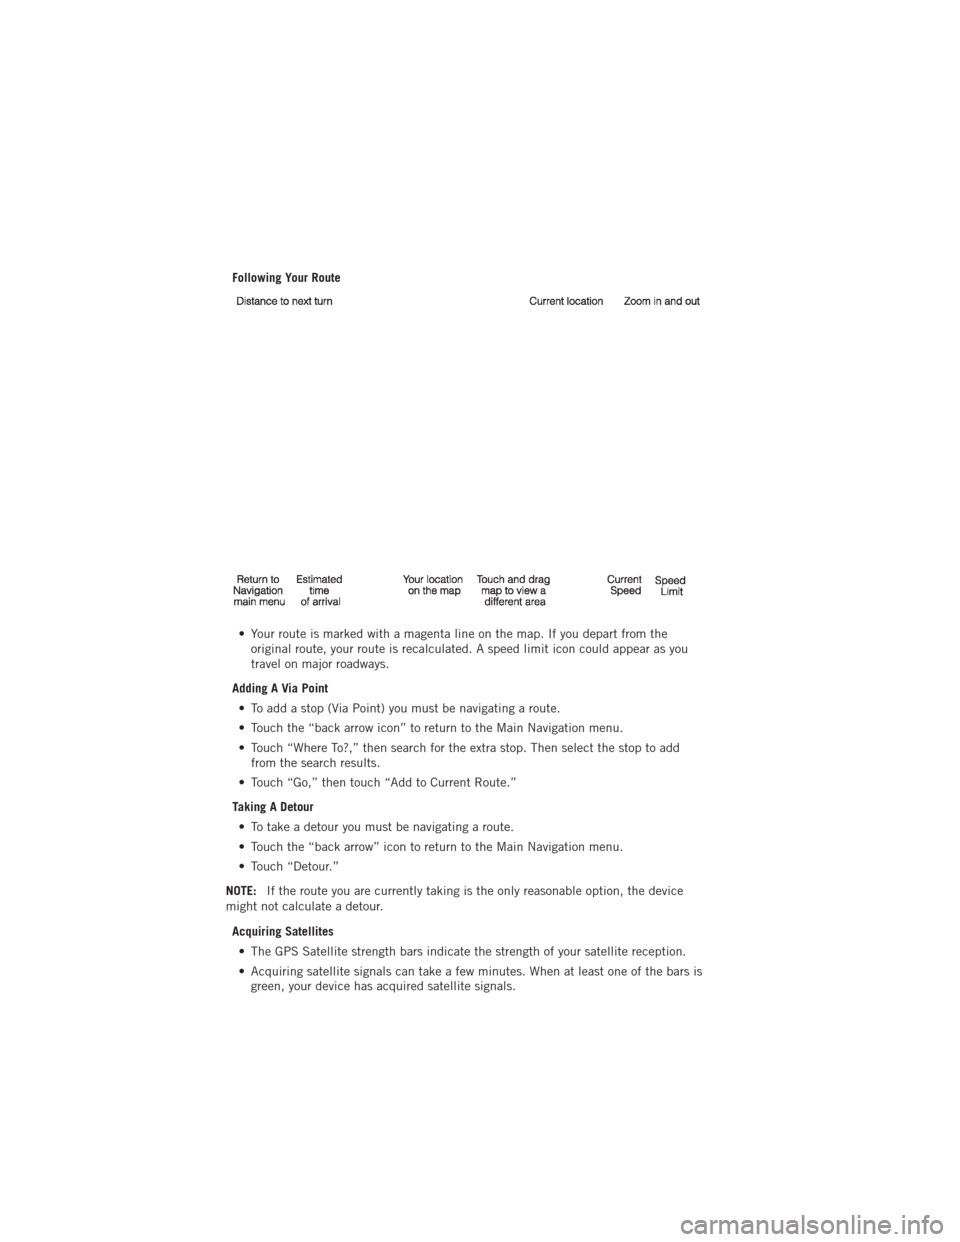
Following Your Route• Your route is marked with a magenta line on the map. If you depart from the original route, your route is recalculated. A speed limit icon could appear as you
travel on major roadways.
Adding A Via Point • To add a stop (Via Point) you must be navigating a route.
• Touch the “back arrow icon” to return to the Main Navigation menu.
• Touch “Where To?,” then search for the extra stop. Then select the stop to add from the search results.
• Touch “Go,” then touch “Add to Current Route.”
Taking A Detour • To take a detour you must be navigating a route.
• Touch the “back arrow” icon to return to the Main Navigation menu.
• Touch “Detour.”
NOTE: If the route you are currently taking is the only reasonable option, the device
might not calculate a detour.
Acquiring Satellites• The GPS Satellite strength bars indicate the strength of your satellite reception.
• Acquiring satellite signals can take a few minutes. When at least one of the bars is green, your device has acquired satellite signals.
ELECTRONICS
54
Page 88 of 140

TRAILER TOWING WEIGHTS (MAXIMUM TRAILER WEIGHT RATINGS)
Engine ModelGCWR (Gross Combined Wt.
Rating) Frontal Area
Max. GTW (Gross Trailer
Wt.) Max. Trailer Tongue
Wt. (See Note)
3.6L RWD 11,600 lbs (5 262 kg) 40 sq ft (3.72 sq m) 6,200 lbs (2 812 kg) 620 lbs (281 kg)
3.6L AWD 11,600 lbs (5 262 kg) 40 sq ft (3.72 sq m) 6,200 lbs (2 812 kg) 620 lbs (281 kg)
5.7L RWD 13,100 lbs (5 942 kg) 60 sq ft (5.57 sq m) 7,200 lbs (3 266 kg) 720 lbs (327 kg)
5.7L AWD 13,100 lbs (5 942 kg) 60 sq ft (5.57 sq m) 7,200 lbs (3 266 kg) 720 lbs (327 kg)
Refer to local laws for maximum trailer towing speeds.
NOTE: The trailer tongue weight must be considered as part of the combined weight of occupants and cargo, and should never exceed the
weight referenced on the Tire and Loading Information placard. The addition of passengers and cargo may require reducing trailer tongue load
and Gross Trailer Weight (GTW). Redistributing cargo (to the trailer) may be necessary to avoid exceeding Rear Gross Axle Weight Rating
(GAWR) of 3,900 lbs (1 769 kg).
• If the gross trailer weight is 3,500 lbs (1587 kg) or more, it is mandatory to use a weight-distributing hitch to ensure stable handling of your vehicle.
NOTE: Vehicles not factory equipped with trailer tow package are limited to 3,500 lbs (350 lbs tongue weight).
UTILITY
86