2012 DODGE CHARGER SRT engine
[x] Cancel search: enginePage 88 of 546
Periodic Safety Checks You Should Make Outside
The Vehicle
Tires
Examine tires for excessive tread wear and uneven wear
patterns. Check for stones, nails, glass, or other objects
lodged in the tread or sidewall. Inspect the tread for cuts
and cracks. Inspect sidewalls for cuts, cracks and bulges.
Check the wheel nuts for tightness. Check the tires
(including spare) for proper cold inflation pressure.
Lights
Have someone observe the operation of exterior lights
while you work the controls. Check turn signal and high
beam indicator lights on the instrument panel.
Door Latches
Check for positive closing, latching, and locking.
Fluid Leaks
Check area under vehicle after overnight parking for fuel,
engine coolant, oil, or other fluid leaks. Also, if gasoline
fumes are detected or if fuel, power steering fluid, or
brake fluid leaks are suspected, the cause should be
located and corrected immediately.
86 THINGS TO KNOW BEFORE STARTING YOUR VEHICLE
PAGE POSITION:86JOB:@zeta.tweddle.com/chry_pdm/CLS_chrysler/GRP_owners/JOB_918945-en-dsr-12D482-126-AA_DSR/DIV_og pubnum: 12D482-126-AB_DSR Periodic Safety Checks You Should Make Outside
The Vehicle
Tires
Examine tires for excessive tread wear and uneven wear
patterns. Check for stones, nails, glass, or other objects
lodged in the tread or sidewall. Inspect the tread for cuts
and cracks. Inspect sidewalls for cuts, cracks and bulges.
Check the wheel nuts for tightness. Check the tires
(including spare) for proper cold inflation pressure.
Lights
Have someone observe the operation of exterior lights
while you work the controls. Check turn signal and high
beam indicator lights on the instrument panel.
Door Latches
Check for positive closing, latching, and locking.
Fluid Leaks
Check area under vehicle after overnight parking for fuel,
engine coolant, oil, or other fluid leaks. Also, if gasoline
fumes are detected or if fuel, power steering fluid, or
brake fluid leaks are suspected, the cause should be
located and corrected immediately.
86 THINGS TO KNOW BEFORE STARTING YOUR VEHICLE
PAGE POSITION:86JOB:@zeta.tweddle.com/chry_pdm/CLS_chrysler/GRP_owners/JOB_918945-en-dsr-12D482-126-AA_DSR/DIV_og pubnum: 12D482-126-AB_DSR
Page 113 of 546

Phone works best when you talk in a normal conver-
sational tone, as if speaking to someone sitting a few
feet/meters away from you.
Natural Speech
Your Uconnect™ Phone Voice system uses a Natural
Language Voice Recognition (VR) engine.
Natural speech allows the user to speak commands in
phrases or complete sentences. The system filters out
certain non-word utterances and sounds such as “ah”
and “eh”. The system handles fill-in words such as “I
would like to”.
The system handles multiple inputs in the same phrase
or sentence such as “make a phone call” and “to Kelly
Smith”. For multiple inputs in the same phrase or sen-
tence, the system identifies the topic or context and
provides the associated follow-up prompt such as “Who
do you want to call?” in the case where a phone call was
requested but the specific name was not recognized.The system utilizes continuous dialog; when the system
requires more information from the user it will ask a
question to which the user can respond without pressing
the Voice Command
button.
Voice Command Tree
Refer to “Voice Tree” in this section.
Help Command
If you need assistance at any prompt, or if you want to
know your options at any prompt, say “Help” following
the beep.
To activate the Uconnect™ Phone from idle, simply press
the
button and say a command or say “help”. All
Uconnect™ Phone sessions begin with a press of the
button on the radio control head.
Cancel Command
At any prompt, after the beep, you can say “Cancel” and
you will be returned to the main menu.
3
UNDERSTANDING THE FEATURES OF YOUR VEHICLE 111
PAGE POSITION:111JOB:@zeta.tweddle.com/chry_pdm/CLS_chrysler/GRP_owners/JOB_918945-en-dsr-12D482-126-AA_DSR/DIV_og pubnum: 12D482-126-AB_DSR Phone works best when you talk in a normal conver-
sational tone, as if speaking to someone sitting a few
feet/meters away from you.
Natural Speech
Your Uconnect™ Phone Voice system uses a Natural
Language Voice Recognition (VR) engine.
Natural speech allows the user to speak commands in
phrases or complete sentences. The system filters out
certain non-word utterances and sounds such as “ah”
and “eh”. The system handles fill-in words such as “I
would like to”.
The system handles multiple inputs in the same phrase
or sentence such as “make a phone call” and “to Kelly
Smith”. For multiple inputs in the same phrase or sen-
tence, the system identifies the topic or context and
provides the associated follow-up prompt such as “Who
do you want to call?” in the case where a phone call was
requested but the specific name was not recognized.The system utilizes continuous dialog; when the system
requires more information from the user it will ask a
question to which the user can respond without pressing
the Voice Command
button.
Voice Command Tree
Refer to “Voice Tree” in this section.
Help Command
If you need assistance at any prompt, or if you want to
know your options at any prompt, say “Help” following
the beep.
To activate the Uconnect™ Phone from idle, simply press
the
button and say a command or say “help”. All
Uconnect™ Phone sessions begin with a press of the
button on the radio control head.
Cancel Command
At any prompt, after the beep, you can say “Cancel” and
you will be returned to the main menu.
3
UNDERSTANDING THE FEATURES OF YOUR VEHICLE 111
PAGE POSITION:111JOB:@zeta.tweddle.com/chry_pdm/CLS_chrysler/GRP_owners/JOB_918945-en-dsr-12D482-126-AA_DSR/DIV_og pubnum: 12D482-126-AB_DSR
Page 135 of 546

for it. For example, you can use the compound com-
mand form voice command “Search for John Smith”,
or you can break the compound command form into
two voice commands: “Search Contact” and when
asked “John Smith”. Please remember, the Uconnect™
Phone works best when you talk in a normal conver-
sational tone, as if speaking to someone sitting a few
feet/meters away from you.
Natural Speech
Your Uconnect™ Phone Voice system uses a Natural
Language Voice Recognition (VR) engine.
Natural speech allows the user to speak commands in
phrases or complete sentences. The system filters out
certain non-word utterances and sounds such as “ah”
and “eh”. The system handles fill-in words such as “I
would like to”.The system handles multiple inputs in the same phrase
or sentence such as “make a phone call” and “to Kelly
Smith”. For multiple inputs in the same phrase or sen-
tence, the system identifies the topic or context and
provides the associated follow-up prompt such as “Who
do you want to call?” in the case where a phone call was
requested but the specific name was not recognized.
The system utilizes continuous dialog; when the system
requires more information from the user it will ask a
question to which the user can respond without pressing
the Voice Command
button.
Voice Command Tree
Refer to “Voice Tree” in this section.
Help Command
If you need assistance at any prompt, or if you want to
know your options at any prompt, say “Help” following
the beep.
3
UNDERSTANDING THE FEATURES OF YOUR VEHICLE 133
PAGE POSITION:133JOB:@zeta.tweddle.com/chry_pdm/CLS_chrysler/GRP_owners/JOB_918945-en-dsr-12D482-126-AA_DSR/DIV_og pubnum: 12D482-126-AB_DSR for it. For example, you can use the compound com-
mand form voice command “Search for John Smith”,
or you can break the compound command form into
two voice commands: “Search Contact” and when
asked “John Smith”. Please remember, the Uconnect™
Phone works best when you talk in a normal conver-
sational tone, as if speaking to someone sitting a few
feet/meters away from you.
Natural Speech
Your Uconnect™ Phone Voice system uses a Natural
Language Voice Recognition (VR) engine.
Natural speech allows the user to speak commands in
phrases or complete sentences. The system filters out
certain non-word utterances and sounds such as “ah”
and “eh”. The system handles fill-in words such as “I
would like to”.The system handles multiple inputs in the same phrase
or sentence such as “make a phone call” and “to Kelly
Smith”. For multiple inputs in the same phrase or sen-
tence, the system identifies the topic or context and
provides the associated follow-up prompt such as “Who
do you want to call?” in the case where a phone call was
requested but the specific name was not recognized.
The system utilizes continuous dialog; when the system
requires more information from the user it will ask a
question to which the user can respond without pressing
the Voice Command
button.
Voice Command Tree
Refer to “Voice Tree” in this section.
Help Command
If you need assistance at any prompt, or if you want to
know your options at any prompt, say “Help” following
the beep.
3
UNDERSTANDING THE FEATURES OF YOUR VEHICLE 133
PAGE POSITION:133JOB:@zeta.tweddle.com/chry_pdm/CLS_chrysler/GRP_owners/JOB_918945-en-dsr-12D482-126-AA_DSR/DIV_og pubnum: 12D482-126-AB_DSR
Page 176 of 546
choose from HI, LO or OFF heat settings. Amber indica-
tor lights in each switch indicate the level of heat in use.
Two indicator lights will illuminate for HI, one for LO
and none for OFF.
Press the switch once to select HI-level heating.
Press the switch a second time to select LO-
level heating. Press the switch a third time to
shut the heating elements OFF.
NOTE:
•Once a heat setting is selected, heat will be felt within
two to five minutes.
•The engine must be running for the heated seats to
operate.
When the HI-level setting is selected, the heater will
provide a boosted heat level during the first four minutes
of operation. Then, the heat output will drop to the
normal HI-level. If the HI-level setting is selected, thesystem will automatically switch to LO-level after a
maximum of 60 minutes of continuous operation. At that
time, the number of illuminated LEDs changes from two
to one, indicating the change. The LO-level setting will
turn OFF automatically after a maximum of 45 minutes.
Ventilated Seats
On some models, both the driver and passenger seats are
ventilated. Located in the seat cushion and seatback are
small fans that draw air from the seat surface through
fine perforations in the seat cover to help keep the driver
and front passenger cooler in higher ambient tempera-
tures.
The ventilated seats can be operated using the Uconnect
Touch™ System.
Front Ventilated Seat Operation — Uconnect
Touch™ 8.4/8.4 Nav:
Press the “Controls” soft-key located on the bottom of the
Uconnect Touch™ display.
174 UNDERSTANDING THE FEATURES OF YOUR VEHICLE
PAGE POSITION:174JOB:@zeta.tweddle.com/chry_pdm/CLS_chrysler/GRP_owners/JOB_918945-en-dsr-12D482-126-AA_DSR/DIV_og pubnum: 12D482-126-AB_DSR choose from HI, LO or OFF heat settings. Amber indica-
tor lights in each switch indicate the level of heat in use.
Two indicator lights will illuminate for HI, one for LO
and none for OFF.
Press the switch once to select HI-level heating.
Press the switch a second time to select LO-
level heating. Press the switch a third time to
shut the heating elements OFF.
NOTE:
•Once a heat setting is selected, heat will be felt within
two to five minutes.
•The engine must be running for the heated seats to
operate.
When the HI-level setting is selected, the heater will
provide a boosted heat level during the first four minutes
of operation. Then, the heat output will drop to the
normal HI-level. If the HI-level setting is selected, thesystem will automatically switch to LO-level after a
maximum of 60 minutes of continuous operation. At that
time, the number of illuminated LEDs changes from two
to one, indicating the change. The LO-level setting will
turn OFF automatically after a maximum of 45 minutes.
Ventilated Seats
On some models, both the driver and passenger seats are
ventilated. Located in the seat cushion and seatback are
small fans that draw air from the seat surface through
fine perforations in the seat cover to help keep the driver
and front passenger cooler in higher ambient tempera-
tures.
The ventilated seats can be operated using the Uconnect
Touch™ System.
Front Ventilated Seat Operation — Uconnect
Touch™ 8.4/8.4 Nav:
Press the “Controls” soft-key located on the bottom of the
Uconnect Touch™ display.
174 UNDERSTANDING THE FEATURES OF YOUR VEHICLE
PAGE POSITION:174JOB:@zeta.tweddle.com/chry_pdm/CLS_chrysler/GRP_owners/JOB_918945-en-dsr-12D482-126-AA_DSR/DIV_og pubnum: 12D482-126-AB_DSR
Page 177 of 546
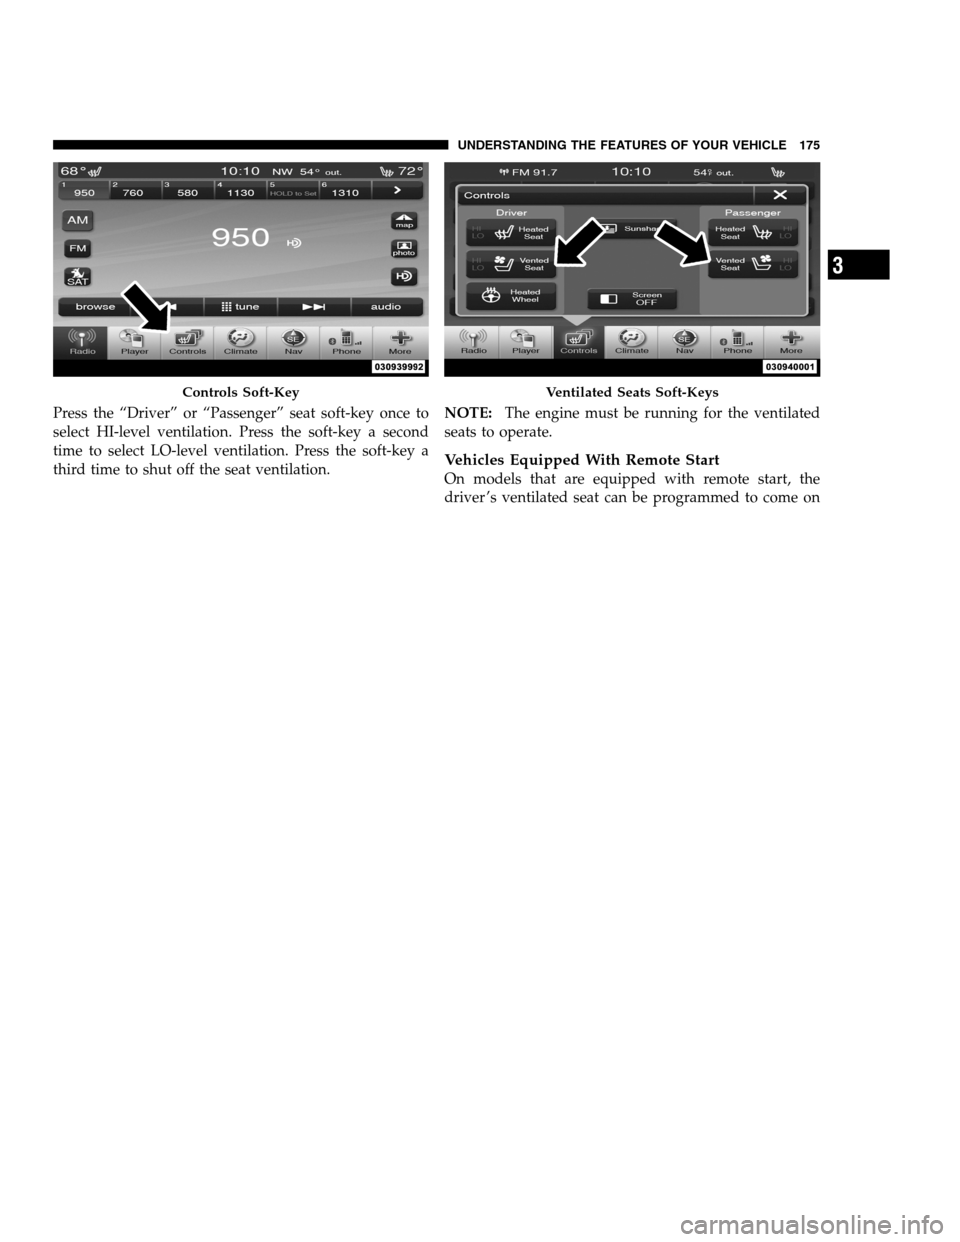
Press the “Driver” or “Passenger” seat soft-key once to
select HI-level ventilation. Press the soft-key a second
time to select LO-level ventilation. Press the soft-key a
third time to shut off the seat ventilation.NOTE:The engine must be running for the ventilated
seats to operate.
Vehicles Equipped With Remote Start
On models that are equipped with remote start, the
driver ’s ventilated seat can be programmed to come on
Controls Soft-KeyVentilated Seats Soft-Keys
3
UNDERSTANDING THE FEATURES OF YOUR VEHICLE 175
PAGE POSITION:175JOB:@zeta.tweddle.com/chry_pdm/CLS_chrysler/GRP_owners/JOB_918945-en-dsr-12D482-126-AA_DSR/DIV_og pubnum: 12D482-126-AB_DSR Press the “Driver” or “Passenger” seat soft-key once to
select HI-level ventilation. Press the soft-key a second
time to select LO-level ventilation. Press the soft-key a
third time to shut off the seat ventilation.NOTE:The engine must be running for the ventilated
seats to operate.
Vehicles Equipped With Remote Start
On models that are equipped with remote start, the
driver ’s ventilated seat can be programmed to come on
Controls Soft-KeyVentilated Seats Soft-Keys
3
UNDERSTANDING THE FEATURES OF YOUR VEHICLE 175
PAGE POSITION:175JOB:@zeta.tweddle.com/chry_pdm/CLS_chrysler/GRP_owners/JOB_918945-en-dsr-12D482-126-AA_DSR/DIV_og pubnum: 12D482-126-AB_DSR
Page 188 of 546
Rotate the headlight switch clockwise to the first detent
for parking light and instrument panel light operation.
Rotate the headlight switch to the second detent for
headlight, parking light and instrument panel light
operation.
Automatic Headlights
This system automatically turns the headlights on or off
according to ambient light levels. To turn the system on,
rotate the headlight switch counterclockwise to the
AUTO position. When the system is on, the headlight
time delay feature is also on. This means the headlights
will stay on for up to 90 seconds after you turn the
ignition switch OFF. To turn the automatic system off,
move the headlight switch out of the AUTO position.
NOTE:The engine must be running before the head-
lights will come on in the automatic mode.
Headlights On With Wipers
When this feature is active, the headlights will turn on
approximately 10 seconds after the wipers are turned on
if the headlight switch is placed in the AUTO position. In
addition, the headlights will turn off when the wipers are
turned off if they were turned on by this feature.
NOTE:The Headlights On with Wipers feature can be
turned on and off using the Uconnect Touch™ System,
refer to “Uconnect Touch™ Settings” in “Understanding
Your Instrument Panel” for further information.
SmartBeam™ — If Equipped
The SmartBeam™ system provides increased forward
lighting at night by automating high beam control
through the use of a digital camera mounted on the
inside rearview mirror. This camera detects vehicle spe-
cific light and automatically switches from high beams to
low beams until the approaching vehicle is out of view.
186 UNDERSTANDING THE FEATURES OF YOUR VEHICLE
PAGE POSITION:186JOB:@zeta.tweddle.com/chry_pdm/CLS_chrysler/GRP_owners/JOB_918945-en-dsr-12D482-126-AA_DSR/DIV_og pubnum: 12D482-126-AB_DSR Rotate the headlight switch clockwise to the first detent
for parking light and instrument panel light operation.
Rotate the headlight switch to the second detent for
headlight, parking light and instrument panel light
operation.
Automatic Headlights
This system automatically turns the headlights on or off
according to ambient light levels. To turn the system on,
rotate the headlight switch counterclockwise to the
AUTO position. When the system is on, the headlight
time delay feature is also on. This means the headlights
will stay on for up to 90 seconds after you turn the
ignition switch OFF. To turn the automatic system off,
move the headlight switch out of the AUTO position.
NOTE:The engine must be running before the head-
lights will come on in the automatic mode.
Headlights On With Wipers
When this feature is active, the headlights will turn on
approximately 10 seconds after the wipers are turned on
if the headlight switch is placed in the AUTO position. In
addition, the headlights will turn off when the wipers are
turned off if they were turned on by this feature.
NOTE:The Headlights On with Wipers feature can be
turned on and off using the Uconnect Touch™ System,
refer to “Uconnect Touch™ Settings” in “Understanding
Your Instrument Panel” for further information.
SmartBeam™ — If Equipped
The SmartBeam™ system provides increased forward
lighting at night by automating high beam control
through the use of a digital camera mounted on the
inside rearview mirror. This camera detects vehicle spe-
cific light and automatically switches from high beams to
low beams until the approaching vehicle is out of view.
186 UNDERSTANDING THE FEATURES OF YOUR VEHICLE
PAGE POSITION:186JOB:@zeta.tweddle.com/chry_pdm/CLS_chrysler/GRP_owners/JOB_918945-en-dsr-12D482-126-AA_DSR/DIV_og pubnum: 12D482-126-AB_DSR
Page 203 of 546
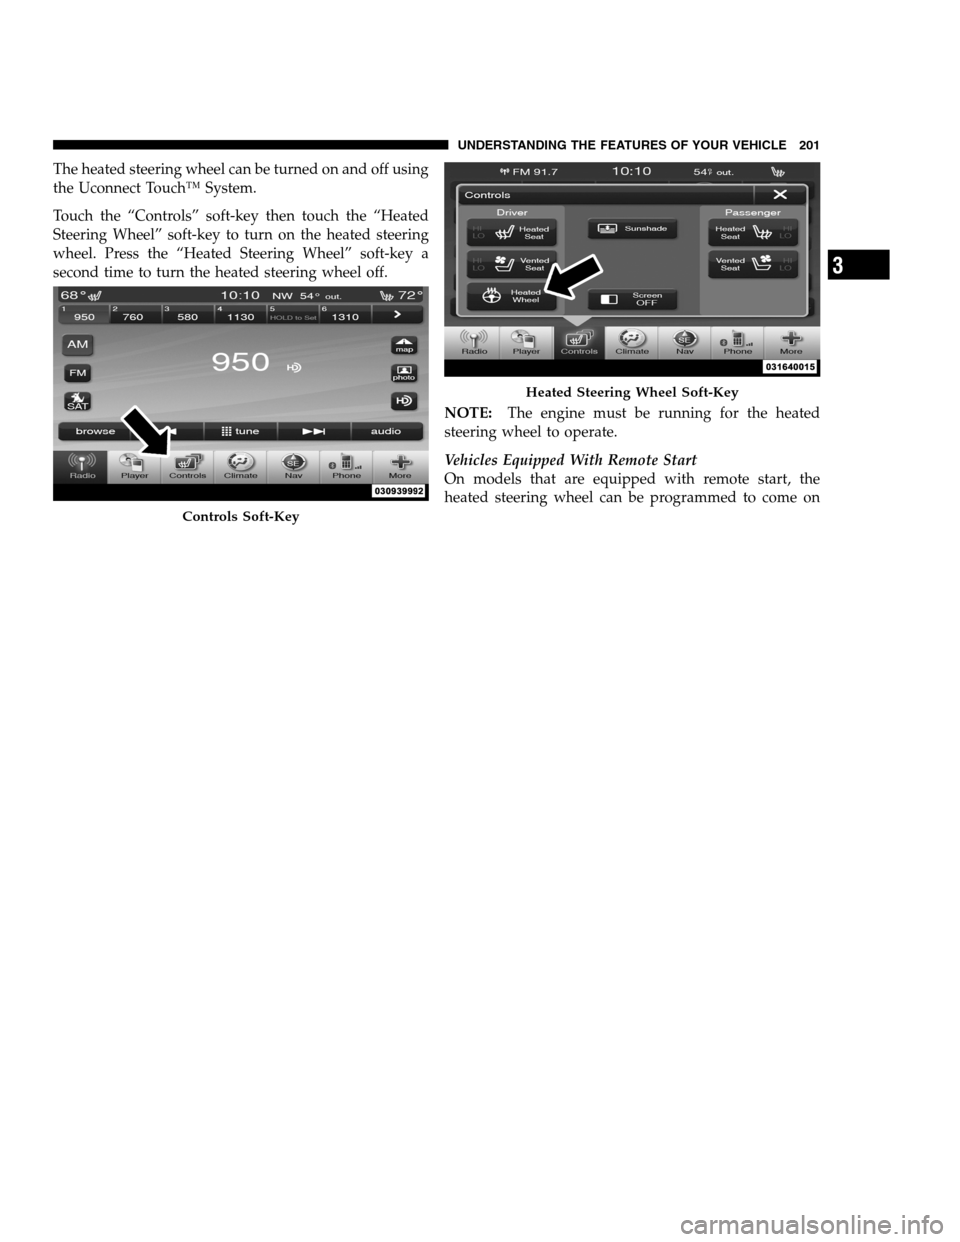
The heated steering wheel can be turned on and off using
the Uconnect Touch™ System.
Touch the “Controls” soft-key then touch the “Heated
Steering Wheel” soft-key to turn on the heated steering
wheel. Press the “Heated Steering Wheel” soft-key a
second time to turn the heated steering wheel off.
NOTE:The engine must be running for the heated
steering wheel to operate.
Vehicles Equipped With Remote Start
On models that are equipped with remote start, the
heated steering wheel can be programmed to come on
Controls Soft-Key
Heated Steering Wheel Soft-Key
3
UNDERSTANDING THE FEATURES OF YOUR VEHICLE 201
PAGE POSITION:201JOB:@zeta.tweddle.com/chry_pdm/CLS_chrysler/GRP_owners/JOB_918945-en-dsr-12D482-126-AA_DSR/DIV_og pubnum: 12D482-126-AB_DSR The heated steering wheel can be turned on and off using
the Uconnect Touch™ System.
Touch the “Controls” soft-key then touch the “Heated
Steering Wheel” soft-key to turn on the heated steering
wheel. Press the “Heated Steering Wheel” soft-key a
second time to turn the heated steering wheel off.
NOTE:The engine must be running for the heated
steering wheel to operate.
Vehicles Equipped With Remote Start
On models that are equipped with remote start, the
heated steering wheel can be programmed to come on
Controls Soft-Key
Heated Steering Wheel Soft-Key
3
UNDERSTANDING THE FEATURES OF YOUR VEHICLE 201
PAGE POSITION:201JOB:@zeta.tweddle.com/chry_pdm/CLS_chrysler/GRP_owners/JOB_918945-en-dsr-12D482-126-AA_DSR/DIV_og pubnum: 12D482-126-AB_DSR
Page 217 of 546
While ACC is set, the set speed can be decreased by
pressing and holding the SET-button. If the button is
continually pressed, the set speed will continue to de-
crease in 5 mph (8 km/h) increments until the button is
released. The decrease in set speed is reflected in the
EVIC display.
Pressing the SET-button once will result ina1mph
(1.6 km/h) decrease in set speed. Each subsequent tap of
the button results in a decrease of 1 mph (1.6 km/h).
NOTE:
•When you use the SET-button to decelerate, if the
engine’s braking power does not slow the vehiclesufficiently to reach the set speed, the brake system
will automatically slow the vehicle.
•The ACC system can only apply a maximum of 25% of
the vehicle’s braking capability and will not bring the
vehicle to a complete stop.
•The ACC system maintains set speed when driving up
hill and down hill. However, a slight speed change on
moderate hills is normal. In addition, downshifting
may occur while climbing uphill or descending down-
hill. This is normal operation and necessary to main-
tain set speed.3
UNDERSTANDING THE FEATURES OF YOUR VEHICLE 215
PAGE POSITION:215JOB:@zeta.tweddle.com/chry_pdm/CLS_chrysler/GRP_owners/JOB_918945-en-dsr-12D482-126-AA_DSR/DIV_og pubnum: 12D482-126-AB_DSR While ACC is set, the set speed can be decreased by
pressing and holding the SET-button. If the button is
continually pressed, the set speed will continue to de-
crease in 5 mph (8 km/h) increments until the button is
released. The decrease in set speed is reflected in the
EVIC display.
Pressing the SET-button once will result ina1mph
(1.6 km/h) decrease in set speed. Each subsequent tap of
the button results in a decrease of 1 mph (1.6 km/h).
NOTE:
•When you use the SET-button to decelerate, if the
engine’s braking power does not slow the vehiclesufficiently to reach the set speed, the brake system
will automatically slow the vehicle.
•The ACC system can only apply a maximum of 25% of
the vehicle’s braking capability and will not bring the
vehicle to a complete stop.
•The ACC system maintains set speed when driving up
hill and down hill. However, a slight speed change on
moderate hills is normal. In addition, downshifting
may occur while climbing uphill or descending down-
hill. This is normal operation and necessary to main-
tain set speed.3
UNDERSTANDING THE FEATURES OF YOUR VEHICLE 215
PAGE POSITION:215JOB:@zeta.tweddle.com/chry_pdm/CLS_chrysler/GRP_owners/JOB_918945-en-dsr-12D482-126-AA_DSR/DIV_og pubnum: 12D482-126-AB_DSR