2012 DODGE CHARGER SRT display
[x] Cancel search: displayPage 322 of 546
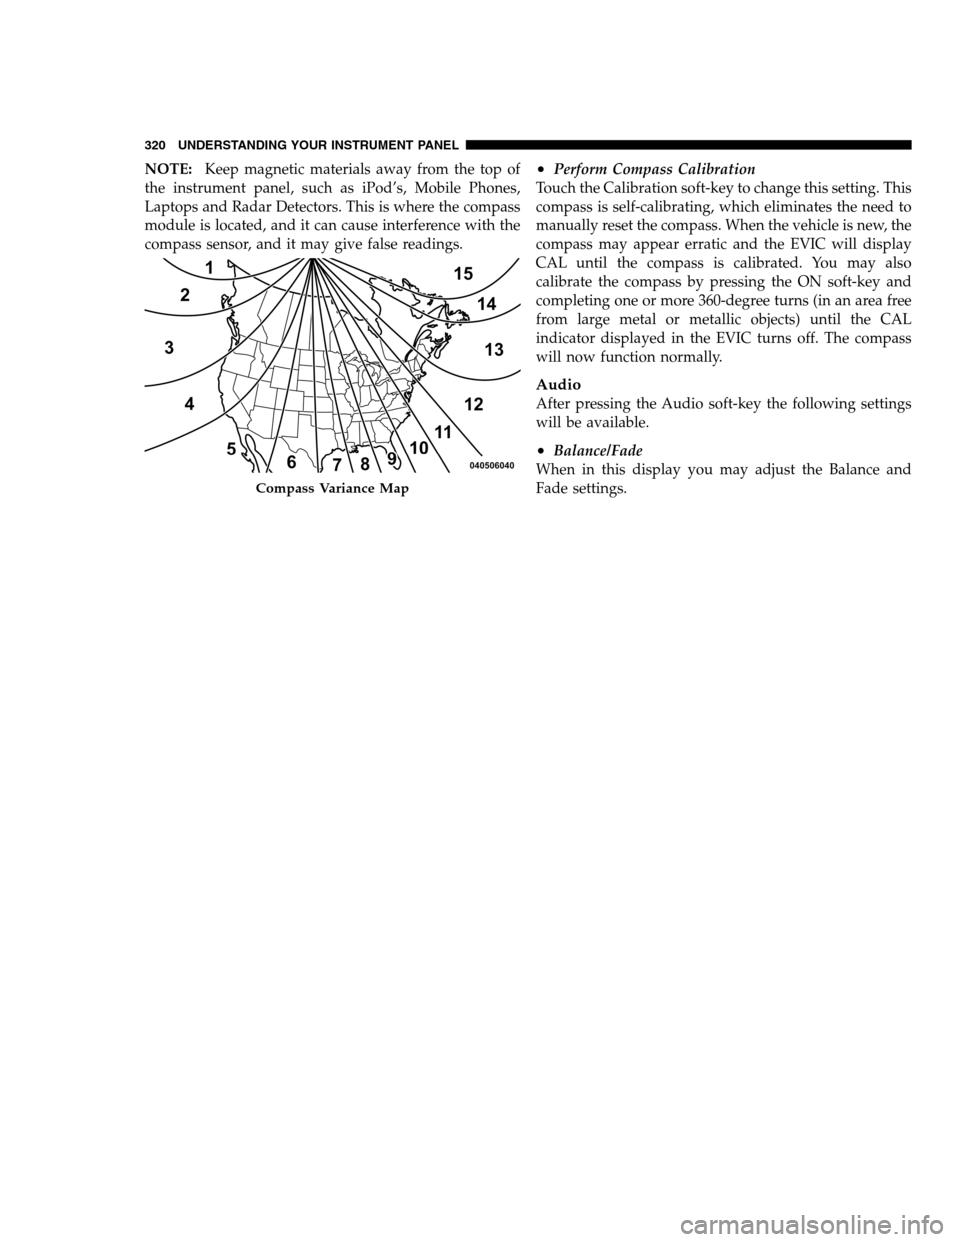
NOTE:Keep magnetic materials away from the top of
the instrument panel, such as iPod’s, Mobile Phones,
Laptops and Radar Detectors. This is where the compass
module is located, and it can cause interference with the
compass sensor, and it may give false readings.•Perform Compass Calibration
Touch the Calibration soft-key to change this setting. This
compass is self-calibrating, which eliminates the need to
manually reset the compass. When the vehicle is new, the
compass may appear erratic and the EVIC will display
CAL until the compass is calibrated. You may also
calibrate the compass by pressing the ON soft-key and
completing one or more 360-degree turns (in an area free
from large metal or metallic objects) until the CAL
indicator displayed in the EVIC turns off. The compass
will now function normally.
Audio
After pressing the Audio soft-key the following settings
will be available.
•Balance/Fade
When in this display you may adjust the Balance and
Fade settings.
Compass Variance Map
320 UNDERSTANDING YOUR INSTRUMENT PANEL
PAGE POSITION:320JOB:@zeta.tweddle.com/chry_pdm/CLS_chrysler/GRP_owners/JOB_918945-en-dsr-12D482-126-AA_DSR/DIV_og pubnum: 12D482-126-AB_DSR NOTE:Keep magnetic materials away from the top of
the instrument panel, such as iPod’s, Mobile Phones,
Laptops and Radar Detectors. This is where the compass
module is located, and it can cause interference with the
compass sensor, and it may give false readings.•Perform Compass Calibration
Touch the Calibration soft-key to change this setting. This
compass is self-calibrating, which eliminates the need to
manually reset the compass. When the vehicle is new, the
compass may appear erratic and the EVIC will display
CAL until the compass is calibrated. You may also
calibrate the compass by pressing the ON soft-key and
completing one or more 360-degree turns (in an area free
from large metal or metallic objects) until the CAL
indicator displayed in the EVIC turns off. The compass
will now function normally.
Audio
After pressing the Audio soft-key the following settings
will be available.
•Balance/Fade
When in this display you may adjust the Balance and
Fade settings.
Compass Variance Map
320 UNDERSTANDING YOUR INSTRUMENT PANEL
PAGE POSITION:320JOB:@zeta.tweddle.com/chry_pdm/CLS_chrysler/GRP_owners/JOB_918945-en-dsr-12D482-126-AA_DSR/DIV_og pubnum: 12D482-126-AB_DSR
Page 323 of 546

•Equalizer
When in this display you may adjust the Bass, Mid and
Treble settings. Adjust the settings with the + and –
setting soft-keys or by selecting any point on the scale
between the + and – soft-keys. Then touch the arrow back
soft-key.
NOTE:Bass/Mid/Treble allow you to simply slide your
finger up or down to change the setting as well as touch
directly on the desired setting.
•Speed Adjusted Volume
This feature increases or decreases volume relative to
vehicle speed. To change the Speed Adjusted Volume
touch the Off, 1, 2 or 3 soft-key. Then touch the arrow
back soft-key.
•Music Info Cleanup
This feature helps organize music files for optimized
music navigation. To make your selection, touch the
Music Info Cleanup soft-key, select On or Off followed by
pressing the arrow back soft-key.
•Surround Sound
This feature provides simulated surround sound mode.
To make your selection, touch the Surround Sound
soft-key, select On or Off followed by pressing the arrow
back soft-key.
Phone/Bluetooth
After pressing the Phone/Bluetooth soft-key the follow-
ing settings will be available.
•Paired Devices
This feature shows which phones are paired to the
Phone/Bluetooth system. For further information, refer
to the Uconnect Touch™ Supplement.
4
UNDERSTANDING YOUR INSTRUMENT PANEL 321
PAGE POSITION:321JOB:@zeta.tweddle.com/chry_pdm/CLS_chrysler/GRP_owners/JOB_918945-en-dsr-12D482-126-AA_DSR/DIV_og pubnum: 12D482-126-AB_DSR •Equalizer
When in this display you may adjust the Bass, Mid and
Treble settings. Adjust the settings with the + and –
setting soft-keys or by selecting any point on the scale
between the + and – soft-keys. Then touch the arrow back
soft-key.
NOTE:Bass/Mid/Treble allow you to simply slide your
finger up or down to change the setting as well as touch
directly on the desired setting.
•Speed Adjusted Volume
This feature increases or decreases volume relative to
vehicle speed. To change the Speed Adjusted Volume
touch the Off, 1, 2 or 3 soft-key. Then touch the arrow
back soft-key.
•Music Info Cleanup
This feature helps organize music files for optimized
music navigation. To make your selection, touch the
Music Info Cleanup soft-key, select On or Off followed by
pressing the arrow back soft-key.
•Surround Sound
This feature provides simulated surround sound mode.
To make your selection, touch the Surround Sound
soft-key, select On or Off followed by pressing the arrow
back soft-key.
Phone/Bluetooth
After pressing the Phone/Bluetooth soft-key the follow-
ing settings will be available.
•Paired Devices
This feature shows which phones are paired to the
Phone/Bluetooth system. For further information, refer
to the Uconnect Touch™ Supplement.
4
UNDERSTANDING YOUR INSTRUMENT PANEL 321
PAGE POSITION:321JOB:@zeta.tweddle.com/chry_pdm/CLS_chrysler/GRP_owners/JOB_918945-en-dsr-12D482-126-AA_DSR/DIV_og pubnum: 12D482-126-AB_DSR
Page 325 of 546
SRT Performance Features
To access the SRT Performance Features, touch the
“More” soft-key then touch the “SRT” soft-key. Press the
UP or DOWN soft-key to cycle through the features.
Press the feature soft-key to select that feature.
WARNING!
Measurement of vehicle statistics with the Perfor-
mance Features is intended for off-highway or off-
road use only and should not be done on any public
roadways. It is recommended that these features be
used in a controlled environment and within the
limits of the law. The capabilities of the vehicle as
measured by the performance pages must never be
exploited in a reckless or dangerous manner, which
can jeopardize the user ’s safety or the safety of
others. Only a safe, attentive, and skillful driver can
prevent accidents.The Performance Page include the following:
•Timers
•Engine Values
•Digital Gauge Displays
•0-60 mph (0-100 km/h)
•Braking Distance
•1/8 Mile
•1/4 Mile
•Instantaneous G-Force
•Peak G-Force
•Digital Speedometer
4
UNDERSTANDING YOUR INSTRUMENT PANEL 323
PAGE POSITION:323JOB:@zeta.tweddle.com/chry_pdm/CLS_chrysler/GRP_owners/JOB_918945-en-dsr-12D482-126-AA_DSR/DIV_og pubnum: 12D482-126-AB_DSR SRT Performance Features
To access the SRT Performance Features, touch the
“More” soft-key then touch the “SRT” soft-key. Press the
UP or DOWN soft-key to cycle through the features.
Press the feature soft-key to select that feature.
WARNING!
Measurement of vehicle statistics with the Perfor-
mance Features is intended for off-highway or off-
road use only and should not be done on any public
roadways. It is recommended that these features be
used in a controlled environment and within the
limits of the law. The capabilities of the vehicle as
measured by the performance pages must never be
exploited in a reckless or dangerous manner, which
can jeopardize the user ’s safety or the safety of
others. Only a safe, attentive, and skillful driver can
prevent accidents.The Performance Page include the following:
•Timers
•Engine Values
•Digital Gauge Displays
•0-60 mph (0-100 km/h)
•Braking Distance
•1/8 Mile
•1/4 Mile
•Instantaneous G-Force
•Peak G-Force
•Digital Speedometer
4
UNDERSTANDING YOUR INSTRUMENT PANEL 323
PAGE POSITION:323JOB:@zeta.tweddle.com/chry_pdm/CLS_chrysler/GRP_owners/JOB_918945-en-dsr-12D482-126-AA_DSR/DIV_og pubnum: 12D482-126-AB_DSR
Page 326 of 546
The following describes each feature and its operation:
Timers
0-60 mph (0-100 km/h), 1/8 Mile, 1/4 Mile
When selected, this screen displays the time it takes for
the vehicle to go from 0 to 60 mph (0 to 100 km/h),
1/8 mile or 1/4 mile.
•The feature will be “ready” when the vehicle speed is
at 0 mph (0 km/h).
•Soft-keys allow access to the current, best and last
times recorded.
Braking Distance
When selected, this screen displays the vehicle’s braking
distance and the speed at which the brake pedal was
depressed.
•This feature will only function when applying the
brakes at speeds above 30 mph (48 km/h).
•The distance measurement will be aborted if the brake
pedal is released before the vehicle comes to a com-
plete stop.
G-Force
When selected, this screen displays all four G-Force
values (two lateral and two longitudinal) as well as
steering angle.
When a force greater than zero is measured, the display
will update the value as it climbs. As the G-Force falls,
the peak forces will continue to display.
Gauges 1
When selected, this screen displays the following values:
•Oil Temperature
Shows the actual oil temperature within the range of the
gauge.
•Oil Pressure
Shows the actual oil pressure.
324 UNDERSTANDING YOUR INSTRUMENT PANEL
PAGE POSITION:324JOB:@zeta.tweddle.com/chry_pdm/CLS_chrysler/GRP_owners/JOB_918945-en-dsr-12D482-126-AA_DSR/DIV_og pubnum: 12D482-126-AB_DSR The following describes each feature and its operation:
Timers
0-60 mph (0-100 km/h), 1/8 Mile, 1/4 Mile
When selected, this screen displays the time it takes for
the vehicle to go from 0 to 60 mph (0 to 100 km/h),
1/8 mile or 1/4 mile.
•The feature will be “ready” when the vehicle speed is
at 0 mph (0 km/h).
•Soft-keys allow access to the current, best and last
times recorded.
Braking Distance
When selected, this screen displays the vehicle’s braking
distance and the speed at which the brake pedal was
depressed.
•This feature will only function when applying the
brakes at speeds above 30 mph (48 km/h).
•The distance measurement will be aborted if the brake
pedal is released before the vehicle comes to a com-
plete stop.
G-Force
When selected, this screen displays all four G-Force
values (two lateral and two longitudinal) as well as
steering angle.
When a force greater than zero is measured, the display
will update the value as it climbs. As the G-Force falls,
the peak forces will continue to display.
Gauges 1
When selected, this screen displays the following values:
•Oil Temperature
Shows the actual oil temperature within the range of the
gauge.
•Oil Pressure
Shows the actual oil pressure.
324 UNDERSTANDING YOUR INSTRUMENT PANEL
PAGE POSITION:324JOB:@zeta.tweddle.com/chry_pdm/CLS_chrysler/GRP_owners/JOB_918945-en-dsr-12D482-126-AA_DSR/DIV_og pubnum: 12D482-126-AB_DSR
Page 327 of 546
•Battery Voltage
Shows the actual battery voltage.
Gauges 2
When selected, this screen displays the following values:
•Coolant Temperature
Shows the actual coolant temperature within the range of
the gauge.
•Oil Temperature
Shows the actual oil temperature within the range of the
gauge.
•Transmission Temperature
Shows the actual transmission temperature within the
range of the gauge.
•Intake Air Temperature
Shows the actual intake air temperature within the range
of the gauge.
•Oil Pressure
Shows the actual oil pressure.
•Battery Voltage
Shows the actual battery voltage.
Engine
When selected, this screen displays miles per hour (mph),
horsepower (hp), torque (ft/lb), oil pressure (psi) and
gear selector values.
Handling
When selected, this screen displays peak g-force, instan-
taneous g-force, steering and yaw angles.
Options
When selected, this screen allows you to choose a stan-
dard or customize display for your SRT home page.
4
UNDERSTANDING YOUR INSTRUMENT PANEL 325
PAGE POSITION:325JOB:@zeta.tweddle.com/chry_pdm/CLS_chrysler/GRP_owners/JOB_918945-en-dsr-12D482-126-AA_DSR/DIV_og pubnum: 12D482-126-AB_DSR •Battery Voltage
Shows the actual battery voltage.
Gauges 2
When selected, this screen displays the following values:
•Coolant Temperature
Shows the actual coolant temperature within the range of
the gauge.
•Oil Temperature
Shows the actual oil temperature within the range of the
gauge.
•Transmission Temperature
Shows the actual transmission temperature within the
range of the gauge.
•Intake Air Temperature
Shows the actual intake air temperature within the range
of the gauge.
•Oil Pressure
Shows the actual oil pressure.
•Battery Voltage
Shows the actual battery voltage.
Engine
When selected, this screen displays miles per hour (mph),
horsepower (hp), torque (ft/lb), oil pressure (psi) and
gear selector values.
Handling
When selected, this screen displays peak g-force, instan-
taneous g-force, steering and yaw angles.
Options
When selected, this screen allows you to choose a stan-
dard or customize display for your SRT home page.
4
UNDERSTANDING YOUR INSTRUMENT PANEL 325
PAGE POSITION:325JOB:@zeta.tweddle.com/chry_pdm/CLS_chrysler/GRP_owners/JOB_918945-en-dsr-12D482-126-AA_DSR/DIV_og pubnum: 12D482-126-AB_DSR
Page 331 of 546
NOTE:If you experience difficulty in playing a particu-
lar disc, it may be damaged (i.e., scratched, reflective
coating removed, a hair, moisture or dew on the disc)
oversized, or have protection encoding. Try a known
good disc before considering disc player service.
RADIO OPERATION AND MOBILE PHONES
Under certain conditions, the mobile phone being on in
your vehicle can cause erratic or noisy performance from
your radio. This condition may be lessened or eliminated
by relocating the mobile phone antenna. This condition is
not harmful to the radio. If your radio performance does
not satisfactorily “clear” by the repositioning of the
antenna, it is recommended that the radio volume be
turned down or off during mobile phone operation when
not using Uconnect™ (if equipped).
CLIMATE CONTROLS
The air conditioning and heating system is designed to
make you comfortable in all types of weather. This
system can be operated through either the Automatic
Climate Controls on the instrument panel or through the
Uconnect Touch™ system display.
When the Uconnect Touch™ system is in different modes
(Radio, Player, Settings, More, etc.) the driver and pas-
senger temperature settings will be indicated at the top of
the display.
4
UNDERSTANDING YOUR INSTRUMENT PANEL 329
PAGE POSITION:329JOB:@zeta.tweddle.com/chry_pdm/CLS_chrysler/GRP_owners/JOB_918945-en-dsr-12D482-126-AA_DSR/DIV_og pubnum: 12D482-126-AB_DSR NOTE:If you experience difficulty in playing a particu-
lar disc, it may be damaged (i.e., scratched, reflective
coating removed, a hair, moisture or dew on the disc)
oversized, or have protection encoding. Try a known
good disc before considering disc player service.
RADIO OPERATION AND MOBILE PHONES
Under certain conditions, the mobile phone being on in
your vehicle can cause erratic or noisy performance from
your radio. This condition may be lessened or eliminated
by relocating the mobile phone antenna. This condition is
not harmful to the radio. If your radio performance does
not satisfactorily “clear” by the repositioning of the
antenna, it is recommended that the radio volume be
turned down or off during mobile phone operation when
not using Uconnect™ (if equipped).
CLIMATE CONTROLS
The air conditioning and heating system is designed to
make you comfortable in all types of weather. This
system can be operated through either the Automatic
Climate Controls on the instrument panel or through the
Uconnect Touch™ system display.
When the Uconnect Touch™ system is in different modes
(Radio, Player, Settings, More, etc.) the driver and pas-
senger temperature settings will be indicated at the top of
the display.
4
UNDERSTANDING YOUR INSTRUMENT PANEL 329
PAGE POSITION:329JOB:@zeta.tweddle.com/chry_pdm/CLS_chrysler/GRP_owners/JOB_918945-en-dsr-12D482-126-AA_DSR/DIV_og pubnum: 12D482-126-AB_DSR
Page 340 of 546
Once the desired temperature is displayed, the system
will achieve and automatically maintain that comfort
level.
3. When the system is set up for your comfort level, it is
not necessary to change the settings. You will experience
the greatest efficiency by simply allowing the system to
function automatically.
NOTE:
•It is not necessary to move the temperature settings for
cold or hot vehicles. The system automatically adjusts
the temperature, mode and blower speed to provide
comfort as quickly as possible.
•The temperature can be displayed in U.S. or Metric
units by selecting the US/M customer-programmable
feature. Refer to the “Uconnect Touch™ System Set-
tings” in this section of the manual.To provide you with maximum comfort in the Automatic
mode, during cold start-ups the blower fan will remain
on low until the engine warms up. The blower will
increase in speed and transition into Auto mode.
Manual Operation
The system allows for manual selection of blower speed,
air distribution mode, A/C status and recirculation con-
trol.
The blower fan speed can be set to any fixed speed by
adjusting the blower control. The fan will now operate at
a fixed speed until additional speeds are selected. This
allows the front occupants to control the volume of air
circulated in the vehicle and cancel the Auto mode.
The operator can also select the direction of the airflow
by selecting one of the available mode settings. A/C
operation and Recirculation control can also be manually
selected in Manual operation.
338 UNDERSTANDING YOUR INSTRUMENT PANEL
PAGE POSITION:338JOB:@zeta.tweddle.com/chry_pdm/CLS_chrysler/GRP_owners/JOB_918945-en-dsr-12D482-126-AA_DSR/DIV_og pubnum: 12D482-126-AB_DSR Once the desired temperature is displayed, the system
will achieve and automatically maintain that comfort
level.
3. When the system is set up for your comfort level, it is
not necessary to change the settings. You will experience
the greatest efficiency by simply allowing the system to
function automatically.
NOTE:
•It is not necessary to move the temperature settings for
cold or hot vehicles. The system automatically adjusts
the temperature, mode and blower speed to provide
comfort as quickly as possible.
•The temperature can be displayed in U.S. or Metric
units by selecting the US/M customer-programmable
feature. Refer to the “Uconnect Touch™ System Set-
tings” in this section of the manual.To provide you with maximum comfort in the Automatic
mode, during cold start-ups the blower fan will remain
on low until the engine warms up. The blower will
increase in speed and transition into Auto mode.
Manual Operation
The system allows for manual selection of blower speed,
air distribution mode, A/C status and recirculation con-
trol.
The blower fan speed can be set to any fixed speed by
adjusting the blower control. The fan will now operate at
a fixed speed until additional speeds are selected. This
allows the front occupants to control the volume of air
circulated in the vehicle and cancel the Auto mode.
The operator can also select the direction of the airflow
by selecting one of the available mode settings. A/C
operation and Recirculation control can also be manually
selected in Manual operation.
338 UNDERSTANDING YOUR INSTRUMENT PANEL
PAGE POSITION:338JOB:@zeta.tweddle.com/chry_pdm/CLS_chrysler/GRP_owners/JOB_918945-en-dsr-12D482-126-AA_DSR/DIV_og pubnum: 12D482-126-AB_DSR
Page 351 of 546

2. The ignition switch will return to the OFF position.
3. If the shift lever is not in PARK, the ENGINE START/
STOP button must be held for two seconds and vehicle
speed must be above 5 mph (8 km/h) before the engine
will shut off. The ignition switch position will remain in
the ACC position until the shift lever is in PARK and the
button is pressed twice to the OFF position. If the shift
lever is not in PARK and the ENGINE START/STOP
button is pressed once, the EVIC (if equipped) will
display a “Vehicle Not In Park” message and the engine
will remain running. Never leave a vehicle out of the
PARK position, or it could roll.
NOTE:If the ignition switch is left in the ACC or RUN
(engine not running) position and the transmission is in
PARK, the system will automatically time out after
30 minutes of inactivity and the ignition will switch to the
OFF position.ENGINE START/STOP Button Functions – With
Driver ’s Foot OFF The Brake Pedal
(In PARK Or NEUTRAL Position)
The ENGINE START/STOP button operates similar to an
ignition switch. It has four positions, OFF, ACC, RUN
and START. To change the ignition switch positions
without starting the vehicle and use the accessories
follow these steps.
•Starting with the ignition switch in the OFF position:
•Press the ENGINE START/STOP button once to
change the ignition switch to the ACC position (EVIC
displays “ACC”),
•Press the ENGINE START/STOP button a second time
to change the ignition switch to the RUN position
(EVIC displays “RUN”),
•Press the ENGINE START/STOP button a third time
to return the ignition switch to the OFF position (EVIC
displays “OFF”).
5
STARTING AND OPERATING 349
PAGE POSITION:349JOB:@zeta.tweddle.com/chry_pdm/CLS_chrysler/GRP_owners/JOB_918945-en-dsr-12D482-126-AA_DSR/DIV_og pubnum: 12D482-126-AB_DSR 2. The ignition switch will return to the OFF position.
3. If the shift lever is not in PARK, the ENGINE START/
STOP button must be held for two seconds and vehicle
speed must be above 5 mph (8 km/h) before the engine
will shut off. The ignition switch position will remain in
the ACC position until the shift lever is in PARK and the
button is pressed twice to the OFF position. If the shift
lever is not in PARK and the ENGINE START/STOP
button is pressed once, the EVIC (if equipped) will
display a “Vehicle Not In Park” message and the engine
will remain running. Never leave a vehicle out of the
PARK position, or it could roll.
NOTE:If the ignition switch is left in the ACC or RUN
(engine not running) position and the transmission is in
PARK, the system will automatically time out after
30 minutes of inactivity and the ignition will switch to the
OFF position.ENGINE START/STOP Button Functions – With
Driver ’s Foot OFF The Brake Pedal
(In PARK Or NEUTRAL Position)
The ENGINE START/STOP button operates similar to an
ignition switch. It has four positions, OFF, ACC, RUN
and START. To change the ignition switch positions
without starting the vehicle and use the accessories
follow these steps.
•Starting with the ignition switch in the OFF position:
•Press the ENGINE START/STOP button once to
change the ignition switch to the ACC position (EVIC
displays “ACC”),
•Press the ENGINE START/STOP button a second time
to change the ignition switch to the RUN position
(EVIC displays “RUN”),
•Press the ENGINE START/STOP button a third time
to return the ignition switch to the OFF position (EVIC
displays “OFF”).
5
STARTING AND OPERATING 349
PAGE POSITION:349JOB:@zeta.tweddle.com/chry_pdm/CLS_chrysler/GRP_owners/JOB_918945-en-dsr-12D482-126-AA_DSR/DIV_og pubnum: 12D482-126-AB_DSR