2012 DODGE CHALLENGER USB
[x] Cancel search: USBPage 3 of 124

INTRODUCTION/WELCOMEWelcome From Chrysler Group LLC....2
CONTROLS AT A GLANCEDriver Cockpit...............4
Instrument Cluster .............6
GETTING STARTEDKeyFob...................8
Remote Start................9
Keyless Enter-N-Go™ ...........9
Theft Alarm ................13
Seat Belt .................13
Supplemental Restraint System
(SRS) — Air Bags ............14
Child Restraints .............15
Front Seats ................18
Rear Seat .................20
Heated Seats ...............20
Tilt / Telescoping Steering Column ....21
OPERATING YOUR VEHICLEEngine Break-In Recommendations . . . 22
Turn Signal/Wiper/Washer/High
Beam Lever................22
Headlight Switch .............23
Speed Control ..............24
Manual Transmission 1 To 4 Skip Shift.. 25
Manual Climate Controls .........25
Automatic Temperature Controls (ATC).. 26
Power Sunroof ..............26
Wind Buffeting ..............27
ELECTRONICSYour Vehicle's Sound System ......28
Media Center 130 (Sales Code RES) . . 30
Media Center 130 With Satellite Radio
(Sales Code RES + RSC) .........32
Media Center 430/430N (Sales Code
RBZ/RHB) ................34
Media Center 730N (Sales Code RHR).. 43Sirius XM™ Satellite Radio/Travel Link.. 53
Steering Wheel Audio Controls ......56
Uconnect™ Phone ............56
Uconnect™ Voice Command .......59
Bluetooth
®Streaming Audio .......61
iPod®/USB/MP3 Control .........61
Electronic Vehicle Information
Center (EVIC) ...............62
Programmable Features .........63
Universal Garage Door Opener
(HomeLink
®) ...............64
Power Outlets ...............67
UTILITYTrailer Towing Weights (Maximum Trailer
Weight Ratings) ..............68
Recreational Towing (Behind
Motorhome, Etc.) .............69
SRT8AutoStick®................70
Electronic Control Damping System . . . 71
Performance Features ..........72
Summer/Three-Season Tires .......73
WHAT TO DO IN EMERGENCIES24-Hour Towing Assistance.......74
Instrument Cluster Warning Lights . . . 74
If Your Engine Overheats .........78
Jacking And Tire Changing ........79
Battery Location .............84
TIREFIT Kit ................84
Jump-Starting ..............89
Shift Lever Override ...........91
Towing A Disabled Vehicle ........92
Freeing A Stuck Vehicle .........93
Event Data Recorder (EDR) .......94
MAINTAINING YOUR VEHICLEOpening The Hood............95
Engine Compartment ...........96
Fluids And Capacities ..........99
Maintenance Chart ........... 102
Fuses .................. 108
Tire Pressures .............. 111
Wheel And Wheel Trim Care ...... 111
Exterior Bulbs ............. 112
CONSUMER ASSISTANCEChrysler Group LLC Customer
Center.................. 113
Chrysler Canada Inc. Customer Center...113Assistance For The Hearing Impaired. . 113
Publications Ordering ......... 113
Reporting Safety Defects In
The 50 United States And
Washington, D.C. ............ 114
MOPAR ACCESSORIESAuthentic Accessories By MOPAR®. . 115
INDEX................. 116
FAQ (How To?)Frequently Asked Questions ...... 119
TABLE OF CONTENTS
Page 40 of 124

• The functions of the portable device are controlled using the device buttons. Thevolume may be controlled using the radio or portable device.
Hard Disk Drive (HDD) Operation
• The Hard Disk Drive (HDD) mode gives you access to the audio files on the internalhard disk drive. It functions similar to a CD player, with the exception that the
internal HDD can hold more tracks.
• It is also possible to import display pictures to the internal hard disk drive. The pictures can be displayed on the right half of the radio screen.
• Before using the HDD mode, you will need to copy songs and pictures to the internal hard drive. Songs and pictures can be added to the hard drive by using a
CD or USB device (e.g. thumb drive or memory stick).
NOTE: WMA/MP3 Files and Selective Songs from a CD can also be added to the HDD.
See the Media Center 430/430N User's Manual for more information.
Copying Music From CD
• Press the “LOAD” hard-key.
• Insert a disc, then press the “MENU” hard-key.
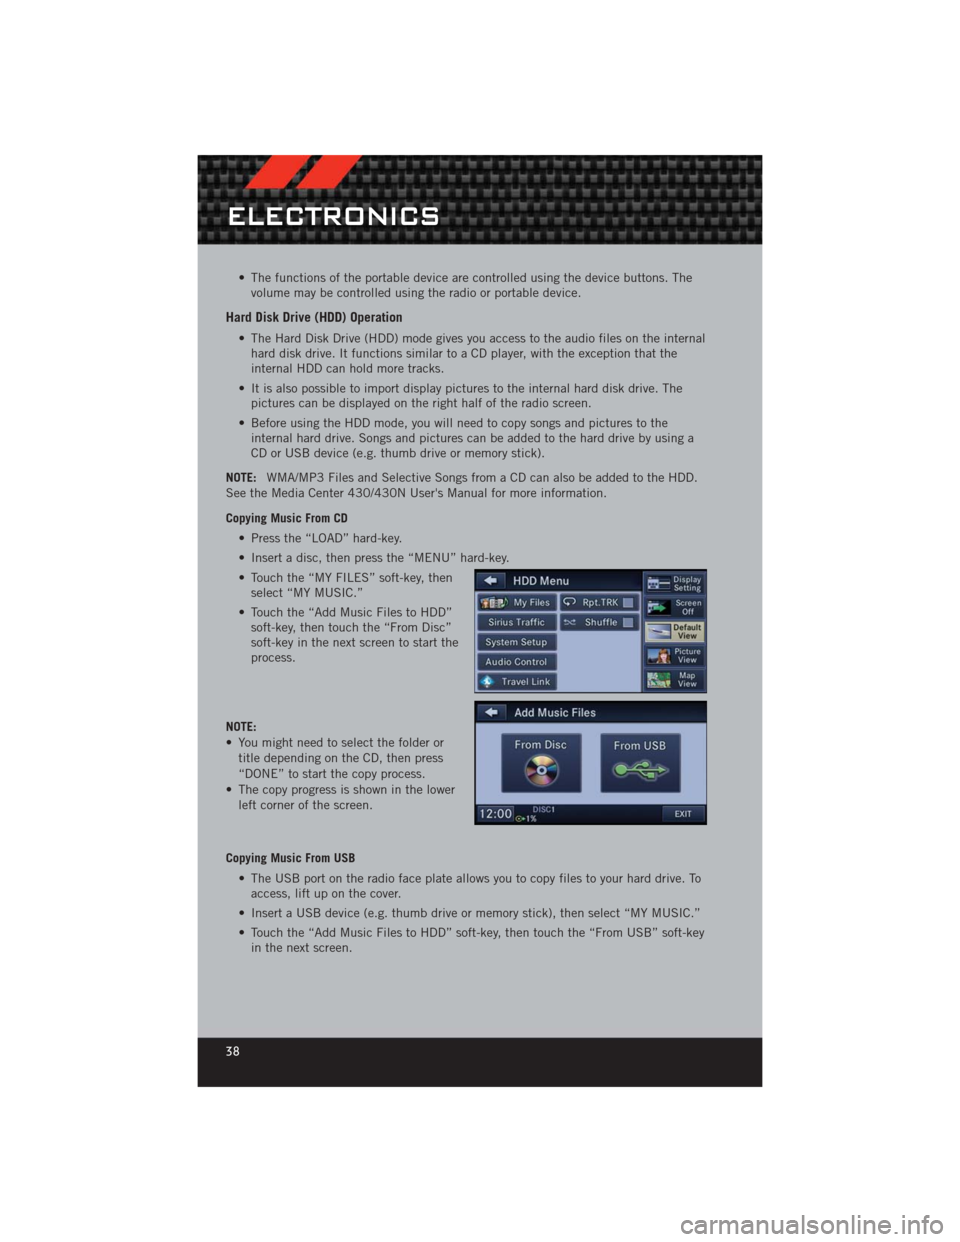
• Touch the “MY FILES” soft-key, thenselect “MY MUSIC.”
• Touch the “Add Music Files to HDD” soft-key, then touch the “From Disc”
soft-key in the next screen to start the
process.
NOTE:
• You might need to select the folder or title depending on the CD, then press
“DONE” to start the copy process.
• The copy progress is shown in the lower left corner of the screen.
Copying Music From USB • The USB port on the radio face plate allows you to copy files to your hard drive. Toaccess, lift up on the cover.
• Insert a USB device (e.g. thumb drive or memory stick), then select “MY MUSIC.”
• Touch the “Add Music Files to HDD” soft-key, then touch the “From USB” soft-key in the next screen.
ELECTRONICS
38
Page 41 of 124

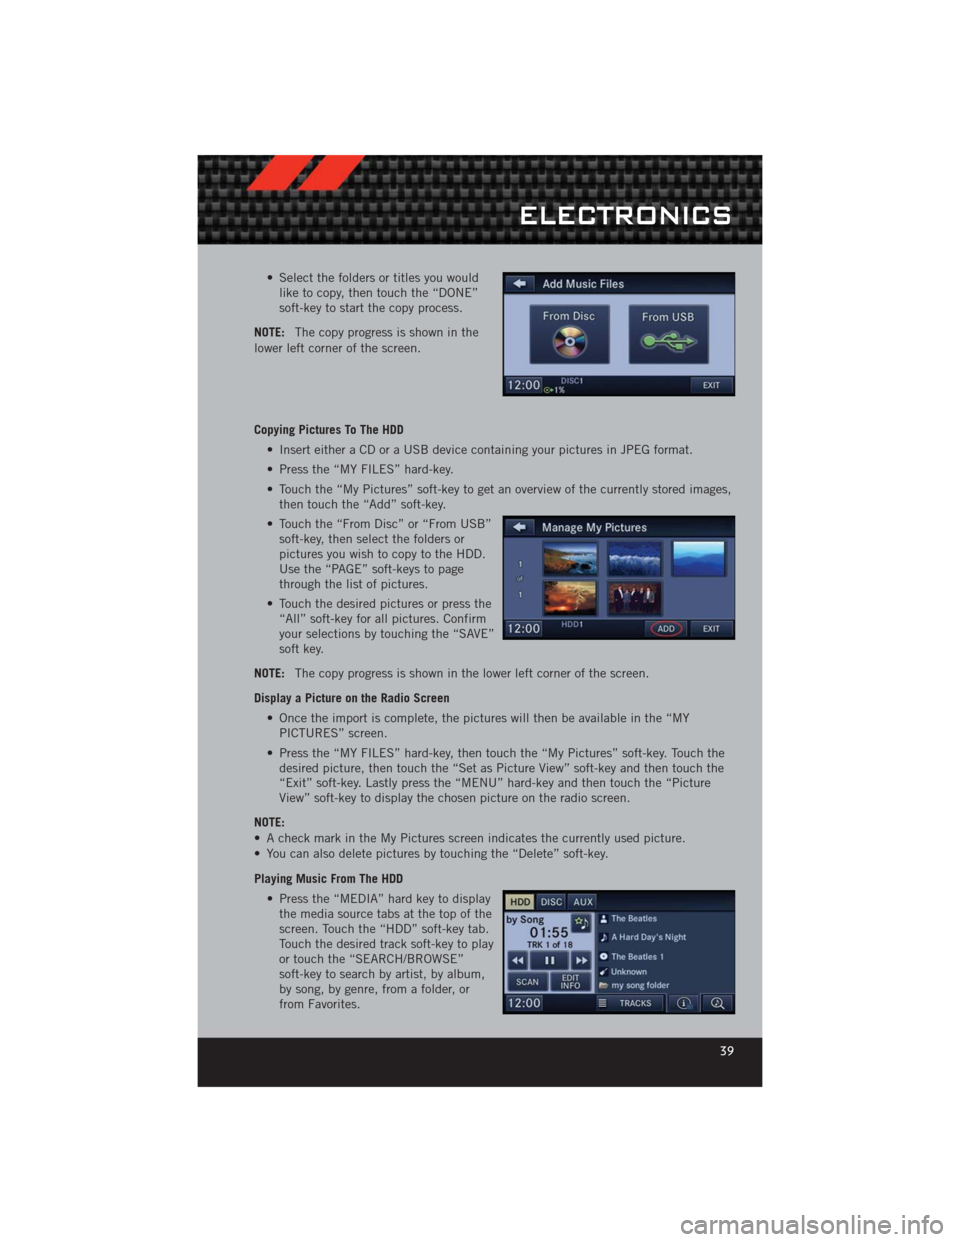
• Select the folders or titles you wouldlike to copy, then touch the “DONE”
soft-key to start the copy process.
NOTE: The copy progress is shown in the
lower left corner of the screen.
Copying Pictures To The HDD
• Insert either a CD or a USB device containing your pictures in JPEG format.
• Press the “MY FILES” hard-key.
• Touch the “My Pictures” soft-key to get an overview of the currently stored images,then touch the “Add” soft-key.
• Touch the “From Disc” or “From USB” soft-key, then select the folders or
pictures you wish to copy to the HDD.
Use the “PAGE” soft-keys to page
through the list of pictures.
• Touch the desired pictures or press the “All” soft-key for all pictures. Confirm
your selections by touching the “SAVE”
soft key.
NOTE: The copy progress is shown in the lower left corner of the screen.
Display a Picture on the Radio Screen • Once the import is complete, the pictures will then be available in the “MYPICTURES” screen.
• Press the “MY FILES” hard-key, then touch the “My Pictures” soft-key. Touch the desired picture, then touch the “Set as Picture View” soft-key and then touch the
“Exit” soft-key. Lastly press the “MENU” hard-key and then touch the “Picture
View” soft-key to display the chosen picture on the radio screen.
NOTE:
• A check mark in the My Pictures screen indicates the currently used picture.
• You can also delete pictures by touching the “Delete” soft-key.
Playing Music From The HDD • Press the “MEDIA” hard key to displaythe media source tabs at the top of the
screen. Touch the “HDD” soft-key tab.
Touch the desired track soft-key to play
or touch the “SEARCH/BROWSE”
soft-key to search by artist, by album,
by song, by genre, from a folder, or
from Favorites.
ELECTRONICS
39
Page 49 of 124

• The functions of the portable device are controlled using the device buttons. Thevolume may be controlled using the radio or portable device.
Hard Disk Drive (HDD) Operation
• The Hard Disk Drive (HDD) mode gives you access to the audio files on the internalhard disk drive. It functions similar to a CD player, with the exception that the
internal HDD can hold more tracks.
• It is also possible to import display pictures to the internal hard disk drive. The pictures can be displayed on the right half of the radio screen.
• Before using the HDD mode, you will need to copy songs and pictures to the internal hard drive. Songs and pictures can be added to the hard drive by using a
CD or USB device (e.g. thumb drive or memory stick).
NOTE: WMA/MP3 Files and Selective Songs from a CD can also be added to the HDD.
See the Media Center 730N User's Manual for more information.
Copying Music From CD
• Press the “OPEN/CLOSE” hard-key.
• Insert a disc, then press the “MENU” hard-key.
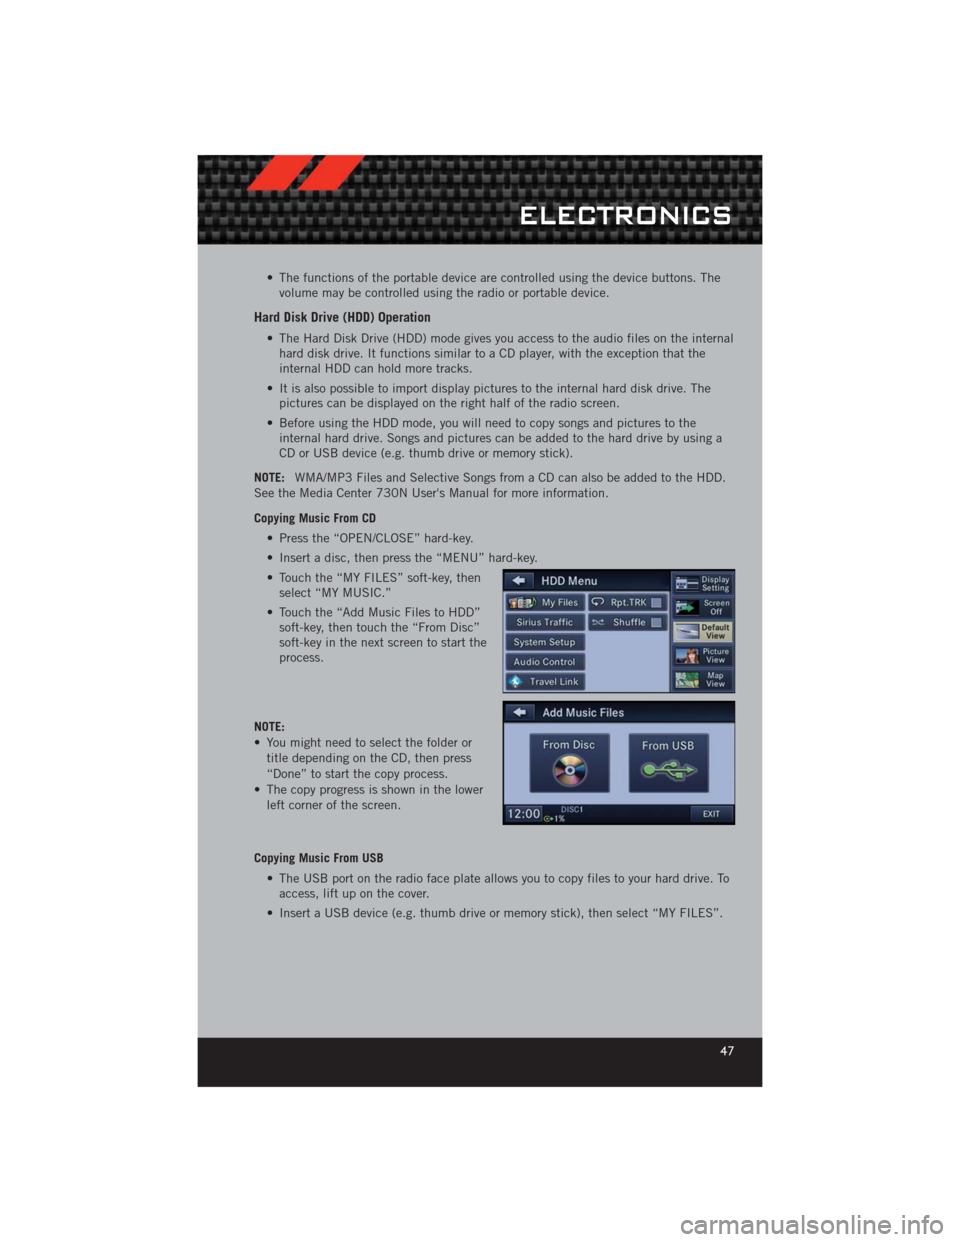
• Touch the “MY FILES” soft-key, thenselect “MY MUSIC.”
• Touch the “Add Music Files to HDD” soft-key, then touch the “From Disc”
soft-key in the next screen to start the
process.
NOTE:
• You might need to select the folder or title depending on the CD, then press
“Done” to start the copy process.
• The copy progress is shown in the lower left corner of the screen.
Copying Music From USB • The USB port on the radio face plate allows you to copy files to your hard drive. Toaccess, lift up on the cover.
• Insert a USB device (e.g. thumb drive or memory stick), then select “MY FILES”.
ELECTRONICS
47
Page 50 of 124

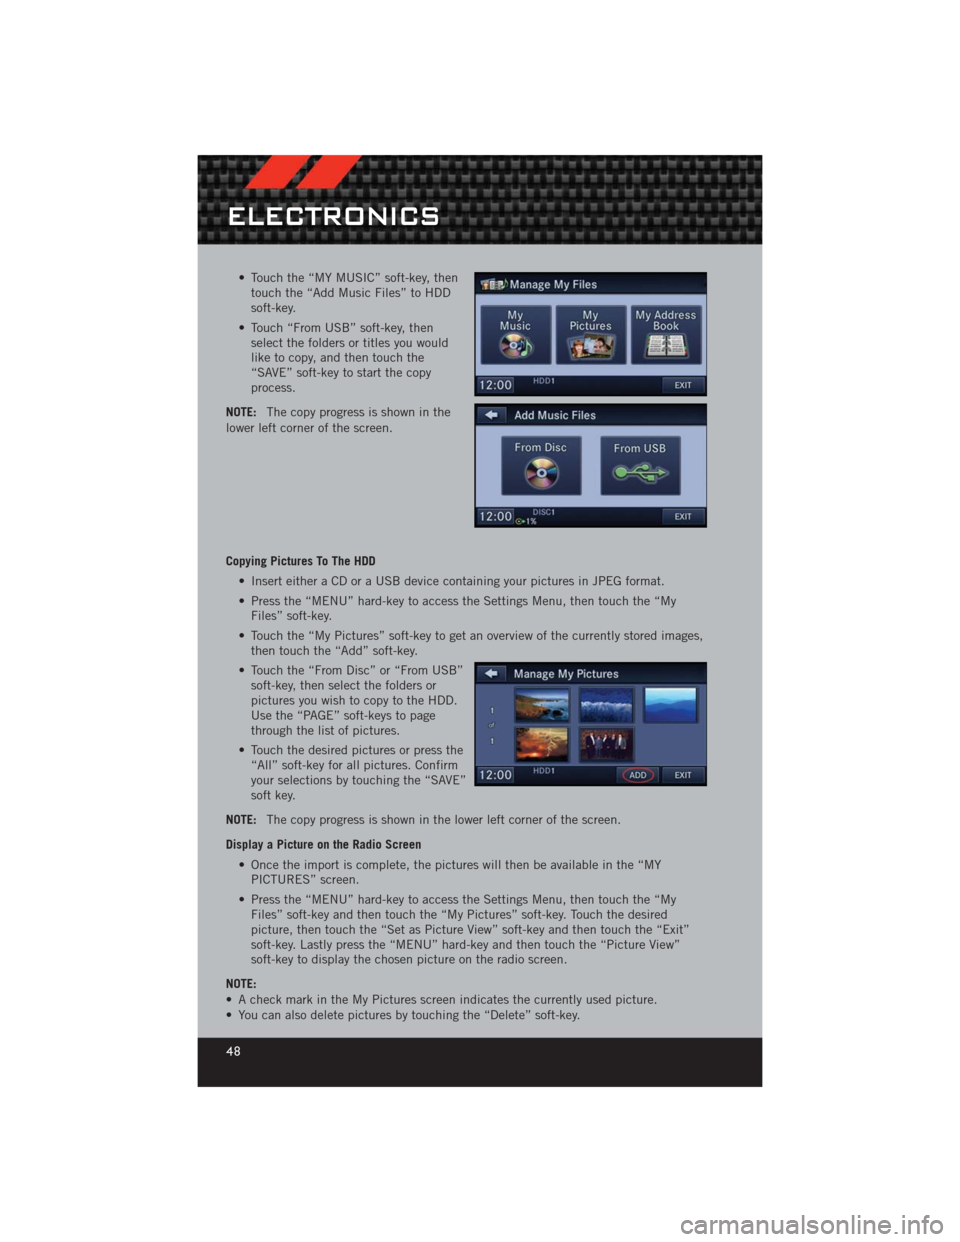
• Touch the “MY MUSIC” soft-key, thentouch the “Add Music Files” to HDD
soft-key.
• Touch “From USB” soft-key, then select the folders or titles you would
like to copy, and then touch the
“SAVE” soft-key to start the copy
process.
NOTE: The copy progress is shown in the
lower left corner of the screen.
Copying Pictures To The HDD
• Insert either a CD or a USB device containing your pictures in JPEG format.
• Press the “MENU” hard-key to access the Settings Menu, then touch the “MyFiles” soft-key.
• Touch the “My Pictures” soft-key to get an overview of the currently stored images, then touch the “Add” soft-key.
• Touch the “From Disc” or “From USB” soft-key, then select the folders or
pictures you wish to copy to the HDD.
Use the “PAGE” soft-keys to page
through the list of pictures.
• Touch the desired pictures or press the “All” soft-key for all pictures. Confirm
your selections by touching the “SAVE”
soft key.
NOTE: The copy progress is shown in the lower left corner of the screen.
Display a Picture on the Radio Screen • Once the import is complete, the pictures will then be available in the “MYPICTURES” screen.
• Press the “MENU” hard-key to access the Settings Menu, then touch the “My Files” soft-key and then touch the “My Pictures” soft-key. Touch the desired
picture, then touch the “Set as Picture View” soft-key and then touch the “Exit”
soft-key. Lastly press the “MENU” hard-key and then touch the “Picture View”
soft-key to display the chosen picture on the radio screen.
NOTE:
• A check mark in the My Pictures screen indicates the currently used picture.
• You can also delete pictures by touching the “Delete” soft-key.
ELECTRONICS
48
Page 63 of 124

Bluetooth®STREAMING AUDIO
• If equipped with Uconnect™ VoiceCommand, your Bluetooth-equipped
iPod
®devices, cell phones or other
media players, may also be able to
stream music to your vehicle's
speakers. Your connected device must
be Bluetooth-compatible, and paired
with your Media Center radio (see
Uconnect™ Phone for pairing
instructions). Non-Touch-Screen
Radios: Press the “AUX” button on the radio faceplate until "BT" or “Audio
Streaming” is displayed on the radio screen. Touch-Screen-Radios: Press the
“RADIO/MEDIA” or “MEDIA” hard-key and then touch the “AUX” soft-key tab.
iPod®/USB/MP3 CONTROL
• There are many ways to play music from iPod®/MP3 players or USB devices
through your vehicle's sound system.
• The remote USB port, located within the center console, allows you to plug an iPod
®into the vehicle's sound system.
NOTE: If equipped with the Media Center
730N (RHR), the USB port on the
faceplate allows the same functions as the
remote USB port.
• Non-Touch-Screen Radios: To hearaudio from devices connected to the
USB port, press the “AUX” button on
the radio faceplate.
• Touch-Screen Radios: To hear audio from devices connected to the USB port, press the “MEDIA” hard-key, then touch the “AUX” or “iPod
®” soft-key.
• When connected to this feature: • The iPod
®can be controlled using the
radio buttons to Play, Browse, and
List the iPod
®or external devices
contents.
• The iPod
®battery charges when
plugged into the USB port (if
supported by the specific audio
device).
• Compatible iPod
®devices may also be controllable using voice commands. Refer
to the Owner's Manual on the DVD for details.
ELECTRONICS
61
Page 64 of 124

NOTE:
• The USB port supports certain Mini, Classic, Nano, Touch, and iPhone®devices. The
USB port also supports playing music from compatible external USB Mass Storage
Class memory devices. For supported audio file formats, refer to the USB Port
section in the Owner's Manual on the DVD. Refer to www.UconnectPhone.com for a
list of tested iPod
®s. Some iPod®software versions may not fully support the USB
port features. Please visit Apple’s website for iPod®software updates.
WARNING!
Do not plug in or remove the iPod®or external device while driving. Failure to
follow this warning could result in a collision.
ELECTRONIC VEHICLE INFORMATION CENTER
(EVIC)
• The EVIC features a driver interactive display that is located in the
instrument cluster. Pressing the
controls on the left side of the steering
wheel allows the driver to select
vehicle information and Personal
Settings. For additional information,
refer to Programmable Features in this
guide.
• Press and release the MENU
button to access the main menu, or to return to
the main menu from the sub menus.
• Press and release the UP
button to scroll upward through the main menus
and sub menus.
• Press and release the DOWN
button to scroll downward through the main
menus and sub menus.
• Press and release the SELECT
button for access to main menus, sub menus or
to select a personal setting in the setup menu. Press and hold the SELECT button
for two seconds to reset features.
Compass Calibration
• This compass is self-calibrating, which eliminates the need to set the compass manually. When the vehicle is new, the compass may appear erratic and the EVIC
will display “CAL” until the compass is calibrated.
• You may also calibrate the compass by completing one or more 360 degree turns (in an area free from large metal or metallic objects) until the “CAL” message
displayed in the EVIC turns off. The compass will now function normally.
ELECTRONICS
62
Page 119 of 124

Instrument Cluster Warning
Lights ................. 6,74
Intermittent Wipers (Delay Wipers) . . 23
Introduction............... 2
iPod
®/USB/MP3 Control ........ 61
Bluetooth Streaming Audio ..... 61
Jack Location .............. 79
Jack Operation ............. 81
Jacking Instructions .......... 81
Jump Starting .............. 89
KeyFob .................. 8
Key Fob Programmable Features . . . 63
Keyless Enter-N-Go™ .......... 9
Lock/Unlock ............. 10
Starting/Stopping ........ 11,12
Lane Change Assist .......... 22
LATCH (Lower Anchors and Tether for
CHildren) ................ 15
Lights TurnSignal .............. 22
Warning (Instrument Cluster
Description) .............. 6
Maintenance Record ......104,107
MaintenanceSchedule ..... 102,105
MediaCenterRadio ........ 30,32
Mirrors Heated .............. 25,26
MOPAR
®Accessories ........ 115
Navigation .............. 40,49
New Vehicle Break-In Period ..... 22
OilChangeIndicator .......... 77
Oil Change Indicator, Reset ...... 77
Oil, Engine Capacity ............... 99
Outlet Power ................. 67
Overheating, Engine .......... 78
Panic Alarm ............... 8 Phone (Pairing)
............. 56
Phone (Uconnect) ........... 56
Placard, Tire and Loading
Information .............. 111
Power Glass Sunroof ............ 26
Outlet (Auxiliary Electrical
Outlet) ................ 67
Seats ................. 18
Steering ................ 99
Preparation for Jacking ........ 80
Programmable Electronic
Features ............... 63,72
Radio Operation .......... 34,43
Rain Sensitive Wiper System ..... 23
Rear Seat, Folding ........... 20
Recreational Towing .......... 69
Remote Starting System ........ 9
ReplacementBulbs .......... 112
Reporting Safety Defects ...... 114
Restraints, Child ............ 15
Rocking Vehicle When Stuck ..... 93
Seat Belts ................ 13
Seats ................... 18
Adjustment .............. 18
Heated ................ 20
Lumbar Support ........... 18
Power ................. 18
RearFolding ............. 20
Seek Button .......... 30,31,33
Setting the Clock ...... 30,32,35,43
Shift Lever Override .......... 91
Short Message Service (SMS) ..... 60
Signals, Turn .............. 22
SIRIUS Travel Link ........... 55
SpareTire ................ 79
SparkPlugs ............... 99
Speed Control Accel/Decel .............. 24
Cancel ................ 24
Resume ................ 24
Speed Control (Cruise Control) .... 24
Starting Remote ................. 9
INDEX
117