2012 DODGE CHALLENGER ABS
[x] Cancel search: ABSPage 8 of 124

INSTRUMENT CLUSTER
Warning Lights
- Low Fuel Warning Light
- Charging System Light**
- Oil Pressure Warning Light**
- Anti-Lock Brake (ABS) Light**
- Air Bag Warning Light**
- Electronic Throttle Control (ETC) Light
- Tire Pressure Monitoring System (TPMS) Light
- Engine Temperature Warning Light
- Seat Belt Reminder Light
BRAKE- Brake Warning Light**
- Malfunction Indicator Light (MIL)**
- Electronic Stability Control (ESC) Activation/Malfunction IndicatorLight*
(See page 74 for more information.)
CONTROLS AT A GLANCE
6
Page 39 of 124

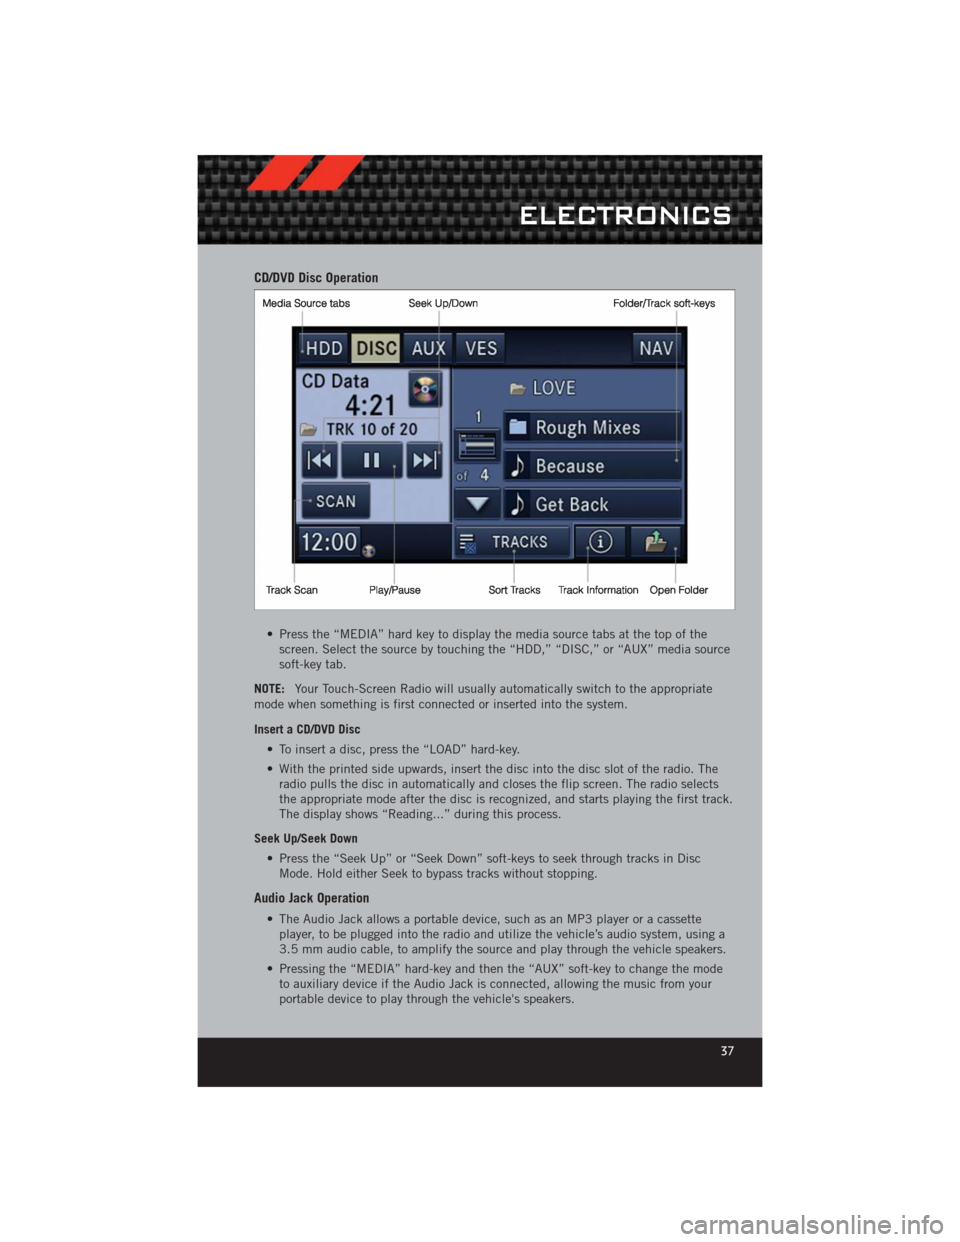
CD/DVD Disc Operation
• Press the “MEDIA” hard key to display the media source tabs at the top of thescreen. Select the source by touching the “HDD,” “DISC,” or “AUX” media source
soft-key tab.
NOTE: Your Touch-Screen Radio will usually automatically switch to the appropriate
mode when something is first connected or inserted into the system.
Insert a CD/DVD Disc
• To insert a disc, press the “LOAD” hard-key.
• With the printed side upwards, insert the disc into the disc slot of the radio. Theradio pulls the disc in automatically and closes the flip screen. The radio selects
the appropriate mode after the disc is recognized, and starts playing the first track.
The display shows “Reading...” during this process.
Seek Up/Seek Down • Press the “Seek Up” or “Seek Down” soft-keys to seek through tracks in DiscMode. Hold either Seek to bypass tracks without stopping.
Audio Jack Operation
• The Audio Jack allows a portable device, such as an MP3 player or a cassetteplayer, to be plugged into the radio and utilize the vehicle’s audio system, using a
3.5 mm audio cable, to amplify the source and play through the vehicle speakers.
• Pressing the “MEDIA” hard-key and then the “AUX” soft-key to change the mode to auxiliary device if the Audio Jack is connected, allowing the music from your
portable device to play through the vehicle's speakers.
ELECTRONICS
37
Page 41 of 124

• Select the folders or titles you wouldlike to copy, then touch the “DONE”
soft-key to start the copy process.
NOTE: The copy progress is shown in the
lower left corner of the screen.
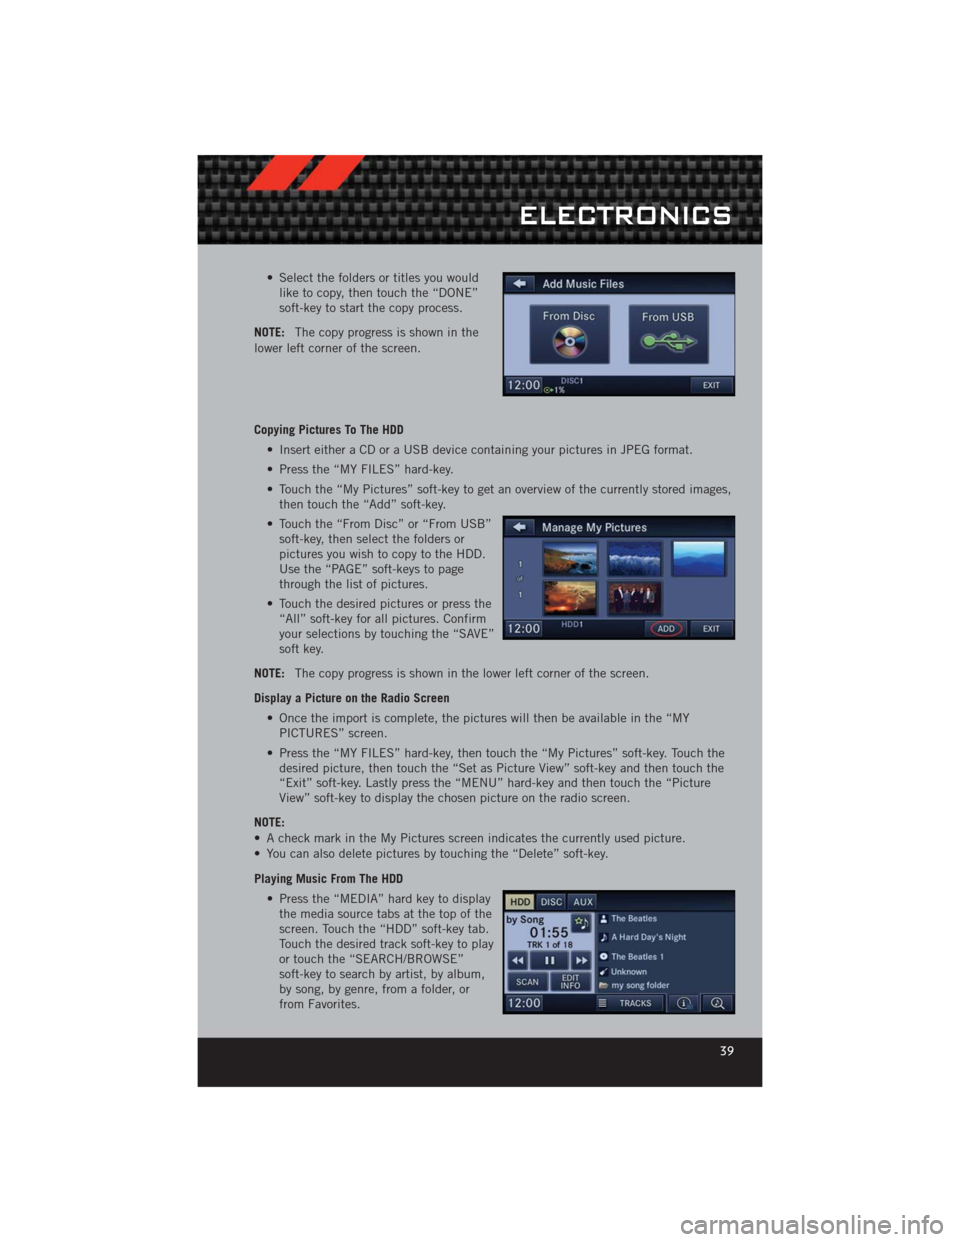
Copying Pictures To The HDD
• Insert either a CD or a USB device containing your pictures in JPEG format.
• Press the “MY FILES” hard-key.
• Touch the “My Pictures” soft-key to get an overview of the currently stored images,then touch the “Add” soft-key.
• Touch the “From Disc” or “From USB” soft-key, then select the folders or
pictures you wish to copy to the HDD.
Use the “PAGE” soft-keys to page
through the list of pictures.
• Touch the desired pictures or press the “All” soft-key for all pictures. Confirm
your selections by touching the “SAVE”
soft key.
NOTE: The copy progress is shown in the lower left corner of the screen.
Display a Picture on the Radio Screen • Once the import is complete, the pictures will then be available in the “MYPICTURES” screen.
• Press the “MY FILES” hard-key, then touch the “My Pictures” soft-key. Touch the desired picture, then touch the “Set as Picture View” soft-key and then touch the
“Exit” soft-key. Lastly press the “MENU” hard-key and then touch the “Picture
View” soft-key to display the chosen picture on the radio screen.
NOTE:
• A check mark in the My Pictures screen indicates the currently used picture.
• You can also delete pictures by touching the “Delete” soft-key.
Playing Music From The HDD • Press the “MEDIA” hard key to displaythe media source tabs at the top of the
screen. Touch the “HDD” soft-key tab.
Touch the desired track soft-key to play
or touch the “SEARCH/BROWSE”
soft-key to search by artist, by album,
by song, by genre, from a folder, or
from Favorites.
ELECTRONICS
39
Page 48 of 124

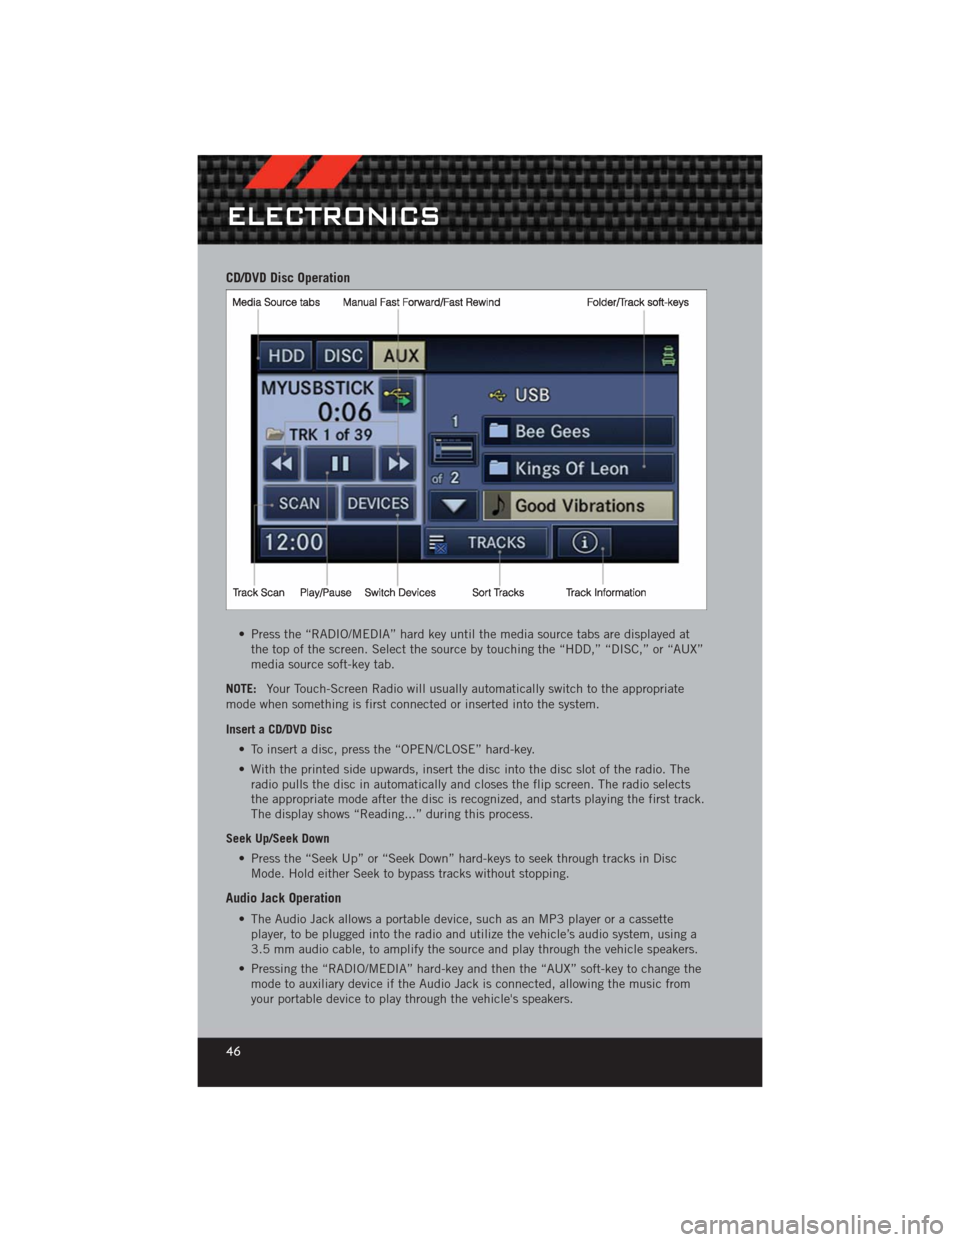
CD/DVD Disc Operation
• Press the “RADIO/MEDIA” hard key until the media source tabs are displayed atthe top of the screen. Select the source by touching the “HDD,” “DISC,” or “AUX”
media source soft-key tab.
NOTE: Your Touch-Screen Radio will usually automatically switch to the appropriate
mode when something is first connected or inserted into the system.
Insert a CD/DVD Disc
• To insert a disc, press the “OPEN/CLOSE” hard-key.
• With the printed side upwards, insert the disc into the disc slot of the radio. Theradio pulls the disc in automatically and closes the flip screen. The radio selects
the appropriate mode after the disc is recognized, and starts playing the first track.
The display shows “Reading...” during this process.
Seek Up/Seek Down • Press the “Seek Up” or “Seek Down” hard-keys to seek through tracks in DiscMode. Hold either Seek to bypass tracks without stopping.
Audio Jack Operation
• The Audio Jack allows a portable device, such as an MP3 player or a cassetteplayer, to be plugged into the radio and utilize the vehicle’s audio system, using a
3.5 mm audio cable, to amplify the source and play through the vehicle speakers.
• Pressing the “RADIO/MEDIA” hard-key and then the “AUX” soft-key to change the mode to auxiliary device if the Audio Jack is connected, allowing the music from
your portable device to play through the vehicle's speakers.
ELECTRONICS
46
Page 51 of 124

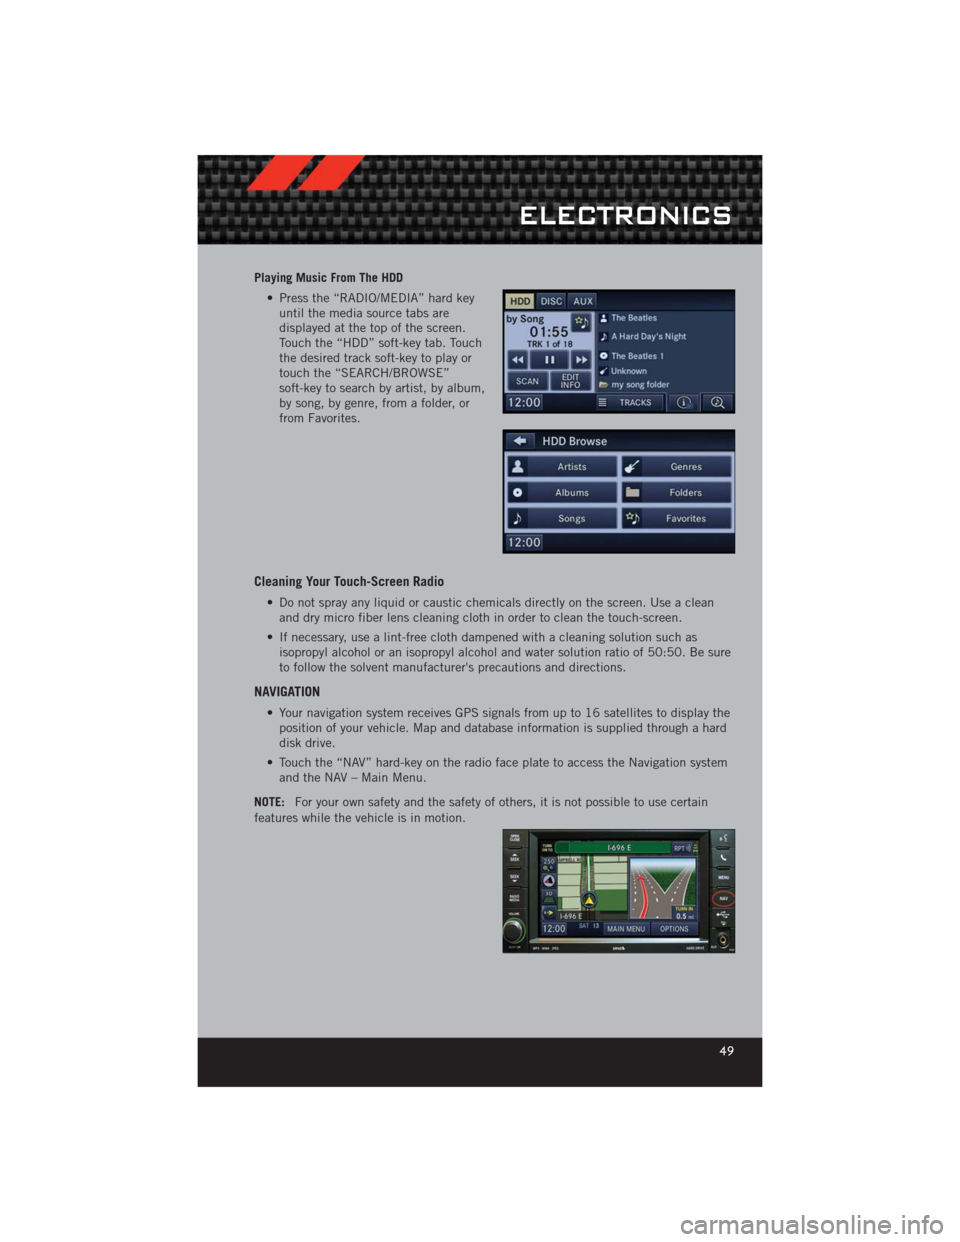
Playing Music From The HDD• Press the “RADIO/MEDIA” hard keyuntil the media source tabs are
displayed at the top of the screen.
Touch the “HDD” soft-key tab. Touch
the desired track soft-key to play or
touch the “SEARCH/BROWSE”
soft-key to search by artist, by album,
by song, by genre, from a folder, or
from Favorites.
Cleaning Your Touch-Screen Radio
• Do not spray any liquid or caustic chemicals directly on the screen. Use a cleanand dry micro fiber lens cleaning cloth in order to clean the touch-screen.
• If necessary, use a lint-free cloth dampened with a cleaning solution such as isopropyl alcohol or an isopropyl alcohol and water solution ratio of 50:50. Be sure
to follow the solvent manufacturer's precautions and directions.
NAVIGATION
• Your navigation system receives GPS signals from up to 16 satellites to display theposition of your vehicle. Map and database information is supplied through a hard
disk drive.
• Touch the “NAV” hard-key on the radio face plate to access the Navigation system and the NAV – Main Menu.
NOTE: For your own safety and the safety of others, it is not possible to use certain
features while the vehicle is in motion.
ELECTRONICS
49
Page 78 of 124

BRAKE- Brake Warning Light
• The Brake Warning light illuminates when there is either a system malfunction orthe parking brake is applied. If the light is on and the parking brake is not applied,
it indicates a possible brake hydraulic malfunction, brake booster problem or an
Anti-Lock Brake System problem.
• Please have your vehicle serviced immediately.
WARNING!
Driving a vehicle with the red brake light on is dangerous. Part of the brake
system may have failed. It will take longer to stop the vehicle. You could have a
collision. Have the vehicle checked immediately.
- Malfunction Indicator Light (MIL)
• Certain conditions, such as a loose or missing gas cap, poor fuel quality, etc., may illuminate the MIL after engine start. The vehicle should be serviced if the light
stays on through several typical driving cycles. In most situations, the vehicle will
drive normally and not require towing.
• If the MIL flashes when the engine is running, serious conditions may exist that could lead to immediate loss of power or severe catalytic converter damage. We
recommend you do not operate the vehicle. Have the vehicle serviced immediately.
- Electronic Stability Control (ESC) OFF Indicator Light
• This light indicates the Electronic Stability Control (ESC) is off.
SPORTSport Mode
• This light will illuminate when the sport mode is selected. This mode providesperformance based tuning.
- Charging System Light
• This light shows the status of the electrical charging system. If the chargingsystem light remains on, it means that the vehicle is experiencing a problem with
the charging system.
• We recommend you do not continue driving if the charging system light is on. Have the vehicle serviced immediately.
- Oil Pressure Warning Light
• This light indicates low engine oil pressure. If the light turns on while driving, stopthe vehicle and shut off the engine as soon as possible. A chime will sound for four
minutes when this light turns on.
• We recommend you do not operate the vehicle or engine damage will occur. Have the vehicle serviced immediately.
- Anti-Lock Brake (ABS) Light
• This light monitors the Anti-Lock Brake System (ABS).
WHAT TO DO IN EMERGENCIES
76
Page 91 of 124

WARNING!(Continued)
• Take care not to allow the contents of TIREFIT to come in contact with hair,eyes, or clothing. TIREFIT is harmful if inhaled, swallowed, or absorbed
through the skin. It causes skin, eye, and respiratory irritation. Flush
immediately with plenty of water if there is any contact with eyes or skin.
Change clothing as soon as possible, if there is any contact with clothing.
• TIREFIT Sealant solution contains latex. In case of an allergic reaction or rash, consult a physician immediately. Keep TIREFIT out of reach of
children. If swallowed, rinse mouth immediately with plenty of water and
drink plenty of water. Do not induce vomiting! Consult a physician
immediately.
• TIREFIT is not a permanent flat tire repair. Have the tire inspected and repaired or replaced after using TIREFIT. Do not exceed 55 mph (88 km/h)
until the tire is repaired or replaced. Failure to follow this warning can result
in injuries that are serious or fatal to you, your passengers, and others around
you.
JUMP-STARTING
• If your vehicle has a discharged batteryit can be jumpstarted using a set of
jumper cables and a battery in another
vehicle or by using a portable battery
booster pack.
• Jump-starting can be dangerous if done improperly so please follow the
procedures in this section carefully.
NOTE: When using a portable battery
booster pack follow the manufacturer’s
operating instructions and precautions.
Preparations for Jump-Start
• The battery is stored under an access cover in the trunk. Remote battery
posts are located on the right side of the engine compartment for jump-starting.
NOTE: The remote battery posts are viewed by standing on the right side of the vehicle
looking over the fender.
• Set the parking brake, shift the automatic transmission into PARK and turn theignition to LOCK.
• Turn off the heater, radio, and all unnecessary electrical accessories.
• If using another vehicle to jump-start the battery, park the vehicle within the jumper cables reach, set the parking brake and make sure the ignition is OFF.
WHAT TO DO IN EMERGENCIES
89
Page 110 of 124

FUSES
Integrated Power Module
• The Integrated Power Module (fuses) is located in the engine compartment on theright hand side near the Washer Fluid Reservoir. This module contains fuses and
relays.
Cavity Cartridge Fuse Mini-Fuse Description
1 — 15 Amp Blue Washer Motor
2 — 25 Amp
Natural Powertrain Control Module (PCM)
3 — 25 Amp
Natural Ignition Run/Start
4 — 25 Amp
Natural EGR Solenoid/Alternator
5 — 15 Amp Blue Powertrain Control Module
6 — 25 Amp
Natural Ignition Coils/Injectors
7 — 25 Amp
Natural Headlamp Washer Relay – If Equipped
8 — 30 Amp
Green Starter
10 30 Amp Pink — Windshield Wiper
11 30 Amp Pink — Anti-Lock Brake System (ABS) Valves
12 40 Amp Green —
Radiator Fan Lo/High
MAINTAINING YOUR VEHICLE
108