Page 65 of 124

ECO
• The ECO message will appear in your EVIC display whenever you are driving in afuel efficient manner.
• This feature allows you to monitor when you are driving in a fuel efficient manner, and it can be used to modify driving habits in order to increase fuel economy.
PROGRAMMABLE FEATURES
Electronic Vehicle Information Center (EVIC)
• The EVIC can be used to program the following Personal Settings. Press andrelease the MENUbutton until Personal Settings displays, then press the UPor DOWNbuttons to scroll through the settings. Press the SELECTbutton to change the setting.
• Language • Hill Start Assist (HSA)
• Unlock Doors Automatically on Exit • Turn Headlights On with Remote Key Unlock
• Remote Key Unlock • Delay Power Off to Accessories Until Exit
• Remote Start Comfort Sys. • Turn-by-Turn Navigation
• Sound Horn with Remote Key Lock • Display ECO Mode
• Flash Lights with Remote Key Lock • Keyless Enter-N-Go™
• Headlamps On with Wipers (Available with Auto Headlamps Only) • Enable/Disable The Rear Park Assist
System
• Delay Turning Headlights Off • Display Units of Measure In
Key Fob Programmable Features
• The following features may also be programmed by using the Key Fob transmitter
or the ignition switch and driver's door lock switch.
NOTE: Pressing the LOCK button while you are inside the vehicle will activate the
Vehicle Security Alarm. Opening a door with the Vehicle Security Alarm activated will
cause the alarm to sound. Press the UNLOCK button to deactivate the Vehicle Security
Alarm.
Unlock On First Press
• To unlock either the driver's side, or all doors, on the first press of the UNLOCKbutton:
• Press and hold the LOCK button for at least 4 seconds, but no longer than 10 seconds. Then, press and hold the UNLOCK button while still holding the
LOCK button.
• Release both buttons at the same time.
Auto Unlock Doors On Exit • To have all of the vehicle doors unlock when any door is opened:• Enter your vehicle and close all the doors.
ELECTRONICS
63
Page 66 of 124
.
• Press the power door UNLOCK switch to unlock the doors.")
• Cycle the ignition switch between LOCK and ON and then back to LOCK fourtimes, ending up in the LOCK position (do not start the engine).
• Press the power door UNLOCK switch to unlock the doors. A single chime will indicate that programming is complete.
Sound Horn With Lock • To turn the horn chirp on or off when the doors are locked:• Press the LOCK button for at least 4 seconds, but no longer than 10 seconds. Then, press the PANIC button while still holding the LOCK button.
• Release both buttons at the same time.
Flashing Lights With Lock • The turn signal lights flashing, when the doors are locked or unlocked, feature canbe turned on or off. To turn this feature on or off:
• Press and hold the UNLOCK button for at least 4 seconds, but no longer than 10 seconds. Then, press and hold the LOCK button while still holding the
UNLOCK button.
• Release both buttons at the same time.
UNIVERSAL GARAGE DOOR OPENER
(HomeLink
®)
• HomeLink®replaces up to three hand-held transmitters that operate devices such
as garage door openers, motorized gates, lighting or home security systems. The
HomeLink
®unit is powered by your vehicles 12 Volt battery.
• The HomeLink
®buttons that are located in the overhead console or sunvisor
designate the three different HomeLink®channels.
• The HomeLink
®indicator is located above the center button.
Before You Begin Programming HomeLink®
• Be sure that your vehicle is parked outside of the garage before you begin
programming.
• For more efficient programming and accurate transmission of the
radio-frequency signal it is
recommended that a new battery be
placed in the hand-held transmitter of
the device that is being programmed to
the HomeLink
®system.
• Erase all channels before you begin programming. To erase the channels, place the ignition switch into the ON/RUN position, then press and hold the two outside
HomeLink
®buttons (I and III) for up 20 seconds. The Electronic Vehicle
Information Center (EVIC) will display “CLEARING CHANNELS”. Release the
buttons when the EVIC displays “CHANNELS CLEARED”.
ELECTRONICS
64
Page 67 of 124

NOTE:
• Erasing all channels should only be performed when programming HomeLink®for the
first time. Do not erase channels when programming additional buttons.
• If you have any problems, or require assistance, please call toll-free 1–800–355– 3515 or, on the Internet at www.HomeLink.com for information or assistance.
Programming A Rolling Code
• For programming Garage Door Openers that were manufactured after 1995. TheseGarage Door Openers can be identified by the “LEARN” or “TRAIN” button located
where the hanging antenna is attached to the Garage Door Opener. It is NOT the
button that is normally used to open and close the door. The name and color of the
button may vary by manufacturer.
• Place the ignition switch into the ON/RUN position.
• Place the hand-held transmitter 1 to 3 in (3 to 8 cm) away from the HomeLink
®
button you wish to program while keeping the HomeLink®indicator light in view.
• Simultaneously press and hold both the HomeLink
®button you want to program
and the hand-held transmitter button.
• Continue to hold buttons until the EVIC display changes from “CHANNEL # TRAINING” to “CHANNEL # TRAINED”, then release both buttons.
NOTE: If the EVIC displays “DID NOT TRAIN” repeat Programming A Rolling Code.
• At the garage door opener motor (in the garage), locate the “LEARN” or “TRAINING” button. This can usually be found where the hanging antenna wire is
attached to the garage door opener motor. Firmly press and release the “LEARN”
or “TRAINING” button.
NOTE: You have 30 seconds in which to initiate the next step after the LEARN button
has been pressed.
• Return to the vehicle and press the programmed HomeLinkt button twice (holdingthe button for two seconds each time). The EVIC will display “CHANNEL #
TRANSMIT”. If the garage door opener/device activates, programming is complete.
NOTE: If the device does not activate, press the button a third time (for two seconds)
to complete the training.
• To program the remaining two HomeLink
®buttons, repeat each step for each
remaining button. DO NOT erase the channels.
ELECTRONICS
65
Page 68 of 124

Programming A Non-Rolling Code
• For programming Garage Door Openers manufactured before 1995.
• Turn the ignition switch to the ON/RUN position.
• Place the hand-held transmitter 1 to 3 in (3 to 8 cm) away from the HomeLink
®
button you wish to program while keeping the HomeLink®indicator light in view.
• Simultaneously press and hold both the HomeLink
®button you want to program
and the hand-held transmitter button.
• Continue to hold buttons until the EVIC display changes from “CHANNEL # TRAINING” to “CHANNEL # TRAINED”, then release both buttons.
• Press and hold the programmed HomeLink
®button and observe the indicator light.
NOTE:
• If the EVIC displays “DID NOT TRAIN” repeat Programming A Non-Rolling Code.
• To program the two remaining HomeLink
®buttons, repeat each step for each
remaining button. DO NOT erase the channels.
Using HomeLink®
• To operate, press and release the programmed HomeLink®button. Activation will
now occur for the programmed device (i.e., garage door opener, gate operator,
security system, entry door lock, home/office lighting, etc.,). The hand-held
transmitter of the device may also be used at any time.
WARNING!
• Your motorized door or gate will open and close while you are programming the universal transceiver. Do not program the transceiver if people or pets are
in the path of the door or gate.
• Do not run your vehicle in a closed garage or confined area while programming the transceiver. Exhaust gas from your vehicle contains Carbon
Monoxide (CO) which is odorless and colorless. Carbon Monoxide is
poisonous when inhaled and can cause you and others to be severely injured
or killed.
ELECTRONICS
66
Page 69 of 124
POWER OUTLETS
• There are two 12 Volt electrical outletson this vehicle.
• The outlet on the front console has power available only when the ignition
is in the ON/RUN position. If desired,
this outlet can be converted by your
authorized dealer to provide power with
the ignition switch in the LOCK
position.
• The second outlet in the center console is powered directly from the battery (power available at all times). Items plugged into this outlet may discharge the battery
and/or prevent engine starting.
NOTE:
• Do not exceed the maximum power of 160 Watts (13 Amps) at 12 Volts. If the 160 Watt (13 Amp) power rating is exceeded, the fuse protecting the system will need to
be replaced.
• Power outlets are designed for accessory plugs only. Do not insert any other object in the power outlet as this will damage the outlet and blow the fuse. Improper use of
the power outlet can cause damage not covered by your new vehicle warranty.
ELECTRONICS
67
Page 70 of 124
TRAILER TOWING WEIGHTS (MAXIMUM TRAILER WEIGHT RATINGS)
Engine/TransmissionFrontal AreaMax. GTW (Gross Trailer Wt.) Max. Tongue Wt.
3.6L Automatic 12 sq ft (1.11 sq m)
1,000 lbs (454 kg) 100 lbs (45 kg)
5.7L Automatic 12 sq ft (1.11 sq m)
1,000 lbs (454 kg) 100 lbs (45 kg)
Refer to local laws for maximum trailer towing speeds
UTILITY
68
Page 71 of 124

Towing This Vehicle Behind Another Vehicle — Automatic Transmission
• Recreational towing (with all four wheels on the ground, or using a tow dolly) is")
RECREATIONAL TOWING (BEHIND MOTORHOME,
ETC.)
Towing This Vehicle Behind Another Vehicle — Automatic Transmission
• Recreational towing (with all four wheels on the ground, or using a tow dolly) isNOT ALLOWED. The only acceptable method for towing this vehicle (behind another
vehicle) is on a vehicle trailer with all four wheels OFFthe ground
Towing This Vehicle Behind Another Vehicle — Manual Transmission
• Flat towing of vehicles equipped with a manual transmission is permitted within
the following limitations:
• The shift lever must be in NEUTRAL
• There is no limitation on the distance to be traveled
• The towing speed must not exceed 65 mph (104 km/h)
CAUTION!
• Exceeding these towing limits may cause severe transmission damage. Such damage is not covered by the New Vehicle Limited Warranty.
• Towing this vehicle in violation of the above requirements can cause severe transmission damage. Damage from improper towing is not covered under the
New Vehicle Limited Warranty.
UTILITY
69
Page 72 of 124

AUTOSTICK®
Steering Wheel Mounted Paddle Shifters Or Console Mounted Shifter
• AutoStick®is a driver-interactive
transmission feature that offers manual
gear shifting to provide you with more
control of the vehicle. AutoStick
®
allows you to maximize engine braking,
and improve overall vehicle
performance.
• This system can also provide you with more control during passing, city
driving, cold slippery conditions,
mountain driving, trailer towing, and
many other situations.
Operation • When the shift lever is in the DRIVE position, the transmission will operateautomatically, shifting between the five available gears. To engage AutoStick
®,
simply move the shift lever to the right or left (+/-) while in the DRIVE position, or
press one of the steering wheel mounted shift paddles (+/-). When AutoStick
®is
active, the current transmission gear is displayed in the Electronic Vehicle
Information Center (EVIC) portion of the instrument cluster. In AutoStick
®mode,
the transmission will shift when manually selected by the driver (using the shift
lever, or the shift paddles), unless an engine lugging or overspeed condition would
result. It will remain in the selected gear until another upshift or downshift is
chosen, except as described below:
• The transmission will automatically downshift as the vehicle slows (to prevent engine lugging) and will display the current gear.
• The transmission will automatically downshift to first gear when coming to a stop.
• You can start out in first or second gear. Tapping (+) (at a stop) will allow starting in second gear. Starting out in second gear is helpful in snowy or icy conditions.
• The system will ignore attempts to upshift at too low of a vehicle speed.
• Transmission shifting will be more noticeable when AutoStick
®is engaged. To
disengage AutoStick®mode, hold the shift lever to the right or press and hold the
(+) shift paddle until “D” is once again displayed in the instrument cluster. You
can shift in or out of the AutoStick
®mode at any time without taking your foot off
the accelerator pedal.
• An “UPSHIFT” message will appear in the Electronic Vehicle Information Center (EVIC) portion of the instrument cluster when using AutoStick
®, to alert the driver
to upshift to the next gear. The “UPSHIFT” message will appear when
approaching the maximum engine speed.
SRT8
70
 1
1 2
2 3
3 4
4 5
5 6
6 7
7 8
8 9
9 10
10 11
11 12
12 13
13 14
14 15
15 16
16 17
17 18
18 19
19 20
20 21
21 22
22 23
23 24
24 25
25 26
26 27
27 28
28 29
29 30
30 31
31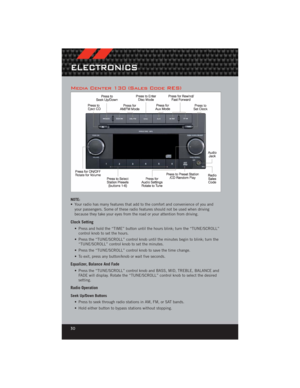 32
32 33
33 34
34 35
35 36
36 37
37 38
38 39
39 40
40 41
41 42
42 43
43 44
44 45
45 46
46 47
47 48
48 49
49 50
50 51
51 52
52 53
53 54
54 55
55 56
56 57
57 58
58 59
59 60
60 61
61 62
62 63
63 64
64 65
65 66
66 67
67 68
68 69
69 70
70 71
71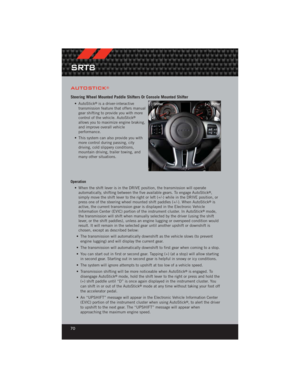 72
72 73
73 74
74 75
75 76
76 77
77 78
78 79
79 80
80 81
81 82
82 83
83 84
84 85
85 86
86 87
87 88
88 89
89 90
90 91
91 92
92 93
93 94
94 95
95 96
96 97
97 98
98 99
99 100
100 101
101 102
102 103
103 104
104 105
105 106
106 107
107 108
108 109
109 110
110 111
111 112
112 113
113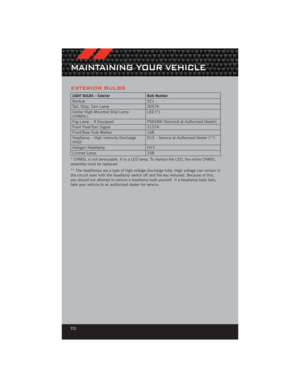 114
114 115
115 116
116 117
117 118
118 119
119 120
120 121
121 122
122 123
123

Engine/TransmissionFrontal AreaMax. GTW (Gross Trailer Wt.) Max. Tongue Wt.
3.6L Automatic 12 sq ft (1.11 sq m)
1,000 lbs (454 kg) 100 lbs (45 k")