Page 334 of 471
Fuel System Cautions
CAUTION!
Follow these guidelines to maintain your vehicle’s
performance:
•The use of leaded gas is prohibited by Federal law.
Using leaded gasoline can impair engine perfor-
mance and damage the emissions control system.
•An out-of-tune engine or certain fuel or ignition
malfunctions can cause the catalytic converter to
overheat. If you notice a pungent burning odor or
some light smoke, your engine may be out of tune
or malfunctioning and may require immediate
service. Contact your authorized dealer for service
assistance.(Continued)
CAUTION! (Continued)
•The use of fuel additives, which are now being
sold as octane enhancers, is not recommended.
Most of these products contain high concentra-
tions of methanol. Fuel system damage or vehicle
performance problems resulting from the use of
such fuels or additives is not the responsibility of
the manufacturer.
NOTE: Intentional tampering with the emissions con-
trol system can result in civil penalties being assessed
against you.
332 STARTING AND OPERATING
Page 339 of 471
Overloading
The load carrying components (axle, springs, tires,
wheels, etc.) of your vehicle will provide satisfactory
service as long as you do not exceed the GVWR and the
front and rear GAWR.
The best way to figure out the total weight of your
vehicle is to weigh it when it is fully loaded and ready for
operation. Weigh it on a commercial scale to ensure that
it is not over the GVWR.
Figure out the weight on the front and rear of the vehicle
separately. It is important that you distribute the load
evenly over the front and rear axles.
Overloading can cause potential safety hazards and
shorten useful service life. Heavier axles or suspension
components do not necessarily increase the vehicle’s
GVWR.
Loading
To load your vehicle properly, first figure out its empty
weight, axle-by-axle and side-by-side. Store heavier items
down low and be sure you distribute their weight as
evenly as possible. Stow all loose items securely before
driving. If weighing the loaded vehicle shows that you
have exceeded either GAWR, but the total load is within
the specified GVWR, you must redistribute the weight.
Improper weight distribution can have an adverse effect
on the way your vehicle steers and handles and the way
the brakes operate.
NOTE:Refer to the “Vehicle Certification Label” affixed
to the rear of the driver’s door for your vehicle’s GVWR
and GAWRs.
TRAILER TOWING
Trailer towing with this vehicle is not recommended.
5
STARTING AND OPERATING 337
Page 345 of 471
•You can also turn the temperature control to maximum
heat, the mode control to floor and the blower control
to high. This allows the heater core to act as a
supplement to the radiator and aids in removing heat
from the engine cooling system.
CAUTION!
Driving with a hot cooling system could damage
your vehicle. If the temperature gauge reads 240°F
(116 °C) or greater pull over and stop the vehicle. Idle
the vehicle with the air conditioner turned off until
the pointer drops back into the normal range 200–
230°F (93–110°C). If the pointer remains at 240°F
(116°C) or greater and you hear a chime, turn the
engine off immediately and call for service.
WARNING!
You or others can be badly burned by hot engine
coolant (antifreeze) or steam from your radiator. If
you see or hear steam coming from under the hood,
do not open the hood until the radiator has had time
to cool. Never try to open a cooling system pressure
cap when the radiator or coolant bottle is hot.
TIREFIT KIT
Small punctures up to1�4in (6 mm) in the tire tread can be
sealed with TIREFIT. Foreign objects (e.g., screws or
nails) should not be removed from the tire. TIREFIT can
be used in outside temperatures down to approximately
-4°F (-20°C).
This kit will provide a temporary tire seal, allowing you
to drive your vehicle up to 100 miles (160 km) with a
maximum speed of 55 mph (88 km/h).6
WHAT TO DO IN EMERGENCIES 343
Page 354 of 471
3.Uncoil the Air Pump Hose (7) (black in color) and screw
the fitting at the end of hose (7) onto the valve stem.
4. Check the pressure in the tire by reading the Pressure
Gauge (3).
If tire pressure is less than 19 psi (1.3 Bar) , the tire is too
badly damaged. Do not attempt to drive the vehicle
further. Call for assistance.
If the tire pressure is 19 psi (1.3 bar) or higher:
1.
Press the Power Button (4) to turn on TIREFIT and
inflate the tire to the pressure indicated on the tire and
loading information label on the driver-side door opening.
NOTE: If the tire becomes over-inflated, press the Defla-
tion Button to reduce the tire pressure to the recom-
mended inflation pressure before continuing.
2. Disconnect the TIREFIT kit from the valve stem,
reinstall the cap on the valve stem and unplug from
12 Volt outlet. 3. Place the TIREFIT kit in its proper storage area in the
vehicle.
4. Have the tire inspected and repaired or replaced at the
earliest opportunity at an authorized dealer or tire ser-
vice center.
5. Replace the Sealant Bottle (1) and Sealant Hose (6)
assembly at your authorized dealer as soon as possible.
Refer to “(F) Sealant Bottle and Hose Replacement.”
NOTE:
When having the tire serviced, advise the au-
thorized dealer or service center that the tire has been
sealed using the TIREFIT service kit.(F) Sealant Bottle And Hose Replacement:
1. Uncoil the Sealant Hose (6) (clear in color).
2. Locate the round Sealant Bottle release button in the
recessed area under the sealant bottle.
352 WHAT TO DO IN EMERGENCIES
Page 362 of 471
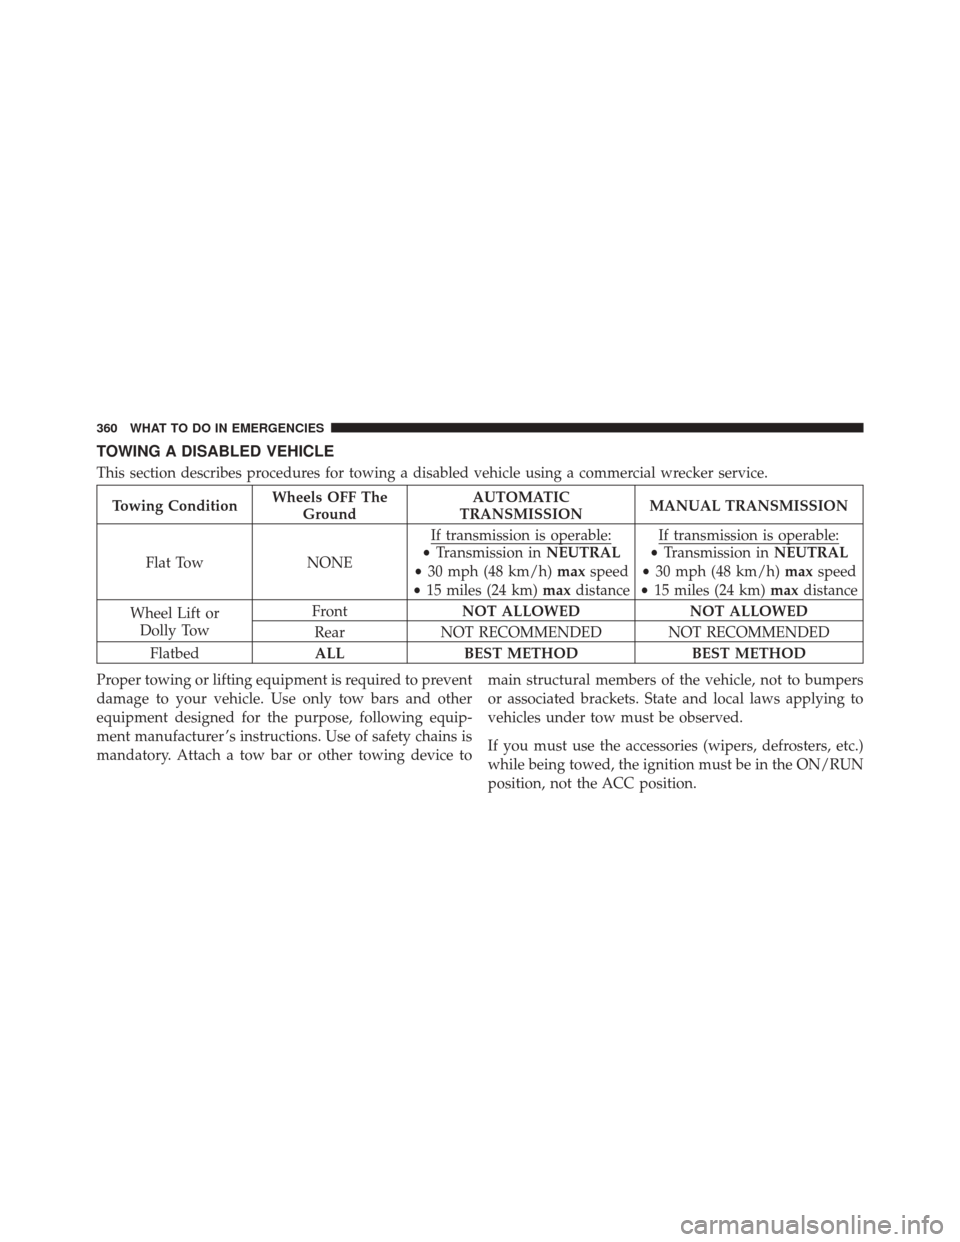
TOWING A DISABLED VEHICLE
This section describes procedures for towing a disabled vehicle using a commercial wrecker service.
Towing ConditionWheels OFF The
Ground AUTOMATIC
TRANSMISSION MANUAL TRANSMISSION
Flat Tow NONE If transmission is operable:
•
Transmission in NEUTRAL
• 30 mph (48 km/h) maxspeed
• 15 miles (24 km) maxdistance If transmission is operable:•
Transmission in NEUTRAL
• 30 mph (48 km/h) maxspeed
• 15 miles (24 km) maxdistance
Wheel Lift or Dolly Tow Front
NOT ALLOWED NOT ALLOWED
Rear NOT RECOMMENDED NOT RECOMMENDED
Flatbed ALLBEST METHOD BEST METHOD
Proper towing or lifting equipment is required to prevent
damage to your vehicle. Use only tow bars and other
equipment designed for the purpose, following equip-
ment manufacturer ’s instructions. Use of safety chains is
mandatory. Attach a tow bar or other towing device to main structural members of the vehicle, not to bumpers
or associated brackets. State and local laws applying to
vehicles under tow must be observed.
If you must use the accessories (wipers, defrosters, etc.)
while being towed, the ignition must be in the ON/RUN
position, not the ACC position.
360 WHAT TO DO IN EMERGENCIES
Page 365 of 471
MAINTAINING YOUR VEHICLE
CONTENTS
�Engine Compartment — 6.4L (392 HEMI) .... 366
� Onboard Diagnostic System — OBD II ...... 367
▫ Loose Fuel Filler Cap ................. 367
� Emissions Inspection And Maintenance
Programs ............................ 368
� Replacement Parts ..................... 369
� Dealer Service ........................ 370
� Maintenance Procedures ................. 370
▫ Engine Oil ......................... 371 ▫
Engine Oil Filter ..................... 373
▫ Engine Air Cleaner Filter ............... 373
▫ Maintenance-Free Battery .............. 374
▫ Air Conditioner Maintenance ............ 376
▫ A/C Air Filter ...................... 377
▫ Body Lubrication .................... 379
▫ Windshield Wiper Blades ............... 379
▫ Adding Washer Fluid ................. 380
▫ Exhaust System ..................... 381
7
Page 369 of 471

ONBOARD DIAGNOSTIC SYSTEM — OBD II
Your vehicle is equipped with a sophisticated onboard
diagnostic system called OBD II. This system monitors
the performance of the emissions, engine, and automatic
transmission control systems. When these systems are
operating properly, your vehicle will provide excellent
performance and fuel economy, as well as engine emis-
sions well within current government regulations.
If any of these systems require service, the OBD II system
will turn on the “Malfunction Indicator Light” (MIL).
It will also store diagnostic codes and other information
to assist your service technician in making repairs. Al-
though your vehicle will usually be drivable and not
need towing, see your authorized dealer for service as
soon as possible.CAUTION!
•Prolonged driving with the MIL on could cause
further damage to the emission control system. It
could also affect fuel economy and drivability. The
vehicle must be serviced before any emissions
tests can be performed.
•If the MIL is flashing while the engine is running,
severe catalytic converter damage and power loss
will soon occur. Immediate service is required.
Loose Fuel Filler Cap
If the vehicle diagnostic system determines that the fuel
filler cap is loose, improperly installed, or damaged, a
”gASCAP” message will display in the odometer or a
“Check Gascap” message will display in the Electronic
Vehicle Information Center (EVIC) (if equipped). If this
occurs, tighten the fuel filler cap properly and press the
7
MAINTAINING YOUR VEHICLE 367
Page 370 of 471

Trip Odometer button to turn off the message. If the
problem continues, the message will appear the next time
the vehicle is started.
A loose, improperly installed, or damaged fuel filler cap
may also turn on the MIL.
EMISSIONS INSPECTION AND MAINTENANCE
PROGRAMS
In some localities, it may be a legal requirement to pass
an inspection of your vehicle’s emissions control system.
Failure to pass could prevent vehicle registration.For states that require an Inspection and Mainte-
nance (I/M), this check verifies the “Malfunction
Indicator Light (MIL)” is functioning and is not
on when the engine is running, and that the OBD II
system is ready for testing. Normally, the OBD II system will be ready. The OBD II
system may
notbe ready if your vehicle was recently
serviced, recently had a dead battery or a battery replace-
ment. If the OBD II system should be determined not
ready for the I/M test, your vehicle may fail the test.
Your vehicle has a simple ignition key-actuated test,
which you can use prior to going to the test station. To
check if your vehicle’s OBD II system is ready, you must
do the following:
1. Turn the ignition switch to the ON position, but do not
crank or start the engine.
2. If you crank or start the engine, you will have to start
this test over.
3. As soon as you turn the ignition switch to the ON
position, you will see the MIL symbol come on as part of
a normal bulb check.
368 MAINTAINING YOUR VEHICLE