2012 DACIA SANDERO service
[x] Cancel search: servicePage 110 of 183

engine coolant ....................................................... (current page)
tanks and reservoirs coolant ............................................................. (current page)
tanks and reservoirs: windscreen washer .......................................... (current page)
4.8
ENG_UD19766_9
Niveaux / Filtres (B90 - L90 Ph2 - Dacia)
ENG_NU_817-9_B90_Dacia_4
Jaune NoirNoir texte
Engine coolant
Windscreen washer reservoir
Coolant
With the engine switched off and on
level ground, the level when cold must
be between the “ MINI" and “ MAXI"
marks on reservoir 2.
Top this level up when cold before it
reaches the “MINI" mark.
No operations should be
carried out on the cooling
circuit when the engine is
hot.
Risk of burns.
Checking intervals
Check the coolant level regularly
(very severe damage is likely to be
caused to the engine if it runs out of
coolant).
If the level needs to be topped up, only
use products approved by our Technical
Department which ensure:
– protection against freezing;
– anti-corrosion protection of the cool-
ing system.
Replacement intervals
Refer to the Maintenance Service
Booklet for your vehicle.
Consult an approved dealer at once
if you notice an abnormal or re -
peated drop in any of the fluid levels.
LEVELS (2/3)
2
The engine may be hot
during operations in close
proximity. In addition, the
engine cooling fan may
come on at any moment.
Risk of burns.
Windscreen washer reservoir
Filling: Remove cap 3, fill until you can
see the fluid, then refit the cap.
This reservoir supplies the front and
rear screen washers.
Liquid: Special windscreen washer
fluid (anti-freeze product in winter).
Jets: to adjust the angle of the jets
pivot the little ball using a pin.
Use products approved by the Technical
Department.
3
Page 112 of 183
filterair filter ............................................................. (current page)
filter diesel filter ........................................................ (current page)
filter ........................................................................\
(current page)
filter passenger compartment filter .......................... (current page)
4.10
ENG_UD20151_3
Filtres (B90 - U90 - L90 Ph2 - F90 Ph2 - R90 Ph2 - H79 - Dacia)
ENG_NU_817-9_B90_Dacia_4
Filters
FILTERS
The replacement of filter elements (air
filter, passenger compartment filter,
diesel filter, etc.) is scheduled in the
maintenance operations for your vehi -
cle.
Replacement intervals for filter el -
ements: refer to the Maintenance
Service Booklet for your vehicle.
Passenger compartment filter
If your vehicle is not originally fitted with
a passenger compartment filter, it is
possible to have one retrofitted.
Contact an approved dealer.
The engine may be hot
when carrying out opera -
tions in close proximity. In
addition, the engine cooling
fan can come on at any moment.
Risk of injury.
Air filter
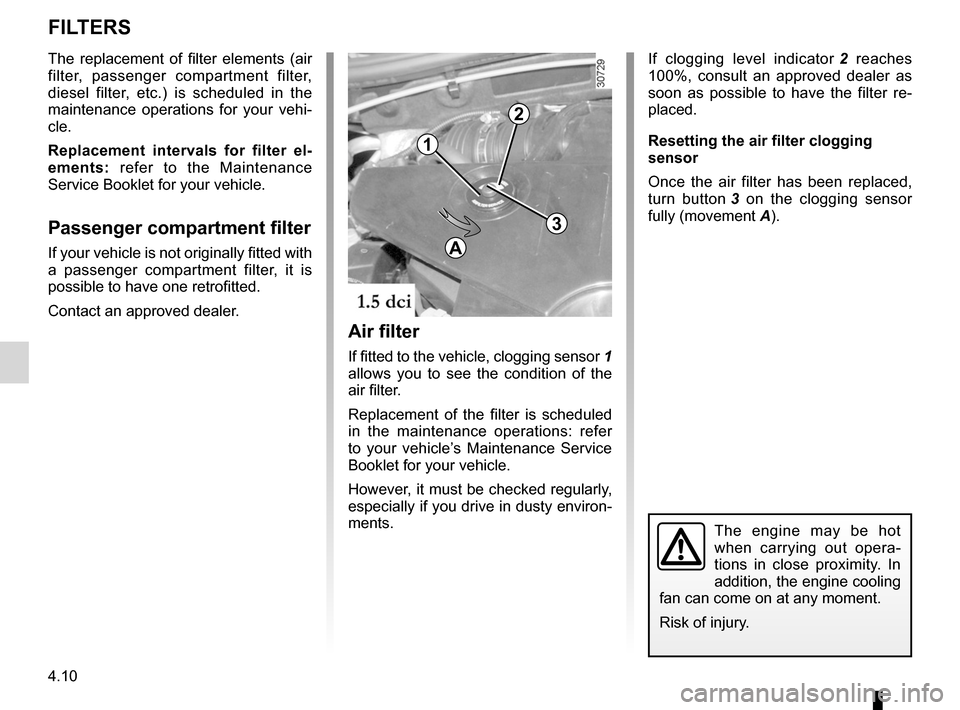
If fitted to the vehicle, clogging sensor 1
allows you to see the condition of the
air filter.
Replacement of the filter is scheduled
in the maintenance operations: refer
to your vehicle’s Maintenance Service
Booklet for your vehicle.
However, it must be checked regularly,
especially if you drive in dusty environ -
ments.
If clogging level indicator 2 reaches
100%, consult an approved dealer as
soon as possible to have the filter re -
placed.
Resetting the air filter clogging
sensor
Once the air filter has been replaced,
turn button 3 on the clogging sensor
fully (movement A).
1
2
3
A
Page 115 of 183
bodywork (maintenance) ...................... (up to the end of the DU)
maintenance: bodywork ........................................ (up to the end of the DU)
washing ................................................ (up to the end of the DU)
paintwork maintenance .................................................... (current page)
4.13
ENG_UD20155_5
Entretien de la carrosserie (B90 - U90 - L90 Ph2 - F90 Ph2 - R90 Ph2 - \
Dacia)
ENG_NU_817-9_B90_Dacia_4
Bodywork maintenance
BODyWORK MAINTENANCE (1/3)
A well-maintained vehicle will have a
longer service life. It is therefore ad -
visable to maintain the vehicle exterior
regularly.
Protection against the effects
of corrosive agents
Although your vehicle has been treated
with very effective anti-corrosion prod -
ucts, it nevertheless remains subject to
the effects of:
– corrosives in the atmosphere
– atmospheric pollution (urban and
industrial areas);
– saline atmosphere (near the sea,
particularly in hot weather);
– seasonal and damp climatic con-
ditions, (e.g.: road salt in winter,
water from road cleaners, etc.).
– abrasives
Wind-borne dust and sand, mud,
road grit thrown up by other vehi -
cles, etc.
– minor impacts
You should take a minimum number of
precautions in order to safeguard your
vehicle against such risks and not to
lose the benefit of your vehicle’s anti -
corrosion protection.
y ou should not:
– Degrease or clean mechanical com-
ponents, underneath the body, parts
with hinges (eg. fuel filler cap, inside
the fuel flap) and painted plastic ex-
ternal fittings (eg. bumpers) using
high-pressure cleaning equipment
or by spraying on products not ap -
proved by our Technical Department.
If adequate precautions are not
taken, this could cause corrosion or
lead to operational faults.
– Aim a high pressure water jet directly
onto damaged parts of the vehicle
(eg. painted bumpers, lights, etc.).
Wash these parts carefully by hand.
– Wash the vehicle in bright sunlight or
freezing temperatures. –
Use hard brushes to clean alloy
wheels. These can scratch or
damage the wheel’s protective coat-
ing.
– Scrape off mud or dirt without
prewetting.
– Allow dirt to accumulate.
– Allow rust to form following minor im-
pacts.
– Use solvents not approved by the
Technical Department to remove
stains as this could damage the
paintwork.
– Drive when the vehicle is muddy or
covered in snow (the wheel arches,
underneath the body, radiator, etc.
must always be free from mud or
snow).
It is forbidden to wash the engine compartment using a high-pressure
water jet: this risks damaging the electrical/electronic components in the
engine compartment.
A label affixed in the engine compartment reminds you of this.
Page 117 of 183
JauneNoirNoir texte
4.15
ENG_UD20155_5
Entretien de la carrosserie (B90 - U90 - L90 Ph2 - F90 Ph2 - R90 Ph2 - \
Dacia)
ENG_NU_817-9_B90_Dacia_4
BODyWORK MAINTENANCE (3/3)
– After cleaning your vehicle, check
the brakes while driving at low speed
to ensure that the braking efficiency
has not been reduced by the water.
If it has, depress the brake pedal
gently while driving to dry the brakes.
– Check the drain holes at the bottom
of the doors to make sure they are
not blocked.
– Inspect the wheels regularly to check
for any traces of impacts or corro -
sion. These can damage the tyre or
cause it to lose pressure.
– Keep well away from the vehicle in
front when driving on gravelled sur -
faces to prevent paint damage.
– Repair or have repaired quickly
patches where the paint has been
damaged to prevent corrosion
spreading. –
Remember to visit the body shop pe-
riodically in order to maintain your
anticorrosion warranty. Refer to the
Maintenance Service Booklet.
– Spray mechanical components,
hinges, etc. with products approved
by the Technical Department to
protect them after they have been
cleaned.
Page 118 of 183
maintenance:interior trim ...................................... (up to the end of the DU)
interior trim maintenance ................................... (up to the end of the DU)
4.16
ENG_UD22288_6
Entretien des garnitures intérieures (B90 - U90 - L90 Ph2 - F90 Ph2 \
- R90 Ph2 - H79 - Dacia)
ENG_NU_817-9_B90_Dacia_4
Jaune NoirNoir texte
Glass instrument panel(e.g.: instrument panel, clock, exterior
temperature display, radio display).
Use a soft or cotton cloth. If this does
not clean them properly, use a soft cloth
(or cotton wool) slightly moistened with
soapy water and then wipe clean with
another damp soft or cotton cloth.
Finally, dry off carefully with a soft dry
cloth.
Cleaning products containing alco -
hol must not be used under any cir-
cumstances.
Seat belts
These must be kept clean. Use products
selected by our Technical Department
or warm, soapy water and a sponge
and wipe with a dry cloth.
Detergents or dyes must not be used
under any circumstances.
Interior trim maintenance
INTERIOR TRIM MAINTENANCE (1/2)
A well-maintained vehicle will have a
longer service life. It is therefore ad -
visable to maintain the vehicle interior
regularly.
Stains should always be dealt with
quickly. Whatever type of stain is on
the trim, use soapy water (if possible,
warm water) containing:
Do not use detergents (washing up
liquid, powdered products, alcohol -
based products, etc.).
Use a soft cloth.
Rinse and soak up the excess.Fabrics (seats, door trim,
etc.)
Dust fabrics regularly.
Liquid stains
Use soapy water.
Dab lightly (never rub) with a soft cloth,
rinse and remove the excess.
Solid or thick stains
Remove any excess solid or thick ma-
terial immediately and carefully using
a spatula (from the edge inwards to
avoid spreading the stain).
Clean using the procedure for a liquid
stain.
Special instructions for sweets or
chewing gum
Put an ice cube on the stain to solidify
it, then proceed as for a solid stain.
For advice on interior maintenance
and/or on unsatisfactory results,
contact an approved dealer.
Page 124 of 183
tyre inflation kit...................................... (up to the end of the DU)
5.4
ENG_UD22290_8
Kit de gonflage des pneumatiques (B90 - L90 Ph2 - F90 Ph2 - R90 Ph2 - D\
acia)
ENG_NU_817-9_B90_Dacia_5
Jaune NoirNoir texte
Tyre inflation kit
TYRE INFLATION KIT (1/3)
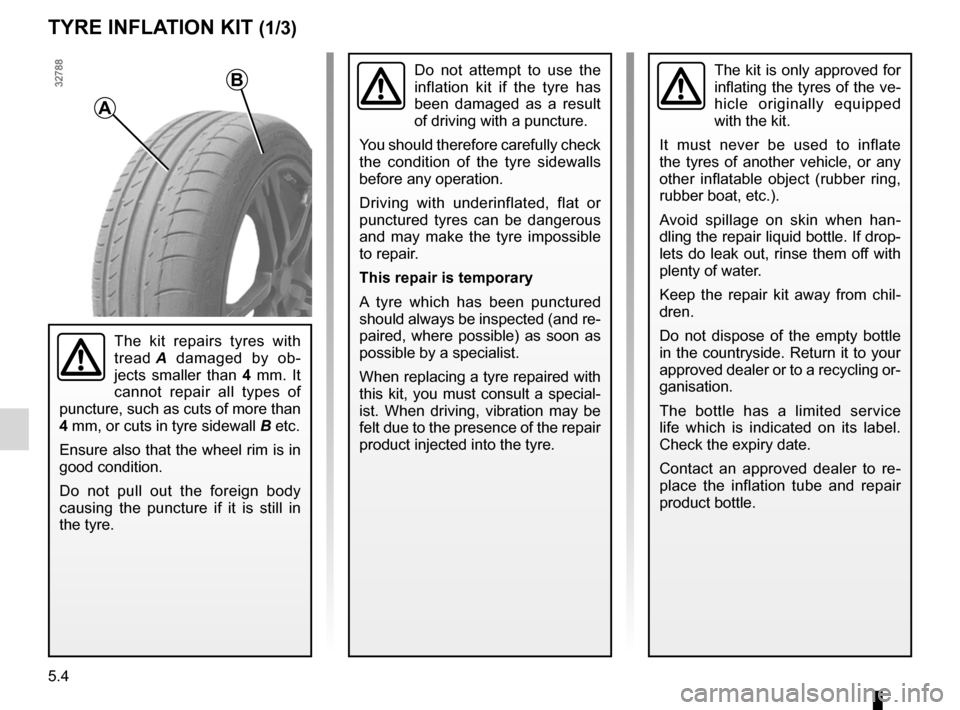
The kit repairs tyres with
tread A damaged by ob -
jects smaller than 4 mm. It
cannot repair all types of
puncture, such as cuts of more than
4 mm, or cuts in tyre sidewall B etc.
Ensure also that the wheel rim is in
good condition.
Do not pull out the foreign body
causing the puncture if it is still in
the tyre.
Do not attempt to use the
inflation kit if the tyre has
been damaged as a result
of driving with a puncture.
You should therefore carefully check
the condition of the tyre sidewalls
before any operation.
Driving with underinflated, flat or
punctured tyres can be dangerous
and may make the tyre impossible
to repair.
This repair is temporary
A tyre which has been punctured
should always be inspected (and re-
paired, where possible) as soon as
possible by a specialist.
When replacing a tyre repaired with
this kit, you must consult a special-
ist. When driving, vibration may be
felt due to the presence of the repair
product injected into the tyre.The kit is only approved for
inflating the tyres of the ve-
hicle originally equipped
with the kit.
It must never be used to inflate
the tyres of another vehicle, or any
other inflatable object (rubber ring,
rubber boat, etc.).
Avoid spillage on skin when han -
dling the repair liquid bottle. If drop-
lets do leak out, rinse them off with
plenty of water.
Keep the repair kit away from chil -
dren.
Do not dispose of the empty bottle
in the countryside. Return it to your
approved dealer or to a recycling or-
ganisation.
The bottle has a limited service
life which is indicated on its label.
Check the expiry date.
Contact an approved dealer to re -
place the inflation tube and repair
product bottle.
A
B
Page 147 of 183
keysreplacing the battery ....................... (up to the end of the DU)
practical advice ..................................... (up to the end of the DU)
battery (remote control) ........................ (up to the end of the DU)
5.27
ENG_UD18258_8
Télécommande à radiofréquence : piles (B90 - U90 - L90 Ph2 \
- F90 Ph2 - R90 Ph2 - Dacia)
ENG_NU_817-9_B90_Dacia_5
Radio frequency remote control: battery
RADIO FREQUENCY REMOTE CONTROL: battery
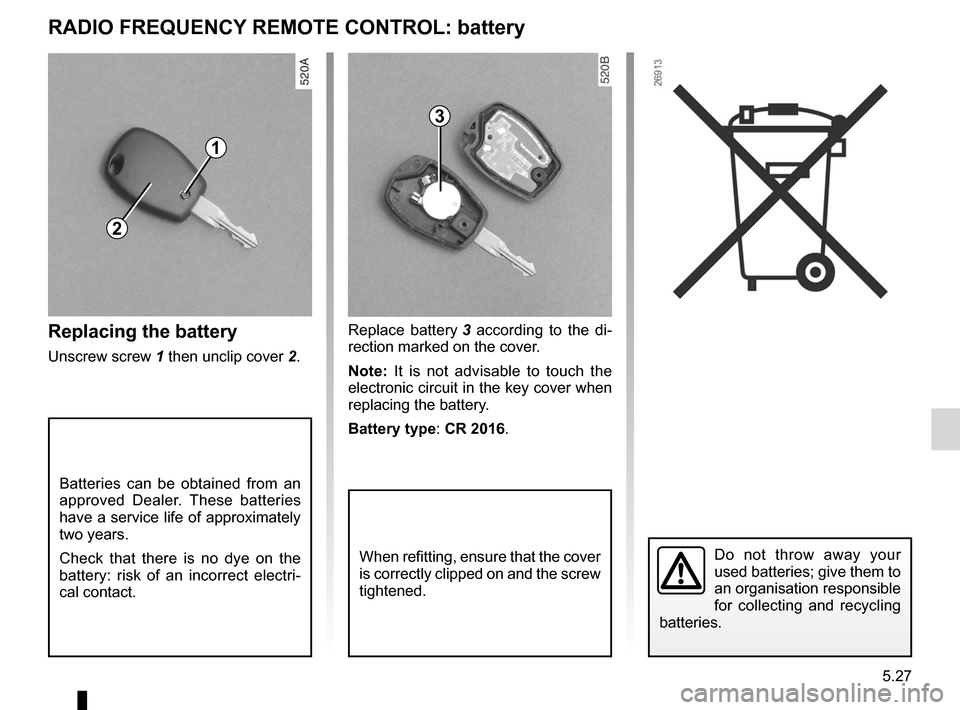
Replacing the battery
Unscrew screw 1 then unclip cover 2.Replace battery
3 according to the di -
rection marked on the cover.
Note: It is not advisable to touch the
electronic circuit in the key cover when
replacing the battery.
Battery type : CR 2016.
Batteries can be obtained from an
approved Dealer. These batteries
have a service life of approximately
two years.
Check that there is no dye on the
battery: risk of an incorrect electri -
cal contact.
Do not throw away your
used batteries; give them to
an organisation responsible
for collecting and recycling
batteries.
2
1
3
When refitting, ensure that the cover
is correctly clipped on and the screw
tightened.
Page 148 of 183
wiper blades ......................................... (up to the end of the DU)
practical advice ..................................... (up to the end of the DU)
wipers blades ............................................. (up to the end of the DU)
5.28
ENG_UD20464_6
Balais d’essuie-vitre (B90 - Dacia)
ENG_NU_817-9_B90_Dacia_5
Wiper blades
WIPER BLADES
12
3
4
Check the condition of the wiper
blades. You are responsible for their
service life:
– clean the blades, windscreen and
rear screen regularly with soapy
water;
– do not use them when the wind-
screen or rear screen are dry;
– free them from the windscreen or
rear screen when they have not
been used for a long time.
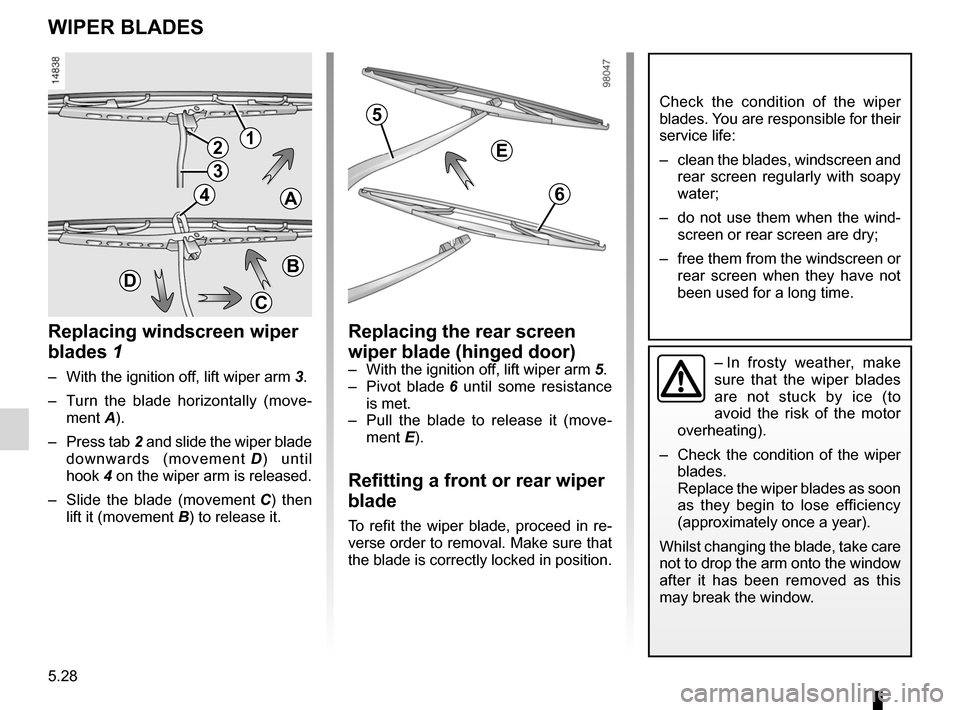
Replacing windscreen wiper
blades 1
– With the ignition off, lift wiper arm 3.
– Turn the blade horizontally (move -
ment A).
– Press tab 2 and slide the wiper blade
downwards (movement D ) until
hook 4 on the wiper arm is released.
– Slide the blade (movement C ) then
lift it (movement B) to release it.
Replacing the rear screen
wiper blade (hinged door)
– With the ignition off, lift wiper arm 5.
– Pivot blade 6 until some resistance
is met.
– Pull the blade to release it (move -
ment E).
Refitting a front or rear wiper
blade
To refit the wiper blade, proceed in re-
verse order to removal. Make sure that
the blade is correctly locked in position.
A
C
BD
6
5
E
– In frosty weather, make
sure that the wiper blades
are not stuck by ice (to
avoid the risk of the motor
overheating).
– Check the condition of the wiper
blades.
Replace the wiper blades as soon
as they begin to lose efficiency
(approximately once a year).
Whilst changing the blade, take care
not to drop the arm onto the window
after it has been removed as this
may break the window.