Page 45 of 182

43
3
EASE OF USE
and
COMFOR
T
Steering mounted controls
AUTOMATIC ILLUMINATION OF HEADLAMPS
Activation
Turn the ring to this position.
The lamps are switched off
automatically when the ignition is
switched off.
Do not cover the sunshine sensor at
the top centre of the windscreen.
GUIDE-ME-HOME LIGHTING
Ignition off or key in the STOP position.
Within 2 minutes after switching off the
engine, position the ignition key in the STOP
position or remove it.
Pull the lighting stalk towards the steering
wheel.
The indicator lamp comes on in
the instrument panel.
Each action on the lighting stalk,
pulled towards the steering
wheel, prolongs the guide me home
lighting by 30 seconds up to approximately
3 minutes. When this time has elapsed, the
lamps are switched off automatically.
Deactivate this control by keeping the stalk
pulled towards the steering wheel for more
than 2 seconds.
If your vehicle is fitted with this function:
when you leave your vehicle, the dipped
beam headlamps remain on for the selected
duration (when leaving a car park for
example).
To set the sensitivity of the sensor,
refer to "Mode" in chapter 4
If your vehicle is fitted with this function, the
dipped beam headlamps are switched on
automatically if the light is poor.
In fog or snow, the sunshine sensor may
detect sufficient light. Therefore, the lamps
will not be switched on automatically. If
necessary, you must switch on the dipped
beam headlamps manually.
They are switched off when the light returns
to a sufficient level.
Page 46 of 182
44
Steering mounted controls
HEADLAMP BEAM
You are advised to adjust the height of the
headlamp beams in accordance with the
load in your vehicle.
This function works in the dipped and main
beam headlamps position.
Press these controls, located
on the dashboard, several times
in succession to adjust the
headlamps.
An indicator lamp on the screen
indicates the adjustment position
selected (0, 1, 2, 3).
PARKING LAMPS
This system enables you to leave the lamps
on when parked; with the ignition off, key in
the STOP position or key removed.
Move the ring on the lighting stalk to
position O then to dipped or main beam
headlamps.
The warning lamp on the
instrument panel comes on.
The lamps will remain on while
you are parked.
Leaving the lighting on for long
periods may significantly reduce the state of
charge of your vehicle's battery.
Page 47 of 182

45
3
EASE OF USE
and
COMFOR
T
Steering mounted controls
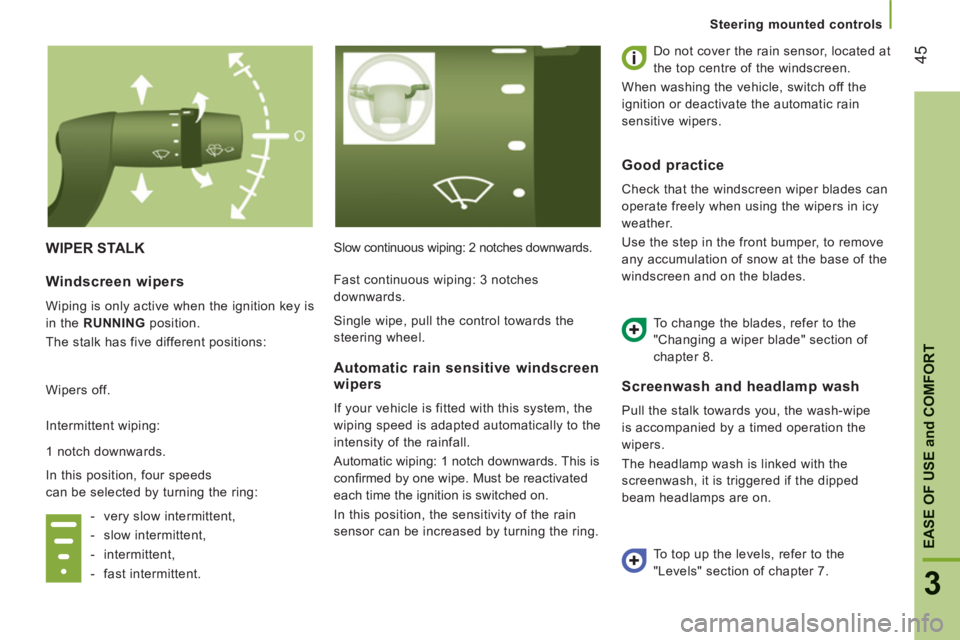
WIPER STALK
Slow continuous wiping: 2 notches downwards. Do not cover the rain sensor, located at
the top centre of the windscreen.
When washing the vehicle, switch off the
ignition or deactivate the automatic rain
sensitive wipers.
Screenwash and headlamp wash
Pull the stalk towards you, the wash-wipe
is accompanied by a timed operation the
wipers.
The headlamp wash is linked with the
screenwash, it is triggered if the dipped
beam headlamps are on.
Windscreen wipers
Wiping is only active when the ignition key is
in the RUNNING
position.
The stalk has five different positions:
Wipers off.
Intermittent wiping:
1 notch downwards.
In this position, four speeds
can be selected by turning the ring:
- very slow intermittent,
- slow intermittent,
- intermittent,
- fast intermittent.
Automatic rain sensitive windscreen
wipers
If your vehicle is fitted with this system, the
wiping speed is adapted automatically to the
intensity of the rainfall.
Automatic wiping: 1 notch downwards. This is
confi rmed by one wipe. Must be reactivated
each time the ignition is switched on.
In this position, the sensitivity of the rain
sensor can be increased by turning the ring.
Good practice
Check that the windscreen wiper blades can
operate freely when using the wipers in icy
weather.
Use the step in the front bumper, to remove
any accumulation of snow at the base of the
windscreen and on the blades.
To change the blades, refer to the
"Changing a wiper blade" section of
chapter 8.
To top up the levels, refer to the
"Levels" section of chapter 7. Fast continuous wiping: 3 notches
downwards.
Single wipe, pull the control towards the
steering wheel.
Page 78 of 182
76
Mode
Menu…
Press...
Sub-menu…
Press...
Select…
Confirm
and exit
Enables you to...
1
Bleep
Speed
(Speed) ON
Increase
Activate/deactivate the audible
signal indicating exceeding of
the programmed speed and
select the speed. Decrease
OFF
2
Headlamps
sensor
Increase
Set the sensitivity of the
sunshine sensor (1 to 3).
Decrease
3
Activation
Trip B
Activate
Display a second distance "Trip B".
Deactivate
4
Setting the
time (Hour)
Hours/ Minutes
Increase
Set the clock.
Decrease
Time format 24
Select the clock display mode.
12
5
Setting the
date
Year/Month/
Day
Activate
Set the date.
Deactivate
6
See radio
ON
Display the name of the station.
OFF
7
Autoclose
While moving
ON Activate/Deactivate automatic door
locking above approx 12 mph
(20 km/h). OFF
Page 119 of 182
11
7
7
CHECK
S
Under the bonnet
DIESEL ENGINES
1.
Windscreen/headlamp wash reservoir.
2.
Fusebox.
3.
Coolant reservoir.
4.
Brake and clutch fluid reservoir.
5.
Air filter.
6.
Dipstick.
a
: 2.2 Iitre 100
b
: 2.2 Iitre 120
c
: 3.0 Iitre 160
7.
Engine oil filler cap.
a
: 2.2 Iitre 100
b
: 2.2 Iitre 120
c
: 3.0 Iitre 160
8.
Power steering reservoir. Battery connections:
+ Positive metal point.
- Negative metal point (earth).
UNDER THE BONNET
Page 121 of 182

11
9
7
CHECK
S
Levels
Cooling system
Only use the fluid recommended by the
manufacturer. Otherwise, you risk seriously
damaging your engine. When the engine
is warm, the temperature of the coolant is
controlled by the engine fan. As this fan can
operate with the ignition key removed and
because the cooling system is pressurised,
wait for at least one hour after the engine
has stopped before carrying out any work.
Slacken the cap by 1/4 of a turn to release
the pressure to prevent any risk of scalding.
When the pressure has dropped, remove the
cap and top up the level with coolant.
If fluid has to be added frequently, this
indicates a failure which must be checked by
a CITROËN dealer as soon as possible.
Power steering fluid level
The vehicle must be parked on level ground
with the engine cold. Unscrew the cap
integrated with the gauge and check the
level which must be between the MIN
and
MAX
marks.
Used oil
Avoid prolonged contact of used oil with the
skin.
Brake fluid is harmful to health and very
corrosive.
Do not dispose of used oil, brake fluid or
coolant into drains or into the ground but
into the containers dedicated to this use
at CITROËN dealerships (France) or to an
authorised waste disposal site.
Topping up
The level must be between the MIN
and
MAX
marks on the expansion bottle. If
more than 1 litre of fluid is required to top
up the level, have the system checked by a
CITROËN dealer.
Windscreen wash and headlamp
wash level
For best quality cleaning and to prevent
freezing, this fluid must not be topped up or
replaced with plain water.
Capacity of the reservoir: approximately
5.5 litres.
Page 133 of 182
131
QUICK HEL
P
8
Changing a bulb
TYPES OF BULB
Various types of bulb are installed on your
vehicle. To remove them:
CHANGING A BULB
Type A Entirely glass bulb: pull gently
as it is fitted by pressure.
Type B Bayonet bulb: press on the bulb
then turn it anticlockwise.
Type C Cylindrical bulb: move aside the
contacts.
Type D - E Halogen bulb: release the
retaining spring from its
housing.
FRONT LAMPS
Open the bonnet. To access the bulbs, reach
behind the headlamp unit.
Carry out the operations in reverse order to
refit each bulb.
Page 134 of 182

132
Changing a bulb
1 - Dipped beam headlamp
Type D
, H7 - 55 W
- Remove the cover by turning it
anticlockwise.
- Disconnect the electrical connector.
- Release the retaining spring by pressing
on the two clips.
- Change the bulb taking care to align the
metal part with the grooves on the lamp.
3 - Main beam headlamp
Type E
, H1 - 55 W
- Remove the cover by turning it
anticlockwise.
- Disconnect the electrical connector.
- Release the retaining spring by pressing
on the two clips.
- Change the bulb taking care to align the
metal part with the groove on the lamp.
2 - Sidelamp
Type A
, W 5 W - 5 W
- Remove the cover by turning it
anticlockwise.
- Remove the bulb holder fitted by
pressure.
- Change the bulb.
4 - Direction indicators
Type B
, PY 21 W - 21 W
- Turn the bulb holder a quarter turn
anticlockwise.
- Remove the bulb by pressing it lightly
while turning it anticlockwise.
- Change the bulb.
5 - Foglamps
Type D
, H1 - 55 W
- Turn the steering fully to the left.
- Unscrew the screw located in the wheel
arch then open the flap.
- Remove the cover.
- Disconnect the electrical connector.
- Release the retaining spring by pressing
on the two clips.
- Change the bulb taking care to align the
metal part with the grooves on the lamp.
Halogen bulbs must be changed after
the headlamp has been off for several
minutes (risk of serious burns). Do not touch
the bulb directly with your fingers, use lint-
free cloths.
When each operation has been completed,
check the operation of the lamps.
When using a high pressure washer
on stubborn dirt, do not persist on the
headlamps, the lamps and their edges to
avoid damaging their lacquer finish and
seals.