Page 54 of 396

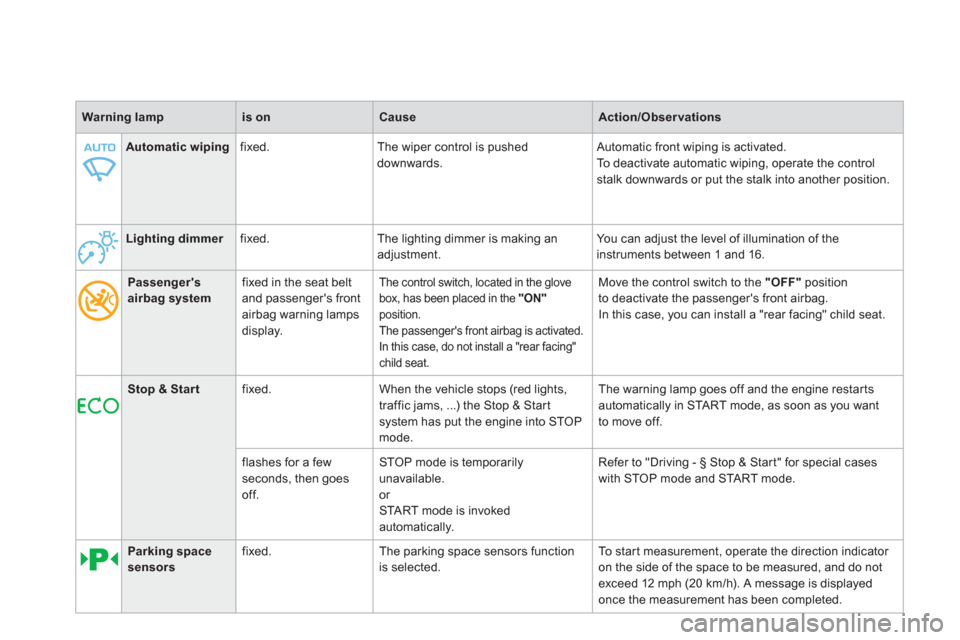
Lighting dimmer fixed. The lighting dimmer is making an
adjustment. You can adjust the level of illumination of the
instruments between 1 and 16.
Passenger's airbag systemfixed in the seat beltand passenger's front airbag warning lamps
display.
The control switch, located in the glove
box, has been placed in the "ON"
position.
The passen
ger's front airbag is activated.
In this case, do not install a "rear facing"child seat.
Move the control switch to the "OFF"
position
to deactivate the passenger's front airbag.
In this case, you can install a "rear facing" child seat.
Automatic wiping
fixed. The wiper control is pushed
downwards. Automatic front wipin
g is activated.
To deactivate automatic wipin
g, operate the control stalk downwards or put the stalk into another position.
Warning lampis onCauseAction/Observations
Stop & Startfixed. When the vehicle stops (red lights,
traffic jams, ...) the Stop & Star t system has put the engine into STOPmode.The warnin
g lamp goes off and the engine restarts
automatically in START mode, as soon as you want
to move off.
fl
ashes for a few seconds, then goesoff. STOP mode is temporaril
y unavailable. or STA R T mode is invokedautomatically. Refer to "Drivin
g - § Stop & Star t" for special cases
with STOP mode and STA R T m o d e .
Parking space sensorsfixed.The parking space sensors function
is selected.To star t measurement, operate the direction indicator
on the side of the space to be measured, and do notexceed 12 mph (20 km/h). A message is displayed
once t
he measurement has been completed.
Page 61 of 396

59Monitoring
Lighting dimmer
Permits manual adjustment of the brightness of
the instruments and controls in relation to theexterior brightness. Only operates when the
vehicle lighting is on in night mode.
Activation
�) Press button A
to change the brightness of
the instruments and controls.�) When the lighting reaches the minimum setting, release the button, then press
again to increase it. or �)
When the lighting reaches the maximum setting, release the button, then press
again to reduce it.�) When the lighting reaches the level of brightness required, release the button.
This indicator and the li
ghting
value appear in the middle o
f theinstrument panel during adjustment
to show the lighting level compared to
the 16 levels available. You can also modi
fy the level of lighting by
turning the thumb wheel B , located on the leftof the steering wheel: �)
upwards; to reduce the level, �)
downwards; to increase the level.
Deactivation
When the vehicle lighting is off, or in day mode (daytime running lamps on), pressing the buttonor turning the thumb wheel does not have anyeffect.
Page 62 of 396
System allowing cer tain screens to be switched
off for night driving. The instrument panel remains on with the
vehicle speed, electronic or automatic gearbox
gear selected, cruise control or speed limiter
in
formation, if in use, and the low fuel aler ts asappropriate.
If there is an aler t or a chan
ge in a function
or to a setting, the black panel mode is
interrupted.
Black panel (black screen)
Activation
�)
With the vehicle lighting on, press this button again to activate the black panel. �)
Press once more to illuminate on thevarious screens again.
In the instrument panel, you can change thecolour of its dials (button A) independently fromAthat of the screens (button B ).
There are five colour variants, from white to
blue.�)press the appropriate button as many times as needed to obtain the desired colour.
Customising the instrument
panel colours
Page 63 of 396

61Monitoring
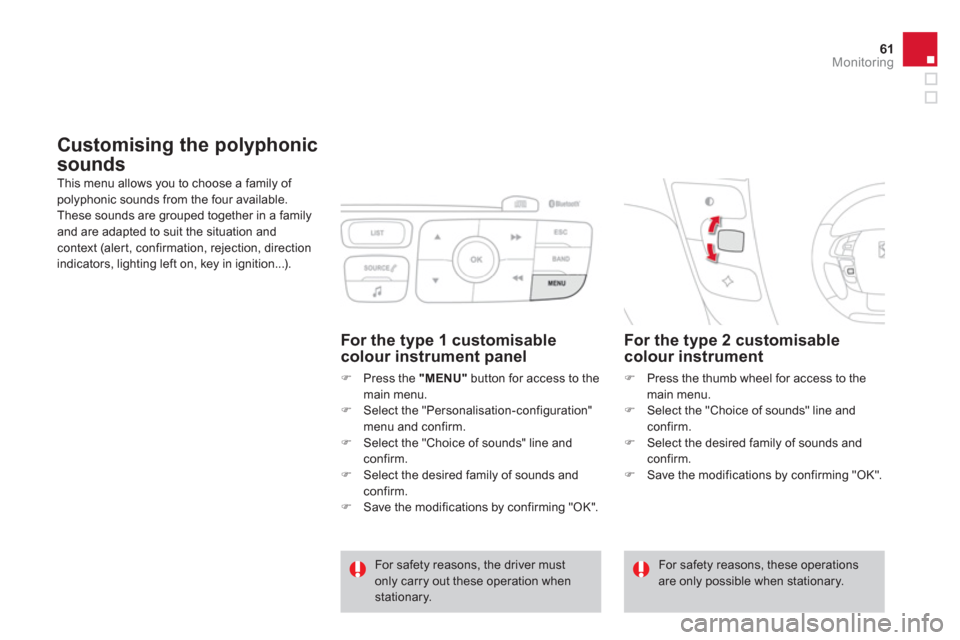
Customising the polyphonic
sounds
This menu allows you to choose a family of polyphonic sounds from the four available.
These sounds are grouped together in a familyand are adapted to suit the situation and context (alert, confirmation, rejection, direction
indicators, lighting left on, key in ignition...).
For the type 2 customisablecolour instrument
�)
Press the thumb wheel for access to the main menu.�)
Select the "Choice of sounds" line and confirm.
�)
Select the desired family of sounds and confirm. �)
Save the modifications by confirming "OK".
For safety reasons, the driver mustonly carry out these operation when stationary.
For safety reasons, these operations are only possible when stationary.
For the type 1 customisable colour instrument panel
�)
Press the "MENU"button for access to the
main menu. �) Select the "Personalisation-configuration"
menu and confirm.
�) Select the "Choice of sounds" line andconfirm.�)
Select the desired family of sounds and confirm.�)
Save the modifications by confirming "OK".
Page 68 of 396

Defi ne the vehicle parameters
- "Driving assistance":
●
"Parkin
g brake automatic" (Automaticelectric parking brake; see the "Driving"section),
●
"Rear wipe in reverse gear" (Rear
wiper coupled to reverse gear; see the
"Visibility" section),
●
"Speeds memorised" (Memorisingspeeds; see the "Driving" section).
- "Vehicle lighting" (see the "Visibility" section):
●
"Directional headlamps" (Main/additional
directional lighting),
●
"Daytime lights" (Daytime running
lamps).
- "Interior lighting" (see the "Visibility" section:
●
"Follow-me-home headlamps"
(Automatic operation of headlamps after switching off the ignition),
●
"Welcome lighting" (Exterior and interior
welcome lighting). For example: settin
g of the duration of the
"follow-me-home" li
ghting�)Press the " �� " or "��
" buttons, to select the
"Define the vehicle parameters" menu, then
the "OK " button.
�)Press the " ��
" or " ��
" buttons to select
the "Interior lighting" line, then the "OK"button; then follow the same procedure to select the "Follow-me-homeheadlamps" line. This menu allows
you to activate or deactivate
the following equipment, classified in different categories:
- "Access to the vehicle" (see the "Access"
section):
●
"Plip action" (Selective unlocking of the
driver's door
),
●
"Unlocking boot only" (Selectiveunlocking of the boot).
"Personalisation-
configuration" menu
This menu gives access to the followingfunctions:
- "Define the vehicle parameters",
- "Choice of language",
- "Display configuration",
- "Choice of sounds".
Page 69 of 396
67
Multifunction screens
�)Press the " ��
" or "��
" buttons to set thevalue required (15, 30 or 60 seconds), then press the "OK"
button to confirm.
Choice of language
Once this menu has been selected, you canchoose the language used by the display from a pre-defined list.
Display confi guration
This menu gives access to the followingsettings:
- "Choice of units",
- "Date and time ad
justment",
- "Display parameters",
- "Brightness".
Choice of sounds
This menu allows you to choose a family of
polyphonic sounds from the four available.
These sounds are grouped together in a familyand are adapted to suit the situation and context (alert, confirmation, rejection, direction
indicators, lighting left on, key in ignition...).
For safety reasons, configuration of the multifunction screen by the driver mustonly be done when stationary.
�)Press the " �� " or " �� " buttons, then the "OK"button to select the "OK"
box and confirm or press the "ESC"button to cancel.
Page 82 of 396
Manual air conditioning
The air conditioning system operates with the engine running.
1. Temperature adjustment
�)
Turn the dial to select a
position between blue (cold)and red (hot) so as to adjust
the temperature to your
requirements.
2. Air fl ow adjustment
This dial is used to increase or
decrease the speed of the air
booster fan.
3. Air distribution adjustment
This dial is used to arrange the distribution of
air in the passenger compartment by combiningseveral air outlets.
�)If you place the air flow control in position 0, the system isdeactivated. However, a slight flow of air, due to the movement of thevehicle, can still be felt.
�) Turn the dial from position 1
to position 5
toobtain a comfortable air flow.
Windscreen and side windows.
Windscreen, side windows and
f
ootwells.
Footwells.
Central and side vents.
Th
e air distribution can be
adapted by placing the dial in an
intermediate position.
Page 87 of 396

85
Comfort
Switching the system off
�)
Turn the air flow control tothe left until all of the indicator
lamps go off.
This switch does not operate the air conditioning, only the air fan. When the "REST" function is activated, you cannot modify the temperature, air flowand distribution settings: these are controlled automatically according to the ambienttemperature.This function is not available in the STOP mode of Stop & Star t.
Avoid prolonged operation in interior air recirculation mode or driving for long periods with the system off (risk of condensation and deterioration of air quality). On switchin
g on the engine
- The control screens come on: the function
is available.
- Pressing the RESTbutton activates the
ventilation for a few minutes. Activation of
the function is confirmed by the display of
two dashes in the control screens and four air flow level indicator lamps.
- The function can be deactivated and reactivated if the control screens are on.
- The screens go off at the end of this period. On stoppin
g the engine- While the control screens remain on: the
function is available.
- Pressing the REST
button activates theventilation for a few minutes. Activation of
the function is confirmed by the display of
two dashes in the control screens and four
air flow level indicator lamps.
Locking the vehicle has no effect on this
function.
- The control screens go off at the end of
this period.
Pressin
g again before the end of the period
interrupts off the ventilation definitively: the control screens go off and the function is
no longer available. This action switches off the air conditionin
g and
the ventilation.
Temperature related comfor t is no longer
assured but a slight flow of air, due to the
movement of the vehicle, can still be felt. �) Modify the settings (temperature, air flow or
air distribution) or press the "AUTO"
button
to reactivate the system with the values set before it was switched off.