Page 99 of 216
97
IIIC
D
REAR SEATS
REAR HEAD RESTRAINTS
The rear head restraints have twopositions:A stowed position for when theseat is not occupied.
A deployed position for safety
of passengers, locking intoplaceincluding for a forward-facing child seat.
To lower the head retraints, presson the tab at the base.
To raise them,
pull them upwards
to their maximum height, pressingthe unlocking button.
•
•
CONTROLS FOR PACKLOUNGE HEATED SEATS
The Pack Lounge seats can beheated independently of eachother.
Use the controlsDlocated on theoutside of the seats to select anyof three heating levels:
CONTROLS FOR HEATED
SEATS IN A BENCHSEAT
The rear seats can be heated inde-
pendently of each other.
Use the controlsClocated under
the rear storage tray to activate the
heating.
0: Off.
1:
Slight heat.
2: Medium heat.
3: Maximum heat.
The seat temperature ad
justs auto-matically.Note: The heated seats only operatewhen the engine is running.
Page 101 of 216

99
III
A
BC
D
REAR SEATS
Seat cushion folded.
Stow the head restraints.
Pr
ess the controlA located at theend of the backrest and fully tilt for-
wards.
The benchseat backrest can befolded in two sections. When youreposition the backrest, make sure
that it locks in place.Your vehicle's boot can be kept
isolated from the passen
ger com-
partment.
T
o lock the access to the boot:1.Place the benchseat in its correct position.The red warning lamp oncontrol Ashould no longer be
visible.
2.Insert the ignition key in thelock.3. Lock it.
Before moving the seats
So as to avoid damaging the seat belts by jamming them, takecare to keep them to the sides of the backrest.
LOCKING/UNLOCKING OF THE ACCESS INTO THE BOOT VIA THE REAR BENCHSEATREAR CENTRAL SEAT BELT
For easier opening of the seat beltcover D, you should fi rst raise thecentral head restraint.
Insert the fi rst fasteningC into thefront left hand (black) buckle, then
insert the second fastening B intothe front right hand buckle.
Page 111 of 216

109
III221
2
2
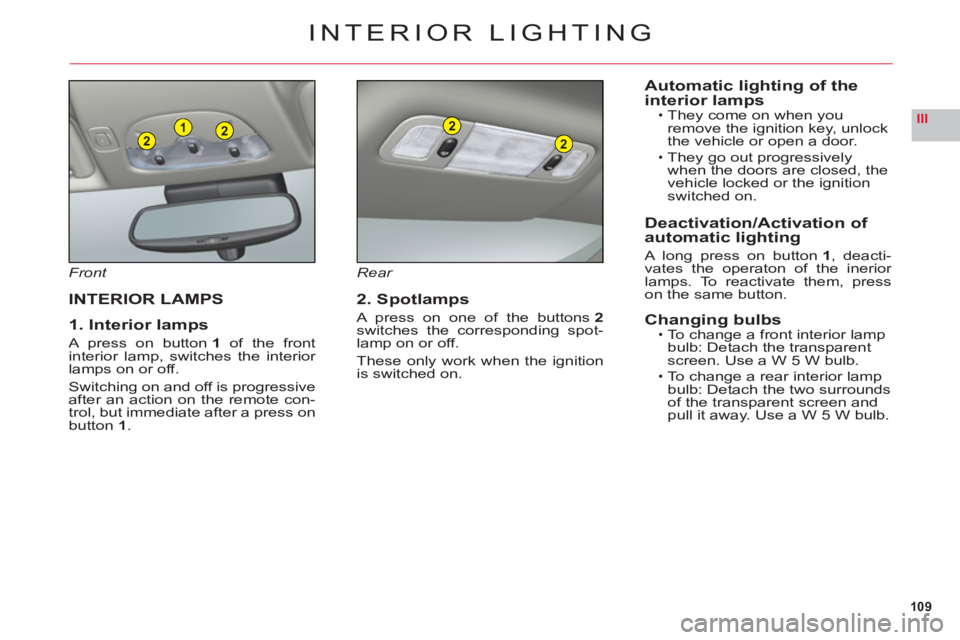
INTERIOR LIGHTING
Front
INTERIOR LAMPS
1. Interior lamps
A press on button 1 of the front
interior lamp, switches the interior lamps on or off.
Switching on and off is progressiveafter an action on the remote con-
trol, but immediate after a press on
button 1.
Rear
2. Spotlamps
A press on one of the buttons2switches the corresponding spot-lamp on or off.
These only work when the ignition
is switched on.
Automatic lighting of the
interior lampsThey come on when you
remove the ignition key, unlock
the vehicle or open a door.
They go out progressively
when the doors are closed, the
vehicle locked or the i
gnitionswitched on.
Deactivation/Activation of
automatic lighting
A long press on button1, deacti-
vates the operaton of the inerior lamps. To reactivate them, presson the same button.
Changing bulbsTo change a front interior lamp
bulb: Detach the transparent
screen. Use a W 5 W bulb.
To change a rear interior lamp bulb: Detach the two surroundsof the transparent screen and pull it away. Use a W 5 W bulb.
•
•
•
•
Page 117 of 216

115
IIIABC
FRONT ARMREST
The armrest gives you extra com-
fort in your driving position.
To optimise
your driving position,lift the control B and push the arm-rest forwards.
Th
e armrest returns to its initialposition when you push it rear-
wards.
Storage areas
Two formatsof storage are avail-able:To have bigstorage in the
armrest, lift the controlC.For smallstorage in the
armrest, lift the controlA.
•
•
Ventilation of the bigstorage in the front armrest
The armrest has aventilation
duct for the big storage.
This benefi ts from the air condi-
tioning at a temperature identical
to the setting for the front of the cabin area. To adjust the air con-
ditioning fl ow, see "Rear automatic
air conditioning".
The ventilation duct can beblocked manually.
INTERIOR COMFORT
USB socket
This connection unit, consisting of
a JACK plug and/or a USB port, islocated in the front armrest.
You can connect portable equip-ment such as an iPod®or a USB®
key.
It reads audio fi le formats (mp3,
ogg, wma, wav, etc.) that it trans-mits to your audio system and areheard through the vehicle’s loud-speakers.
Yo u can control these fi les with
the audio system’s steering wheel
or dashboard controls and displaythem on the multifunction screen.
Portable equipment can berecharged while it is being used.
Page 126 of 216

124
IV
A
D
C
B
BATTERY LOCATION AND
ACCESS
The battery is located in the bootunder the left hand wing trim. To
access the battery, rotate the pin
on the fl ap by a 1/4.
CHANGING THE BATTERY (Contact a CITROËN dealer or a qualifi ed
workshop).
1. Release the two pins on each side at the back of the boot, and remove
the boot fl oor.2. On each side trim, release the two fi xing pinsA.3. Undo the two screws Bon each side and remove the sill embellisher.4. On the side trim close to the battery, release the pin D.5. Separate the side trim close to the battery, pulling hard to free the other fi xing points.
6. Unclip the boot lamp C.7.Disconnect both battery terminals.8. Release the battery from its support.9. Remove the battery.
Before changing or repairing the battery, open all four windows.
If you have to unlock your vehicle with the key because of a problem with the battery, any opening/closingof a door with the window closed may seriously damage the glass to the point of breaking it.
12 V BATTERY
Page 131 of 216

129
IV
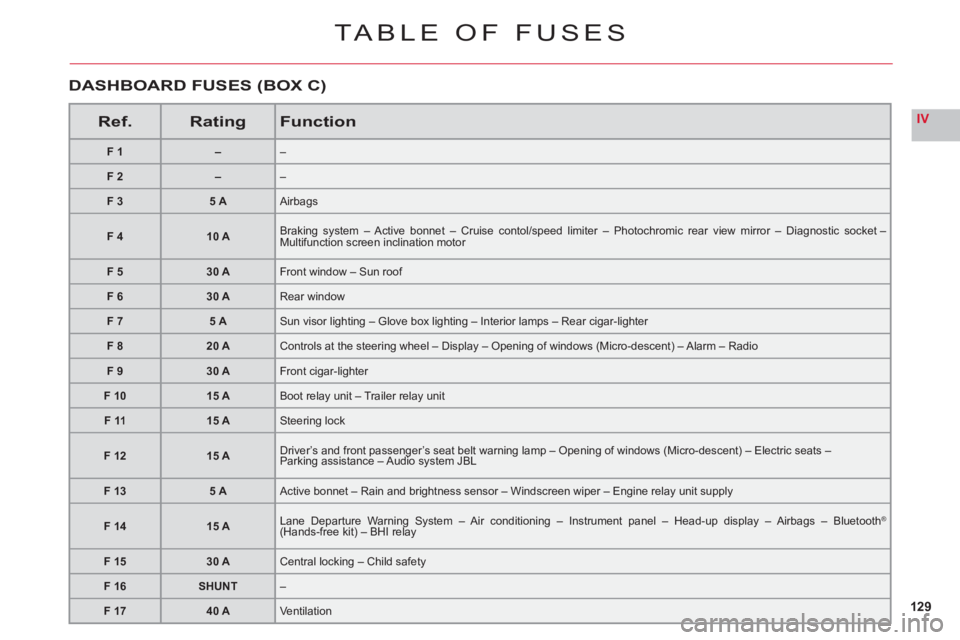
TABLE OF FUSES
Ref.RatingFunction
F1––
F2––
F 35 AAirbags
F 410 ABraking system – Active bonnet – Cruise contol/speed limiter – Photochromic rear view mirror – Diagnostic socket – Multifunction screen inclination motor
F 530 AFront window – Sun roof
F 630 ARear window
F 75 ASun visor lighting – Glove box lighting – Interior lamps – Rear cigar-lighter
F 820 AControls at the steering wheel – Display – Opening of windows (Micro-descent) – Alarm – Radio
F 930 AFront cigar-lighter
F 1015 ABoot relay unit – Trailer relay unit
F 1115 ASteering lock
F1215 ADriver’s and front passenger’s seat belt warning lamp – Opening of windows (Micro-descent) – Electric seats –Parking assistance – Audio system JBL
F 135 AActive bonnet – Rain and brightness sensor – Windscreen wiper – Engine relay unit supply
F 1415 ALane Departure Warning System – Air conditioning – Instrument panel – Head-up display – Airbags – Bluetooth® (Hands-free kit) – BHI relaygg
F 1530 ACentral locking – Child safety
F 16SHUNT–
F 1740 AVentilation
DASHBOARD FUSES (BOX C)
Page 135 of 216

133
VA
A
FUEL
If you should put in fuel that is not suitable for your vehicle'sengine type, it is imperative to have the tank drained beforeyou start the engine again.
While you are refuelling, theengine must be stopped and the
ignition switched off.
When you are seeking to fi ll your
tank, do not persist after the
third cut-off; that could cause
your vehicle to malfunction.
Fuel must be added in quantitiesof more than 5 litres to be reco-gnised by the fuel gauge.
To open the fl ap, press button A. Undo the cap and attach it to the
tab on the inside of the fl ap.
Opening the cap can trigger a
vacuum. This results in a noise caused by the sealing of the fuel circuit.Note: The fuel fl ap is locked when you lock your vehicle with the remote control.
FUEL QUALITY
A label inside the fi ller fl ap tells you
which type of fuel to use.
Quality of the fuel used for Diesel engines
The Diesel engines are perfectlycompatible with biofuels whichconform to current and futureEuropean standards (Diesel fuel
which complies with standard EN
590 mixed with a biofuel whichcomplies with standard EN 14214)which can be distributed at thepumps (possible incorporation of 0
to 7 % Fatty Acid Methyl Ester).
The use of an
y other type of (bio)fuel (vegetable or animal oils,
domestic fuel oil, etc.) is strictlyprohibited (risk of damage to theengine and fuel circuit).
Page 167 of 216

7.17
11
22
33
44
11
22
33
44
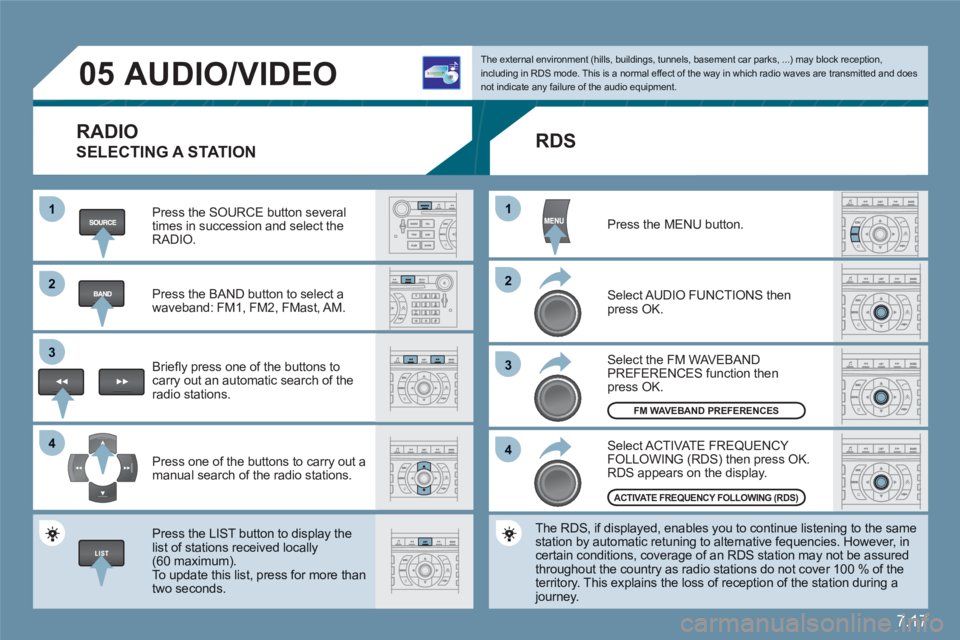
05AUDIO/VIDEO
RADIO
SELECTING A STATION
Press the SOURCE button several times in succession and select theRADIO.
Press the BAND button to select awaveband: FM1, FM2, FMast, AM.
Briefl y press one of the buttons to carry out an automatic search of theradio stations.
Press one of the buttons to carry out a manual search of the radio stations.
Press the LIST button to display the list of stations received locally(60 maximum).
To update this list, press for more than two seconds.
The external environment (hills, buildings, tunnels, basement car parks, ...) may block reception,including in RDS mode. This is a normal effect of the way in which radio waves are transmitted and does not indicate any failure of the audio equipment.
RDS
Select ACTIVATE FREQUENCY FOLLOWING (RDS) then press OK. RDS appears on the display.
Select the FM WAVEBANDPREFERENCES function thenpress OK.
Select AUDIO FUNCTIONS then press OK.
Press the MENU button.
The RDS, if displayed, enables you to continue listening to the samestation by automatic retuning to alternative fequencies. However, in certain conditions, coverage of an RDS station may not be assuredthroughout the country as radio stations do not cover 100 % of the territory. This explains the loss of reception of the station during a journey.
FM WAVEBAND PREFERENCES
ACTIVATE FREQUENCY FOLLOWING (RDS)