2012 CITROEN C6 start stop button
[x] Cancel search: start stop buttonPage 92 of 216

90
III
5
6
7
AUTOMATIC AIR CONDITIONING
5. FRONT DEMISTING - DEICING
Press button 5 for rapidclear windows. The warning lamp comes on. This system controls the air condi-
tioning, the air fl ow and the entry of air from outside. It sends the ventilation towards the windscreen and side
windows.
A press on the 1 button returns you to "AUTO"mode.
6. REAR DEMISTING - DEICING
Press button 6, with the engine running, to start a rapid
deicing or demisting of the rear screen and rear view mirrors. The warning lamp comes on.
This mode stops automatically depending on the out-side temperature. It can be paused by pressing again on button6or by stopping the engine.
In the latter case, demisting will resume when the engine is switched on again.Note:The heated rear screen operates independently of the automatic air conditioning.
7. AIR RECIRCULATION – ENTRY OF AIR
FROM OUTSIDE
Press repeatedly on button7 to select the air entrymode. The corresponding warning lamp lights up:Air intake in automatic pollution control mode (on by default, with automatic comfort regulation).
The automatic mode makes use of an air quality sen-sor. It analyses the air and isolates the cabin from theexterior if the presence of pollutants is detected. In thiscase it automatically activates recirculation of the cabinair.
Please note: this function does not detect and there-fore protect the cabin from unpleasant odours. It is not
active when the ambient temperature is below +5 °C so
as to avoid the risk of misting the vehicle’s windows.
Closing the exterior air intake
Press button 7to close the intake of air from the exterior.
While maintaining the other settings, this position allows
the driver to avoid unpleasant odours and smoke out-
side the vehicle at any time.
It should be cancelled as soon as possible to allowexchange of the cabin air and to avoid misting of
the vehicle’s windows.
Exterior air intake
Press button7once to open the exterior air intake.
•
•
•
Page 96 of 216

94
III
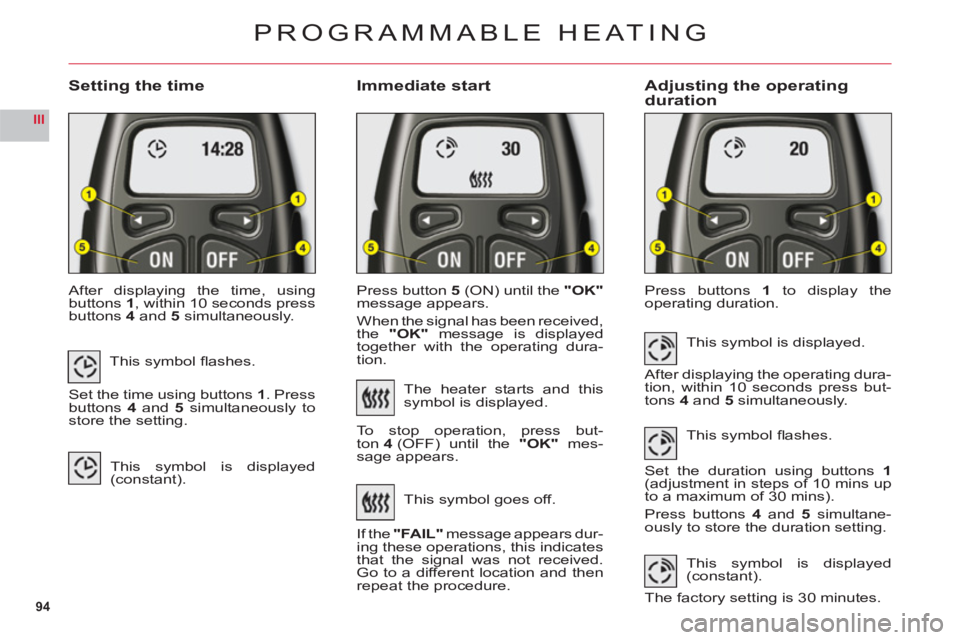
Setting the timeImmediate startAdjusting the operating duration
After displaying the time, usingbuttons1, within 10 seconds pressbuttons4and5 simultaneously.Pr
ess button5(ON) until the "OK"
message appears.
When the si
gnal has been received,
the "OK" message is displayed
together with the operating dura-
tion.Pr
ess buttons1 to display the
operating duration.
PROGRAMMABLE HEATING
This symbol fl ashes.
Set the time using buttons 1. Pressbuttons4and 5 simultaneously tostore the setting.
This symbol is displayed(constant).
The heater starts and this
symbol is displayed.
To stop operation, press but-
t
on 4 (OFF) until the"OK" mes-
sage appears.
This s
ymbol goes off.
I
f the "FAIL"message appears dur-
ing these operations, this indicates
that the signal was not received. Go to a different location and then
repeat the procedure.This s
ymbol is displayed.
After displaying the operating dura-
tion, within 10 seconds press but-
tons 4 and 5 simultaneously.
This s
ymbol fl ashes.
Set the duration using buttons1(adjustment in steps of 10 mins up
to a maximum of 30 mins).
Press buttons 4 and 5 simultane-
ously to store the duration setting.
This symbol is displayed(constant).
The factory setting is 30 minutes.
Page 97 of 216

95
III
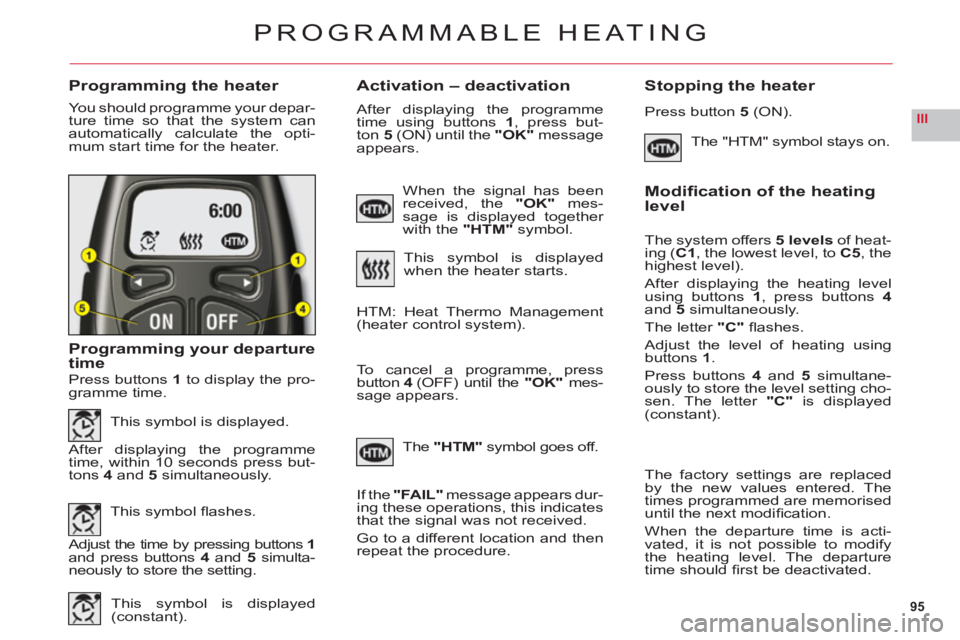
Programming the heaterActivation – deactivation Stopping the heater
You should programme your depar-
ture time so that the system can
automatically calculate the opti-mum start time for the heater.
Programming your departure
time
The "HTM" symbol stays on.
PROGRAMMABLE HEATING
Press buttons 1to display the pro-
gramme time.
This symbol is displayed.
After displaying the programme
time, within 10 seconds press but-
t
ons 4 and 5 simultaneously.
This s
ymbol fl ashes.
Adjust the time by pressing buttons 1and press buttons4 and5 simulta-neously to store the setting.
This s
ymbol is displayed(constant).
When the signal has been received, the"OK" mes-sage is displayed together
with the "HTM"symbol.
This symbol is displayed
when the heater starts.
After displaying the programme
time using buttons 1, press but-
ton 5 (ON) until the "OK"message
appears.
HTM: Heat Thermo Management (heater control system).
To cancel a pro
gramme, press button 4 (OFF) until the"OK"mes-sage appears.
Th
e"HTM"symbol goes off.
If th
e "FAIL"message appears dur-
ing these operations, this indicates
that the signal was not received.
Go to a different location and then
repeat the procedure.
Press button 5(ON).
Modifi cation of the heating level
The system offers5 levels of heat-
ing (C1, the lowest level, toC5, thehighest level).
After displaying the heating levelusing buttons 1, press buttons4and5simultaneously.
The letter "C"fl ashes.
Adjust the level of heating usingbuttons1.
Press buttons 4 and 5 simultane-
ously to store the level setting cho-sen. The letter "C" is displayed(constant).
The
factory settings are replaced
by the new values entered. The
times programmed are memoriseduntil the next modifi cation.
When the de
parture time is acti-
vated, it is not possible to modifythe heating level. The departure
time should fi rst be deactivated.
Page 135 of 216

133
VA
A
FUEL
If you should put in fuel that is not suitable for your vehicle'sengine type, it is imperative to have the tank drained beforeyou start the engine again.
While you are refuelling, theengine must be stopped and the
ignition switched off.
When you are seeking to fi ll your
tank, do not persist after the
third cut-off; that could cause
your vehicle to malfunction.
Fuel must be added in quantitiesof more than 5 litres to be reco-gnised by the fuel gauge.
To open the fl ap, press button A. Undo the cap and attach it to the
tab on the inside of the fl ap.
Opening the cap can trigger a
vacuum. This results in a noise caused by the sealing of the fuel circuit.Note: The fuel fl ap is locked when you lock your vehicle with the remote control.
FUEL QUALITY
A label inside the fi ller fl ap tells you
which type of fuel to use.
Quality of the fuel used for Diesel engines
The Diesel engines are perfectlycompatible with biofuels whichconform to current and futureEuropean standards (Diesel fuel
which complies with standard EN
590 mixed with a biofuel whichcomplies with standard EN 14214)which can be distributed at thepumps (possible incorporation of 0
to 7 % Fatty Acid Methyl Ester).
The use of an
y other type of (bio)fuel (vegetable or animal oils,
domestic fuel oil, etc.) is strictlyprohibited (risk of damage to theengine and fuel circuit).
Page 169 of 216

7.19
22
33
11
55
66
44
COPY CD TO JUKEBOX
COMPLETE CD
STOP COPY
OK
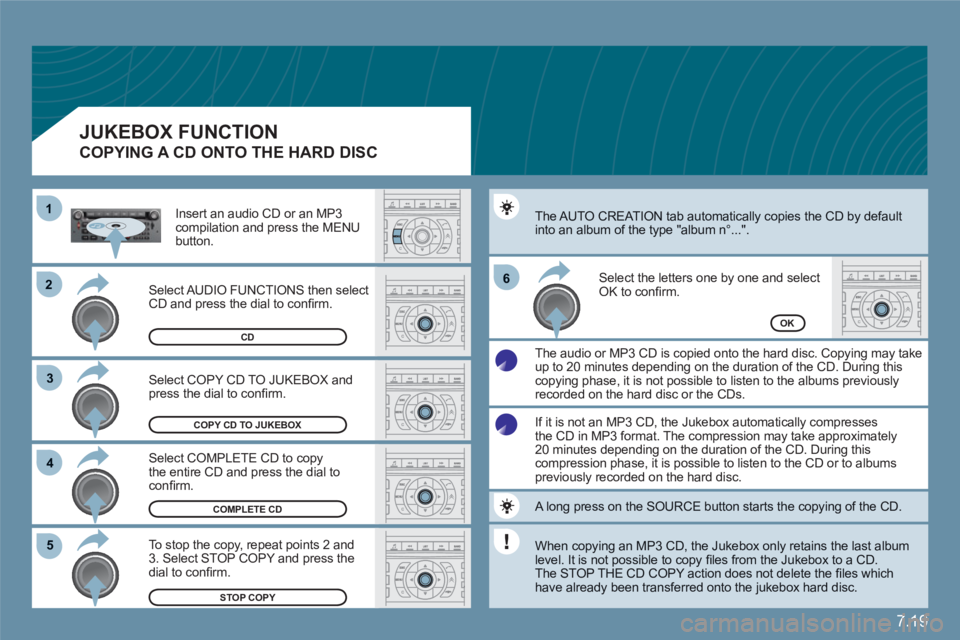
Select COPY CD TO JUKEBOX andpress the dial to confi rm.
Select COMPLETE CD to copy the entire CD and press the dial toconfi rm.
To stop the copy, repeat points 2 and 3. Select STOP COPY and press the dial to confi rm.
The AUTO CREATION tab automatically copies the CD by defaultinto an album of the type "album n∞...".
The audio or MP3 CD is copied onto the hard disc. Copying may take up to 20 minutes depending on the duration of the CD. During this copying phase, it is not possible to listen to the albums previously recorded on the hard disc or the CDs.
Select the letters one by one and select OK to confi rm.
If it is not an MP3 CD, the Jukebox automatically compressesthe CD in MP3 format. The compression may take approximately20 minutes depending on the duration of the CD. During thiscompression phase, it is possible to listen to the CD or to albumspreviously recorded on the hard disc.
A long press on the SOURCE button starts the copying of the CD.
When copying an MP3 CD, the Jukebox only retains the last album level. It is not possible to copy fi les from the Jukebox to a CD.
The STOP THE CD COPY action does not delete the fi les which have already been transferred onto the jukebox hard disc.
Select AUDIO FUNCTIONS then selectCD and press the dial to confi rm.
Insert an audio CD or an MP3 compilation and press the MENUbutton.
JUKEBOX FUNCTION
COPYING A CD ONTO THE HARD DISC
CD
Page 182 of 216

7.32
2 1
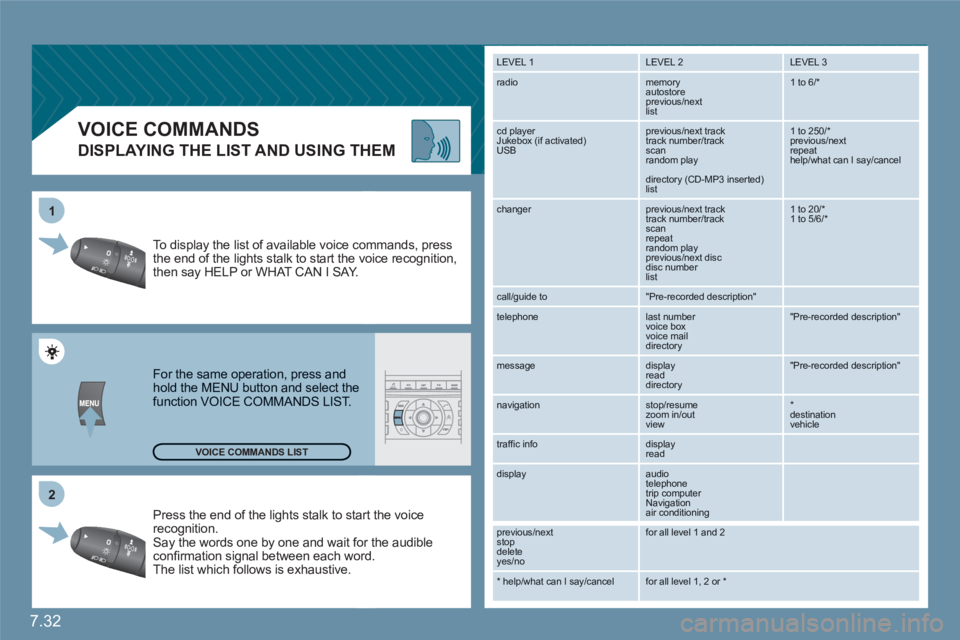
VOICE COMMANDS
DISPLAYING THE LIST AND USING THEM
Press the end of the lights stalk to staart the voicerecognition. Say the words one by one and wait foor the audibleconfi rmation signal between each woord.
The list which follows is exhaustive.
To display the list of available voice coommands, press the end of the lights stalk to start the vvoice recognition,then say HELP or WHAT CAN I SAY.
For the same operation, press and hold the MENU button and select the function VOICE COMMANDS LIST.
LEVEL 1
LEVEL 2 LEVEL 3
radio memory autostore
previous/next list
1 to 6/*
cd player
Jukebox (if activated) USB
previous/next track
track number/track scan
random play
directory (CD-MP3 inserted) list
1 to 250/* previous/next repeat help/what can I say/cancel
changer
previous/next track
track number/track scan
repeat
random play previous/next disc disc number list
1 to 20/* 1 to 5/6/*
call/guide to
"Pre-recorded description"
telephone
last number
voice box
voice mail
directory
"Pre-recorded description"
message
display
read directory
"Pre-recorded description"
navigation
stop/resume
zoom in/out
view
*destination vehicle
traffi c info display
read
display audio
telephone
trip computer
Navigation
air conditioning
previous/next
stop delete
yes/no
for all level 1 and 2
* help/what can I say/cancel for all level 1, 2 or * VOICE COMMANDS LIST
Page 190 of 216

7.40
QUESTION SOLUTIONRESPONSE
The TRAFFIC INFO box is ticked. However, certain traffi c jams along the route are notindicated in real time.
On starting, it is several minutes before the system begins to receive the traffi c information.Wait until the traffi c information is being receivedcorrectly (displaying of the traffi c information symbols on the map).
In certain countries, only major routes (motorways, ...) are listed for the traffi c information.
The time taken tocalculate a routesometimes seems longer than usual.
This phenomenon is normal. The system isdependent on the traffi c information available.
The performance of the system may slow down temporarily if a CD is being copied onto the Jukebox at the same time as a route is beingcalculated.
Wait until the CD has been copied or stop thecopying before starting the guidance function.
Does the emergency call function work without aSIM card ?
No, European regulations impose the presence of a SIM card in order tomake an emergency call. Insert a valid SIM card in the slot on the system.
My SIM card is not recognised.
The system accepts 3.3V SIM cards, the old 5V and 1.8V SIM cards are not recognised. Contact your telephone operator.
The altitude is notdisplayed. On starting, the initialisation of the GPS may take up to 3 minutes toreceive more than 4 satellites correctly.
Wait until the system has started up completely. Check that there is a GPS coverage of at least 4 satellites (long press on the MENU button, thenselect AUDIO/TELEPHONE DIAGNOSTICS,then GPS COVERAGE).
Depending on the geographical environment (tunnel, ...) or the weather, the conditions of reception of the GPS signal may vary.
This phenomenon is normal. The system isdependent on the conditions of reception of theGPS signal.
Page 208 of 216

7.58
QUESTION SOLUTION ANSWER
The stored stations donot function (no sound,87.5 Mhz is displayed...)
An incorrect waveband is selected.
Press the BAND AST button to return to the waveband (AM, FM1, FM2, FMAST) on which thestations are stored.
The traffi c announcement (TA) is displayed. I do not receive any traffi c information.
Tune to a radio station which broadcasts traffi cinformation. The radio station is not part of the regional traffi c information network.
The quality of receptionof the radio stationlistened to graduallydeteriorates or the stored stations donot function (no sound, 87.5 Mhz isdisplayed...).
The vehicle is too far from the transmitter used by the station listened to or there is no transmitter in the geographical area through which the vehicleis travelling.
The environment (hills, buildings, tunnels, basement car parks...) block reception, including in RDS mode.
The aerial is absent or has been damaged (for example when goingthrough a car wash or into an underground car park).
Activate the RDS function to enable the systemto check whether there is a more powerful transmitter in the geographical area.
This phenomenon is normal and does notindicate a failure of the audio equipment.
Have the aerial checked by a CITROÀN dealer.
Sound cut-outs of 1to 2 seconds in radio mode.
During this brief sound cut-out, the RDS searches for any frequencypermitting better reception of the station.
Deactivate the RDS function if the phenomenonis too frequent and always on the same route.
With the engine off, the audio equipmentswitches off after a few minutes of use.
When the engine is switched off, the audio equipment operating time depends on the battery charge.The switch-off is normal: the audio equipment switches to economy modeand switches off to prevent discharging of the vehicle's battery.
Start the vehicle's engine to increase the batterycharge.
The message "the audiosystem is overheated"appears on the display.
Switch the audio system off for a few minutes to allow the system to cool.In order to protect the installation if the surrounding temperature is too high,the audio equipment switches to an automatic thermal protection modeleading to a reduction of the volume or stopping of the playing of the CD.