2012 CITROEN C6 DAG ECU
[x] Cancel search: ECUPage 62 of 216

60
II
21
M
MEMORISAT ION
DRIVING POSITIONS MEMORISED VIA
BUTTONS 1 AND 2
To memorise a driving position:a. Place the igntion key in "Drive"position (second posi-
tion).b. Make your adjustments of the
seat, the steering wheel, the
rear view mirrors and theHead-up Display.c. Press successively on but-
tonMthen on button1(fi rst driving position) or 2(second driving position).
The memorisation is confi rmed by
a sound signal.Note: The memorisation of a new driving position cancels and replaces the previous one. Th
e memorisation function allowsto make the following dashboard
adjustments:Driver's seat
Steering wheelExterior rear view mirrors
Head-up display.
See "Steering column adjustment","Rear view mirrors" and "Head-up
Display".
You have the possibility to memo-rise two driving positions usingbuttons1and2.
•
••
•
RECALL OF A MEMORISEDDRIVING POSITION
Vehicle stationary (ignition
on or engine running)
Press briefl y on button1 or 2 torecall the corresponding memo-rised position.
The completion of the adjustments
is confi rmed by a sound signal.
Vehicle in motion
Keep button 1or 2pressed down
to recall the corresponding memo-rised position.Note: After a few consecutiverecalls of a memorised driving position, the function deactivates until the engine is started.
Page 100 of 216

98
III
1
2
REAR SEATS
FOLDING BENCHSEAT
The whole or just part of the benchseat can be folded. It is necessary to remove the head restraints.
Seat cushion
Use the strap to lift the seat cushion, then rest it against the front seat back-rests. When repositioning the seat cushion, make sure that the seat belt buckles are correctly in place.
FLAP FOR TRANSPORT OFLONG OBJECTS
A fl ap in the backrest, located to
the rear of the armrest, facilitates
the carr
ying of long objects.
Before installing any long objects,
fold the interior blind and thenmake sure that the loads areproperly secured, not obstructingthe movements of the gear lever.
This fl ap can be concealed b
y meansof a foldable cover with a tab.
Page 105 of 216

103
III
CHILD RESTRAINTS
CHILD SEATS SECURED BY MEANS OF THE VEHICLE
SEAT BELT
In conformity with European law,
this table shows you the possibili-
ties for the installation of univer-sally approved child seats using aseat belt, depending on the weightof the child.
Consult "User Precautions", chap-ter on "Child Safety" at the end of this handbook, in order to ensurethat you are installing your child inconditions of maximum safety.
Seat position(s)
Weight of child
Up to 10 kgand up to 13 kg(groups 0 and 0+)
9 - 18 kg (group 1)15 - 25 kg(group 2)22 - 36 kg(group 3)
Front passenger’s (a)U (R)U (R)U (R)U (R)
Lateral rearUUUU
Central rearL1XL3L3
In the front passenger's seat position, it is imperative to deactivate the front passenger's airbag if you are installing a "rear-facing child seat" there. Otherwise the child risks being killed or seriously injured should the airbag deploy.
Take care to comply with the fi tting instructions given in the child seat manufacturer’s installation guide.
U: Seat position suitable for the installation of a universal rear-facing child
seat and a universal forward-facing child seat position.
U (R): Seat position suitable for installation of a universal rear-facing child
seat and of a forward-facing seat. The vehicle seat should be adjusted to
the highest position.
(a): In the front passenger's seat position, it is imperative to deactivate the
front passenger's airbag if you are installing a "rear-facing child seat" there.Otherwise the child risks being killed or seriously injured should the airbagdeploy.
Before placin
g your child in the front passenger’s seat position, consult thelegislation currently in force in your country on the carrying of children in this
position.
L-:
Only the child seats indicated may be installed in the seat positionconcerned (depending on country).
X: Position not suitable for installation of a child seat of the weight groupindicated.
Page 106 of 216

104
III
ab
ab
Pack Lounge seats
ISOFIX ANCHORINGPOINTS AND THE ISOFIX
FASTENING SYSTEM
Your vehicle is type-approvedaccording to new ISOFIX direc-
tives. The lateral rear seats of your vehicle are each equipped
with regulation ISOFIX anchoringpoints.
Incorrect installation of a child seat
in a vehicle compromises protec-
tion of the child in the event of a col-lision. The ISOFIX system enablesyou to minimise the risks posed byincorrect fi tting. The ISOFIX fas-
tening system gives you a conven-
ient, strong and reliable fi tting for achild seat in your vehicle.B
enchseat
The ISOFIX fastening
system
The ISOFIX system features3ringsfor each lateral rear seat position:Two bottom rings aandblocated between the backrestand the seat cushion. These are about 28 cm apart,concealed in the case of a
benchseat under a fl ap with the
logo
ISOFIX.
One top ring c fi xed on the rear shelf,concealedunder a fl ap
with the logo
TOP TETHERbehind the head restraint.
•
•
The ISOFIX child seat
fastening system
ISOFIX child seats have two latches
which are easy to secure on the two
bottom rings aandb.
Some ISOFIX child seats also have
a top belt which is for attaching on
the ISOFIX top ringc.
To attach the top belt, raise thehead restraint of the vehicle seat,
then pass the buckle between the
two su
pports. Next fi x the buckle
on the top ringc and tension thetop belt.
This fi xing system is intended for children weighingup to 18 kg.
The ISOFIX child seats that can beinstalled in your vehicle are given
in the table opposite.
CHILD RESTRAINTS
Page 107 of 216

105
III
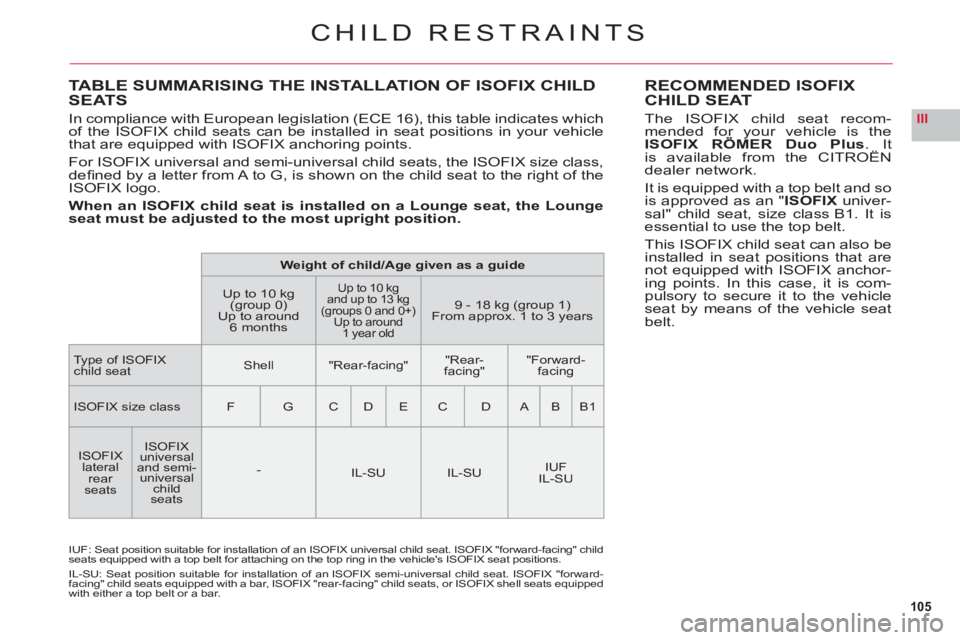
TABLE SUMMARISING THE INSTALLATION OF ISOFIX CHILD
SEATS
In compliance with European legislation (ECE 16), this table indicates which
of the ISOFIX child seats can be installed in seat positions in your vehicle
that are equipped with ISOFIX anchoring points.
For ISOFIX universal and semi-universal child seats, the ISOFIX size class,
defi ned by a letter from A to G, is shown on the child seat to the right of the
ISOFIX logo.
When an ISOFIX child seat is installed on a Loun
ge seat, the Lounge
seat must be adjusted to the most upright position.
RECOMMENDED ISOFIX
CHILD SEAT
The ISOFIX child seat recom-mended for your vehicle is theISOFIX RÖMER Duo Plusy. It
is available from the CITROËNdealer network.
It is equipped with a top belt and so
is approved as an "ISOFIX univer-sal" child seat, size class B1. It isessential to use the top belt.
This ISOFIX child seat can also beinstalled in seat positions that arenot equipped with ISOFIX anchor-
ing points. In this case, it is com-pulsory to secure it to the vehicleseat by means of the vehicle seatbelt.
IUF: Seat position suitable for installation of an ISOFIX universal child seat. ISOFIX "forward-facing" child
seats equipped with a top belt for attaching on the top ring in the vehicle's ISOFIX seat positions.
IL-SU: Seat position suitable for installation of an ISOFIX semi-universal child seat. ISOFIX "forward-
facing" child seats equipped with a bar, ISOFIX "rear-facing" child seats, or ISOFIX shell seats equipped
with either a top belt or a bar.
Weight of child/Age given as a guide
Up to 10 kg(group 0)Up to around 6 months
Up to 10 kg and up to 13 kg(groups 0 and 0+)Up to around 1 year old
9 - 18 kg (group 1)From approx. 1 to 3 years
Type of ISOFIXchild seatShell"Rear-facing""Rear-facing""Forward-facing
ISOFIX size classFGCDECDABB1
ISOFIX lateral rear seats
ISOFIX universaland semi-universalchildseats
-IL-SUIL-SUIUFIL-SU
CHILD RESTRAINTS
Page 115 of 216

113
III
INTERIOR COMFORT
CIGAR-LIGHTER
Front ci
gar-lighter
The front cigar-lighter is on thecentral console.
Rear cigar-lighter
The two rear cigar-lighters are on
the central console below the air
vents.
Operation
The cigar lighter operates when
the ignition is on.
Push in and wait a few moments.
The cigar lighter will release auto-
matically: gradually emerging for easy removal.Note: The cigar lighter makes use
of the 12 V accessory socket.
Driver's fl oor mat
If taking out the fl oor mat on the
driver's side, slide the seat rear-
wards as
far as it will go andremove the fi xings.
When re
fi tting, position the fl oor mat correctly on the pins, then
attach the fi xings. Check that it issecurely retained.
To avoid
your feet becomingjammed under the pedals:Use only a fl oor mat that issuited to the fi xings, already present in the vehicle.
The use o
f these fi xings isessential.
Never fi t more than one fl oor
mat superimposed.
ï
ï
Page 122 of 216

120
IV
A
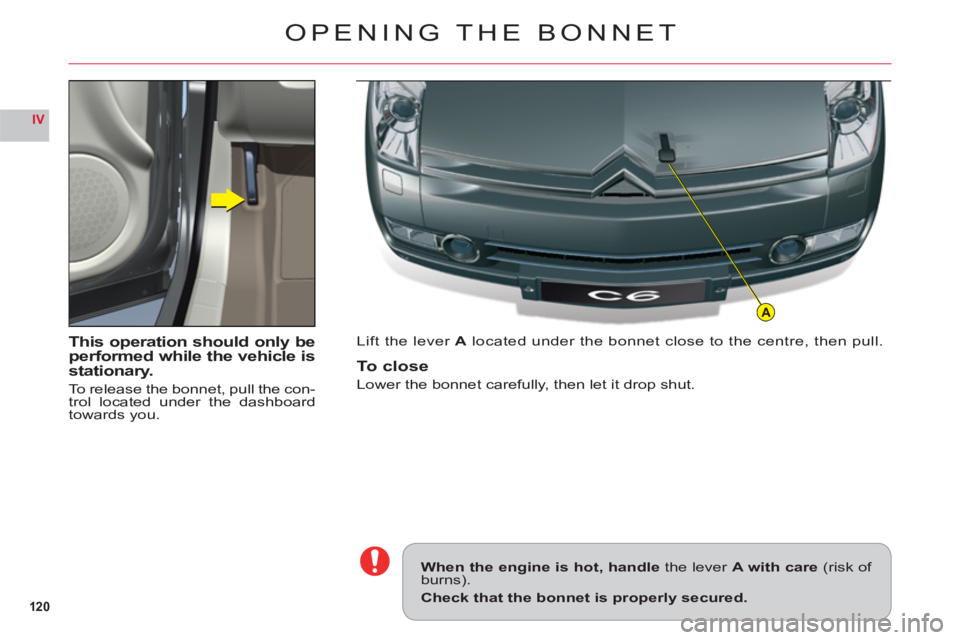
This operation should only be
performed while the vehicle is
stat
ionary.
To release the bonnet, pull the con-
trol located under the dashboardtowards you.
Lift the leverA located under the bonnet close to the centre, then pull.
To close
Lower the bonnet carefully, then let it drop shut.
When the engine is hot, handle the lever A with care(risk of burns).
Check that the bonnet is properly secured.
OPENING THE BONNET
Page 128 of 216

126
IV
BC
A
i
12 V BATTERY
STARTING THE ENGINE WITH AN ASSISTING BATTERY
If the battery is discharged, it is possible to use either
a separate emergency battery or a battery on another
vehicle.
If you use the battery on another vehicle, stop the engine on the latter. The two vehicles must not come
into direct contact with each other.
Check that the assisting battery has suffi cient voltage (12 V).
Connect the cables according to the orderindicated in rthe diagram.
A Pole "+" on the vehicle being assisted (under the
red cover).
B Assisting battery.C Pole"-" on the assisted vehicle (under the bonnet).
Check that the leads are well secured (risk of sparks).
Start the engine of the assisting vehicle. Let the engine
run for around 1 minute at a slightly accelerated idle.
Operate the starter on the vehicle being assisted.
It is essential to follow the indicated sequencecorrectly.
Never approach with a fl ame or create sparks in the vicinity of the battery (explosive gas).
The battery contains dilute sulphuric acid which is highly corrosive.
When handling batteries, always protect your face and especially your eyes.
In the event of any contact with the skin, rinse immediately with copious amounts of fresh water.
ADVICE
Do not touch the leads during the operation.
Do not lean over the batteries.
Disconnect the cables in reverse order, making sure
they do not touch together.