2012 CITROEN C6 DAG light
[x] Cancel search: lightPage 83 of 216

81
II
DIESEL PARTICULATE FILTER SYSTEM
In addition to the catalytic converter, this fi lter contributes actively to the preserving of air quality, by collecting thepolluting particles that have not been burnt off. Black exhaust fumes are thus eliminated.
Simultaneous lighting of the SERVICEand depollution system warning lamps indicates an
increased risk of clogging.
Contact a CITROËN dealer or a qualifi ed workshop as soon as possible.
DIESEL ADDITIVE LEVEL
If the additive level is low, it is necessary to top up the additive level.
Contact a CITROËN dealer or a qualifi ed workshop as soon as possible.
CLOGGING OF THE PARTICLE FILTER
Clogging is caused by the particle fi lter starting to be saturated (owing to exceptionally long periodsspent driving in urban conditions: low speeds, traffi c jams, etc.).
In order to re
generate the fi lter you are advised to drive as soon as possible, when traffi c conditions allow, at a speedof 60 km/h (37 mph) or more for at least 5 minutes. If the problem persists, contact a CITROÀN dealer or a qualifi edgyp,,p
workshop.Note: If the vehicle has been running for long periods at very low speeds or at idle, vapour emissions may be seencoming from the exhaust under acceleration. These have no consequences for the running of the vehicle or for theenvironment.
Page 84 of 216

82
III
LOCKING/UNLOCKING
FROM THE INSIDE
A press on the controlA operates
the electric central locking andunlocking, provided all the doorsare closed.
It is still possible to open the doorsfrom the inside.
Remark: Control Ais inactive if
the vehicle has been locked usingthe remote control or the key.
The three statuses
for locking/unlocking the vehicle are signalledby the warning lamp on the con-
trol A:It fl ashes when the vehicle is
locked, engine stopped.
It lights up when the ignition is switched on, vehicle locked.It goes out when the vehicle is unlocked.
ï
ï
ï
ACCESS
ANTI-THEFT PROTECTION
When you start the vehicle, doors
and boot closed, the system
automatically locksthe doorsas soon as you reach a speed of
around 10 km/h (6 mph).Note: If a door has been opened,this will lock again automatically when the vehicle reaches approx.10 km/h (6 mph).
Activation/Deactivation of
the anti-intrusion protection
Give a long press on control Afor central locking until you see a mes-sage displayed.ANTI-THEFT
The boot locks automatically as soon as the vehicle reaches a
speed of around10 km/h (6 mph).Note: The opening of a door or use of the control A unlocks the vehicle.
Your vehicle is fi tted with doors that have frameless windows. When you open the doors, immediately youaction the exterior handle, a micro-descent device on the SIDE WINDOWS lowers the glass slightly.
If this device were not working properly, it could result in thewindows breaking:If there should be a battery failure:
Open the doors gently.Do not close the door abruptly as this risks breaking the window, if possible wait until the battery ispowering the vehicle again.If you are intending to work on the battery, open the windows fi rst.In freezing conditions, ice may form to hinder the operation of the micro-descent device. If the actionon the door handle does not move the window down, it is essential fi rst to free the ice.
ï
--
-ï
Page 87 of 216

85
III
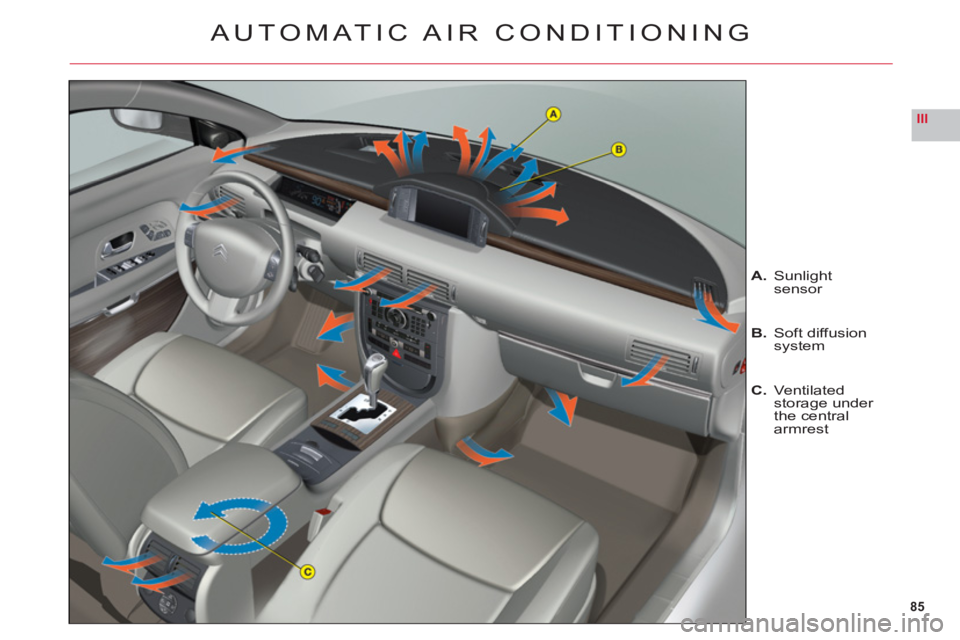
AUTOMATIC AIR CONDITIONING
A.Sunlightsensor
B.Soft diffusion system
C.Ventilated storage under
the centralarmrest
Page 88 of 216

86
III
AUTOMATIC AIR CONDITIONING
AIR CONDITIONING
This system automatically adjusts the temperature, the fl ow of air and the distribution of air inside the cabin,
depending on your desired comfort level.
Provided
you retain automatic mode (by pressing button "AUTO") and all the air vents are open, you will main-
tain an optimum comfort level, also removing humidity
and misting, whatever the ambient climatic conditions.
The temperature inside the cabin cannot be lower than
the temperature outside if the air conditioning is not
operating.
To be e
ffective, the air conditioning should only be used
with the windows closed. If after a lengthy stop in bright sunlight the interior temperature is excessive, air the passenger compartment by opening the windows for a
few moments, then close them again.
To keep the air conditioning compressor well sealed,
it is essential to operate the air conditioning at least
once every month.
The air conditionin
g operates by using power from the engine. This results in a slight increase in fuel con-sumption.
Sensors
The automatic regulation of the air conditioning inside
the cabin makes use of a number of sensors, relieving you of the need to make adjustments, other than the desired cabin temperature.
Take care not to obstruct sensor A.
Air inlet
Check that the exterior grille for the air inlet, at the
bottom of the windscreen, is clean and free of dead
leaves, snow, etc.
If washing the vehicle with a high pressure jet, avoid
targeting the air inlet zone.
Air circulation
For your comfort we advise you to maintain a proper
distribution of air within the cabin, both at the front andat the rear.
Th
e air vents to the face have thumbwheels so thatyou can adjust the fl ow of air, and grilles to orient thedirection.
There are air vents on the fl oor underneath the frontseats and on the rear control panel, for enhanced heat-
ing of the rear seat positions.
Do not obstruct the air outlets located in the boot area.
Dust/pollen fi lter
There is a fi lter for excluding pollen and dust.
This
fi lter has to be changed according to the vehicle
maintenance schedule. See "Maintenance and WarrantyGuide".
Page 89 of 216

87
III
1
2a2b1
3a3b4
765
AUTOMATIC AIR CONDITIONING
The system has a differentiated adjustment for the driver's side and passenger's side, in terms of temperature andair distribution. The air fl ow is common to both sides.
Symbols and messages relating to the automatic air conditioning controls will display on the multifunction screen.
2. TEMPERATURE ADJUSTMENT
To adjust the temperature, press button 2a for the driver'sside and button 2b for the passenger's side.
An ad
justment around 21 will give you the optimumcomfort level. However, depending on your preferences
anywhere between 18 and 24 is quite usual.
Operating the air conditioning system on"AUTO"guar-
antees good ventilation inside the cabin.Note:there may be a difference between the actual
cabin temperature and the fi gure displayed.
This is the normal operatin
g mode for the system. Depending on the temperature chosen, a press on this
button, confi rmed by the lighting of the warning lamp,
will automatically and simultaneously bring all the fol-lowing functions into play:Air fl ow.
Cabin temperature.
Air distribution.Exterior air intake/Air recirculation.
It is recommended to keep all the air vents open. Just by pressing any of the buttons, except for temperature 2aand 2b, you can change to manual mode. The warning lamp goes off, and the automatic air intake function is deactivated.
•
•
••
1. AUTOMATIC OPERATION
Page 92 of 216

90
III
5
6
7
AUTOMATIC AIR CONDITIONING
5. FRONT DEMISTING – DEICING
Press button 5 for rapidclear windows. The warning lamp comes on. This system controls the air condi-
tioning, the air fl ow and the entry of air from outside. It sends the ventilation towards the windscreen and side
windows.
A press on the 1 button returns you to "AUTO"mode.
6. REAR DEMISTING – DEICING
Press button 6, with the engine running, to start a rapid
deicing or demisting of the rear screen and rear view mirrors. The warning lamp comes on.
This mode stops automatically as a function of the out-side temperature. It can be paused by pressing again on button6or by stopping the engine.
In the latter case, demisting will resume when the engine is switched on again.Note:The heated rear screen operates independently of the automatic air conditioning.
7. AIR RECIRCULATION – ENTRY OF AIR
FROM OUTSIDE
Press repeatedly on button7 to select the air entrymode. The corresponding warning lamp lights up:Air intake in automatic pollution control mode (on by default, with automatic comfort regulation).
The automatic mode makes use of an air quality sensor.It analyses the air and isolates the cabin from the exterior
if the presence of pollutants is detected. In this case it
automatically activates recirculation of the cabin air.
Please note: this function does not detect and there-fore protect the cabin from unpleasant odours. It is not
active when the ambient temperature is below + 5 °C so
as to avoid the risk of misting the vehicle’s windows.
Closing the exterior air intake
Press button 7to close the intake of air from the exterior.
While maintaining the other settings, this position allows
the driver to avoid unpleasant odours and smoke out-side the vehicle at any time.
It should be cancelled as soon as possible to allowexchange of the cabin air and to avoid misting of
the vehicle’s windows.
Exterior air intake
Press button7once to open the exterior air intake.
•
•
•
Page 94 of 216

92
III
A
B
C
D
AUTOMATIC OPERATION
Activation
When you press buttonA, the
automatic mode automatically andsimultaneously controls theair
fl ow andair distribution for therear air conditioning.
The warning lamp on buttonAlights up.
It is recommended to keep both air
vents open.
Deactivation
A press on any of the buttons B,C or D, deactivates the automatic operation of the rear air conditioning.
The warning lamp on button Agoes out.
Note: If the air conditioning in the front of the cabin is stopped (func-
tion deactivated in the "Air condi-
tioning" menu or via the control4for adjusting the air fl ow), then the
rear automatic air conditioning is
not available.
ADJUSTING THE AIR FLOW
If you press buttons Bor Dyou increase or decrease the fl ow for
the rear air conditioning.
The number of diode
(s) lit up, composing the symbol for air fl ow (helix, situated between buttons Band D) expresses its power level.
To deactivate the air fl ow and air distribution for the rear air condi-
tioning, press successively on but-
ton Dso that all the diodes go out.
DISTRIBUTION TO FOOT-
WELLS/HEADS
Successive presses on buttonCwill modify the distribution of theair fl ow.
Three directions are available:Passengers' heads.
Passenger footwells.
Passengers' heads and
footwells.
The arrow lit up indicates the dis-
tribution of air chosen manually. In"AUTO"mode, no arrow lights up.
ADJUSTMENT OF THE
FLOW OF AIR INTO THE
STORAGE UNDER THE
FRONT CENTRAL
ARMRE
ST
If you choose a maximum fl ow
of air in the rear by pressingBand distribution towards passen-ger's heads by pressingC, havingclosed the rear air vents, you willobtain a maximum fl ow of air intothe storage beneath the armrest.
ï
ï
ï
REAR AUTOMATIC AIR CONDITIONING
The temperature of the air distributed in the rear of the cabindepends on that chosen for the front. The air fl ow and air distribution in the rear of the cabin are infl uenced by the adjustments made for the front.
Page 99 of 216

97
IIIC
D
REAR SEATS
REAR HEAD RESTRAINTS
The rear head restraints have twopositions:A stowed position for when theseat is not occupied.
A deployed position for safety
of passengers, locking intoplaceincluding for a forward-facing child seat.
To lower the head retraints, presson the tab at the base.
To raise them,
pull them upwards
to their maximum height, pressingthe unlocking button.
•
•
CONTROLS FOR PACKLOUNGE HEATED SEATS
The Pack Lounge seats can be heated
independently of each other.
Use the controlsDlocated on theoutside of the seats to select anyof three heating levels:
CONTROLS FOR HEATED
SEATS IN A BENCHSEAT
The rear seats can be heated inde-
pendently of each other.
Use the controlsClocated under
the rear storage tray to activate the
heating.
0: Off.
1: Slight heat.
2: Medium heat.
3: Maximum heat.
The seat temperature adjusts auto-matically.Note: The heated seats only ope-rate when the engine is running.