Page 25 of 208
23
Access
READY TO GO
2
From inside
Pull the handle towards you to open
the left-hand door.
Opening to approximately 180°
A check strap system permits
extension of the opening from
approximately 90° to approximately
180°.
Pull the yellow control when the door
is open.
The check strap will engage again
automatically on closing. When parked with the
rear doors open to 90°,
the doors mask the rear
lamps. To signal your
position to other road
users driving in the same
direction who may not
have seen your vehicle,
use a warning triangle
or other device required
by the legislation in your
country.
Page 26 of 208

24
Access
REAR ROOF FLAP
This rear roof fl ap is only compatible
with the hinged doors.
To open the rear roof fl ap:
- raise the black paddle of the toggle,
- relieve the toggle by pressing the
rear roof fl ap (downwards) then
release the hook,
- lift the rear roof fl ap,
- pass the point of resistance to
secure the rear roof fl ap using
the support struts.
Support bar
A support bar is provided for
transporting long loads, after opening
the rear roof fl ap.
Fold back the support bar by lifting
the lever.
Support it to the door pillar.
Support the long loads to be
transported, lift them and reposition the
support bar with one hand.
Ensure that it is secured correctly by
pressing the handle downwards past
the point of resistance and secure the
loads fi rmly. The rear bumper has been
reinforced to serve as a footrest
when entering the vehicle.
Never drive without the support
bar in place.
The rear doors only lock when the
support bar is installed.
When the rear roof fl ap is open, take
care when driving where height is
restricted.
Never rest loads directly on the rear
doors.
Comply with the usual indications, to
warn other drivers. The side supports can be used as
hooking points.
- lower the black paddle to secure
the rear roof fl ap.
Securing the rear roof fl ap places it
on the seal correctly and guarantees
sealing without noise.
To close the rear roof fl ap:
- check that the support bar is
secured correctly,
- lower the rear roof fl ap,
- while pressing the rear roof fl ap
(downwards), take hold of the
two loops of the spring then place
the hook in its housing,
Page 27 of 208

25
Access
READY TO GO
2
TAILGATE
From outside
Locking/unlocking is by means of the
remote control.
To open, press the control below the
trim then raise the tailgate.
A pull strap is available to close the
tailgate in the high position.
Guide the closing of the tailgate to the
balance point of its travel then apply
a fi nal press on the tailgate to close it
fully.
From inside
Emergency control
In the event of a central unlocking
operating fault, this permits unlocking
of the tailgate from the inside.
Insert a small screwdriver in the
opening, between the door and the
fl oor. To unlock the lock, move the
catch to the left then push the tailgate.
Tailgate screen
The opening rear screen allows you to
access the rear of the vehicle directly,
without having to open the tailgate.
Opening
After unlocking the vehicle using the
remote control or the key, press the
control and raise the rear screen
to open it.
Closing
Close the rear screen by pressing
the centre of the glass until it is fully
closed.
The tailgate and tailgate screen cannot
both be open at the same time, to
prevent damage to the screen.
Page 28 of 208

26
Access
The control switch LED:
-
fl ashes when the doors are locked with
the vehicle stationary and the engine off,
- comes on when the doors are
locked and from the time the
ignition is switched on.
CENTRAL LOCKING
Cab and load space
Load space
Locking while driving
When the vehicle moves off, as soon
as you reach approximately 6 mph
(10 km/h), the system locks the doors.
The characteristic central locking noise
is heard. The LED in the control switch
on the dashboard central switch panel
comes on.
During the journey, opening a door
results in complete unlocking of the
vehicle.
In the event of a serious impact, the
doors are unlocked automatically
to permit access by the emergency
services.
Anti-intrusion protection
An initial press locks the front
and rear doors, when they
are closed.
A second press unlocks the
vehicle.
The control switch is inactive when
the vehicle has been locked using
the remote control or the key from the
outside.
Activating/deactivating the function
With the ignition on, press
and hold this switch to
activate or deactivate the
function.
Door open warning lamp
If this warning lamp comes
on, check that all of your
vehicle's doors are closed
correctly.
Press to lock/unlock the rear
doors without changing the
locking status of the cab.
The doors can still be opened
from the inside.
Page 29 of 208
READY TO GO
22
Instruments and controls
INSTRUMENTS AND CONTROLS
INSTRUMENT PANEL
Dials
1.
Distance recorder in kilometres/
miles.
2.
Screen.
3.
Fuel level, coolant temperature.
4.
Rev counter.
5.
Trip distance recorder/service
indicator zero reset.
6.
Instrument panel lighting dimmer.
Displays
- Speed limiter/cruise control.
- Kilometres/Miles travelled.
- Service indicator, engine oil level
indicator, total kilometres/miles.
- Presence of water in the diesel
fi lter.
- Diesel pre-heating.
Screens
The information is presented on board
the vehicle in different display formats
according to the vehicle's equipment.
Page 30 of 208

28
Instruments and controls
Centre console with screen
Instrument panel without
screen
- turn to the right to increase the
hours (hold the button to the right
for rapid scrolling),
- turn to the left: 24H or 12H is
displayed,
- turn to the right to select 24H or
12H,
- turn to the left to complete the time
adjustment.
After approximately 30 seconds
without any action, the screen returns
to the normal display.
ADJUSTING THE TIME
To adjust the time and date
indicated in the screen, refer to
the "Adjusting the date and time"
section of chapter 9.
Centre console without screen
To adjust the time of the
clock, use the left-hand
button on the instrument
panel then carry out the
operations in the following
order:
- turn to the left: the minutes fl ash,
- turn to the right to increase the
minutes (hold the button to the right
for rapid scrolling),
- turn to the left: the hours fl ash, The display - time sequence
is linked according to model
(version). The access to the
"Date" adjustment is only
active when the model version
offers a date in words.
Page 31 of 208

READY TO GO
22
Instruments and controls
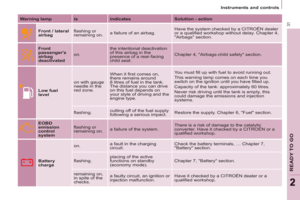
Warning lamps
Each time the vehicle is started: a series of warning lamps comes on applying a self-test check. They go off almost
immediately. When the engine is running: the warning lamp becomes a warning if it remains on continuously or fl ashes.
This initial warning may be accompanied by an audible signal and a message which appears in the screen.
Do not ignore these warnings.
Warning lamp
is
indicates
Solution - action
STOP
on, associated
with another
warning
lamp and
accompanied
by a message
in the screen. major faults linked with
the "Brake fl uid level",
"Engine oil pressure and
temperature", "Coolant
temperature", "Electronic
brake force distribution",
"Power steering" and
"Under-infl ation detection"
warning lamps.
You must stop as soon as it is safe to do
so, park and switch off the ignition. Have it
checked by a CITROËN dealer or a qualifi ed
workshop.
Parking
brake / Brake
fl uid level /
EBFD
on.
that the parking brake is applied
or has not been released fully. Releasing the parking brake switches off the
warning lamp.
on. low brake fl uid level. Top up using a fl uid recommended by CITROËN.
remaining on even
though the level
is correct and
associated with the
ABS warning lamp.
a fault with the electronic
brake force distribution.
You must stop as soon as it is safe to do
so, park and switch off the ignition. Have it
checked by a CITROËN dealer or a qualifi ed
workshop.
Engine oil
pressure and
temperature
on while
driving. low pressure or a high
temperature. Park and switch off the ignition then allow to
cool. Visually check the level. Chapter 6, "Levels"
section.
remaining on,
even though
the level is
correct. a major fault. Have it checked by a CITROËN dealer or a
qualifi ed workshop.
Page 32 of 208

30
Instruments and controls
Warning lamp
is
indicates
Solution - action
Coolant
temperature
and level
on with needle
in the red
zone. an abnormal increase in
temperature. Park and switch off the ignition then allow to cool.
Visually check the level.
fl ashing. a drop in the coolant level. Chapter 6, "Levels" section. Contact a
CITROËN dealer or a qualifi ed workshop.
Service
on temporarily. minor faults or warnings. Consult the alert log in the display or screen. If your
vehicle is equipped with a trip computer or a screen:
refer to the "Audio equipment - Trip computer"
section of chapter 9.
Contact a CITROËN dealer or a qualifi ed workshop. remaining on. major faults.
Driver's
seat belt not
fastened
on then
fl ashing. the driver has not fastened
their seat belt. Pull the strap then insert the tongue in the buckle.
accompanied
by an audible
signal then
remains on. the vehicle is moving with
the driver's seat belt not
fastened. Check that the seat belt is fastened by pulling the
strap. Chapter 4, "Seat belts" section.
ECO
on. The Stop & Start system
has put the engine in STOP
mode following a vehicle
stop (red light, traffi c jam,
etc...). As soon as you want to move off, the warning
lamp goes off and the engine restarts
automatically in START mode.
fl ashes for a
few seconds,
then goes off. The STOP is temporarily
unavailable.
or
The START mode has been
invoked automatically. Section 2, under "Stop & Start".