Page 345 of 652
Operation Instructions — CD MODE for CD and
MP3 Audio Play
NOTE:
•The ignition switch must be in the ON/RUN or ACC
position to operate the radio.
•This radio is capable of playing compact discs (CD),
recordable compact discs (CD-R), rewritable compact
discs (CD-RW), compact discs with MP3 tracks and
multisession compact discs with CD and MP3 tracks.
Inserting Compact Disc(s)
Gently insert one CD into the CD player with the CD
label facing up. The CD will automatically be pulled into
the CD player and the CD icon will illuminate on the
radio display. If a CD does not go into the slot more than
1.0 in (2.5 cm), a disc may already be loaded and must be
ejected before a new disc can be loaded.If you insert a disc with the ignition ON/RUN and the
radio ON, the unit will switch from radio to CD mode
and begin to play when you insert the disc. The display
will show the track number, and index time in minutes
and seconds. Play will begin at the start of track 1.
CAUTION!
•This CD player will accept 4–3/4 in (12 cm) discs
only. The use of other sized discs may damage the
CD player mechanism.
•Do not use adhesive labels. These labels can peel
away and jam the player mechanism.
•The RES Media Center is a single CD player. Do
not attempt to insert a second CD if one is already
loaded.
EJECT Button - Ejecting a CD
Press the EJECT button to eject the CD.
4
UNDERSTANDING YOUR INSTRUMENT PANEL 343
Page 357 of 652
control mode, audio tracks (if available from audio
device) start playing over the vehicle’s audio system.
Play Mode
When switched to iPod�/USB/MP3 control mode, the
iPod�or external USB device automatically starts Play
mode. In Play mode, the following buttons on the radio
faceplate may be used to control the iPod� or external
USB device and display data:
•Use the TUNE control knob to select the next or
previous track.
•Turning it clockwise (forward) by one click, while
playing a track, skips to the next track or press the
VR button and say �Next Track�.
•Turning it counterclockwise (backward) by one
click, will jump to the previous track in the list or
press the VR button and say �Previous Track�
•Jump backward in the current track by pressing and
holding the <
button long enough will jump to the beginning of
the current track.
•Jump forward in the current track by pressing and
holding the FF>> button.
•A single press backward << RWor forward FF>> will
jump backward or forward respectively, for five
seconds.
•Use the << SEEKandSEEK >> buttons to jump to the
previous or next track. Pressing the SEEK>> button
during play mode will jump to the next track in the
list, or press the VR button and say �Next or Previous
Track�.
•While a track is playing, press the INFObutton to see
the associated metadata (artist, track title, album, etc.)
for that track. Pressing the INFObutton again jumps
4
UNDERSTANDING YOUR INSTRUMENT PANEL 355
Page 362 of 652
•Cycle the ignition to the ON or ACC position.
•Turn on the VES™ player (if equipped on Dual Screen
System) by pushing the Power button, located on the far
left, or by pressing the button on the Remote Control.
•When the Video Screen(s) are open and a DVD is
inserted into the VES™ player, the screen(s) turn(s) on
automatically, the headphone transmitters turn on and
playback begins.
•For Dual Video Screen System, Channel 1 on the
Remote Control and Headphones refers to Screen 1
(second row) and Channel 2 on the Remote Control
and Headphones refers to Screen 2 (third row). Refer
to the Dual Video Screen section for more information.
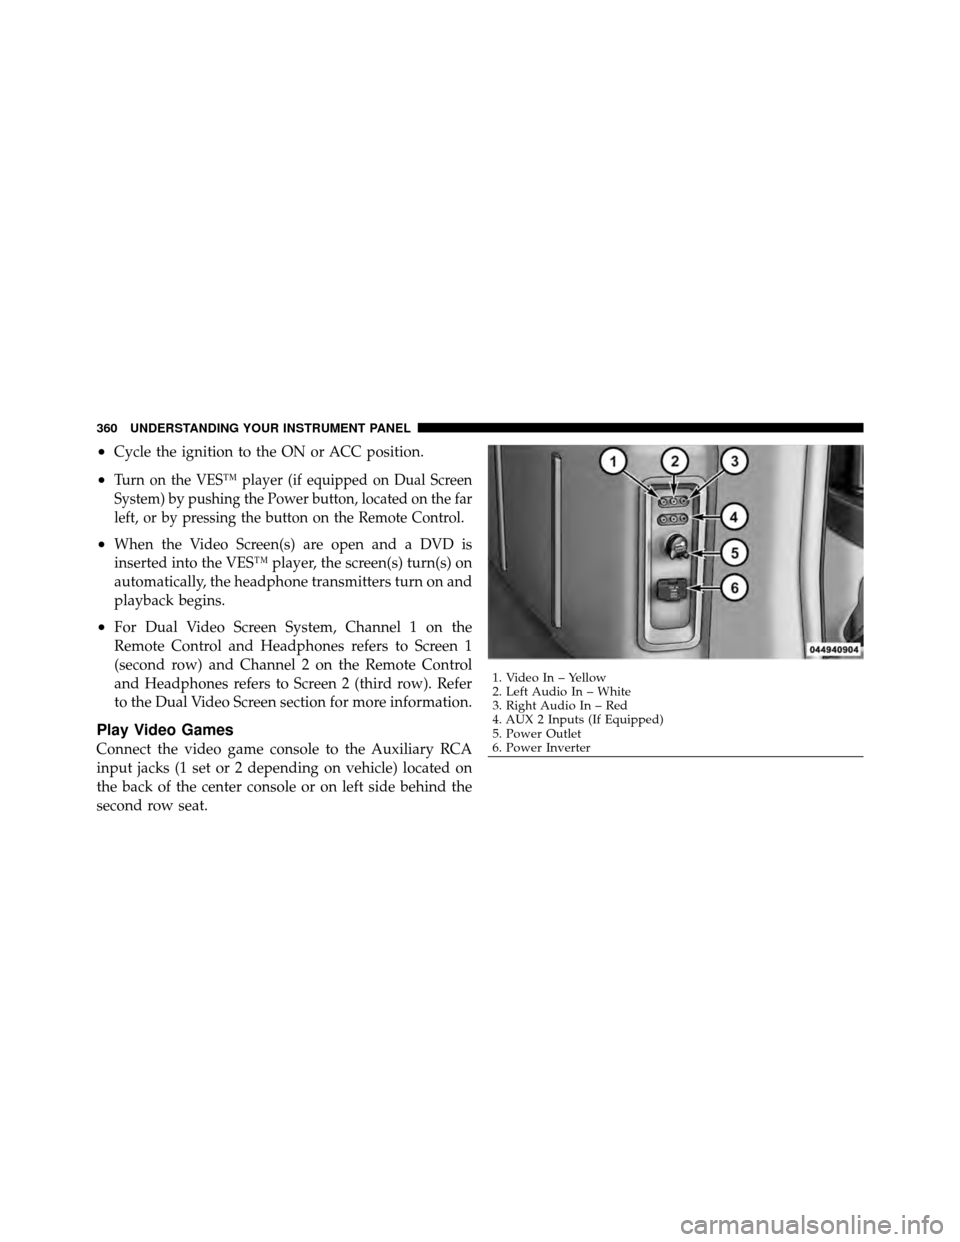
Play Video Games
Connect the video game console to the Auxiliary RCA
input jacks (1 set or 2 depending on vehicle) located on
the back of the center console or on left side behind the
second row seat.
1. Video In – Yellow
2. Left Audio In – White
3. Right Audio In – Red
4. AUX 2 Inputs (If Equipped)
5. Power Outlet
6. Power Inverter
360 UNDERSTANDING YOUR INSTRUMENT PANEL
Page 367 of 652
Dual Video Screen
NOTE:Typically there are two different ways to operate
the features of the Video Entertainment System (VES)™.
•The Remote Control
•The Touch-Screen Radio (If Equipped)
Play A DVD Using The Touch-Screen Radio
1. Press the OPEN/CLOSE or LOAD hard-key on the
radio faceplate (Touch-Screen).
2. Insert the DVD with the label facing up. The radio
automatically selects the appropriate mode after the disc
is recognized and displays the menu screen or starts
playing the first track. 3. To watch a DVD on Screen 1 for second row passen-
gers, ensure the Remote Control and Headphone switch
is on Channel 1.
4. To watch a DVD on Screen 2 for third row passengers,
ensure the Remote Control and Headphone switch is on
Channel 2.
4
UNDERSTANDING YOUR INSTRUMENT PANEL 365
Page 370 of 652
•Viewing a DVD on the Touch-Screen radio screen is
not available in all states/provinces, and the vehicle
must be stopped, and the shift lever must be in the
PARK position for vehicles with automatic transmis-
sion. In vehicles with manual transmission the parking
brake must be engaged.
•Touching the screen on a Touch-Screen radio while a
DVD is playing brings up basic remote control func-
tions for DVD play such as scene selection, Play,
Pause, FF, RW, and Stop. Pressing the X in the upper
corner will turn off the remote control screen
functions.
Play A DVD Using The VES™ Player (If Equipped)
1. Insert the DVD with the label facing up. The VES™
player automatically selects the appropriate mode after
the disc is recognized and starts playing the DVD.NOTE:
The VES™ player has basic DVD control func-
tion such as Menu, Play, Pause, FF, RW and Stop
2. To watch a DVD on Screen 1 for second row passen-
gers, ensure the Remote Control and Headphone switch
is on Channel 1.
3. To watch a DVD on Screen 2 for third row passengers,
ensure the Remote Control and Headphone switch is on
Channel 2.
Using The Remote Control
1. Press the MODE button on the Remote Control.
2. While looking at Screen 1 or 2, highlight VES DISC by
either pressing Up/Down/Left/Right buttons or by re-
peatedly pressing the MODE button, then press ENTER
on the Remote Control.
368 UNDERSTANDING YOUR INSTRUMENT PANEL
Page 372 of 652
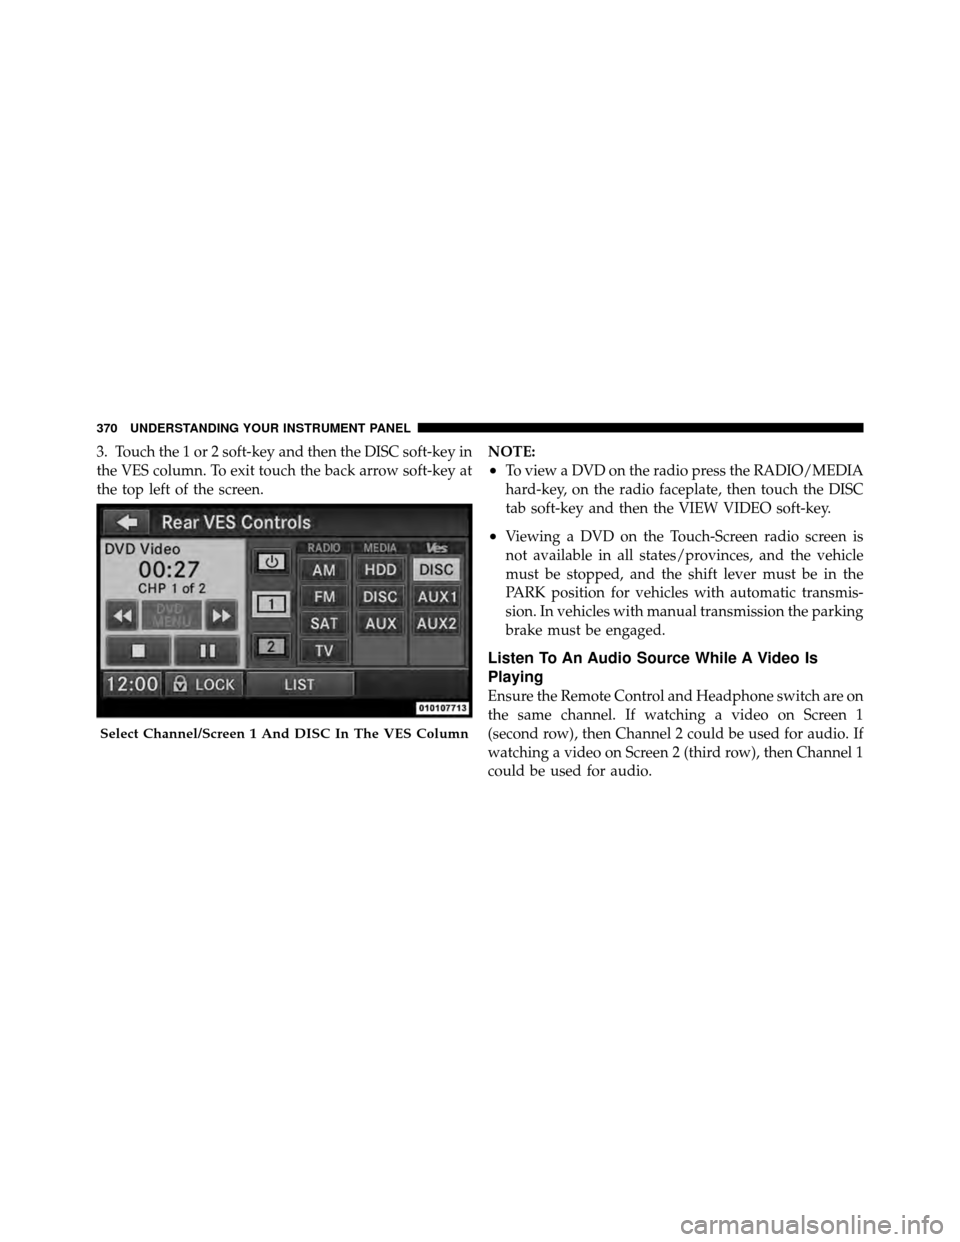
3. Touch the 1 or 2 soft-key and then the DISC soft-key in
the VES column. To exit touch the back arrow soft-key at
the top left of the screen.NOTE:
•To view a DVD on the radio press the RADIO/MEDIA
hard-key, on the radio faceplate, then touch the DISC
tab soft-key and then the VIEW VIDEO soft-key.
•Viewing a DVD on the Touch-Screen radio screen is
not available in all states/provinces, and the vehicle
must be stopped, and the shift lever must be in the
PARK position for vehicles with automatic transmis-
sion. In vehicles with manual transmission the parking
brake must be engaged.
Listen To An Audio Source While A Video Is
Playing
Ensure the Remote Control and Headphone switch are on
the same channel. If watching a video on Screen 1
(second row), then Channel 2 could be used for audio. If
watching a video on Screen 2 (third row), then Channel 1
could be used for audio.
Select Channel/Screen 1 And DISC In The VES Column
370 UNDERSTANDING YOUR INSTRUMENT PANEL
Page 377 of 652
2. Channel Selector Indicators – When a button is
pressed, the currently affected channel or channel button
is illuminated momentarily.
3. Light – Turns the remote control backlighting on or off.
The remote backlighting turns off automatically after five
seconds.
4. Channel/Screen Selector Switch - Indicates which
channel is being controlled by the remote control. When
the selector switch is in the Channel 1 position, the
remote controls the functionality of headphone Channel
1 (right side of the screen). When the selector switch is in
the Channel 2, position the remote controls the function-
ality of headphone Channel 2 (left side of the screen).
5.�� – In radio modes, press to seek the next tunable
station. In disc modes, press and hold to fast forward
through the current audio track or video chapter. In
menu modes use to navigate in the menu. 6.
� / Prev – In radio modes, press to select to the
previous station. In disc modes, press to advance to the
start of the current or previous audio track or video
chapter. In menu modes, use to navigate in the menu.
7. MENU – Press to return to the main menu of a DVD
disc, to select a satellite audio channel from the Station
list, or select playback modes (SCAN/RANDOM for a
CD).
8. �/ (Play/Pause) – Begin/resume or pause disc play.
9.
(Stop) – Stops disc play
10. PROG Up/Down – When listening to a radio mode,
pressing PROG Up selects the next preset and pressing
PROG Down selects the previous preset stored in the
radio. When listening to compressed audio on a data
disc, PROG Up selects the next directory and PROG
Down selects the previous directory. When listening to a
4
UNDERSTANDING YOUR INSTRUMENT PANEL 375
Page 381 of 652
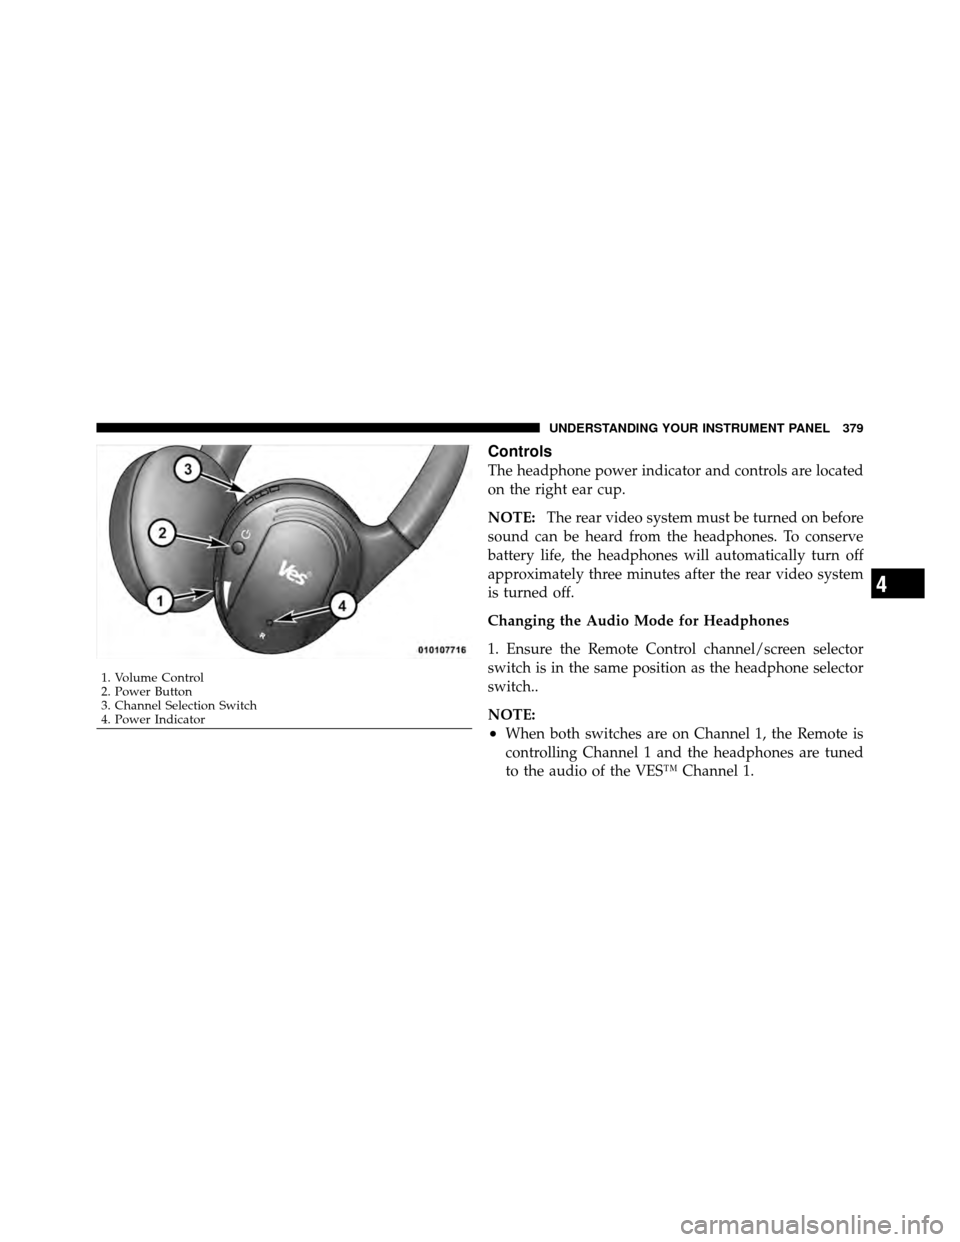
Controls
The headphone power indicator and controls are located
on the right ear cup.
NOTE:The rear video system must be turned on before
sound can be heard from the headphones. To conserve
battery life, the headphones will automatically turn off
approximately three minutes after the rear video system
is turned off.
Changing the Audio Mode for Headphones
1. Ensure the Remote Control channel/screen selector
switch is in the same position as the headphone selector
switch..
NOTE:
•When both switches are on Channel 1, the Remote is
controlling Channel 1 and the headphones are tuned
to the audio of the VES™ Channel 1.
1. Volume Control
2. Power Button
3. Channel Selection Switch
4. Power Indicator
4
UNDERSTANDING YOUR INSTRUMENT PANEL 379