Page 218 of 652
WARNING! (Continued)
•Do not place anything on the steering wheel that
insulates against heat, such as a blanket or steering
wheel covers of any type and material. This may
cause the steering wheel heater to overheat.
ADJUSTABLE PEDALS — IF EQUIPPED
The adjustable pedals system is designed to allow a
greater range of driver comfort for steering wheel tilt and
seat position. This feature allows the brake, accelerator,
and clutch pedals (if equipped) to move toward or away
from the driver to provide improved position with the
steering wheel.
The switch is located on the left side of the steering
column.Press the switch forward to move the pedals forward
(toward the front of the vehicle).
Press the switch rearward to move the pedals rearward
(toward the driver).
•The pedals can be adjusted with the ignition OFF.
Adjustable Pedal Switch
216 UNDERSTANDING THE FEATURES OF YOUR VEHICLE
Page 220 of 652

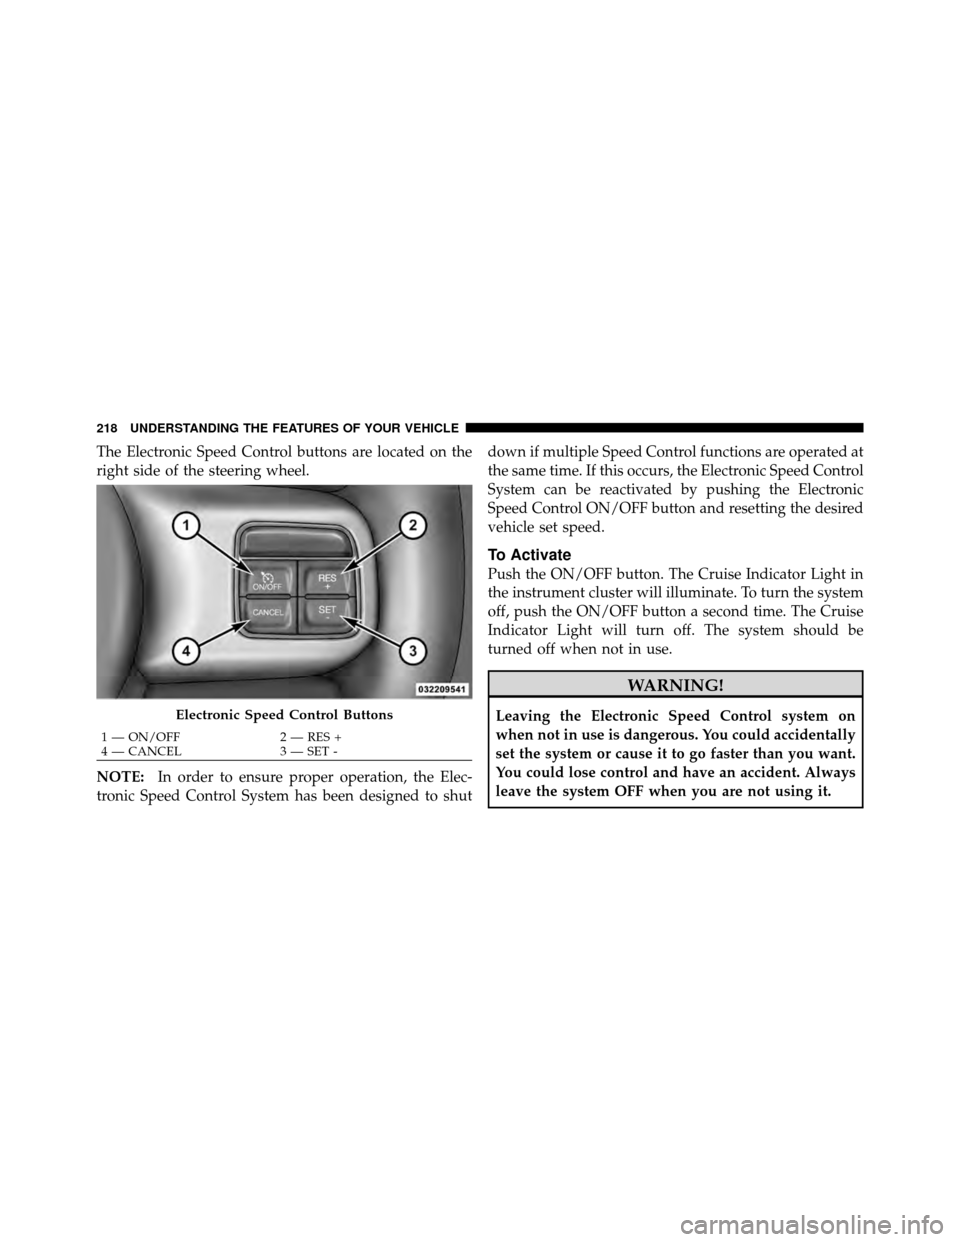
The Electronic Speed Control buttons are located on the
right side of the steering wheel.
NOTE:In order to ensure proper operation, the Elec-
tronic Speed Control System has been designed to shut down if multiple Speed Control functions are operated at
the same time. If this occurs, the Electronic Speed Control
System can be reactivated by pushing the Electronic
Speed Control ON/OFF button and resetting the desired
vehicle set speed.
To Activate
Push the ON/OFF button. The Cruise Indicator Light in
the instrument cluster will illuminate. To turn the system
off, push the ON/OFF button a second time. The Cruise
Indicator Light will turn off. The system should be
turned off when not in use.
WARNING!
Leaving the Electronic Speed Control system on
when not in use is dangerous. You could accidentally
set the system or cause it to go faster than you want.
You could lose control and have an accident. Always
leave the system OFF when you are not using it.Electronic Speed Control Buttons
1 — ON/OFF
2 — RES +
4 — CANCEL 3 — SET -
218 UNDERSTANDING THE FEATURES OF YOUR VEHICLE
Page 288 of 652

▫Locking The Remote Control ............ 378
▫ Replacing The Remote Control Batteries .... 378
▫ Headphones Operation ................ 378
▫ Controls ........................... 379
▫ Replacing The Headphone Batteries ....... 380
▫ Unwired� Stereo Headphone Lifetime
Limited Warranty .................... 380
▫ System Information ................... 382
� Steering Wheel Audio
Controls — If Equipped .................. 395
▫ Radio Operation ..................... 396
▫ CD Player ......................... 396
� CD/DVD Disc Maintenance .............. 397
� Radio Operation And Mobile Phones ....... 397�
Climate Controls ...................... 398
▫ Manual Heating And Air Conditioning
System — If Equipped ................. 398
▫ Rear Manual Climate Control —
If Equipped ........................ 403
▫ Automatic Temperature Control
(ATC) — If Equipped ................. 406
▫ Summer Operation ................... 417
▫ Winter Operation .................... 417
▫ Vacation/Storage .................... 418
▫ Window Fogging .................... 418
▫ Outside Air Intake ................... 418
▫ Operating Tips ...................... 419
▫ A/C Air Filter ...................... 419
286 UNDERSTANDING YOUR INSTRUMENT PANEL
Page 293 of 652

U.S. Federal regulations require that upon transfer of
vehicle ownership, the seller certify to the purchaser the
correct mileage that the vehicle has been driven. If your
odometer needs to be repaired or serviced, the repair
technician should leave the odometer reading the same
as it was before the repair or service. If s/he cannot do so,
then the odometer must be set at zero, and a sticker must
be placed in the door jamb stating what the mileage was
before the repair or service. It is a good idea for you to
make a record of the odometer reading before the repair/
service, so that you can be sure that it is properly reset, or
that the door jamb sticker is accurate if the odometer
must be reset at zero.
This also displays Trip A and Trip B, DTE, MPG or
L/100km, OAT (Outside Air Temperature) information to
Base Cluster, use STEP and RESET button (on steering
wheel) to access or reset the display. For further informa-
tion refer to “Compass Mini-Trip Computer”.Message Display Area
When the appropriate conditions exist, the following
odometer messages will display:
door
............................. Door Ajar
gATE ........................... Liftgate Ajar
LoW tirE ..................... LowTirePr essure
gASCAP ....................... Fuel Cap Fault
noFUSE .......................... Fuse Fault
CHAngE OIL ............... Oil Change Required
LoCOOL ........................ Low Coolant
NOTE: Some of the above warnings will be displayed in
the Electronic Vehicle Information Center Display Area
located in the instrument cluster.
Refer to ”Electronic Vehicle Information Center (EVIC)
Display — If Equipped” for further information.
4
UNDERSTANDING YOUR INSTRUMENT PANEL 291
Page 294 of 652

LoW tirE
When the appropriate condition exists, the odometer
display will toggle between LoW and tirE for three cycles.
gASCAP
If the vehicle diagnostic system determines that the fuel
filler cap is loose, improperly installed, or damaged, a
“gASCAP” message will display in the odometer display
area. Tighten the fuel filler cap properly and press the
STEP button on the steering wheel to turn off the
message. If the problem continues, the message will
appear the next time the vehicle is started.
noFUSE
If the vehicle diagnostic system determines that the
Ignition Off Draw (IOD) fuse is improperly installed, or
damaged, a “noFUSE” message will display in the odom-
eter display area. For further information on fuses and
fuse locations refer to “Fuses” in “Maintaining Your
Vehicle”.CHAngE OIL
Your vehicle is equipped with an engine oil change
indicator system. The
CHAngE OILmessage will flash in
the instrument cluster odometer for approximately
12 seconds, after a single chime has sounded, to indicate
the next scheduled oil change interval. The engine oil
change indicator system is duty cycle-based, which
means the engine oil change interval may fluctuate
dependent upon your personal driving style.
Unless reset, this message will continue to display each
time you turn the ignition switch to the ON/RUN
position. To turn off the message temporarily, press and
release the STEP button on the steering wheel. To reset
the oil change indicator system (after performing the
scheduled maintenance), perform the following steps.
1. Turn the ignition switch to the ON/RUN position (do
not start the engine).
292 UNDERSTANDING YOUR INSTRUMENT PANEL
Page 306 of 652
ELECTRONIC VEHICLE INFORMATION CENTER
(EVIC) — IF EQUIPPED
The Electronic Vehicle Information Center (EVIC) fea-
tures a driver-interactive display that is located in the
instrument cluster.This system conveniently allows the driver to select a
variety of useful information by pressing the switches
mounted on the steering wheel. The EVIC consists of the
following:
•Radio Information
•Fuel Economy
•Vehicle Speed
•Trip Info
•Tire PSI
•Vehicle Info
•Messages
•Units
•System Setup (Personal Settings)
•Turn Menu Off
Electronic Vehicle Information Center (EVIC)
304 UNDERSTANDING YOUR INSTRUMENT PANEL
Page 307 of 652
The system allows the driver to select information by
pressing the following buttons mounted on the steering
wheel:UP Button
Press and release the UP button to scroll up-
ward through the main menus (Fuel Economy,
Vehicle Info, Tire PSI, Cruise, Messages, Units,
System Setup) and sub-menus.
DOWN Button Press and release the DOWN button to scroll
downward through the main menus and sub-
menus.
SELECT Button The SELECT button allows access to informa-
tion in EVIC submenus, selects some feature
settings, and resets some EVIC features. The
EVIC prompts the driver when the SELECT
button can be used by displaying the right arrow graphic.
EVIC Steering Wheel Buttons
4
UNDERSTANDING YOUR INSTRUMENT PANEL 305
Page 324 of 652

Auto Unlock Doors
When ON is selected, all doors will unlock when the
vehicle is stopped and the transmission is in the PARK or
NEUTRAL position and the driver’s door is opened. To
make your selection, press and release the SELECT
button until a check-mark appears next to the feature
showing the system has been activated or the check-mark
is removed showing the system has been deactivated.
Remote Unlock Sequence
WhenDriver Door 1st Press is selected, only the driver’s
door will unlock on the first press of the Remote Keyless
Entry (RKE) transmitter UNLOCK button. When Driver
Door 1st Press is selected, you must press the RKE
transmitter UNLOCK button twice, to unlock the passen-
ger’s doors. When All Doors 1st Press is selected, all of
the doors will unlock on the first press of the RKE
transmitter UNLOCK button. To make your selection,
press and release the SELECT button until a check-mark appears next to the feature showing the system has been
activated or the check-mark is removed showing the
system has been deactivated.
RKE Linked To Memory
When this feature is selected the memory seat, mirror,
and radio settings will return to the memory set position
when the RKE transmitter UNLOCK button is pressed. If
this feature is not selected then the memory seat, mirror,
and radio settings can only return to the memory set
position using the door mounted switch. To make your
selection, press and release the SELECT button until a
check-mark appears next to the feature showing the
system has been activated or the check-mark is removed
showing the system has been deactivated.
Remote Start Comfort Sys.
When this feature is selected and the remote start is
activated, the heated steering wheel and driver heated
seat features will automatically turn on in cold weather.
322 UNDERSTANDING YOUR INSTRUMENT PANEL