Page 171 of 652

When the HIGH-level setting is selected, the heater will
provide a boosted heat level during the initial stages of
operation. Then, the heat output will drop to the normal
HIGH-level. If the HIGH-level setting is selected, the
system will automatically switch to LOW-level after a
maximum of 60 minutes of continuous operation. At that
time, the display will change from HIGH to LOW,
indicating the change. The LOW-level setting will turn
OFF automatically after a maximum of 45 minutes.
Rear Heated Seats
On some models, the second row seats are equipped with
heaters. There are two heated seat switches that allow the
second row passengers to operate the seats indepen-
dently. The heated seat switches are located on the sliding
side door handle trim panels.You can choose from HIGH, LOW or OFF heat settings.
Amber indicator lights in each switch indicate the level of
heat in use. Two indicator lights will illuminate for
HIGH, one for LOW and none for OFF.
Second Row Heated Seat Switch
3
UNDERSTANDING THE FEATURES OF YOUR VEHICLE 169
Page 172 of 652

Press the switch once to select HIGH-level
heating. Press the switch a second time to select
LOW-level heating. Press the switch a third
time to shut the heating elements OFF.
NOTE: Once a heat setting is selected, heat will be felt
within two to five minutes.
When the HIGH-level setting is selected, the heater will
provide a boosted heat level during the initial stages of
operation. Then, the heat output will drop to the normal
HIGH-level. If the HIGH-level setting is selected, the
system will automatically switch to LOW-level after
approximately 30 minutes of continuous operation. At
that time, the display will change from HIGH to LOW,
indicating the change. The LOW-level setting will turn
OFF automatically after approximately 45 minutes.Manual Front/Second Row Seat Adjuster
Both front seats are adjustable forward or rearward. The
manual seat adjustment handle is located under the seat
cushion at the front edge of each seat.
Manual Seat Adjuster
170 UNDERSTANDING THE FEATURES OF YOUR VEHICLE
Page 200 of 652
.
6. Turn the ignition switch to the OFF position and
remove the key.
7. Press and release the SET (S)")
5. Turn on the radio and set the radio station presets (up
to 10 AM and 10 FM stations can be set).
6. Turn the ignition switch to the OFF position and
remove the key.
7. Press and release the SET (S) button located on the
driver’s door.
8. Within five seconds, press and release MEMORY
button 1 or 2 on the driver’s door. The next step must be
performed within 5 seconds if you desire to also use a
RKE transmitter to recall memory positions.
9. Press and release the LOCK button on one of the RKE
transmitters.
10. Insert the ignition key and turn the ignition switch to
the ON position.11. Select “Remote Linked to Memory” in the Electronic
Vehicle Information Center (EVIC) and enter “Yes”. Refer
to “Electronic Vehicle Information Center (EVIC)/
Customer-Programmable Features” in “Understanding
Your Instrument Panel” for further information.
12. Repeat the above steps to set the next Memory
position using the other numbered Memory button or to
link another RKE transmitter to memory.
Memory Position Recall
NOTE:
The vehicle must be in PARK to recall memory
positions. If a recall is attempted when the vehicle is not
in PARK, a message will be displayed in the EVIC.
To recall the memory settings for driver one, press
MEMORY button 1 on the driver’s door or the UNLOCK
button on the RKE transmitter linked to memory position
1.
198 UNDERSTANDING THE FEATURES OF YOUR VEHICLE
Page 206 of 652
Dimmer Control
With the parking lights or headlights on, rotating the left
dimmer control for the interior lights on the instrument
panel upward will increase the brightness of the instru-
ment panel lights.
Parade Mode (Daytime Brightness Feature)
Rotate the left dimmer control to the first detent. This
feature brightens the odometer, radio and overhead
displays when the parking lights or headlights are on.
Interior Lights On
Rotate the left dimmer control completely upward to the
second detent (extreme top position) to turn on the
interior lights. The interior lights will remain on when the
dimmer control is in this position.
Halo Lights — If Equipped
Halo lights are strategically placed soft lighting that help
to illuminate specific areas to aid the occupants in
locating specific features while driving at night.
The Halo control switch is located to the right of the
dimmer switch.
Halo Switch
204 UNDERSTANDING THE FEATURES OF YOUR VEHICLE
Page 219 of 652

•The pedalscannotbe adjusted when the vehicle is in
REVERSE or when the Electronic Speed Control Sys-
tem is on. The following messages will be displayed
on vehicles equipped with the Electronic Vehicle In-
formation System (EVIC) if the pedals are attempted to
be adjusted when the system is locked out (“Adjust-
able Pedal Disabled — Cruise Control Engaged” or
“Adjustable Pedal Disabled — Vehicle In Reverse”.
CAUTION!
Do not place any article under the adjustable pedals
or impede its ability to move, as it may cause damage
to the pedal controls. Pedal travel may become lim-
ited if movement is stopped by an obstruction in the
adjustable pedal’s path.
WARNING!
Do not adjust the pedals while the vehicle is moving.
You could lose control and have an accident. Always
adjust the pedals while the vehicle is parked.
ELECTRONIC SPEED CONTROL — IF EQUIPPED
When engaged, the Electronic Speed Control takes over
accelerator operations at speeds greater than 25 mph
(40 km/h).
3
UNDERSTANDING THE FEATURES OF YOUR VEHICLE 217
Page 223 of 652
 from the last ignition cycle when the ignition is
changed to the ON/RUN position.
ParkSense� can be active only when the shift lever i")
ParkSense�will retain the last system state (enabled or
disabled) from the last ignition cycle when the ignition is
changed to the ON/RUN position.
ParkSense� can be active only when the shift lever is in
REVERSE. If ParkSense� is enabled at this shift lever
position, the system will remain active until the vehicle
speed is increased to approximately 11 mph (18 km/h) or
above. The system will become active again if the vehicle
speed is decreased to speeds less than approximately
10 mph (16 km/h).ParkSense� Sensors
The four ParkSense� sensors, located in the rear fascia/
bumper, monitor the area behind the vehicle that is
within the sensors’ field of view. The sensors can detect
obstacles from approximately 12 in (30 cm) up to 79 in
(200 cm) from the rear fascia/bumper in the horizontal
direction, depending on the location, type and orienta-
tion of the obstacle.
ParkSense� Warning Display
The ParkSense� Warning screen will only be displayed if
Sound and Display is selected from the Customer- Pro-
grammable Features section of the Electronic Vehicle
Information Center (EVIC). Refer to “Electronic Vehicle
Information Center (EVIC)/Personal Settings (Customer-
Programmable Features)” in “Understanding Your In-
strument Panel” for further information.
3
UNDERSTANDING THE FEATURES OF YOUR VEHICLE 221
Page 224 of 652
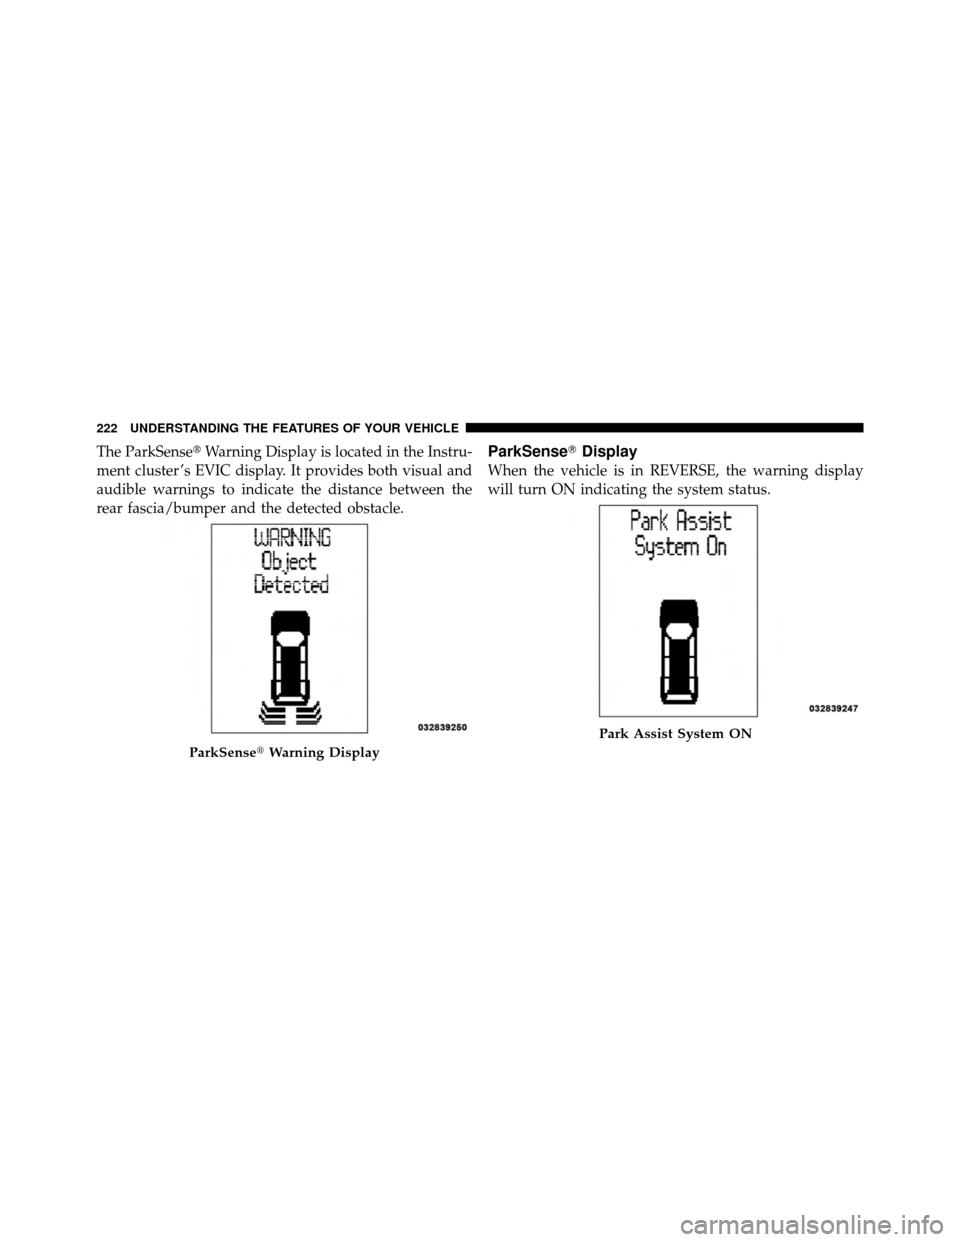
The ParkSense�Warning Display is located in the Instru-
ment cluster ’s EVIC display. It provides both visual and
audible warnings to indicate the distance between the
rear fascia/bumper and the detected obstacle.ParkSense� Display
When the vehicle is in REVERSE, the warning display
will turn ON indicating the system status.
ParkSense�Warning Display
Park Assist System ON
222 UNDERSTANDING THE FEATURES OF YOUR VEHICLE
Page 225 of 652
The system will indicate a detected obstacle by showing
three solid arcs and will produce a one-half second tone.
As the vehicle moves closer to the object the EVIC
display will show fewer arcs and the sound tone will
change from slow, to fast, to continuous.
Park Assist System OFF
Slow Tone
3
UNDERSTANDING THE FEATURES OF YOUR VEHICLE 223