Page 65 of 557

The Advanced Front Air Bags and Supplemental Driver
Side Knee Air Bag will not deploy in all frontal collisions,
including some that may produce substantial vehicle
damage — for example, some pole collisions, truck
underrides, and angle offset collisions. On the other
hand, depending on the type and location of impact,
Advanced Front Air Bags may deploy in crashes with
little vehicle front-end damage but that produce a severe
initial deceleration.
The side air bags will not deploy in all side collisions.
Side air bag deployment will depend on the severity and
type of collision.
Because air bag sensors measure vehicle deceleration
over time, vehicle speed and damage by themselves are
not good indicators of whether or not an air bag should
have deployed.Seat belts are necessary for your protection in all colli-
sions, and also are needed to help keep you in position,
away from an inflating air bag.
The ORC monitors the readiness of the electronic parts of
the air bag system whenever the ignition is in the START
or ON/RUN position. If the ignition is in the OFF
position or in the ACC position, the air bag system is not
on and the air bags will not inflate.
The ORC contains a backup power supply system that
may deploy the air bags even if the battery loses power or
it becomes disconnected prior to deployment.
Also, the ORC turns on the Air Bag Warning
Light in the instrument panel for approxi-
mately four to eight seconds for a self-check
when the ignition is first turned on. After the
self-check, the Air Bag Warning Light will turn off. If the
ORC detects a malfunction in any part of the system, it
2
THINGS TO KNOW BEFORE STARTING YOUR VEHICLE 63
Page 71 of 557

WARNING! (Continued)
•Do not attempt to modify any part of your air bag
system. The air bag may inflate accidentally or
may not function properly if modifications are
made. Take your vehicle to an authorized dealer
for any air bag system service. If your seat includ-
ing your trim cover and cushion needs to be
serviced in any way (including removal or
loosening/tightening of seat attachment bolts),
take the vehicle to your authorized dealer. Only
manufacturer approved seat accessories may be
used. If it is necessary to modify the air bag system
for persons with disabilities, contact your autho-
rized dealer.
Air Bag Warning Light
You will want to have the air bags ready to
inflate for your protection in a collision. The
Air Bag Warning Light monitors the internal
circuits and interconnecting wiring associated
with air bag system electrical components. While the air
bag system is designed to be maintenance free, if any of
the following occurs, have an authorized dealer service
the air bag system immediately.
•The Air Bag Warning Light does not come on during
the four to eight seconds when the ignition switch is
first cycled to the ON/RUN position.
•The Air Bag Warning Light remains on after the four to
eight-second interval.
•The Air Bag Warning Light comes on intermittently or
remains on while driving.
2
THINGS TO KNOW BEFORE STARTING YOUR VEHICLE 69
Page 432 of 557
TIREFIT Storage
The TIREFIT kit is located in the trunk.
TIREFIT Kit Components And Operation
1. Sealant Bottle
2. Deflation Button
3. Pressure Gauge
4. Power Button
TIREFIT Location
430 WHAT TO DO IN EMERGENCIES
Page 436 of 557

WARNING! (Continued)
•TIREFIT Sealant solution contains latex. In case of
an allergic reaction or rash, consult a physician
immediately. Keep TIREFIT out of reach of chil-
dren. If swallowed, rinse mouth immediately with
plenty of water and drink plenty of water. Do not
induce vomiting! Consult a physician immediately.
Sealing A Tire With TIREFIT
(A) Whenever You Stop To Use TIREFIT:
1. Pull over to a safe location and turn on the vehicle’s
Hazard Warning flashers.
2. Verify that the valve stem (on the wheel with the
deflated tire) is in a position that is near to the ground.
This will allow the TIREFIT Hoses (6) and (7) to reach the
valve stem and keep the TIREFIT kit flat on the ground.
This will provide the best positioning of the kit wheninjecting the sealant into the deflated tire and running the
air pump. Move the vehicle as necessary to place the
valve stem in this position before proceeding.
3. Place the transmission in PARK (auto transmission) or
in Gear (manual transmission) and turn Off the ignition.
4. Set the parking brake.
(B) Setting Up To Use TIREFIT:
1. Turn the Mode Select Knob (5) to the Sealant Mode
position.
2. Uncoil the Sealant Hose (6) and then remove the cap
from the fitting at the end of the hose.
3. Place the TIREFIT kit flat on the ground next to the
deflated tire.
4. Remove the cap from the valve stem and then screw
the fitting at the end of the Sealant Hose (6) onto the
valve stem.
434 WHAT TO DO IN EMERGENCIES
Page 437 of 557

5. Uncoil the Power Plug (8) and insert the plug into the
vehicle’s 12 Volt power outlet.
NOTE:Do not remove foreign objects (e.g., screws or
nails) from the tire.
(C) Injecting TIREFIT Sealant Into The Deflated
Tire:
•
Always start the engine before turning ON the TIRE-
FIT kit.
NOTE: Manual transmission vehicles must have the
parking brake engaged and the shift lever in NEUTRAL.
•After pressing the Power Button (4), the sealant (white
fluid) will flow from the Sealant Bottle (1) through the
Sealant Hose (6) and into the tire.
NOTE: Sealant may leak out through the puncture in
the tire. If the sealant (white fluid) does not flow
within 0 –
10 seconds through the Sealant Hose (6):
1. Press the Power Button (4) to turn Off the TIREFIT kit.
Disconnect the Sealant Hose (6) from the valve stem.
Make sure the valve stem is free of debris. Reconnect the
Sealant Hose (6) to the valve stem. Check that the Mode
Select Knob (5) is in the Sealant Mode position and not
Air Mode. Press the Power Button (4) to turn On the
TIREFIT kit.
2. Connect the Power Plug (8) to a different 12 Volt
power outlet in your vehicle or another vehicle, if avail-
able. Make sure the engine is running before turning ON
the TIREFIT kit.
3. The Sealant Bottle (1) may be empty due to previous
use. Call for assistance.
NOTE: If the Mode Select Knob (5) is on Air Mode and
the pump is operating, air will dispense from the Air
Pump Hose (7) only, not the Sealant Hose (6).
6
WHAT TO DO IN EMERGENCIES 435
Page 449 of 557

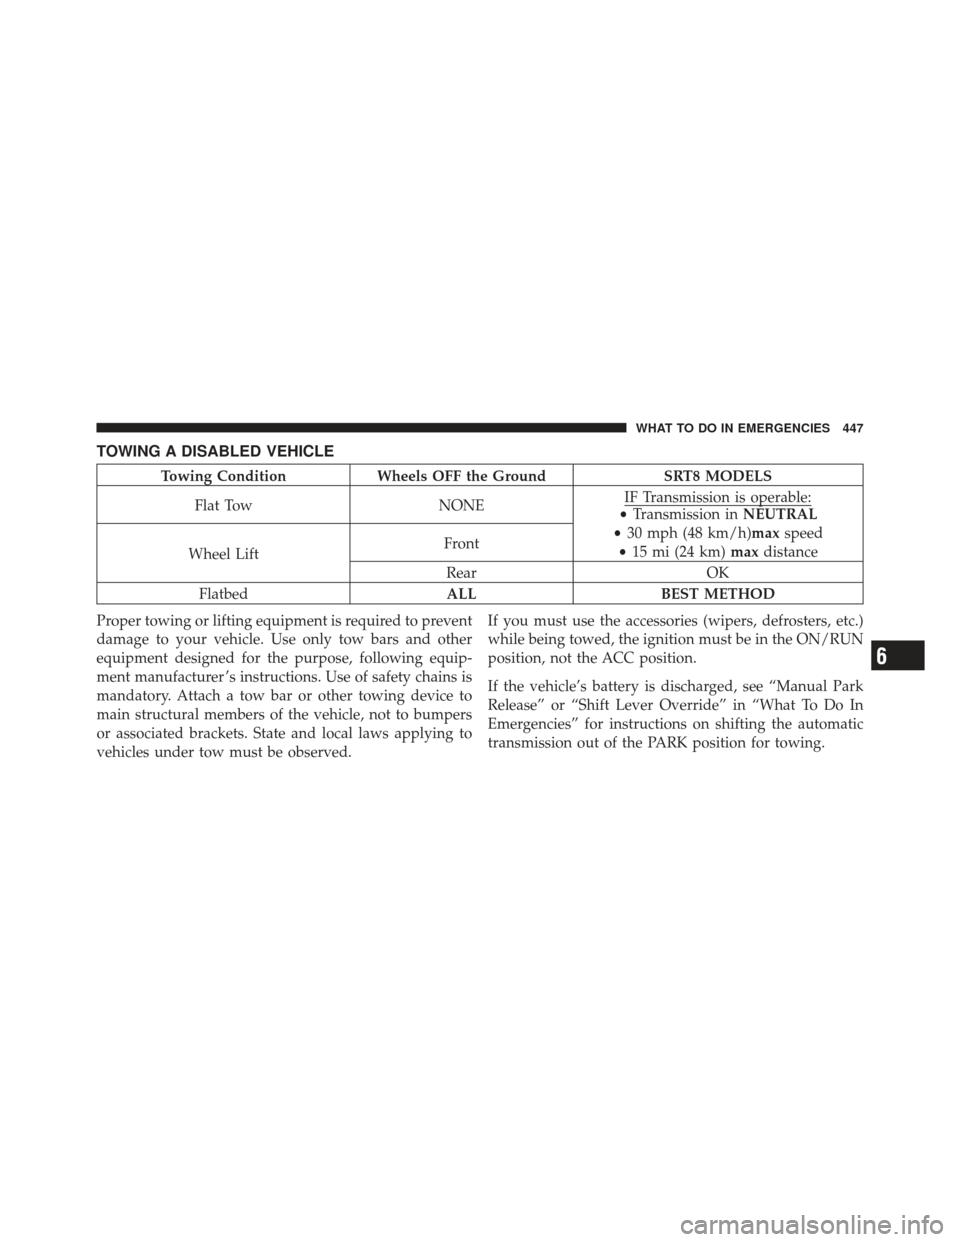
TOWING A DISABLED VEHICLE
Towing ConditionWheels OFF the Ground SRT8 MODELS
Flat Tow NONEIF Transmission is operable:
•
Transmission in NEUTRAL
• 30 mph (48 km/h)max speed
• 15 mi (24 km) maxdistance
Wheel Lift Front
Rear OK
Flatbed ALLBEST METHOD
Proper towing or lifting equipment is required to prevent
damage to your vehicle. Use only tow bars and other
equipment designed for the purpose, following equip-
ment manufacturer ’s instructions. Use of safety chains is
mandatory. Attach a tow bar or other towing device to
main structural members of the vehicle, not to bumpers
or associated brackets. State and local laws applying to
vehicles under tow must be observed. If you must use the accessories (wipers, defrosters, etc.)
while being towed, the ignition must be in the ON/RUN
position, not the ACC position.
If the vehicle’s battery is discharged, see “Manual Park
Release” or “Shift Lever Override” in “What To Do In
Emergencies” for instructions on shifting the automatic
transmission out of the PARK position for towing.
6
WHAT TO DO IN EMERGENCIES 447