Page 210 of 557
Adaptive Cruise Control (ACC) Operation
The speed control buttons (located on the right side of the
steering wheel) operates the ACC system.NOTE:
Any chassis/suspension modifications to the
vehicle will effect the performance of the Adaptive Cruise
Control.
Activating Adaptive Cruise Control (ACC)
You can only activate ACC if the vehicle speed is above
20 mph (32 km/h).
When the system is turned on and in the READY state,
the Electronic Vehicle Information Center (EVIC) dis-
plays “Adaptive Cruise Ready.”
When the system is OFF, the EVIC displays “Adaptive
Cruise Control Off.”
1 — DISTANCE SETTING
2 — RES +
3 — SET -
4 — CANCEL
5 — ON/OFF
6 — MODE
208 UNDERSTANDING THE FEATURES OF YOUR VEHICLE
Page 280 of 557

▫Messages # ......................... 309
▫ Turn Menu Off ...................... 309
� Uconnect Touch™ Settings ............... 309
▫ Hard-Keys ......................... 309
▫ Soft-Keys .......................... 309
▫ Customer Programmable Features —
Uconnect Touch™ System 8.4 Settings ...... 310
▫ SRT Performance Features .............. 324
� Setting The Analog Clock ................ 328
� iPod�/USB/MP3 Control — If Equipped ..... 328
� Harman Kardon� Logic7�High Performance
Multichannel Surround Sound System With
Driver-Selectable Surround (DSS) — If
Equipped ............................ 328 �
Steering Wheel Audio Controls ............ 330
▫ Radio Operation ..................... 330
▫ CD Player ......................... 331
� CD/DVD Disc Maintenance .............. 331
� Radio Operation And Mobile Phones ....... 332
� Climate Controls ...................... 332
▫ General Overview .................... 333
▫ Climate Control Functions .............. 340
▫ Automatic Temperature Control (ATC) ..... 341
▫ Operating Tips ...................... 342
278 UNDERSTANDING YOUR INSTRUMENT PANEL
Page 294 of 557
ELECTRONIC VEHICLE INFORMATION CENTER
(EVIC)
The Electronic Vehicle Information Center (EVIC) fea-
tures a driver-interactive display that is located in the
instrument cluster.This system allows the driver to select a variety of useful
information by pressing the switches mounted on the
steering wheel. The EVIC consists of the following:
•Radio Info
•Fuel Economy Info
•Cruise Control Info
•Digital Vehicle Speed
•Trip Info
•Tire Pressure
•Vehicle Info Messages
•Stored Warning Messages
•Turn Menu OFF
Electronic Vehicle Information Center (EVIC)
292 UNDERSTANDING YOUR INSTRUMENT PANEL
Page 295 of 557
The system allows the driver to select information by
pressing the following buttons mounted on the steering
wheel:UP Button
Press and release the UP button to scroll upward
through the main menu and Vehicle Info and
Trip Info sub-menus (Fuel Economy, Vehicle
Info, Tire PSI, Cruise, Messages) and sub-menus.
DOWN Button
Press and release the DOWN button to scroll
downward through the main menus and Ve-
hicle Info and Trip Info sub-menus.
SELECT Button Press and release the SELECT button to access
the information screens or sub-menu screens of
a main menu item. Press and hold the SELECT
button for two seconds to reset displayed/
selected features that can be reset.
EVIC Steering Wheel Buttons
4
UNDERSTANDING YOUR INSTRUMENT PANEL 293
Page 311 of 557

Messages #
Select from Main Menu using the UP or DOWN buttons.
This feature shows the number of stored warning mes-
sages (in the # place holder). Pressing the SELECT button
will allow you to see what the stored messages are.
Pressing the BACK button takes you back to the Main
Menu.
Turn Menu OFF
Select from Main Menu using the DOWN button. Press-
ing the SELECT button blanks the menu display. Pressing
any one of the four steering wheel buttons brings the
menu back.
Uconnect Touch™ SETTINGS
The Uconnect Touch™ system uses a combination of soft
and hard keys located on the center of the instrument
panel that allows you to access and change the customer
programmable features.
Hard-Keys
Hard-Keys are located below the Uconnect Touch™
system in the center of the instrument panel. In addition,
there is a Scroll/Enter control knob located on the right
side of the Climate Controls in the center of the instru-
ment panel. Turn the control knob to scroll through
menus and change settings (i.e., 30, 60, 90), press the
center of the control knob one or more times to select or
change a setting (i.e., ON, OFF).
Soft-Keys
Soft-Keys are accessible on the Uconnect Touch™ display.
4
UNDERSTANDING YOUR INSTRUMENT PANEL 309
Page 319 of 557

•Auto Dim High Beams “SmartBeam™” — If
Equipped
When this feature is selected, the high beam headlights
will deactivate automatically under certain conditions. To
make your selection, touch the Auto High Beams soft-
key, until a check-mark appears next to setting, showing
that setting has been selected. Touch the back arrow
soft-key to return to the previous menu. Refer to “Lights/
SmartBeam™ — If Equipped” in “Understanding The
Features Of Your Vehicle” for further information.
•Daytime Running Lights
When this feature is selected, the headlights will turn on
whenever the engine is running. To make your selection,
touch the Daytime Running Lights soft-key, until a
check-mark appears next to setting, showing that setting
has been selected. Touch the back arrow soft-key to
return to the previous menu.
•Steering Directed Lights
When this feature is selected, the headlights turn relative
to a change in direction of the steering wheel. To make
your selection, touch the Steering Directed Lights soft-
key, until a check-mark appears next to setting, showing
that setting has been selected. Touch the back arrow
soft-key to return to the previous menu.
•Flash Headlights With Lock
When this feature is selected, the headlights will flash
when the doors are locked or unlocked with the Remote
Keyless Entry (RKE) transmitter. This feature may be
selected with or without the sound horn on lock feature
selected. To make your selection, touch the Flash Head-
lights with Lock soft-key, until a check-mark appears
next to setting, showing that setting has been selected.
Touch the back arrow soft-key to return to the previous
menu.4
UNDERSTANDING YOUR INSTRUMENT PANEL 317
Page 322 of 557

NOTE:The seat will return to the memorized seat
location (if Recall Memory with Remote Key Unlock is set
to ON) when the Remote Keyless Entry (RKE) transmitter
is used to unlock the door. Refer to “Driver Memory
Seat” in “Understanding The Features Of Your Vehicle”
for further information.
Auto-On Comfort & Remote Start
After pressing the Auto-On Comfort & Remote Start
soft-key the following settings will be available.
•Horn With Remote Start
When this feature is selected, the horn will sound when
the remote start is activated. To make your selection,
touch the Sound Horn With Remote Start soft-key, until a
check-mark appears next to setting, showing that setting
has been selected. Touch the back arrow soft-key to
return to the previous menu.
•Auto-On Driver Heated/Ventilated Seat & Steering
Wheel With Vehicle Start — If Equipped
When this feature is selected the driver’s heated seat and
heated steering wheel will automatically turn on when
temperatures are below 40° F (4.4° C). When tempera-
tures are above 80° F (26.7° C) the driver vented seat will
turn on. To make your selection, touch the Auto Heated
Seats soft-key, until a check-mark appears next to setting,
showing that setting has been selected. Touch the back
arrow soft-key to return to the previous menu.
Engine Off Options
After pressing the Engine Off Options soft-key the fol-
lowing settings will be available.
•Easy Exit Seat
This feature provides automatic driver seat positioning to
enhance driver mobility when entering and exiting the
vehicle. To make your selection, touch the Easy Exit Seats
soft-key, until a check-mark appears next to setting,
320 UNDERSTANDING YOUR INSTRUMENT PANEL
Page 332 of 557

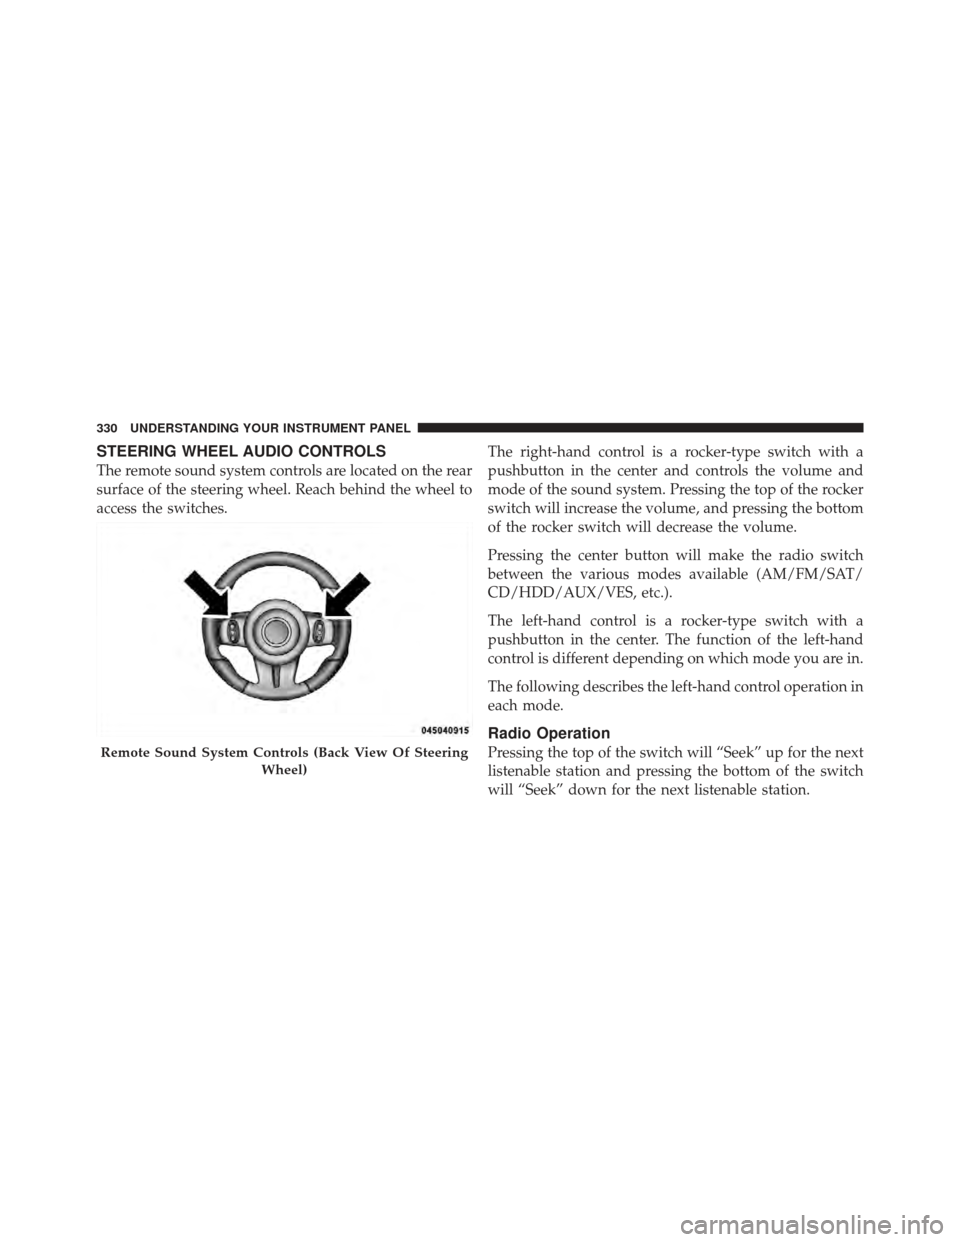
STEERING WHEEL AUDIO CONTROLS
The remote sound system controls are located on the rear
surface of the steering wheel. Reach behind the wheel to
access the switches.The right-hand control is a rocker-type switch with a
pushbutton in the center and controls the volume and
mode of the sound system. Pressing the top of the rocker
switch will increase the volume, and pressing the bottom
of the rocker switch will decrease the volume.
Pressing the center button will make the radio switch
between the various modes available (AM/FM/SAT/
CD/HDD/AUX/VES, etc.).
The left-hand control is a rocker-type switch with a
pushbutton in the center. The function of the left-hand
control is different depending on which mode you are in.
The following describes the left-hand control operation in
each mode.
Radio Operation
Pressing the top of the switch will “Seek” up for the next
listenable station and pressing the bottom of the switch
will “Seek” down for the next listenable station.Remote Sound System Controls (Back View Of Steering
Wheel)
330 UNDERSTANDING YOUR INSTRUMENT PANEL