Page 73 of 116

Block the front and rear of the wheel diagonally
opposite of the jacking position. For example,
if changing the right front tire, block the left
rear wheel.
NOTE:Passengers should not remain in the
vehicle when the vehicle is being jacked.
Jacking And Changing A Tire
1. Remove the spare tire, jack, and lug wrench.
2. If equipped with aluminum wheels where the center cap covers the lug nuts, use
the lug wrench to pry the center cap off
carefully before raising the vehicle.
3. Before raising the vehicle, use the lug wrench to loosen, but not remove, the lug
nuts on the wheel with the flat tire. Turn
the lug nuts counterclockwise one turn
while the wheel is still on the ground.
4. Place the jack underneath the lift area that is closest to the flat tire. Turn the jack screw clockwise to firmly engage the jack saddle with the lift area of the sill flange.
5. Raise the vehicle just enough to removethe flat tire and install the spare tire.
WHAT TO DO IN EMERGENCIES
71
ProCarManuals.com
Page 74 of 116

6. Remove the lug nuts and tire.
7. Mount the spare tire.
NOTE:
• For vehicles so equipped, do not attemptto install a center cap or wheel cover on
the compact spare.
• Refer to “Compact Spare Tire” and to “Limited-Use Spare” under
“Tires—General Information” in “Starting
and Operating” in the Owner's Manual on
the DVD for additional warnings,
cautions, and information about the spare
tire, its use, and operation.
8. Install the lug nuts with the cone shaped end of the lug nut toward the wheel.
Lightly tighten the lug nuts.
9. Lower the vehicle to the ground by turning the jack handle counterclockwise.
10. Finish tightening the lug nuts. Push down on the wrench while at the end of
the handle for increased leverage.
Tighten the lug nuts in a star pattern
until each nut has been tightened twice.
The correct tightness of each lug nut is
110 ft/lb. (150 N·m). If in doubt about
the correct tightness, have them
checked with a torque wrench by your
authorized dealer or at a service station.
11. Stow the jack, tools and flat tire. Make sure the base of the jack faces the front of the vehicle before tightening down the fastener.
Road Tire Installation
1. Mount the road tire on the axle.
2. Install the remaining lug nuts with the cone shaped end of the nut toward the wheel.Lightly tighten the lug nuts.
3. Lower the vehicle to the ground by turning the jack handle counterclockwise.
4. Finish tightening the lug nuts. Push down on the wrench while at the end of the handle for increased leverage. Tighten the lug nuts in a star pattern until each nut has been
tightened twice. The correct tightness of each lug nut is 110 ft/lbs (150 N·m). If in doubt
about the correct tightness, have them checked with a torque wrench by your authorized
dealer or service station.
5. After 25 miles (40 km) check the lug nut torque with a torque wrench to ensure that all lug nuts are properly seated against the wheel.
WHAT TO DO IN EMERGENCIES
72
ProCarManuals.com
Page 75 of 116

CAUTION!
Do not attempt to raise the vehicle by jacking on locations other than those indicated in the
Jacking Instructions for this vehicle.
WARNING!
• Do not attempt to change a tire on the side of the vehicle close to moving traffic. Pull farenough off the road to avoid the danger of being hit when operating the jack or
changing the wheel.
• Being under a jacked-up vehicle is dangerous. The vehicle could slip off the jack and fall on you. You could be crushed. Never put any part of your body under a vehicle that is on
a jack.
• Never start or run the engine while the vehicle is on a jack. If you need to get under a raised vehicle, take it to a service center where it can be raised on a lift.
• The jack is designed to be used as a tool for changing tires only. The jack should not be used to lift the vehicle for service purposes. The vehicle should be jacked on a firm level
surface only. Avoid ice or slippery areas.
• A loose tire or jack thrown forward in a collision or hard stop could endanger the occupants of the vehicle. Always stow the jack parts and the spare tire in the places
provided.
• Carefully follow these tire changing warnings to help prevent personal injury or damage to your vehicle:
• Always park on a firm, level surface as far from the edge of the roadway as possible before raising the vehicle.
• Turn on the Hazard Warning flasher.
• Block the wheel diagonally opposite the wheel to be raised.
• Set the parking brake firmly and set an automatic transmission in PARK; a manual transmission in REVERSE.
• Do not let anyone sit in the vehicle when it is on a jack.
• Do not get under the vehicle when it is on a jack.
• Only use the jack in the positions indicated and for lifting this vehicle during a tire change.
• If working on or near a roadway, be extremely careful of motor traffic.
• Raising the vehicle higher than necessary can make the vehicle less stable. It could slip off the jack and hurt someone near it. Raise the vehicle only enough to remove the tire.
• To avoid the risk of forcing the vehicle off the jack, do not fully tighten the wheel nuts until the vehicle has been lowered. Failure to follow this warning may result in personal
injury.
• A loose tire or jack thrown forward in a collision or hard stop could endanger the occupants of the vehicle. Always stow the jack parts and the spare tire in the places
provided.
(Continued)
WHAT TO DO IN EMERGENCIES
73
ProCarManuals.com
Page 76 of 116

• The limited-use spare tires are for emergency use only. Installation of this limited-usespare tire affects vehicle handling. With this tire, do not drive more than 60 mph
(100")
WARNING!(Continued)
• The limited-use spare tires are for emergency use only. Installation of this limited-usespare tire affects vehicle handling. With this tire, do not drive more than 60 mph
(100 km/h). Keep inflated to the cold tire inflation pressure listed on either your tire
placard or limited-use spare tire and wheel assembly. Replace (or repair) the original tire
at the first opportunity and reinstall it on your vehicle. Failure to do so could result in loss
of vehicle control.
BATTERY LOCATION
• The battery is stored under an access cover in the trunk. Remote battery posts are locatedon the right side of the engine compartment for jump-starting.
JUMP-STARTING
• If your vehicle has a discharged battery itcan be jump-started using a set of jumper
cables and a battery in another vehicle or
by using a portable battery booster pack.
• Jump-starting can be dangerous if done improperly so please follow the
procedures in this section carefully.
NOTE:When using a portable battery
booster pack follow the manufacturer’s
operating instructions and precautions.
Preparations for Jump-Start
• The battery is stored under an access cover in the trunk. Remote battery posts are located on the right side of the engine compartment for jump-starting.
NOTE:The remote battery posts are viewed by standing on the right side of the vehicle
looking over the fender.
• Set the parking brake, shift the automatic transmission into PARK and turn the ignition toOFF.
• Turn off the heater, radio, and all unnecessary electrical accessories.
• If using another vehicle to jump-start the battery, park the vehicle within the jumper cables reach, set the parking brake and make sure the ignition is OFF.
WHAT TO DO IN EMERGENCIES
74
ProCarManuals.com
Page 77 of 116
end of the jumper cable to the remote positive (+)post of the
discharged vehicle.
• Connect the opposite end of the positive (+)jumper cable to the")
Jump-Starting Procedure
• Connect the positive(+)end of the jumper cable to the remote positive (+)post of the
discharged vehicle.
• Connect the opposite end of the positive (+)jumper cable to the positive(+)post of the
booster battery.
• Connect the negative end (-)of the jumper cable to the negative (-)post of the booster
battery.
• Connect the opposite end of the negative (-)jumper cable to the remote negative(-)post
of the vehicle with the discharged battery.
• Start the engine in the vehicle that has the booster battery, let the engine idle a few minutes, and then start the engine in the vehicle with the discharged battery.
Once the engine is started, remove the jumper cables in the reverse sequence:
• Disconnect the negative (-)
jumper cable from the remote negative (-)post of the vehicle
with the discharged battery.
• Disconnect the negative end (-)of the jumper cable from the negative (-)post of the
booster battery.
• Disconnect the opposite end of the positive (+)jumper cable from the positive(+)post of
the booster battery.
• Disconnect the positive (+)end of the jumper cable from the remote positive (+)post of the
discharged vehicle.
• If frequent jump-starting is required to start your vehicle you should have the battery and charging system inspected at your authorized dealer.
CAUTION!
• Do not use a portable battery booster pack or any other booster source with a systemvoltage greater than 12 Volts or damage to the battery, starter motor, alternator or
electrical system may occur.
• Failure to follow these procedures could result in damage to the charging system of the booster vehicle or the discharged vehicle.
• Accessories that can be plugged into the vehicle power outlets draw power from the vehicle’s battery, even when not in use (i.e., cellular phones, etc.). Eventually, if plugged
in long enough, the vehicle’s battery will discharge sufficiently to degrade battery life
and/or prevent the engine from starting.
WARNING!
• When temperatures are below the freezing point, electrolyte in a discharged battery mayfreeze. Do not attempt jump-starting because the battery could rupture or explode and
cause personal injury. Battery temperature must be brought above freezing point before
attempting a jump-start.
(Continued)
WHAT TO DO IN EMERGENCIES
75
ProCarManuals.com
Page 78 of 116

• Take care to avoid the radiator cooling fan whenever the hood is raised. It can startanytime the ignition switch is on. You can be injured by moving fan blades.
• Remove any")
WARNING!(Continued)
• Take care to avoid the radiator cooling fan whenever the hood is raised. It can startanytime the ignition switch is on. You can be injured by moving fan blades.
• Remove any metal jewelry, such as watch bands or bracelets, that might make an inadvertent electrical contact. You could be severely injured.
• Batteries contain sulfuric acid that can burn your skin or eyes and generate hydrogen gas which is flammable and explosive. Keep open flames or sparks away from the battery.
• Do not allow vehicles to touch each other as this could establish a ground connection and personal injury could result.
• Failure to follow this procedure could result in personal injury or property damage due to battery explosion.
• Do not connect the cable to the negative post (-)of the discharged battery. The
resulting electrical spark could cause the battery to explode and could result in personal
injury.
SHIFT LEVER OVERRIDE
• If a malfunction occurs and the shift lever cannot be moved out of the PARK
position, you can use the following
procedure to temporarily move the shift
lever:
• The shift lever override port is located in the storage bin to the right of shift lever.
• Firmly set the parking brake.
• Turn the ignition switch to the ACC or ON position without starting the engine.
• Press and maintain firm pressure on the brake pedal.
• Using a screwdriver or similar tool, press and hold the override tab through the access port on the center console.
• Move the shift lever into the NEUTRAL position.
• The vehicle may then be started in NEUTRAL.
• Reinstall the override cover.
MANUAL PARK RELEASE — 8 SPEED TRANSMISSION (3.6L Engine)
• If a malfunction occurs and the shift lever cannot be moved out of the PARK position, you can use the following procedure to temporarily move the shift lever:
• Remove the console storage bin to access the Manual Park Release lever.
WHAT TO DO IN EMERGENCIES
76
ProCarManuals.com
Page 79 of 116

• Using a small screwdriver or similar tool,fish the tether strap up through the
opening in the console base.
• Insert the screwdriver into the slot in the center of the lever, and disengage the
spring steel lever locking tab by pushing it
to the right.
• While holding the locking tab in the disengaged position, pull the tether strap
to rotate the lever up and rearward, until it
locks in place in the vertical position. The
vehicle is now out of PARK and can be
towed. Release the parking brake only
when the vehicle is securely connected to
a tow vehicle.
To Reset The Manual Park Release: • Push the latch (at the base of the lever, onthe rear side) rearward (away from the
lever) to unlatch the lever.
• Rotate the Manual Park Release lever forward and down, to its original position,
until the locking tab snaps into place to
secure the lever.
• Pull up gently on the tether strap to confirm that the lever is locked in its
stowed position.
• Tuck the tether strap into the base of the console. Reinstall the console storage bin.
WARNING!
Always secure your vehicle by fully applying the parking brake, before activating the
Manual Park Release. Activating the Manual Park Release will allow your vehicle to roll
away if it is not secured by the parking brake or by proper connection to a tow vehicle.
Activating the Manual Park Release on an unsecured vehicle could lead to serious injury or
death for those in or around the vehicle.
WHAT TO DO IN EMERGENCIES
77
ProCarManuals.com
Page 80 of 116
TOWING A DISABLED VEHICLEModelFlat Towing
(all four wheels on the
ground)Flatbed Towing
(all four wheels suspended
OFF the ground)Front Wheels Raised, Rear
Wheels on the Ground
Rear Wheels Raised, Front
Wheels on the Ground
RWDWithoutaKey NOT Permitted
Recommended Method NOT Permitted NOT Permitted
RWDWithaKey Shift lever must be in
NEUTRAL. The distance to
be traveled must not exceed
15 mi (24 km), and the
towing speed must not
exceed 30 mph (48 km/h).Recommended Method May Be Used
NOT Permitted
AWDWithoutaKey NOT Permitted
Recommended Method NOT Permitted NOT Permitted
AWDWithaKey Shift lever must be in
NEUTRAL and the
driveshaft must be removed.Recommended Method NOT Permitted
NOT Permitted
WHAT TO DO IN EMERGENCIES
78
ProCarManuals.com
 1
1 2
2 3
3 4
4 5
5 6
6 7
7 8
8 9
9 10
10 11
11 12
12 13
13 14
14 15
15 16
16 17
17 18
18 19
19 20
20 21
21 22
22 23
23 24
24 25
25 26
26 27
27 28
28 29
29 30
30 31
31 32
32 33
33 34
34 35
35 36
36 37
37 38
38 39
39 40
40 41
41 42
42 43
43 44
44 45
45 46
46 47
47 48
48 49
49 50
50 51
51 52
52 53
53 54
54 55
55 56
56 57
57 58
58 59
59 60
60 61
61 62
62 63
63 64
64 65
65 66
66 67
67 68
68 69
69 70
70 71
71 72
72 73
73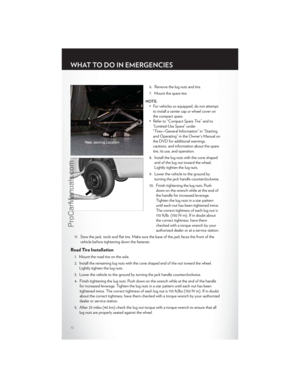 74
74 75
75 76
76 77
77 78
78 79
79 80
80 81
81 82
82 83
83 84
84 85
85 86
86 87
87 88
88 89
89 90
90 91
91 92
92 93
93 94
94 95
95 96
96 97
97 98
98 99
99 100
100 101
101 102
102 103
103 104
104 105
105 106
106 107
107 108
108 109
109 110
110 111
111 112
112 113
113 114
114 115
115Flatbed Towing
(all four wheels suspended
OFF the ground)Front Wheels Raised, Rear
Wheels on the Ground
Rear Wheels Raised, Fro")