2012 CHEVROLET SUBURBAN instrument panel
[x] Cancel search: instrument panelPage 188 of 514
Black plate (4,1)Chevrolet Tahoe/Suburban Owner Manual - 2012
6-4 Lighting
To turn off the automatic headlamp
system, turn the exterior lamps
switch to the off position and then
release it. For vehicles first sold in
Canada, the transmission must be
in the P (Park) position before the
automatic headlamp system can be
turned off.
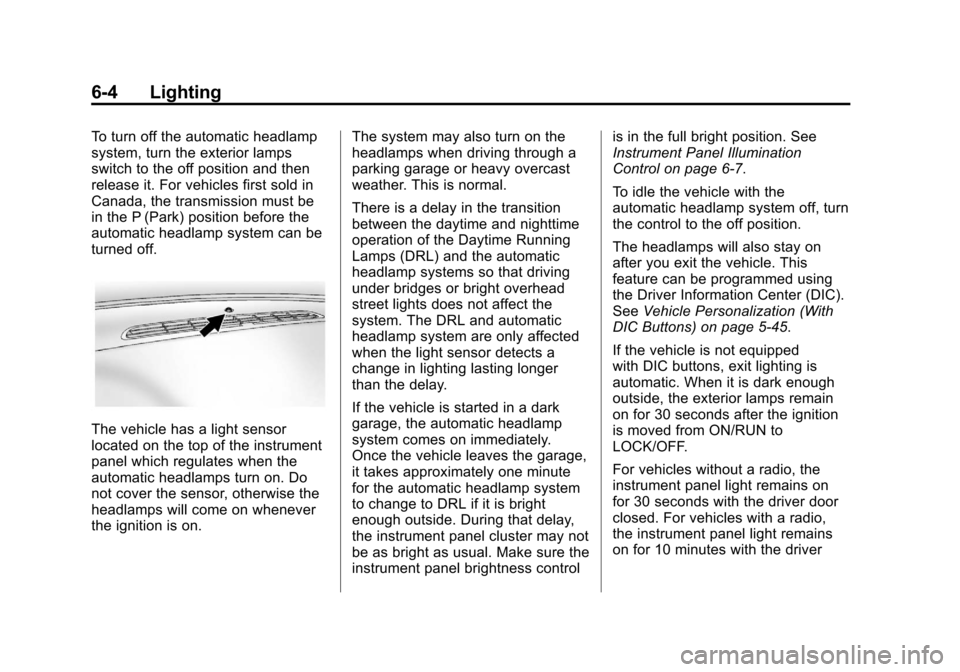
The vehicle has a light sensor
located on the top of the instrument
panel which regulates when the
automatic headlamps turn on. Do
not cover the sensor, otherwise the
headlamps will come on whenever
the ignition is on.The system may also turn on the
headlamps when driving through a
parking garage or heavy overcast
weather. This is normal.
There is a delay in the transition
between the daytime and nighttime
operation of the Daytime Running
Lamps (DRL) and the automatic
headlamp systems so that driving
under bridges or bright overhead
street lights does not affect the
system. The DRL and automatic
headlamp system are only affected
when the light sensor detects a
change in lighting lasting longer
than the delay.
If the vehicle is started in a dark
garage, the automatic headlamp
system comes on immediately.
Once the vehicle leaves the garage,
it takes approximately one minute
for the automatic headlamp system
to change to DRL if it is bright
enough outside. During that delay,
the instrument panel cluster may not
be as bright as usual. Make sure the
instrument panel brightness controlis in the full bright position. See
Instrument Panel Illumination
Control on page 6‑7.
To idle the vehicle with the
automatic headlamp system off, turn
the control to the off position.
The headlamps will also stay on
after you exit the vehicle. This
feature can be programmed using
the Driver Information Center (DIC).
See
Vehicle Personalization (With
DIC Buttons) on page 5‑45.
If the vehicle is not equipped
with DIC buttons, exit lighting is
automatic. When it is dark enough
outside, the exterior lamps remain
on for 30 seconds after the ignition
is moved from ON/RUN to
LOCK/OFF.
For vehicles without a radio, the
instrument panel light remains on
for 30 seconds with the driver door
closed. For vehicles with a radio,
the instrument panel light remains
on for 10 minutes with the driver
Page 189 of 514
Black plate (5,1)Chevrolet Tahoe/Suburban Owner Manual - 2012
Lighting 6-5
door closed. SeeRetained
Accessory Power (RAP) on
page 9‑26.
The regular headlamp system can
be turned on when needed.
Hazard Warning Flashers
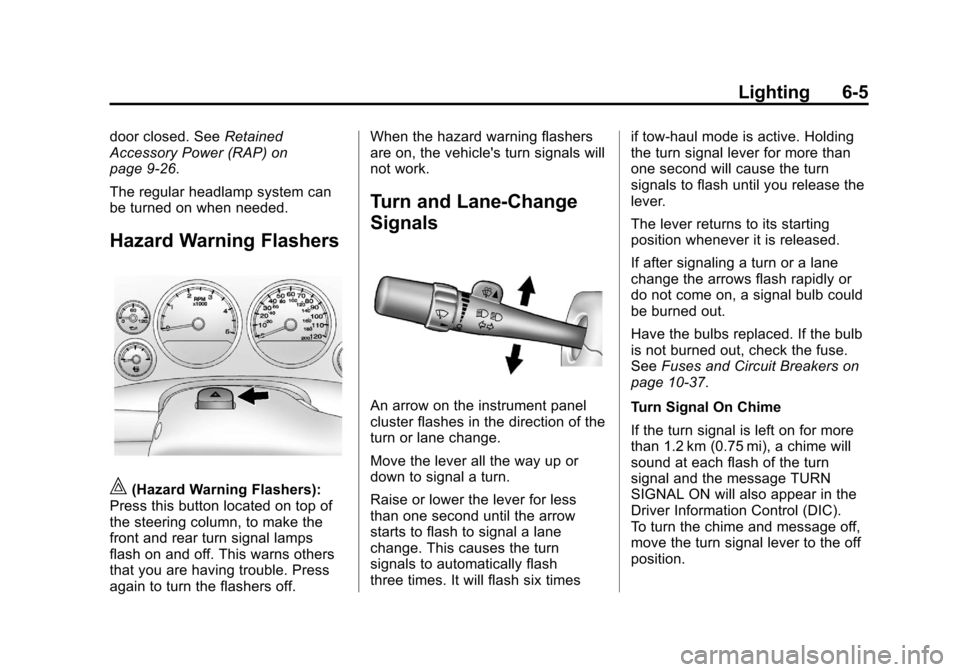
|(Hazard Warning Flashers):
Press this button located on top of
the steering column, to make the
front and rear turn signal lamps
flash on and off. This warns others
that you are having trouble. Press
again to turn the flashers off. When the hazard warning flashers
are on, the vehicle's turn signals will
not work.
Turn and Lane-Change
Signals
An arrow on the instrument panel
cluster flashes in the direction of the
turn or lane change.
Move the lever all the way up or
down to signal a turn.
Raise or lower the lever for less
than one second until the arrow
starts to flash to signal a lane
change. This causes the turn
signals to automatically flash
three times. It will flash six times
if tow-haul mode is active. Holding
the turn signal lever for more than
one second will cause the turn
signals to flash until you release the
lever.
The lever returns to its starting
position whenever it is released.
If after signaling a turn or a lane
change the arrows flash rapidly or
do not come on, a signal bulb could
be burned out.
Have the bulbs replaced. If the bulb
is not burned out, check the fuse.
See
Fuses and Circuit Breakers on
page 10‑37.
Turn Signal On Chime
If the turn signal is left on for more
than 1.2 km (0.75 mi), a chime will
sound at each flash of the turn
signal and the message TURN
SIGNAL ON will also appear in the
Driver Information Control (DIC).
To turn the chime and message off,
move the turn signal lever to the off
position.
Page 190 of 514
Black plate (6,1)Chevrolet Tahoe/Suburban Owner Manual - 2012
6-6 Lighting
Fog Lamps
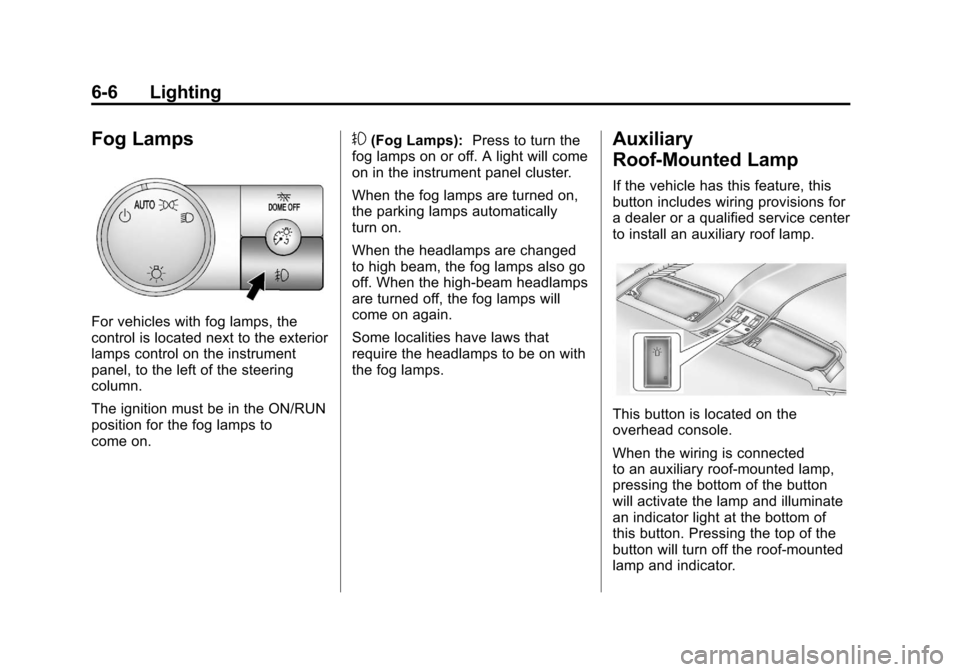
For vehicles with fog lamps, the
control is located next to the exterior
lamps control on the instrument
panel, to the left of the steering
column.
The ignition must be in the ON/RUN
position for the fog lamps to
come on.
#(Fog Lamps):Press to turn the
fog lamps on or off. A light will come
on in the instrument panel cluster.
When the fog lamps are turned on,
the parking lamps automatically
turn on.
When the headlamps are changed
to high beam, the fog lamps also go
off. When the high-beam headlamps
are turned off, the fog lamps will
come on again.
Some localities have laws that
require the headlamps to be on with
the fog lamps.Auxiliary
Roof-Mounted Lamp
If the vehicle has this feature, this
button includes wiring provisions for
a dealer or a qualified service center
to install an auxiliary roof lamp.
This button is located on the
overhead console.
When the wiring is connected
to an auxiliary roof‐mounted lamp,
pressing the bottom of the button
will activate the lamp and illuminate
an indicator light at the bottom of
this button. Pressing the top of the
button will turn off the roof‐mounted
lamp and indicator.
Page 191 of 514
Black plate (7,1)Chevrolet Tahoe/Suburban Owner Manual - 2012
Lighting 6-7
The emergency roof lamp circuit
is fused at 30 amps, so the total
current draw of the attached lamps
should be less than this value. The
attachment points for the roof lamp
circuits are two blunt cut wires
located above the overhead
console, a dark green switched
power wire and a black ground wire.
For more information on roof mount
emergency lamp installation, please
visit the GM Upfitter website at
www.gmupfitter.com or contact your
dealer.
If the vehicle has this button,
the vehicle may have the snow
plow prep package. For further
information, seeAdding a Snow
Plow or Similar Equipment on
page 9‑85.Interior Lighting
Instrument Panel
Illumination Control
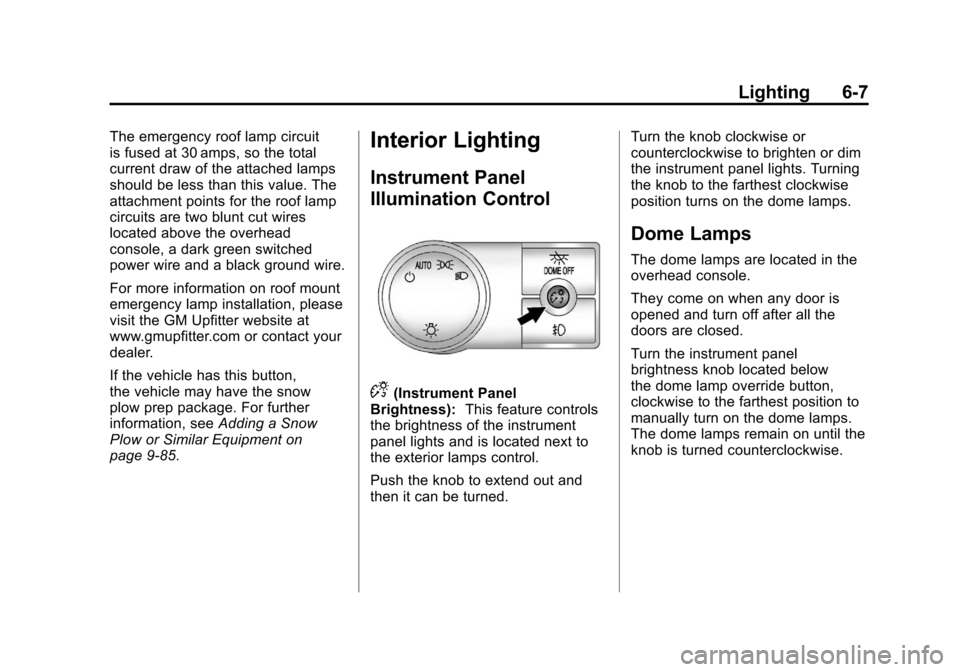
D(Instrument Panel
Brightness): This feature controls
the brightness of the instrument
panel lights and is located next to
the exterior lamps control.
Push the knob to extend out and
then it can be turned. Turn the knob clockwise or
counterclockwise to brighten or dim
the instrument panel lights. Turning
the knob to the farthest clockwise
position turns on the dome lamps.
Dome Lamps
The dome lamps are located in the
overhead console.
They come on when any door is
opened and turn off after all the
doors are closed.
Turn the instrument panel
brightness knob located below
the dome lamp override button,
clockwise to the farthest position to
manually turn on the dome lamps.
The dome lamps remain on until the
knob is turned counterclockwise.
Page 225 of 514
Black plate (31,1)Chevrolet Tahoe/Suburban Owner Manual - 2012
Infotainment System 7-31
player. If a portable audio player is
not connected,“No Input Device
Found” displays.
DVD/CD AUX (CD/Auxiliary):
Press to cycle through DVD, CD,
or Auxiliary when listening to the
radio. The DVD/CD text tab and a
message showing track or chapter
number displays when a disc is in
either slot. Press again and the
system automatically searches for
an auxiliary input device, such as a
portable audio player. If a portable
audio player is not connected, “No
Aux Input Device” displays. If a disc
is in both the DVD slot and the CD
slot the DVD/CD AUX button cycles
between the two sources and not
indicate “No Aux Input Device”. If a
front auxiliary device is connected,
the DVD/CD AUX button cycles
through all available options,
such as: DVD slot, CD slot, Front
Auxiliary, and Rear Auxiliary
(if available). See “Using the
Auxiliary Input Jack(s)” in this
section, or “Audio/Video (A/V) Jacks”
under,Rear Seat
Entertainment (RSE) System on
page 7‑35 for more information.
Using the USB Port
Radios with a USB port can control
a USB storage device or an iPod
using the radio buttons and knobs.
USB Support
The USB connector is located on
the instrument panel or in the
center console, and uses the
USB 2.0 standard.
USB Supported Devices
.USB Flash Drives
.Portable USB Hard Drives
.Fifth generation or later iPod
.iPod nanos
.iPod touch
.iPod classic
Not all iPods and USB Drives are
compatible with the USB port. Make sure the iPod has the
latest firmware from Apple
®
for proper operation. iPod
firmware can be updated using
the latest iTunes
®application.
See www.apple.com/itunes.
For help with identifying your iPod,
go to www.apple.com/support.
Radios that have a USB port can
play .mp3 and .wma files that are
stored on a USB storage device as
well as AAC files that are stored on
an iPod.
USB Supported File and Folder
Structure
The radio supports:
.Up to 700 folders.
.Up to 8 folders in depth.
.Up to 65,535 files.
.Folder and file names up to
64 bytes.
.Files with an .mp3 or .wma file
extension.
Page 226 of 514
Black plate (32,1)Chevrolet Tahoe/Suburban Owner Manual - 2012
7-32 Infotainment System
.AAC files stored on an iPod.
.FAT16
.FAT32
Connecting a USB Storage
Device or iPod
The USB Port can be used to
control an iPod or a USB storage
device.
To connect a USB storage device,
connect the device to the USB port
located in the center console or on
the instrument panel.
To connect an iPod, connect one
end of the USB cable that came
with the iPod to the iPod’s dock
connector and connect the other
end to the USB port located in the
center console or on the instrument
panel. If the vehicle is on and theUSB connection works,
“OK to
disconnect” and a GM logo may
appear on the iPod and iPod
appears on the radio display. The
iPod music appears on the radio’s
display and begins playing.
The iPod charges while it is
connected to the vehicle if the
vehicle is in the ACC/ACCESSORY
or ON/RUN position. When the
vehicle is turned off, the iPod
automatically powers off and will
not charge or draw power from the
vehicle's battery.
If you have an older iPod model that
is not supported, it can still be used
by connecting it to the Auxiliary
Input Jack using a standard 3.5 mm
(1/8 in) stereo cable. See “Using the
Auxiliary Input Jack” earlier for more
information.
Using the Radio to Control a
USB Storage Device or iPod
The radio can control a USB
storage device or an iPod using the
radio buttons and knobs and display
song information on the radio’s
display.
f(Tune): Turn to select files.
©SEEK:Press to go to the start of
the track, if more than ten seconds
have played. Press and hold or
press multiple times to continue
moving backward through tracks.
¨SEEK: Press to go to the next
track. Press and hold or press
multiple times to continue moving
forward through tracks.
sREV (Reverse): Press and hold
to reverse playback quickly. Sound
is heard at a reduced volume.
Release
sREV to resume playing.
The elapsed time of the file
displays.
Page 250 of 514

Black plate (2,1)Chevrolet Tahoe/Suburban Owner Manual - 2012
8-2 Climate Controls
Temperature Control:Move
the thumbwheels up or down
to increase or decrease the
temperature on the driver side or
the passenger side of the vehicle
for the dual zone system.
9(Fan Control): Turn the left
knob clockwise or counterclockwise
to increase or decrease the fan
speed. Turn the knob all the way
counterclockwise to turn the front
system off.
Air Delivery Mode Control: Turn
clockwise or counterclockwise to
change the airflow direction inside
the vehicle. By positioning the knob
between two modes, a combination
of those modes is selected.
Select from the following modes:
H(Vent): Air is directed to the
instrument panel outlets.
)(Bi-Level): Air is divided
between the instrument panel and
floor outlets. Some air is directed
towards the windshield and side window outlets. Cooler air is
directed to the upper outlets and
warmer air to the floor outlets.
6(Floor):
Air is directed to the
floor outlets, with some of the air
directed to the windshield, side
window, and second row floor
outlets. In this mode, the system
automatically selects outside air.
Recirculation cannot be selected
when in Floor Mode.
-(Defog): The defog mode is
used to clear the windows of fog
or moisture. Air is directed to the
windshield, floor outlets, and side
window vents. In this mode, the
system turns off recirculation and
runs the air conditioning compressor
unless the outside temperature is
close to freezing. The recirculation
mode cannot be selected while in
the defog mode.
0(Defrost): The defrost mode
is used to remove fog or frost from
the windshield more quickly. Air is
directed to the windshield and side
window vents, with some directed to
the floor vents. In this mode, the
system automatically forces outside
air into the vehicle. The recirculation
mode cannot be selected while
in the defrost mode. The air
conditioning compressor runs
automatically in this setting, unless
the outside temperature is close to
freezing.
Do not drive the vehicle until all the
windows are clear.
#(Air Conditioning): Press this
button to turn the air conditioning
system on or off. An indicator
light comes on to show that the
air conditioning is on. The air
conditioning can be selected in any
mode as long as the fan switch
is on.
Page 254 of 514
Black plate (6,1)Chevrolet Tahoe/Suburban Owner Manual - 2012
8-6 Climate Controls
When AUTO is selected, the
air conditioning operation and
air inlet will be automatically
controlled. The air conditioning
compressor will run when the
outside temperature is over
about 4°C (40°F). The air inlet
will normally be set to outside
air. If it is hot outside, the air
inlet may automatically switch
to recirculate inside air to help
quickly cool down the vehicle.
The light on the button comes on
in recirculation.
2. Set the driver and passenger temperature.
To find your comfort setting, start
with a 23°C (74°F) temperature
setting and allow about
20 minutes for the system to
regulate. Use the driver or
passenger temperature buttons
to adjust the temperature setting
as necessary. If a temperature
setting of 15°C (60°F) is chosen,
the system remains at the
maximum cooling setting. If a temperature setting of 32°C
(90°F) is chosen, the system
remains at the maximum
heat setting. Choosing either
maximum setting will not cause
the vehicle to heat or cool any
faster.
Do not cover the solar sensor
located on the top of the instrument
panel near the windshield. This
sensor regulates air temperature
based on sun load and also turns
on the headlamps. For more
information on the solar sensor, see
“Sensors” later in this section.
To avoid blowing cold air in cold
weather, the system will delay
turning on the fan until warm air
is available. The length of delay
depends on the engine coolant
temperature. Pressing the fan
switch will override this delay and
change the fan to a selected speed.Manual Operation
D C(Fan Control): Press these
buttons to increase or decrease the
fan speed.
Pressing either fan button while in
automatic control places the fan
under manual control. The fan
setting remains displayed and
the AUTO light turns off. The air
delivery mode remains under
automatic control.
H G(Air Delivery Mode Control):
Press these buttons to change the
direction of the airflow in the vehicle.
Repeatedly press either button until
the desired mode appears on the
display. Pressing either mode button
while the system is off changes the
air delivery mode without turning the
system on. Pressing either mode
button while in automatic control
places the mode under manual
control.
The air delivery mode setting is
displayed and the AUTO light
turns off. The fan remains under
automatic control.