2012 CHEVROLET SILVERADO ECU
[x] Cancel search: ECUPage 390 of 584

Black plate (104,1)Chevrolet Silverado Owner Manual - 2012
9-104 Driving and Operating
Safety Chains
Always attach chains between the
vehicle and the trailer. Cross the
safety chains under the tongue of
the trailer to help prevent the tongue
from contacting the road if it
becomes separated from the hitch.
Instructions about safety chains
may be provided by the hitch
manufacturer or by the trailer
manufacturer. If the trailer being
towed weighs up to 2 271 kg
(5,000 lbs) with a factory-installed
step bumper, safety chains may be
attached to the attaching points on
the bumper; otherwise, safety
chains should be attached to holes
on the trailer hitch platform. Always
leave just enough slack so the
combination can turn. Never allow
safety chains to drag on the ground.
Trailer Brakes
A loaded trailer that weighs more
than 900 kg (2,000 lbs) needs to
have its own brake system that is
adequate for the weight of the
trailer. Be sure to read and follow
the instructions for the trailer brakes
so they are installed, adjusted, and
maintained properly.
Do not tap into the vehicle's
hydraulic brake system.
Auxiliary Battery
The auxiliary battery provision can
be used to supply electrical power
to additional equipment that may be
added, such as a slide-in camper.
If the vehicle has this provision, this
relay will be located on the driver
side of the vehicle, next to the
underhood electrical center.
Be sure to follow the proper
installation instructions included
with any electrical equipment that is
installed.Notice:
Leaving electrical
equipment on for extended
periods will drain the battery.
Always turn off electrical
equipment when not in use and
do not use equipment that
exceeds the maximum amperage
rating for the auxiliary battery
provision.
Trailer Wiring Harness
The vehicle is equipped with one of
the following wiring harnesses for
towing a trailer or hauling a slide-in
camper.
Basic Trailer Wiring
All regular, extended cab and crew
cab pickups have a seven‐wire
trailer towing harness.
For vehicles not equipped with
heavy duty trailering, the harness
is secured to the vehicle's frame
behind the spare tire mount.
The harness requires the installation
of a trailer connector, which is
available through your dealer.
Page 402 of 584
Black plate (116,1)Chevrolet Silverado Owner Manual - 2012
9-116 Driving and Operating
Say, for example, you have a 318 kg
(700 lb) snow plow. The total weight
of all occupants and cargo inside
the cab should not exceed 135 kg
(300 lb). This means that you may
only be able to carry one passenger.
But, even this may be too much if
there is other equipment already
adding to the weight of the vehicle.
Here are some guidelines for safely
carrying a snow plow on the vehicle:
.Make sure the weight on the
front and rear axles does not
exceed the axle rating for each.
.For the front axle, if more cargo
or passengers must be carried,
appropriate counter ballast must
be installed rear of the rear axle.
Counter ballast must be properly
secured so it will not move
during driving.
.Follow the snow plow
manufacturer's
recommendations regarding
rear ballast. Rear ballast may be
required to ensure a proper front
and rear weight distribution ratio,
even though the actual weight at
the front axle may be less than
the front axle rating.
.The snow plow manufacturer
or installer can assist you in
determining the amount of rear
ballast required, to help make
sure the snowplow/vehicle
combination does not exceed
the GVW rating, the front and
rear axle ratings, and the front
and rear weight distribution ratio.
.The total vehicle must not
exceed the GVW rating.Front axle reserve capacity is the
difference between the Gross Axle
Weight Rating (GAWR) and the front
axle weight of the vehicle with full
fuel and passengers. Basically, it is
the amount of weight that can be
added to the front axle before
reaching the front GAWR.
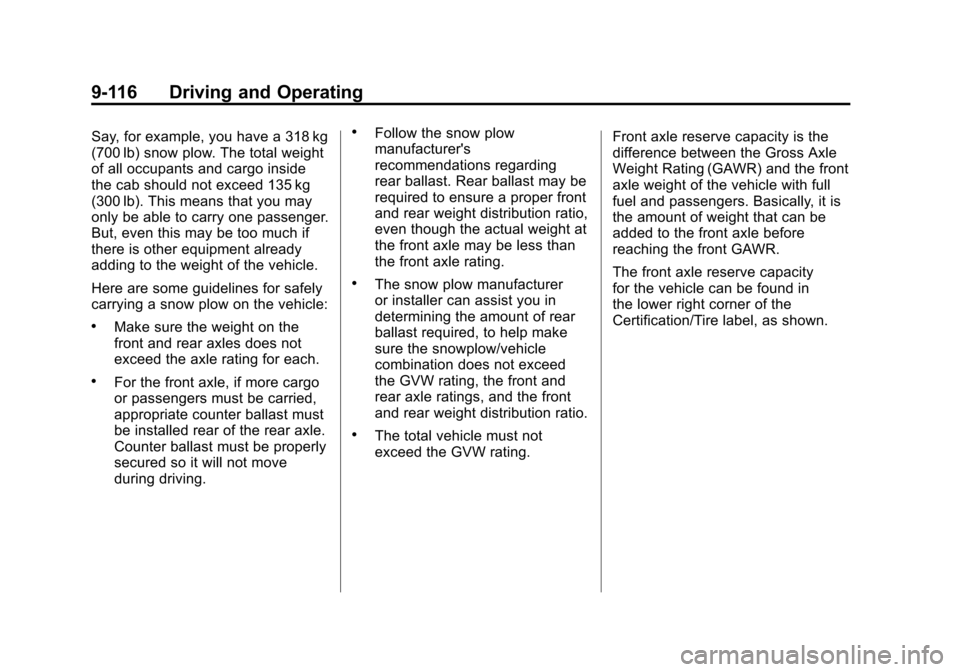
The front axle reserve capacity
for the vehicle can be found in
the lower right corner of the
Certification/Tire label, as shown.
Page 429 of 584
Black plate (23,1)Chevrolet Silverado Owner Manual - 2012
Vehicle Care 10-23
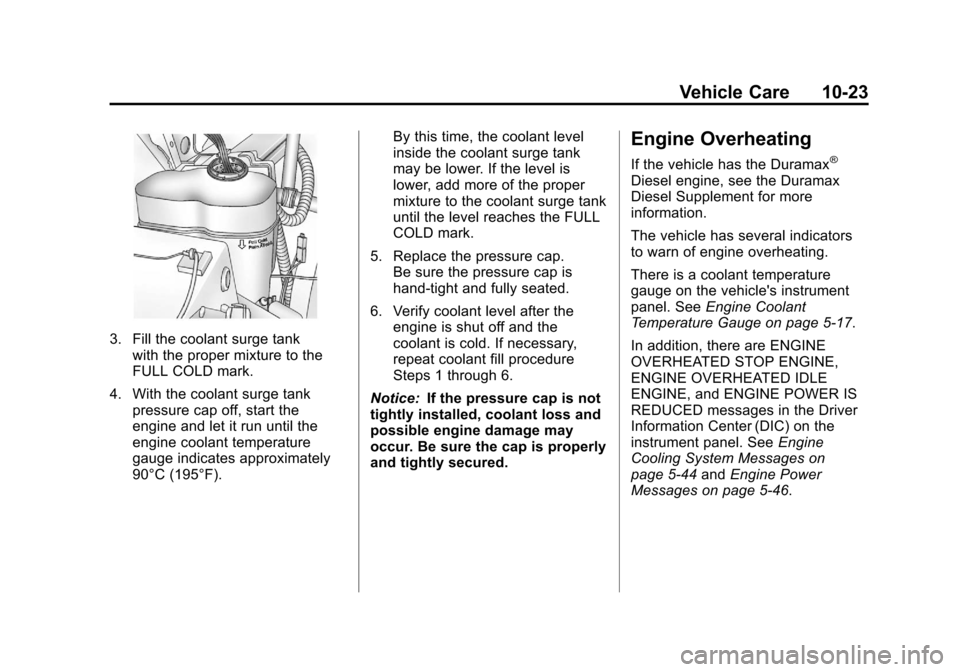
3. Fill the coolant surge tankwith the proper mixture to the
FULL COLD mark.
4. With the coolant surge tank pressure cap off, start the
engine and let it run until the
engine coolant temperature
gauge indicates approximately
90°C (195°F). By this time, the coolant level
inside the coolant surge tank
may be lower. If the level is
lower, add more of the proper
mixture to the coolant surge tank
until the level reaches the FULL
COLD mark.
5. Replace the pressure cap. Be sure the pressure cap is
hand-tight and fully seated.
6. Verify coolant level after the engine is shut off and the
coolant is cold. If necessary,
repeat coolant fill procedure
Steps 1 through 6.
Notice: If the pressure cap is not
tightly installed, coolant loss and
possible engine damage may
occur. Be sure the cap is properly
and tightly secured.
Engine Overheating
If the vehicle has the Duramax®
Diesel engine, see the Duramax
Diesel Supplement for more
information.
The vehicle has several indicators
to warn of engine overheating.
There is a coolant temperature
gauge on the vehicle's instrument
panel. See Engine Coolant
Temperature Gauge on page 5‑17.
In addition, there are ENGINE
OVERHEATED STOP ENGINE,
ENGINE OVERHEATED IDLE
ENGINE, and ENGINE POWER IS
REDUCED messages in the Driver
Information Center (DIC) on the
instrument panel. See Engine
Cooling System Messages on
page 5‑44 andEngine Power
Messages on page 5‑46.
Page 448 of 584
Black plate (42,1)Chevrolet Silverado Owner Manual - 2012
10-42 Vehicle Care
Bulb Replacement
For the proper type of replacement
bulbs, seeReplacement Bulbs on
page 10‑45.
For any bulb‐changing procedure
not listed in this section, contact
your dealer.
Halogen Bulbs
{WARNING
Halogen bulbs have pressurized
gas inside and can burst if you
drop or scratch the bulb. You or
others could be injured. Be sure
to read and follow the instructions
on the bulb package.
Headlamps, Front Turn
Signal, Sidemarker, and
Parking Lamps
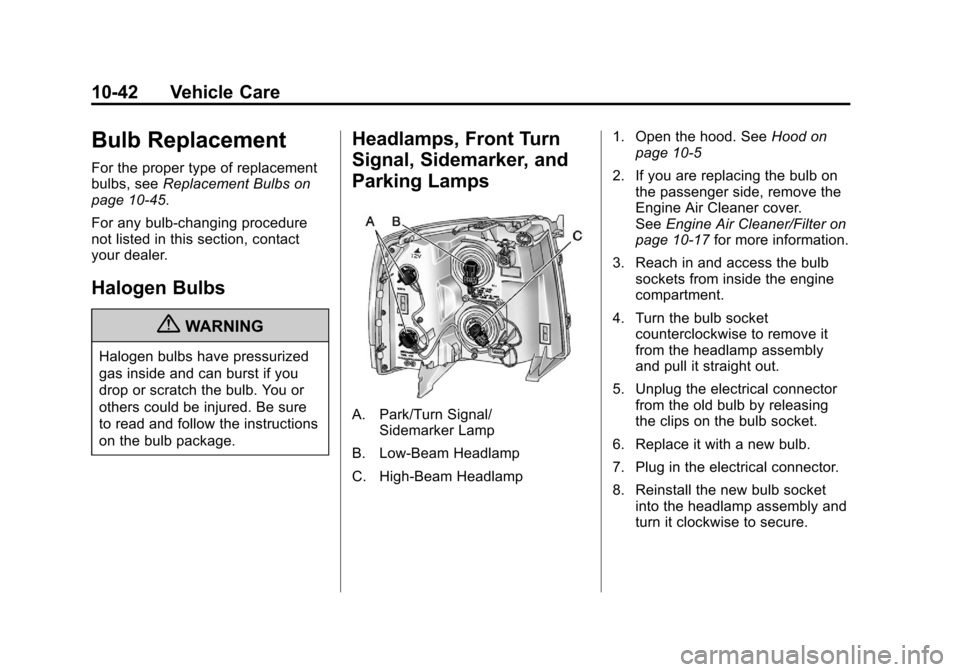
A. Park/Turn Signal/
Sidemarker Lamp
B. Low‐Beam Headlamp
C. High‐Beam Headlamp 1. Open the hood. See
Hood on
page 10‑5
2. If you are replacing the bulb on the passenger side, remove the
Engine Air Cleaner cover.
See Engine Air Cleaner/Filter on
page 10‑17 for more information.
3. Reach in and access the bulb sockets from inside the engine
compartment.
4. Turn the bulb socket counterclockwise to remove it
from the headlamp assembly
and pull it straight out.
5. Unplug the electrical connector from the old bulb by releasing
the clips on the bulb socket.
6. Replace it with a new bulb.
7. Plug in the electrical connector.
8. Reinstall the new bulb socket into the headlamp assembly and
turn it clockwise to secure.
Page 484 of 584
Black plate (78,1)Chevrolet Silverado Owner Manual - 2012
10-78 Vehicle Care
Tire Chains
{WARNING
If the vehicle has dual wheels or
P265/65R18, P275/55R20,
LT265/70R17, LT265/70R18,
LT265/60R20, P285/50R20,
P285/45R22 or 285/45R22 size
tires, do not use tire chains.
They can damage the vehicle
because there is not enough
clearance. Tire chains used on a
vehicle without the proper amount
of clearance can cause damage
to the brakes, suspension,
or other vehicle parts. The area
damaged by the tire chains could
cause you to lose control of the
vehicle and you or others may be
injured in a crash.(Continued)
WARNING (Continued)
Use another type of traction
device only if its manufacturer
recommends it for use on the
vehicle and tire size combination
and road conditions. Follow that
manufacturer's instructions.
To help avoid damage to the
vehicle, drive slowly, readjust,
or remove the device if it is
contacting the vehicle, and
do not spin the vehicle's wheels.
If you do find traction devices
that will fit, install them on the
rear tires. Notice:
If the vehicle does not
have dual wheels and has a tire
size other than P265/65R18,
P275/55R20, LT265/70R17, LT265/
70R18, LT265/60R20, P285/50R20,
P285/45R22, or 285/45R22, use
tire chains only where legal and
only when you must. Use chains
that are the proper size for the
tires. Install them on the tires of
the rear axle. Do not use chains
on the tires of the front axle.
Tighten them as tightly as
possible with the ends securely
fastened. Drive slowly and
follow the chain manufacturer's
instructions. If you can hear the
chains contacting the vehicle,
stop and retighten them. If the
contact continues, slow down
until it stops. Driving too fast or
spinning the wheels with chains
on will damage the vehicle.
Page 491 of 584
Black plate (85,1)Chevrolet Silverado Owner Manual - 2012
Vehicle Care 10-85
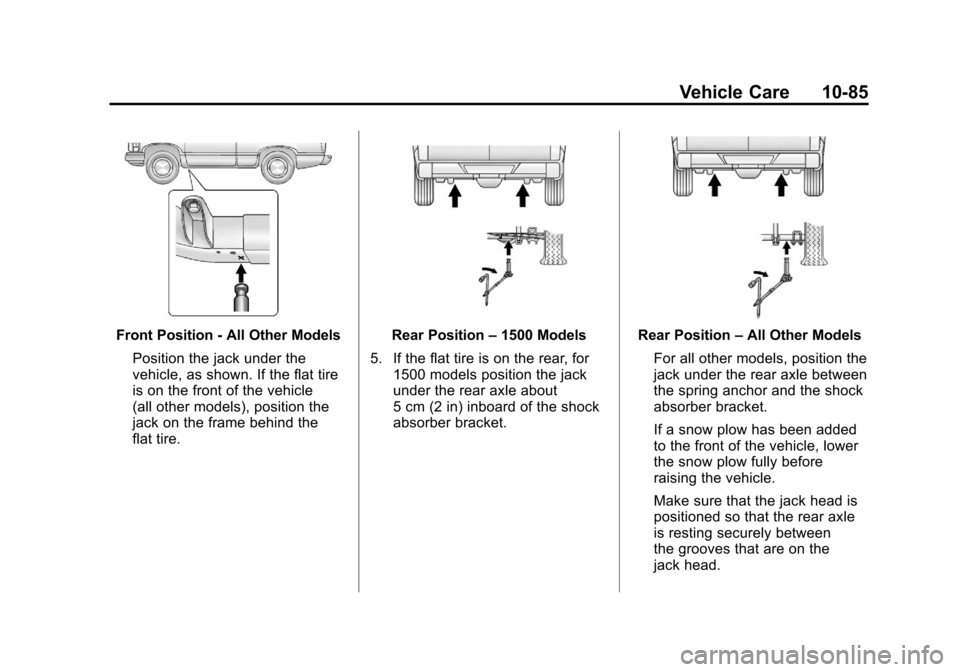
Front Position - All Other ModelsPosition the jack under the
vehicle, as shown. If the flat tire
is on the front of the vehicle
(all other models), position the
jack on the frame behind the
flat tire.Rear Position –1500 Models
5. If the flat tire is on the rear, for 1500 models position the jack
under the rear axle about
5 cm (2 in) inboard of the shock
absorber bracket.Rear Position –All Other Models
For all other models, position the
jack under the rear axle between
the spring anchor and the shock
absorber bracket.
If a snow plow has been added
to the front of the vehicle, lower
the snow plow fully before
raising the vehicle.
Make sure that the jack head is
positioned so that the rear axle
is resting securely between
the grooves that are on the
jack head.
Page 496 of 584
Black plate (90,1)Chevrolet Silverado Owner Manual - 2012
10-90 Vehicle Care
4. Insert the hoist end (F) throughthe hole (G) in the rear bumper
and onto the hoist shaft.
Do not use the chiseled end of
the wheel wrench.
5. Raise the tire part way upward. Make sure the retainer is seated
in the wheel opening.
6. Raise the tire fully against the underside of the vehicle by
turning the wheel wrench
clockwise until you hear two
clicks or feel it skip twice. You
cannot overtighten the cable.7. Make sure the tire is stored
securely. Push, pull (A), and then
try to turn (B) the tire. If the tire
moves, use the wheel wrench to
tighten the cable.
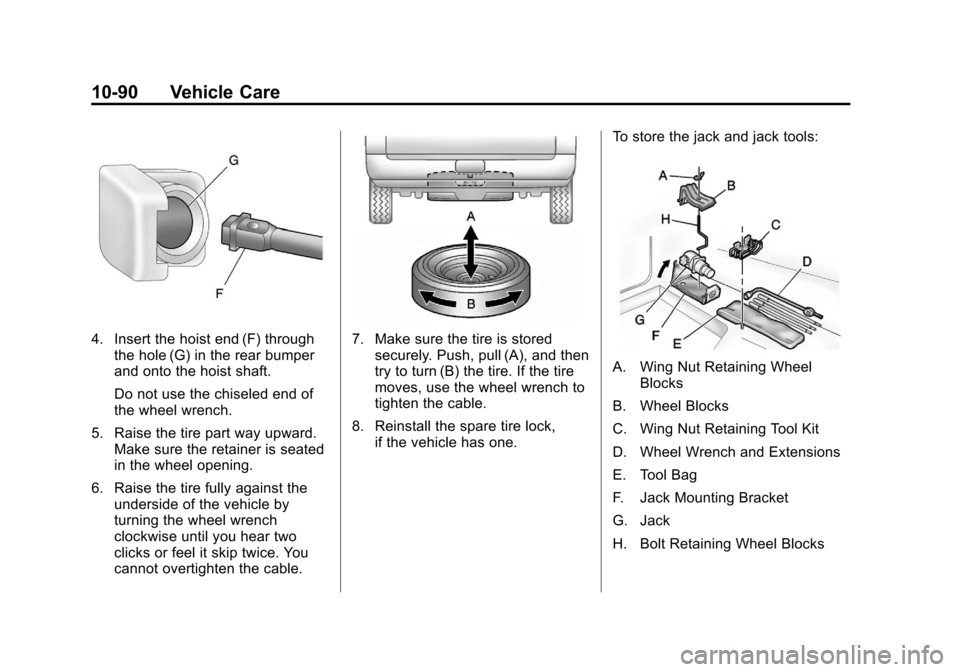
8. Reinstall the spare tire lock, if the vehicle has one. To store the jack and jack tools:
A. Wing Nut Retaining Wheel
Blocks
B. Wheel Blocks
C. Wing Nut Retaining Tool Kit
D. Wheel Wrench and Extensions
E. Tool Bag
F. Jack Mounting Bracket
G. Jack
H. Bolt Retaining Wheel Blocks
Page 504 of 584
Black plate (98,1)Chevrolet Silverado Owner Manual - 2012
10-98 Vehicle Care
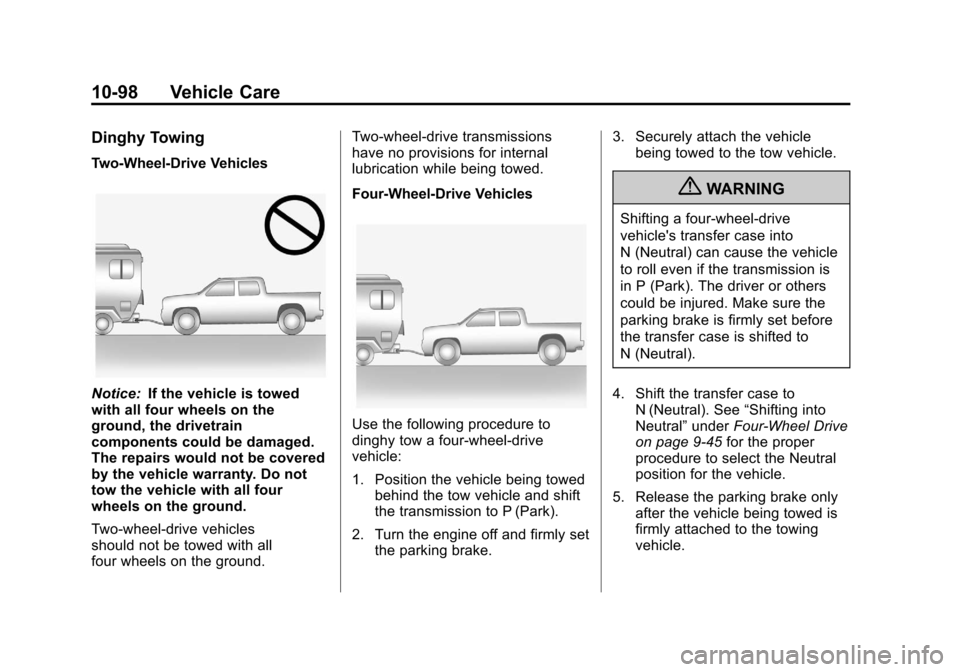
Dinghy Towing
Two-Wheel-Drive Vehicles
Notice:If the vehicle is towed
with all four wheels on the
ground, the drivetrain
components could be damaged.
The repairs would not be covered
by the vehicle warranty. Do not
tow the vehicle with all four
wheels on the ground.
Two-wheel-drive vehicles
should not be towed with all
four wheels on the ground. Two-wheel-drive transmissions
have no provisions for internal
lubrication while being towed.
Four-Wheel-Drive Vehicles
Use the following procedure to
dinghy tow a four-wheel-drive
vehicle:
1. Position the vehicle being towed
behind the tow vehicle and shift
the transmission to P (Park).
2. Turn the engine off and firmly set the parking brake. 3. Securely attach the vehicle
being towed to the tow vehicle.
{WARNING
Shifting a four-wheel-drive
vehicle's transfer case into
N (Neutral) can cause the vehicle
to roll even if the transmission is
in P (Park). The driver or others
could be injured. Make sure the
parking brake is firmly set before
the transfer case is shifted to
N (Neutral).
4. Shift the transfer case to N (Neutral). See “Shifting into
Neutral” underFour-Wheel Drive
on page 9‑45 for the proper
procedure to select the Neutral
position for the vehicle.
5. Release the parking brake only after the vehicle being towed is
firmly attached to the towing
vehicle.