2012 CHEVROLET SILVERADO warning
[x] Cancel search: warningPage 370 of 584
Black plate (84,1)Chevrolet Silverado Owner Manual - 2012
9-84 Driving and Operating
Backing Up
Hold the bottom of the steering
wheel with one hand. To move the
trailer to the left, move that hand to
the left. To move the trailer to the
right, move your hand to the right.
Always back up slowly and,
if possible, have someone
guide you.
Making Turns
Notice:Making very sharp turns
while trailering could cause the
trailer to come in contact with the
vehicle. The vehicle could be
damaged. Avoid making very
sharp turns while trailering.
When turning with a trailer, make
wider turns than normal. Do this
so the trailer will not strike soft
shoulders, curbs, road signs, trees,
or other objects. Avoid jerky or
sudden maneuvers. Signal well in
advance. If the trailer turn signal bulbs burn
out, the arrows on the instrument
panel will still flash for turns. It is
important to check occasionally to
be sure the trailer bulbs are still
working.
Driving on Grades
Reduce speed and shift to a
lower gear
beforestarting down a
long or steep downgrade. If the
transmission is not shifted down,
the brakes might get hot and no
longer work well.
Vehicles can tow in D (Drive).
Shift the transmission to a lower
gear if the transmission shifts too
often under heavy loads and/or hilly
conditions.
The Tow/Haul Mode may be used if
the transmission shifts too often.
See Tow/Haul Mode on page 9‑43.
When towing at high altitude on
steep uphill grades, consider the
following: Engine coolant will boil at
a lower temperature than at normal altitudes. If the engine is turned off
immediately after towing at high
altitude on steep uphill grades, the
vehicle may show signs similar to
engine overheating. To avoid this,
let the engine run while parked,
preferably on level ground, with the
automatic transmission in P (Park)
for a few minutes before turning the
engine off. If the overheat warning
comes on, see
Engine Overheating
on page 10‑23.
Parking on Hills
{WARNING
Parking the vehicle on a hill with
the trailer attached can be
dangerous. If something goes
wrong, the rig could start to move.
People can be injured, and both
the vehicle and the trailer can be
damaged. When possible, always
park the rig on a flat surface.
Page 371 of 584

Black plate (85,1)Chevrolet Silverado Owner Manual - 2012
Driving and Operating 9-85
If parking the rig on a hill:
1. Press the brake pedal, butdo not shift into P (Park) yet.
Turn the wheels into the curb if
facing downhill or into traffic if
facing uphill.
2. Have someone place chocks under the trailer wheels.
3. When the wheel chocks are in place, release the regular brakes
until the chocks absorb the load.
4. Reapply the brake pedal. Then apply the parking brake
and shift into P (Park).
5. If the vehicle is four-wheel-drive, be sure the transfer case is in a
drive gear and not in N (Neutral).
6. Release the brake pedal.{WARNING
It can be dangerous to get out of
the vehicle if the shift lever is not
fully in P (Park) with the parking
brake firmly set. The vehicle
can roll.
If the engine has been left
running, the vehicle can move
suddenly. You or others could be
injured. To be sure the vehicle will
not move, even when on fairly
level ground, use the steps that
follow.
Always put the shift lever fully in
P (Park) with the parking brake
firmly set.
If the transfer case on a
four-wheel-drive vehicle is in
N (Neutral), the vehicle will be
free to roll, even if the shift lever
is in P (Park). Be sure the transfer
case is in a drive gear —not in
N (Neutral).
Leaving After Parking on a Hill
1. Apply and hold the brake pedal.
2. Start the engine.
3. Shift into a gear.
4. Release the parking brake.
5. Let up on the brake pedal.
6. Drive slowly until the trailer is clear of the chocks.
7. Stop and have someone pick up and store the chocks.
Maintenance when Trailer
Towing
The vehicle needs service more
often when pulling a trailer.
See Maintenance Schedule on
page 11‑3. Things that are
especially important in trailer
operation are automatic
transmission fluid, engine oil, axle
lubricant, belts, cooling system, and
brake system. It is a good idea to
inspect these before and during
the trip.
Check periodically to see that all
hitch nuts and bolts are tight.
Page 372 of 584
Black plate (86,1)Chevrolet Silverado Owner Manual - 2012
9-86 Driving and Operating
Trailer Towing
If the vehicle has a diesel engine,
see the Duramax diesel supplement
for more information.
If the vehicle is a hybrid, see the
hybrid supplement for more
information.
Do not tow a trailer during break‐in.
SeeNew Vehicle Break-In on
page 9‑26 for more information.
{WARNING
The driver can lose control when
pulling a trailer if the correct
equipment is not used or the
vehicle is not driven properly.
For example, if the trailer is too
heavy, the brakes may not work
well or even at all. The driver and
passengers could be seriously
injured. The vehicle may also be
damaged; the resulting repairs
(Continued)
WARNING (Continued)
would not be covered by the
vehicle warranty. Pull a trailer
only if all the steps in this section
have been followed. Ask your
dealer for advice and information
about towing a trailer with the
vehicle.
Notice: Pulling a trailer
improperly can damage the
vehicle and result in costly
repairs not covered by the vehicle
warranty. To pull a trailer
correctly, follow the advice in this
section and see your dealer for
important information about
towing a trailer with the vehicle.
To identify the trailering capacity of
the vehicle, read the information in
“Weight of the Trailer” later in this
section. Trailering is different than just
driving the vehicle by itself.
Trailering means changes in
handling, acceleration, braking,
durability, and fuel economy.
Successful, safe trailering takes
correct equipment, and it has to be
used properly.
The following information has many
time-tested, important trailering tips
and safety rules. Many of these are
important for your safety and that of
your passengers. So please read
this section carefully before pulling
a trailer.
Weight of the Trailer
How heavy can a trailer safely be?
It depends on how the rig is used.
Speed, altitude, road grades,
outside temperature, and how much
the vehicle is used to pull a trailer
are all important. It can depend on
any special equipment on the
vehicle, and the amount of tongue
weight the vehicle can carry.
Page 395 of 584
Black plate (109,1)Chevrolet Silverado Owner Manual - 2012
Driving and Operating 9-109
{WARNING
Connecting a trailer that is not
compatible with the ITBC system
may result in reduced or complete
loss of trailer braking. There may
be an increase in stopping
distance or trailer instability which
could result in personal injury or
damage to the vehicle, trailer,
or other property. An aftermarket
controller may be available for
use with trailers with surge, air,
or electric‐over‐hydraulic trailer
brake systems. To determine the
type of brakes on the trailer and
the availability of controllers,
check with your trailer
manufacturer or dealer.When trailering, make sure of the
following:.The ITBC system is used only
with trailers that are equipped
with electric brakes.
.All applicable local and federal
laws and regulations are
followed.
.All electrical and mechanical
connections to the trailer are
made correctly.
.The trailer
’s brakes are in proper
working condition.
.The trailer and vehicle are
properly loaded for the towing
condition.
The ITBC system is a
factory-installed item.
Out‐of‐factory installation of this
system should not be attempted.
GM is not responsible for warranty
or performance of the system
resulting from out‐of‐factory
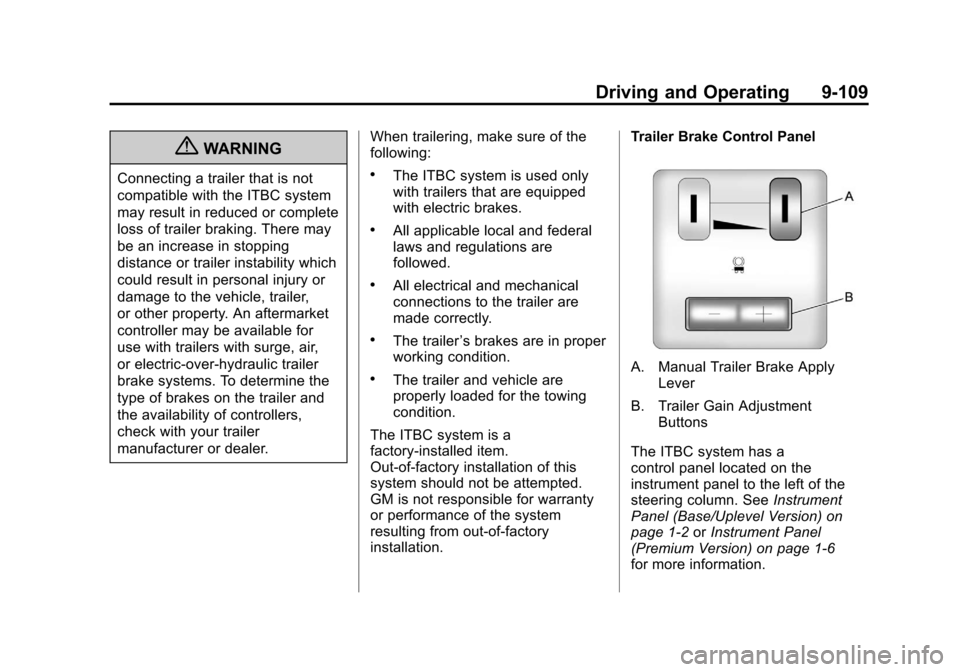
installation. Trailer Brake Control PanelA. Manual Trailer Brake Apply
Lever
B. Trailer Gain Adjustment Buttons
The ITBC system has a
control panel located on the
instrument panel to the left of the
steering column. See Instrument
Panel (Base/Uplevel Version) on
page 1‑2 orInstrument Panel
(Premium Version) on page 1‑6
for more information.
Page 396 of 584
Black plate (110,1)Chevrolet Silverado Owner Manual - 2012
9-110 Driving and Operating
The control panel allows adjustment
to the amount of output, referred to
as trailer gain, available to the
electric trailer brakes and allows
manual application of the trailer
brakes. The Trailer Brake Control
Panel is used along with the Trailer
Brake Display Page on the DIC to
adjust and display power output to
the trailer brakes.
Trailer Brake DIC Display Page
The ITBC system displays
messages on the vehicle’s Driver
Information Center (DIC). See
Driver Information Center (DIC) on
page 5‑32for more information.
The display page indicates Trailer
Gain setting, power output to the
electric trailer brakes, trailer
connection, and system operational
status. The Trailer Brake Display Page can
be displayed by performing any of
the following actions:
.Scrolling through the DIC menu
pages using the odometer trip
stem or the DIC Vehicle
Information button (if equipped).
.Pressing a Trailer Gain
button—If the Trailer Brake
Display Page is not currently
displayed, pressing a Trailer
Gain button will first recall the
current Trailer Gain setting.
After the Trailer Brake Display
Page is displayed, each press
and release of the gain buttons
will then cause the Trailer Gain
setting to change.
.Activating the Manual Trailer
Brake Apply lever.
.Connecting a trailer equipped
with electric trailer brakes.All DIC warning and service
messages must first be
acknowledged by the driver by
pressing the odometer trip stem or
the DIC Vehicle Information button
(if equipped) before the Trailer
Brake Display Page can be
displayed and Trailer Gain can be
adjusted.
TRAILER GAIN: This setting is
displayed any time the Trailer Brake
Display Page is active. This setting
can be adjusted from 0.0 to 10.0
with either a trailer connected or
disconnected. To adjust the Trailer
Gain, press one of the Trailer Gain
adjustment buttons located on the
Trailer Brake Control Panel. Press
and hold a gain button to cause the
Trailer Gain to continuously adjust.
To turn the output to the trailer off,
adjust the Trailer Gain setting to
0.0 (zero).
Page 400 of 584
Black plate (114,1)Chevrolet Silverado Owner Manual - 2012
9-114 Driving and Operating
SERVICE TRAILER BRAKE
SYSTEM: This message
will be displayed when there is a
problem with the ITBC system.
If this message persists over
multiple ignition cycles, there is a
problem with the ITBC system.
Take the vehicle to an authorized
GM dealer to have the ITBC system
diagnosed and repaired.
If either the CHECK TRAILER
WIRING or SERVICE TRAILER
BRAKE SYSTEM message is
displayed while driving the vehicle,
power is no longer available to the
trailer brakes. When traffic
conditions allow, carefully pull the
vehicle over to the side of the road
and turn the ignition off. Check the
wiring connection to the trailer and
turn the ignition back on. If either of
these messages continues, either
the vehicle or trailer needs service.An authorized GM dealer may be
able to diagnose and repair
problems with the trailer. However,
any diagnosis and repair of the
trailer is not covered under the
vehicle warranty. Please contact
your trailer dealer for assistance
with trailer repairs and trailer
warranty information.
Trailer Sway
Control (TSC)
Non-hybrid vehicles with StabiliTrak
have a Trailer Sway Control (TSC)
feature. If the vehicle is towing a
trailer and the system detects that
the trailer is swaying, the vehicle
brakes are applied without the
driver pressing the brake pedal.
If the vehicle is equipped with the
Integrated Trailer Brake Control
(ITBC) system, StabiliTrak may
also apply the trailer brakes.
The TCS/StabiliTrak warning light
will flash on the instrument panel
cluster to notify the driver to reduce
speed. If the trailer continues to
sway, StabiliTrak will reduce engine
torque to help slow the vehicle.
See
StabiliTrak
®System on
page 9‑62 for more information.
Adding non‐dealer accessories can
affect the vehicle performance.
See Accessories and Modifications
on page 10‑3 for more information.
Page 404 of 584
Black plate (118,1)Chevrolet Silverado Owner Manual - 2012
9-118 Driving and Operating
Heavier equipment can be added on
the front of the vehicle if it is
compensated for by carrying fewer
passengers, less cargo, or by
positioning cargo toward the rear.
This has the effect of reducing the
load on the front. However, the front
GAWR, rear GAWR, and the Gross
Vehicle Weight Rating (GVWR) must
never be exceeded.
{WARNING
On some vehicles that have
certain front mounted equipment,
such as a snow plow, it may be
possible to load the front axle to
the front gross axle weight rating
(GAWR) but not have enough
weight on the rear axle to have
proper braking performance.
If the brakes cannot work
properly, you could have a crash.(Continued)
WARNING (Continued)
To help the brakes work properly
when a snow plow is installed,
always follow the snow plow
manufacturer or installer's
recommendation for rear ballast
to ensure a proper front and rear
weight distribution ratio, even
though the actual front weight
may be less than the front
GAWR, and the total vehicle
weight is less than the gross
vehicle weight rating (GVWR).
Maintaining a proper front and
rear weight distribution ratio is
necessary to provide proper
braking performance.
Total vehicle reserve capacity is the
difference between the GVWR and
the weight of the truck with full fuel
and passengers. It is the amount of
weight that can be added to the
vehicle before reaching the GVWR. Keep in mind that reserve capacity
numbers are intended as a guide
when selecting the amount of
equipment or cargo the truck can
carry. If unsure of the vehicle's front,
rear, or total weight, go to a weigh
station and weigh the vehicle.
Your dealer can also help with this.
The total vehicle reserve capacity
for the vehicle can be found in
the lower right corner of the
Certification/Tire label as shown
previously.
See your dealer for additional
advice and information about
using a snow plow on the vehicle.
Also, see
Vehicle Load Limits on
page 9‑17.
Page 407 of 584

Black plate (1,1)Chevrolet Silverado Owner Manual - 2012
Vehicle Care 10-1
Vehicle Care
General Information
General Information . . . . . . . . . . 10-2
California Proposition65 Warning . . . . . . . . . . . . . . . . . 10-3
California Perchlorate Materials Requirements . . . . 10-3
Accessories and Modifications . . . . . . . . . . . . . . . 10-3
Vehicle Checks
Doing Your OwnService Work . . . . . . . . . . . . . . . 10-4
Hood . . . . . . . . . . . . . . . . . . . . . . . . 10-5
Engine Compartment Overview . . . . . . . . . . . . . . . . . . . 10-6
Engine Oil . . . . . . . . . . . . . . . . . . . 10-7
Engine Oil Life System . . . . . 10-10
Automatic Transmission Fluid (4-Speed Transmission) . . . 10-11
Automatic Transmission Fluid (6-Speed
Transmission) . . . . . . . . . . . . . 10-14
Manual Transmission Fluid . . . . . . . . . . . . . . . . . . . . . . 10-17
Hydraulic Clutch . . . . . . . . . . . . 10-17 Engine Air Cleaner/Filter . . . . 10-17
Cooling System . . . . . . . . . . . . 10-19
Engine Coolant . . . . . . . . . . . . . 10-20
Engine Overheating . . . . . . . . 10-23
Overheated Engine
Protection
Operating Mode . . . . . . . . . . . 10-26
Engine Fan . . . . . . . . . . . . . . . . . 10-26
Power Steering Fluid . . . . . . . 10-27
Washer Fluid . . . . . . . . . . . . . . . 10-28
Brakes . . . . . . . . . . . . . . . . . . . . . 10-28
Brake Fluid . . . . . . . . . . . . . . . . . 10-30
Battery . . . . . . . . . . . . . . . . . . . . . 10-31
Four-Wheel Drive . . . . . . . . . . . 10-32
Front Axle . . . . . . . . . . . . . . . . . . 10-33
Rear Axle . . . . . . . . . . . . . . . . . . 10-34
Noise Control System . . . . . . 10-36
Starter Switch Check . . . . . . . 10-36
Automatic Transmission Shift Lock Control Function
Check . . . . . . . . . . . . . . . . . . . . . 10-37
Ignition Transmission Lock Check . . . . . . . . . . . . . . . . . . . . . 10-38
Park Brake and P (Park) Mechanism Check . . . . . . . . 10-38
Wiper Blade Replacement . . . . . . . . . . . . . . 10-39
Glass Replacement . . . . . . . . 10-39
Headlamp Aiming
Headlamp Aiming . . . . . . . . . . 10-39
Bulb Replacement
Bulb Replacement . . . . . . . . . . 10-42
Halogen Bulbs . . . . . . . . . . . . . . 10-42
Headlamps, Front Turn Signal, Sidemarker, and
Parking Lamps . . . . . . . . . . . . 10-42
Pick-Up Box Identification and Fender Marker
Lamps . . . . . . . . . . . . . . . . . . . . 10-43
Taillamps (Chassis Cab Models) . . . . . . . . . . . . . . . . . . . 10-43
Taillamps, Turn Signal, Stoplamps, and Back-Up
Lamps . . . . . . . . . . . . . . . . . . . . 10-44
Center High-Mounted
Stoplamp (CHMSL) and
Cargo Lamp . . . . . . . . . . . . . . 10-44
License Plate Lamp . . . . . . . . 10-45
Replacement Bulbs . . . . . . . . . 10-45