2012 CHEVROLET SILVERADO service
[x] Cancel search: servicePage 465 of 584
Black plate (59,1)Chevrolet Silverado Owner Manual - 2012
Vehicle Care 10-59
(E) Rim Diameter:Diameter of
the wheel in inches.
(F) Load Range
:Load Range.
(G) Service Description
:
The service description indicates
the load index and speed rating
of a tire. If two numbers are
given as in the example,
120/116, then this represents
the load index for single versus
dual wheel usage (single/dual).
The speed rating is the
maximum speed a tire is
certified to carry a load.
Tire Terminology and
Definitions
Air Pressure:The amount of
air inside the tire pressing
outward on each square inch
of the tire. Air pressure is
expressed in kPa (kilopascal)
or psi (pounds per square inch). Accessory Weight
:The
combined weight of optional
accessories. Some examples
of optional accessories are
automatic transmission, power
steering, power brakes, power
windows, power seats, and air
conditioning.
Aspect Ratio
:The relationship
of a tire's height to its width.
Belt
:A rubber coated layer of
cords that is located between
the plies and the tread. Cords
may be made from steel or other
reinforcing materials.
Bead
:The tire bead contains
steel wires wrapped by steel
cords that hold the tire onto
the rim.
Bias Ply Tire
:A pneumatic tire
in which the plies are laid at
alternate angles less than
90 degrees to the centerline of
the tread. Cold Tire Pressure
:The
amount of air pressure in a tire,
measured in kPa (kilopascal)
or psi (pounds per square inch)
before a tire has built up heat
from driving. See Tire Pressure
on page 10‑62.
Curb Weight
:The weight of a
motor vehicle with standard and
optional equipment including the
maximum capacity of fuel, oil,
and coolant, but without
passengers and cargo.
DOT Markings
:A code
molded into the sidewall of a
tire signifying that the tire is in
compliance with the U.S.
Department of Transportation
(DOT) Motor Vehicle Safety
Standards. The DOT code
includes the Tire Identification
Number (TIN), an alphanumeric
designator which can also
Page 472 of 584
Black plate (66,1)Chevrolet Silverado Owner Manual - 2012
10-66 Vehicle Care
A Tire and Loading Information label
shows the size of the original
equipment tires and the correct
inflation pressure for the tires when
they are cold. SeeVehicle Load
Limits on page 9‑17, for an example
of the Tire and Loading Information
label and its location. Also see Tire
Pressure on page 10‑62.
The TPMS can warn about a
low tire pressure condition but it
does not replace normal tire
maintenance. See Tire Inspection
on page 10‑68, Tire Rotation on
page 10‑69 andTires on
page 10‑54.
Notice: Tire sealant materials are
not all the same. A non-approved
tire sealant could damage the
TPMS sensors. TPMS sensor
damage caused by using an
incorrect tire sealant is not
covered by the vehicle
warranty. Always use only the
GM-approved tire sealant
available through your dealer
or included in the vehicle.TPMS Malfunction Light and
Message
The TPMS will not function properly
if one or more of the TPMS sensors
are missing or inoperable. When the
system detects a malfunction, the
low tire pressure warning light
flashes for about one minute and
then stays on for the remainder of
the ignition cycle. A DIC warning
message also displays. The
malfunction light and DIC warning
message come on at each ignition
cycle until the problem is corrected.
Some of the conditions that can
cause these to come on are:
.One of the road tires has been
replaced with the spare tire.
The spare tire does not have a
TPMS sensor. The malfunction
light and the DIC message
should go off after the road tire
is replaced and the sensor
matching process is performed
successfully. See "TPMS Sensor
Matching Process" later in this
section.
.The TPMS sensor matching
process was not done or
not completed successfully
after rotating the tires.
The malfunction light and the
DIC message should go off after
successfully completing the
sensor matching process.
See "TPMS Sensor Matching
Process" later in this section.
.One or more TPMS sensors
are missing or damaged.
The malfunction light and the
DIC message should go off
when the TPMS sensors are
installed and the sensor
matching process is performed
successfully. See your dealer
for service.
.Replacement tires or wheels do
not match the original equipment
tires or wheels. Tires and wheels
other than those recommended
could prevent the TPMS from
functioning properly. See Buying
New Tires on page 10‑72.
Page 473 of 584

Black plate (67,1)Chevrolet Silverado Owner Manual - 2012
Vehicle Care 10-67
.Operating electronic devices or
being near facilities using radio
wave frequencies similar to the
TPMS could cause the TPMS
sensors to malfunction.
If the TPMS is not functioning
properly, it cannot detect or signal a
low tire condition. See your dealer
for service if the TPMS malfunction
light and DIC message come on
and stay on.
TPMS Sensor Matching
Process
Each TPMS sensor has a unique
identification code. The identification
code needs to be matched to a
new tire/wheel position after rotating
the vehicle’ s tires or replacing one
or more of the TPMS sensors.
Also, the TPMS sensor matching
process should be performed after
replacing a spare tire with a road
tire containing the TPMS sensor. The malfunction light and the DIC
message should go off at the next
ignition cycle. The sensors are
matched to the tire/wheel positions,
using a TPMS relearn tool, in the
following order: driver side front tire,
passenger side front tire, passenger
side rear tire, and driver side rear.
See your dealer for service or to
purchase a relearn tool.
There are two minutes to match
the first tire/wheel position, and
five minutes overall to match all
four tire/wheel positions. If it takes
longer, the matching process stops
and must be restarted.
The TPMS sensor matching
process is:
1. Set the parking brake.
2. Turn the ignition to ON/RUN with
the engine off. 3. Press the Remote Keyless
Entry (RKE) transmitter's LOCK
and UNLOCK buttons at the
same time for approximately
five seconds. The horn sounds
twice to signal the receiver is
in relearn mode and TIRE
LEARNING ACTIVE message
displays on the DIC screen.
If the vehicle does not have
RKE, press the Driver
Information Center (DIC) vehicle
information button until the
PRESSVTO RELEARN TIRE
POSITIONS message displays.
The horn sounds twice to signal
the receiver is in relearn mode
and TIRE LEARNING ACTIVE
message displays on the DIC
screen.
Page 479 of 584
Black plate (73,1)Chevrolet Silverado Owner Manual - 2012
Vehicle Care 10-73
{WARNING
Tires could explode during
improper service. Attempting
to mount or dismount a tire
could cause injury or death.
Only your dealer or authorized
tire service center should
mount or dismount the tires.
{WARNING
Mixing tires of different sizes,
brands, or types may cause loss
of control of the vehicle, resulting
in a crash or other vehicle
damage. Use the correct size,
brand, and type of tires on all
wheels.
This vehicle may have a different
size spare than the road tires
originally installed on the vehicle. (Continued)
WARNING (Continued)
When new, the vehicle included a
spare tire and wheel assembly
with a similar overall diameter as
the road tires and wheels, so it is
all right to drive on it. The spare
tire was developed for use on this
vehicle and will not affect vehicle
handling.
{WARNING
Using bias-ply tires on the
vehicle may cause the wheel
rim flanges to develop cracks
after many miles of driving.
A tire and/or wheel could fail
suddenly and cause a crash.
Use only radial-ply tires with
the wheels on the vehicle.
If the vehicle tires must be replaced
with a tire that does not have a TPC
Spec number, make sure they are
the same size, load range, speed
rating, and construction (radial) as
the original tires.
Vehicles that have a tire pressure
monitoring system could give an
inaccurate low‐pressure warning
if non‐TPC Spec rated tires are
installed. See Tire Pressure Monitor
System on page 10‑64.
The Tire and Loading Information
label indicates the original
equipment tires on the vehicle.
See Vehicle Load Limits on
page 9‑17 for the label location
and more information about the
Tire and Loading Information label.
Page 481 of 584
Black plate (75,1)Chevrolet Silverado Owner Manual - 2012
Vehicle Care 10-75
car tires. The Uniform Tire
Quality Grading (UTQG) system
does not apply to deep tread,
winter-type snow tires,
space-saver, or temporary use
spare tires, tires with nominal
rim diameters of 10 to 12 inches
(25 to 30 cm), or to some
limited-production tires.
While the tires available on
General Motors passenger cars
and light trucks may vary with
respect to these grades, they
must also conform to federal
safety requirements and
additional General Motors Tire
Performance Criteria (TPC)
standards.
All Passenger Car Tires Must
Conform to Federal Safety
Requirements In Addition To
These Grades.Treadwear
The treadwear grade is a
comparative rating based on the
wear rate of the tire when tested
under controlled conditions on
a specified government test
course. For example, a tire
graded 150 would wear one and
a half (1½) times as well on the
government course as a tire
graded 100. The relative
performance of tires depends
upon the actual conditions of
their use, however, and may
depart significantly from the
norm due to variations in
driving habits, service practices
and differences in road
characteristics and climate.
Traction
–AA, A, B, C
The traction grades, from
highest to lowest, are AA, A, B,
and C. Those grades represent
the tire's ability to stop on wet
pavement as measured under
controlled conditions on
specified government test
surfaces of asphalt and
concrete. A tire marked C may
have poor traction performance.
Warning: The traction grade
assigned to this tire is based
on straight-ahead braking
traction tests, and does not
include acceleration, cornering,
hydroplaning, or peak traction
characteristics.
Page 485 of 584
Black plate (79,1)Chevrolet Silverado Owner Manual - 2012
Vehicle Care 10-79
If a Tire Goes Flat
It is unusual for a tire to blowout
while driving, especially if the tires
are maintained properly. If air goes
out of a tire, it is much more likely to
leak out slowly. But if there ever is a
blowout, here are a few tips about
what to expect and what to do:
If a front tire fails, the flat tire
creates a drag that pulls the vehicle
toward that side. Take your foot off
the accelerator pedal and grip the
steering wheel firmly. Steer to
maintain lane position, and then
gently brake to a stop, well off the
road, if possible.
A rear blowout, particularly on a
curve, acts much like a skid and
may require the same correction as
used in a skid. Stop pressing the
accelerator pedal and steer to
straighten the vehicle. It may be
very bumpy and noisy. Gently brake
to a stop, well off the road,
if possible.{WARNING
Driving on a flat tire will cause
permanent damage to the tire.
Re-inflating a tire after it has
been driven on while severely
underinflated or flat may cause a
blowout and a serious crash.
Never attempt to re-inflate a tire
that has been driven on while
severely underinflated or flat.
Have your dealer or an authorized
tire service center repair or
replace the flat tire as soon as
possible.
{WARNING
Lifting a vehicle and getting
under it to do maintenance or
repairs is dangerous without the
appropriate safety equipment and(Continued)
WARNING (Continued)
training. If a jack is provided with
the vehicle, it is designed only for
changing a flat tire. If it is used for
anything else, you or others could
be badly injured or killed if the
vehicle slips off the jack. If a jack
is provided with the vehicle, only
use it for changing a flat tire.
If a tire goes flat, avoid further tire
and wheel damage by driving slowly
to a level place, well off the road,
if possible. Turn on the hazard
warning flashers. See Hazard
Warning Flashers on page 6‑5.
Page 494 of 584
Black plate (88,1)Chevrolet Silverado Owner Manual - 2012
10-88 Vehicle Care
{WARNING
Wheel nuts that are improperly or
incorrectly tightened can cause
the wheels to become loose or
come off. The wheel nuts should
be tightened with a torque wrench
to the proper torque specification
after replacing. Follow the torque
specification supplied by the
aftermarket manufacturer when
using accessory locking wheel
nuts. SeeCapacities and
Specifications on page 12‑2 for
original equipment wheel nut
torque specifications. Notice:
Improperly tightened
wheel nuts can lead to brake
pulsation and rotor damage.
To avoid expensive brake repairs,
evenly tighten the wheel nuts
in the proper sequence and to
the proper torque specification.
See Capacities and Specifications
on page 12‑2 for the wheel nut
torque specification.
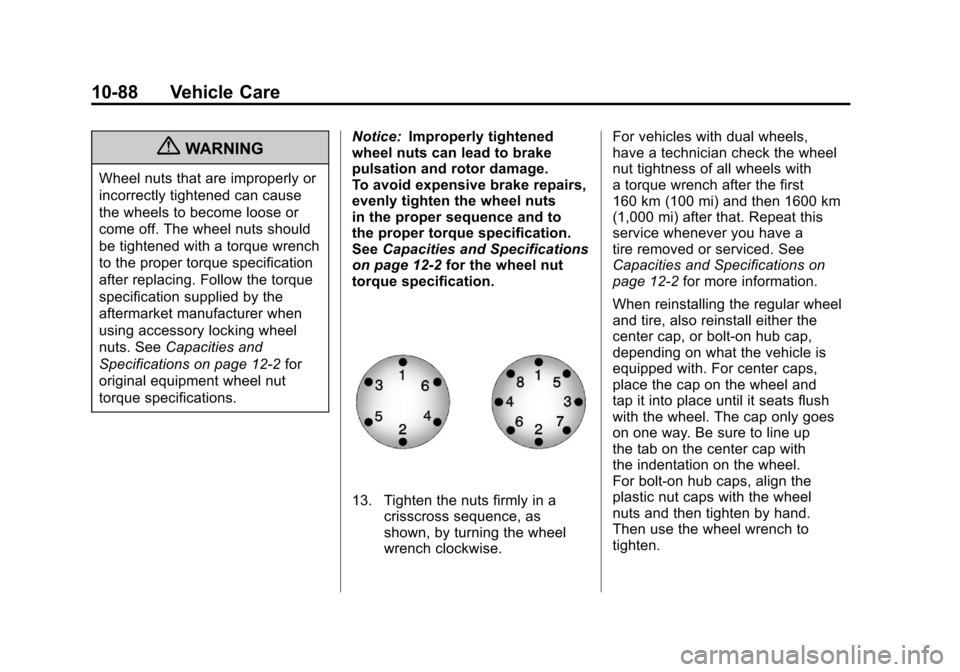
13. Tighten the nuts firmly in a crisscross sequence, as
shown, by turning the wheel
wrench clockwise. For vehicles with dual wheels,
have a technician check the wheel
nut tightness of all wheels with
a torque wrench after the first
160 km (100 mi) and then 1600 km
(1,000 mi) after that. Repeat this
service whenever you have a
tire removed or serviced. See
Capacities and Specifications on
page 12‑2
for more information.
When reinstalling the regular wheel
and tire, also reinstall either the
center cap, or bolt-on hub cap,
depending on what the vehicle is
equipped with. For center caps,
place the cap on the wheel and
tap it into place until it seats flush
with the wheel. The cap only goes
on one way. Be sure to line up
the tab on the center cap with
the indentation on the wheel.
For bolt-on hub caps, align the
plastic nut caps with the wheel
nuts and then tighten by hand.
Then use the wheel wrench to
tighten.
Page 501 of 584
Black plate (95,1)Chevrolet Silverado Owner Manual - 2012
Vehicle Care 10-95
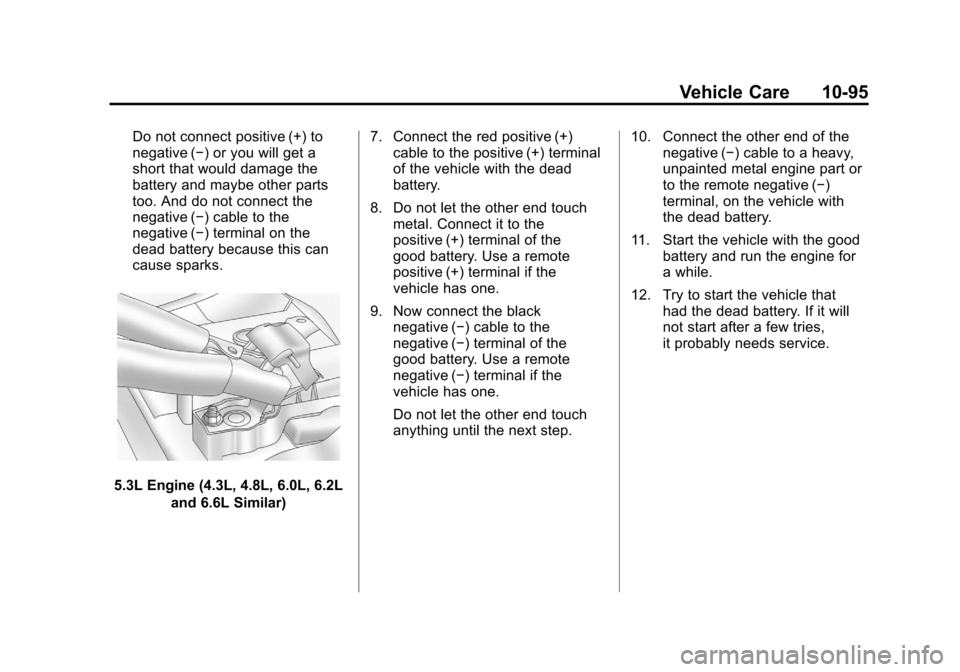
Do not connect positive (+) to
negative (−) or you will get a
short that would damage the
battery and maybe other parts
too. And do not connect the
negative (−) cable to the
negative (−) terminal on the
dead battery because this can
cause sparks.
5.3L Engine (4.3L, 4.8L, 6.0L, 6.2Land 6.6L Similar) 7. Connect the red positive (+)
cable to the positive (+) terminal
of the vehicle with the dead
battery.
8. Do not let the other end touch metal. Connect it to the
positive (+) terminal of the
good battery. Use a remote
positive (+) terminal if the
vehicle has one.
9. Now connect the black negative (−) cable to the
negative (−) terminal of the
good battery. Use a remote
negative (−) terminal if the
vehicle has one.
Do not let the other end touch
anything until the next step. 10. Connect the other end of the
negative (−) cable to a heavy,
unpainted metal engine part or
to the remote negative (−)
terminal, on the vehicle with
the dead battery.
11. Start the vehicle with the good battery and run the engine for
a while.
12. Try to start the vehicle that had the dead battery. If it will
not start after a few tries,
it probably needs service.