2012 CHEVROLET SILVERADO AUX
[x] Cancel search: AUXPage 32 of 584

Black plate (26,1)Chevrolet Silverado Owner Manual - 2012
1-26 In Brief
Storing Radio Stations
A maximum of 36 stations can be
stored as favorites using the six
softkeys located below the radio
station frequency tabs and by using
the radio FAV button. Press FAV to
go through up to six pages of
favorites, each having six favorite
stations available per page. Each
page of favorites can contain any
combination of AM, FM, or XM
stations.
For more information, see“Storing
Radio Stations” inAM-FM Radio on
page 7‑8.
Setting the Clock
To set the time and date:
1. Turn the ignition key to ACC/ACCESSORY or
ON/RUN, then press
O,
to turn the radio on.
2. Press
Hto display HR, MIN,
MM, DD, and YYYY (hour,
minute, month, day, and year).
3. Press the softkey located under any one of the labels to be
changed.
4. To increase or decrease the time or date, turn
fclockwise or
counter‐clockwise.
For detailed instructions on setting
the clock for the vehicle's specific
audio system, see Clock on
page 5‑8.
Satellite Radio
XM is a satellite radio service based
in the 48 contiguous United States
and 10 Canadian provinces.
XM satellite radio has a wide
variety of programming and
commercial-free music, coast to
coast, and in digital-quality sound.
A fee is required to receive the
XM service.
For more information, refer to:
.www.xmradio.com or call
1-800-929-2100 (U.S.)
.www.xmradio.ca or call
1-877-438-9677 (Canada)
See Satellite Radio on page 7‑10.
Portable Audio Devices
This vehicle may have an auxiliary
input located on the radio faceplate
and a USB port located in the center
console or on the instrument panel.
Page 33 of 584
Black plate (27,1)Chevrolet Silverado Owner Manual - 2012
In Brief 1-27
External devices such as an iPod®,
laptop computer, MP3 player, CD
changer, or USB storage device can
be connected to the auxiliary port
using a 3.5 mm (1/8 in) input cable
or the USB port depending on the
audio system.
See “Using the Auxiliary Input Jack”
and “Using the USB Port” in
Auxiliary Devices on page 7‑34.
Bluetooth®
For vehicles with a Bluetooth
system, it allows users with a
Bluetooth‐enabled cell phone to
make and receive hands-free calls
using the vehicle’ s audio system
and controls.
The Bluetooth‐enabled cell phone
must be paired with the Bluetooth
system before it can be used in the
vehicle. Not all phones will support
all functions. For more information,
visit www.gm.com/bluetooth.
For more information, see Bluetooth
on page 7‑52.
Steering Wheel Controls
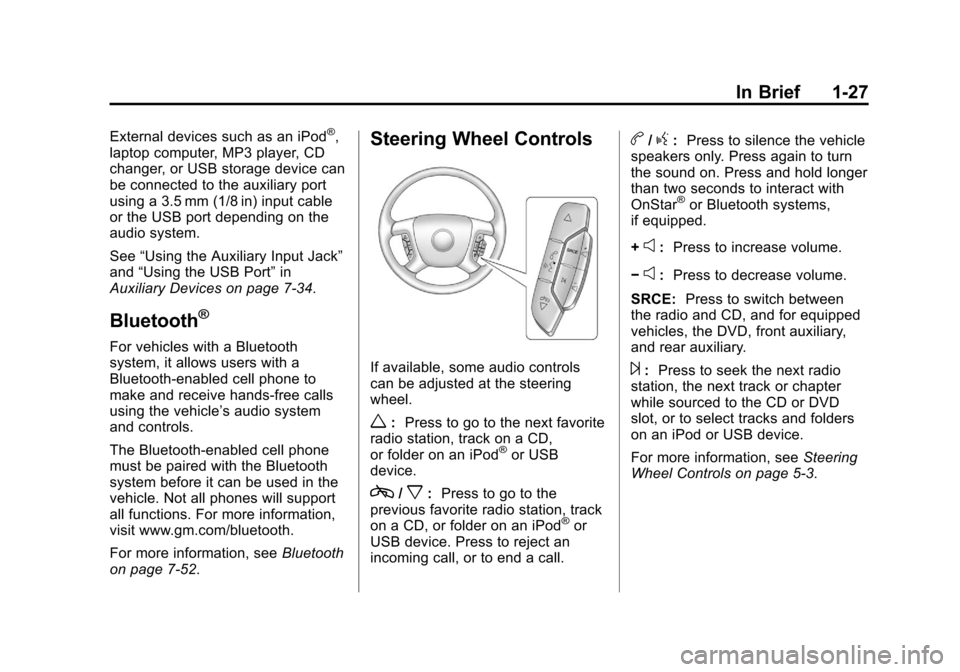
If available, some audio controls
can be adjusted at the steering
wheel.
w: Press to go to the next favorite
radio station, track on a CD,
or folder on an iPod
®or USB
device.
c/x: Press to go to the
previous favorite radio station, track
on a CD, or folder on an iPod
®or
USB device. Press to reject an
incoming call, or to end a call.
b/g: Press to silence the vehicle
speakers only. Press again to turn
the sound on. Press and hold longer
than two seconds to interact with
OnStar
®or Bluetooth systems,
if equipped.
+
e: Press to increase volume.
−
e: Press to decrease volume.
SRCE: Press to switch between
the radio and CD, and for equipped
vehicles, the DVD, front auxiliary,
and rear auxiliary.
¨: Press to seek the next radio
station, the next track or chapter
while sourced to the CD or DVD
slot, or to select tracks and folders
on an iPod or USB device.
For more information, see Steering
Wheel Controls on page 5‑3.
Page 142 of 584
Black plate (4,1)Chevrolet Silverado Owner Manual - 2012
5-4 Instruments and Controls
Navigating an iPod or USB Device
on the Main Audio Screen
(Vehicles with a Navigation
System)
1. Press and release
worc/x
to select the next or previous
track within the selected
category.
2. Press and hold
worc/xto
move quickly through the tracks.
3. Press and release
¨to move up
one track within the selected
category.
Navigating an iPod or USB Device
on the Music Navigator Screen
(Vehicles with a Navigation
System)
1. Press and release
worc/x
to select the next or previous
track within the selected
category.
2. Press and hold
worc/xto
move quickly through the tracks
within the selected category. 3. Press and release
¨to move up
one track within the selected
category.
b/g(Mute/Push to Talk): Press
to silence the vehicle speakers only.
Press again to turn the sound on.
For vehicles with Bluetooth or
OnStar systems, press and hold for
longer than two seconds to interact
with those systems. See Bluetooth
on page 7‑52 andOnStar Overview
on page 14‑1 for more information.
SRCE (Source/Voice
Recognition): Press to switch
between the radio and CD, and for
equipped vehicles, the DVD, front
auxiliary, and rear auxiliary.
For vehicles with the navigation
system, press and hold this button
for longer than one second to
initiate voice recognition. See “Voice
Recognition” in the Navigation
System manual for more
information.
¨(Seek): Press to go to the
next radio station while in AM,
FM, or XM™.
For vehicles with or without a
navigation system:
Press
¨to go to the next track or
chapter while sourced to the CD or
DVD slot.
Press
¨to select a track or a folder
when navigating folders on an iPod
or USB device.
For vehicles with a navigation
system:
1. Press and hold
¨until a beep is
heard, to place the radio into
SCAN mode. A station will play
for five seconds before moving
to the next station.
2. To stop the SCAN function, press
¨again.
Page 205 of 584
Black plate (1,1)Chevrolet Silverado Owner Manual - 2012
Lighting 6-1
Lighting
Exterior Lighting
Exterior Lamp Controls . . . . . . . . 6-1
Exterior Lamps OffReminder . . . . . . . . . . . . . . . . . . . . 6-3
Headlamp High/Low-Beam Changer . . . . . . . . . . . . . . . . . . . . . 6-3
Flash-to-Pass . . . . . . . . . . . . . . . . . 6-3
Daytime Running Lamps (DRL) . . . . . . . . . . . . . . . . 6-3
Automatic Headlamp System . . . . . . . . . . . . . . . . . . . . . . 6-4
Hazard Warning Flashers . . . . . 6-5
Turn and Lane-Change Signals . . . . . . . . . . . . . . . . . . . . . . 6-6
Fog Lamps . . . . . . . . . . . . . . . . . . . . 6-6
Auxiliary Roof-Mounted Lamp . . . . . . . . . 6-7
Interior Lighting
Instrument Panel IlluminationControl . . . . . . . . . . . . . . . . . . . . . . 6-8
Cargo Lamp . . . . . . . . . . . . . . . . . . 6-8
Dome Lamps . . . . . . . . . . . . . . . . . 6-8
Reading Lamps . . . . . . . . . . . . . . . 6-9
Lighting Features
Entry Lighting . . . . . . . . . . . . . . . . . 6-9
Exit Lighting . . . . . . . . . . . . . . . . . . . 6-9
Battery Load Management . . . . 6-9
Battery Power Protection . . . . 6-10
Exterior Lighting
Exterior Lamp Controls
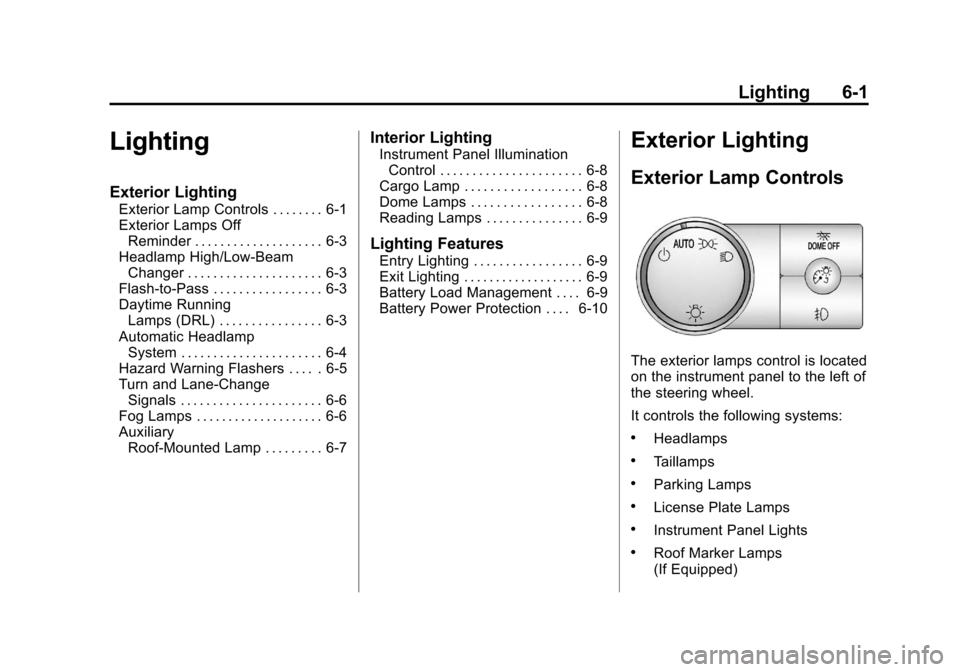
The exterior lamps control is located
on the instrument panel to the left of
the steering wheel.
It controls the following systems:
.Headlamps
.Taillamps
.Parking Lamps
.License Plate Lamps
.Instrument Panel Lights
.Roof Marker Lamps
(If Equipped)
Page 211 of 584
Black plate (7,1)Chevrolet Silverado Owner Manual - 2012
Lighting 6-7
#(Fog Lamps):Press to turn the
fog lamps on or off. A light will come
on in the instrument panel cluster.
When the fog lamps are turned on,
the parking lamps automatically
turn on.
When the headlamps are changed
to high beam, the fog lamps also go
off. When the high-beam headlamps
are turned off, the fog lamps will
come on again.
Some localities have laws that
require the headlamps to be on with
the fog lamps.Auxiliary
Roof-Mounted Lamp
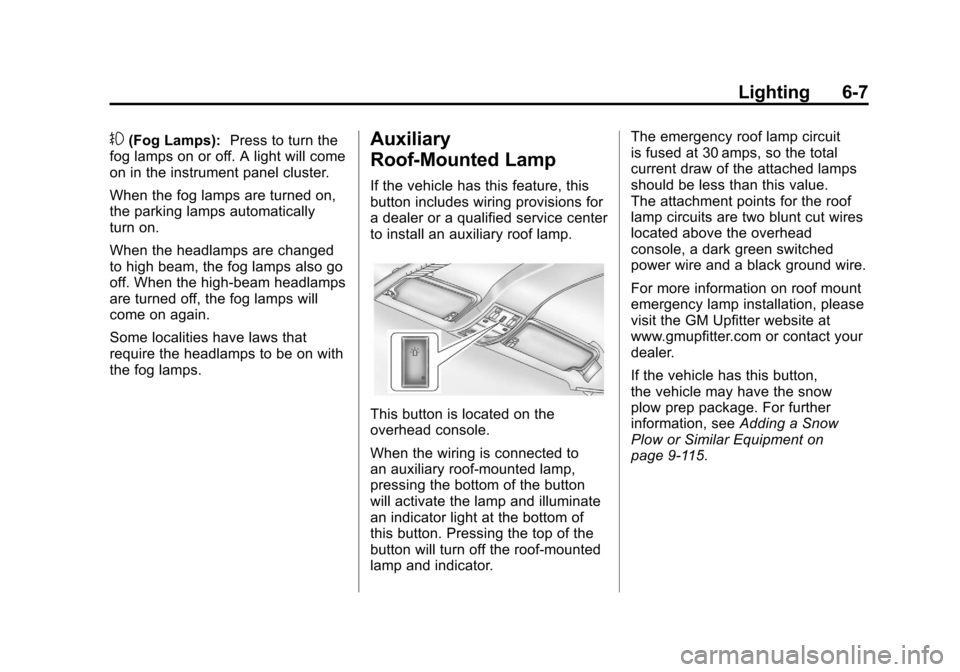
If the vehicle has this feature, this
button includes wiring provisions for
a dealer or a qualified service center
to install an auxiliary roof lamp.
This button is located on the
overhead console.
When the wiring is connected to
an auxiliary roof‐mounted lamp,
pressing the bottom of the button
will activate the lamp and illuminate
an indicator light at the bottom of
this button. Pressing the top of the
button will turn off the roof‐mounted
lamp and indicator. The emergency roof lamp circuit
is fused at 30 amps, so the total
current draw of the attached lamps
should be less than this value.
The attachment points for the roof
lamp circuits are two blunt cut wires
located above the overhead
console, a dark green switched
power wire and a black ground wire.
For more information on roof mount
emergency lamp installation, please
visit the GM Upfitter website at
www.gmupfitter.com or contact your
dealer.
If the vehicle has this button,
the vehicle may have the snow
plow prep package. For further
information, see
Adding a Snow
Plow or Similar Equipment on
page 9‑115.
Page 215 of 584

Black plate (1,1)Chevrolet Silverado Owner Manual - 2012
Infotainment System 7-1
Infotainment
System
Introduction
Infotainment . . . . . . . . . . . . . . . . . . . 7-1
Theft-Deterrent Feature . . . . . . . 7-2
Operation . . . . . . . . . . . . . . . . . . . . . 7-3
Radio
AM-FM Radio . . . . . . . . . . . . . . . . . 7-8
Satellite Radio . . . . . . . . . . . . . . . 7-10
Radio Reception . . . . . . . . . . . . . 7-14
Fixed Mast Antenna . . . . . . . . . 7-15
Satellite Radio Antenna . . . . . . 7-15
Audio Players
CD Player . . . . . . . . . . . . . . . . . . . 7-16
CD/DVD Player . . . . . . . . . . . . . . 7-23
Auxiliary Devices . . . . . . . . . . . . 7-34
Rear Seat Infotainment
Rear Seat Entertainment(RSE) System . . . . . . . . . . . . . . 7-40
Rear Seat Audio (RSA) System . . . . . . . . . . . . . . . . . . . . . 7-50
Phone
Bluetooth . . . . . . . . . . . . . . . . . . . . 7-52
Trademarks and License
Agreements
Trademarks and LicenseAgreements . . . . . . . . . . . . . . . . 7-59
Introduction
Infotainment
Determine which radio the vehicle
has and read the following pages to
become familiar with its features.
{WARNING
Taking your eyes off the road
for extended periods could
cause a crash resulting in injury
or death to you or others. Do not
give extended attention to
entertainment tasks while driving.
This system provides access to
many audio and non‐audio listings.
Page 232 of 584
Black plate (18,1)Chevrolet Silverado Owner Manual - 2012
7-18 Infotainment System
CD/AUX (CD/Auxiliary):Press to
cycle between CD or Auxiliary when
listening to the radio. The CD icon
and a message showing the disc
and/or track number will display
when a CD is in the player. Press
again and the system automatically
searches for an auxiliary input
device; see Auxiliary Devices on
page 7‑34 for more information.
If a portable audio player is not
connected, “No Input Device Found”
displays.
4(Information): Press to display
additional text information related to
the current song. If information is
available, the song title information
displays on the top line of the
display and artist information
displays on the bottom line.
When information is not available,
“NO INFO” displays.
f(Tune):Turn to select tracks on
the CD that is currently playing.
©SEEK: Press to go to the start of
the current track if more than
10 seconds on the CD have played.
Press to go to the previous track if
less than 10 seconds on the CD
have played.
Press and hold, or press multiple
times, to continue moving backward
through the tracks on the CD.
¨SEEK: Press to go to the next
track.
Press and hold, or press multiple
times, to continue moving forward
through the tracks on the CD.
sREV (Fast Reverse): Press
and hold to reverse playback quickly
within a track.
\FWD (Fast Forward): Press
and hold to advance playback
quickly within a track. RPT (Repeat):
For the AM-FM
Radio with CD, press and release
the RPT button to repeat the current
track. Press RPT again to turn off
repeat play.
RDM (Random): Press to listen
to tracks in random, rather than
sequential order. To use random,
do one of the following:
For the AM-FM Radio with CD:
1. Press the RDM button until the random icon displays.
2. Press the RDM button again until the random icon disappears
from the display.
For the Radio with CD (MP3) and
Radio with USB and CD (MP3):
1. Press the softkey positioned under the RDM tab until Random
Current Disc displays.
2. Press the softkey again to turn off random play.
Page 238 of 584
Black plate (24,1)Chevrolet Silverado Owner Manual - 2012
7-24 Infotainment System
Audio Output
Only one audio source can be heard
through the speakers at one time.
An audio source is defined as DVD
slot, CD slot, XM, FM‐AM, front
auxiliary jack, USB port, or rear
auxiliary jack.
Press the
Obutton to turn the radio
on. The radio can be heard through
all of the vehicle speakers.
Front seat passengers can listen
to the radio (AM, FM, or XM if
equipped) by pressing the BAND
button or the DVD/CD AUX button
to select CD slot, DVD slot, front
auxiliary input, USB port, or rear
auxiliary input (if available).
If a playback device is plugged into
the radio’s front auxiliary input jack,
USB port, or the rear auxiliary jack,
the front seat passengers are able to listen to playback from this
source through the vehicle
speakers. See
“Using the Auxiliary
Input Jack” inAuxiliary Devices on
page 7‑34, or “Audio/Video
(A/V) Jacks” underRear Seat
Entertainment (RSE) System on
page 7‑40 for more information.
In some vehicles, depending on
audio options, the rear speakers
can be muted when the RSA power
is turned on. See Rear Seat Audio
(RSA) System on page 7‑50 for
more information.
Inserting a Disc
Insert a disc partway into either slot,
label side up. The player pulls it in
and the disc should begin playing.
(Loading a disc into the system,
depending on media type and
format, ranges from 5 to 20 seconds
for a CD, and up to 30 seconds for
a DVD to begin playing.)
Ejecting a Disc
ZCD (Eject): Press and release
to eject the disc that is currently
playing. The CD ejects from the
bottom slot. A beep sounds and
Ejecting Disc displays. Once the
disc is ejected, Remove Disc
displays. The disc can be removed.
If the disc is not removed, after
several seconds the disc
automatically pulls back into the
player.
ZDVD (Eject): Press and
release to eject the disc that is
currently playing in the top slot.
A beep sounds and Ejecting Disc
displays.
If loading and reading of a disc
cannot be completed, due to
unknown format, etc., and the disc
fails to eject, press and hold for
more than five seconds to force the
disc to eject.