2012 CHEVROLET SILVERADO warning light
[x] Cancel search: warning lightPage 1 of 584

Black plate (1,1)Chevrolet Silverado Owner Manual - 2012
2012 Chevrolet Silverado Owner ManualM
In Brief. . . . . . . . . . . . . . . . . . . . . . . . 1-1
Instrument Panel . . . . . . . . . . . . . . 1-2
Initial Drive Information . . . . . . . . 1-8
Vehicle Features . . . . . . . . . . . . . 1-25
Performance and Maintenance . . . . . . . . . . . . . . . . 1-33
Keys, Doors, and Windows . . . . . . . . . . . . . . . . . . . . 2-1
Keys and Locks . . . . . . . . . . . . . . . 2-2
Doors . . . . . . . . . . . . . . . . . . . . . . . . . . 2-9
Vehicle Security . . . . . . . . . . . . . . 2-11
Exterior Mirrors . . . . . . . . . . . . . . . 2-14
Interior Mirrors . . . . . . . . . . . . . . . . 2-17
Windows . . . . . . . . . . . . . . . . . . . . . 2-18
Roof . . . . . . . . . . . . . . . . . . . . . . . . . . 2-20 Seats and Restraints
. . . . . . . . . 3-1
Head Restraints . . . . . . . . . . . . . . . 3-2
Front Seats . . . . . . . . . . . . . . . . . . . . 3-3
Rear Seats . . . . . . . . . . . . . . . . . . . 3-11
Safety Belts . . . . . . . . . . . . . . . . . . 3-13
Airbag System . . . . . . . . . . . . . . . . 3-23
Child Restraints . . . . . . . . . . . . . . 3-42
Storage . . . . . . . . . . . . . . . . . . . . . . . 4-1
Storage Compartments . . . . . . . . 4-1
Instruments and Controls . . . . 5-1
Controls . . . . . . . . . . . . . . . . . . . . . . . 5-2
Warning Lights, Gauges, and Indicators . . . . . . . . . . . . . . . . . . . 5-12
Information Displays . . . . . . . . . . 5-32
Vehicle Messages . . . . . . . . . . . . 5-42
Vehicle Personalization . . . . . . . 5-52
Universal Remote System . . . . 5-60 Lighting
. . . . . . . . . . . . . . . . . . . . . . . 6-1
Exterior Lighting . . . . . . . . . . . . . . . 6-1
Interior Lighting . . . . . . . . . . . . . . . . 6-8
Lighting Features . . . . . . . . . . . . . . 6-9
Infotainment System . . . . . . . . . 7-1
Introduction . . . . . . . . . . . . . . . . . . . . 7-1
Radio . . . . . . . . . . . . . . . . . . . . . . . . . . 7-8
Audio Players . . . . . . . . . . . . . . . . 7-16
Rear Seat Infotainment . . . . . . . 7-40
Phone . . . . . . . . . . . . . . . . . . . . . . . . 7-52
Trademarks and License Agreements . . . . . . . . . . . . . . . . . 7-59
Climate Controls . . . . . . . . . . . . . 8-1
Climate Control Systems . . . . . . 8-1
Air Vents . . . . . . . . . . . . . . . . . . . . . 8-11
Page 5 of 584

Black plate (5,1)Chevrolet Silverado Owner Manual - 2012
Introduction v
Vehicle Symbol Chart
Here are some additional symbols
that may be found on the vehicle
and what they mean. For more
information on the symbol, refer to
the Index.
0:Adjustable Pedals
9:Airbag Readiness Light
#:Air Conditioning
!:Antilock Brake System (ABS)
%:Audio Steering Wheel Controls
or OnStar®
$: Brake System Warning Light
":Charging System
I:Cruise Control
B: Engine Coolant Temperature
O:Exterior Lamps
#:Fog Lamps
.: Fuel Gauge
+:Fuses
3: Headlamp High/Low-Beam
Changer
j: LATCH System Child
Restraints
*: Malfunction Indicator Lamp
::Oil Pressure
g:Outside Power Foldaway
Mirrors
}: Power
/:Remote Vehicle Start
>:Safety Belt Reminders
7:Tire Pressure Monitor
_: Tow/Haul Mode
d:Traction Control/StabiliTrak®
M:Windshield Washer Fluid
Page 9 of 584

Black plate (3,1)Chevrolet Silverado Owner Manual - 2012
In Brief 1-3
A.Air Vents on page 8‑11.
B. Turn and Lane‐Change Lever. See Turn and Lane-Change
Signals on page 6‑6.
Windshield Wiper/Washer on
page 5‑5.
C. Driver Information Center (DIC) Buttons. See Driver Information
Center (DIC) on page 5‑32.
D. Hazard Warning Flashers on
page 6‑5 (Out of View).
E. Instrument Cluster on
page 5‑13.
F. Shift Lever. See Automatic
Transmission on page 9‑38.
Tow/Haul Selector Button
(If Equipped). See Tow/Haul
Mode on page 9‑43.
Range Selection Mode (Allison
Transmission and Hydra-Matic
®
6‐Speed Button) (If Equipped).
See Manual Mode on
page 9‑42. G.
Infotainment on page 7‑1.
H. Instrument Panel Storage on
page 4‑1.
I. Integrated Trailer Brake Controller (If Equipped).
See Trailer Towing on
page 9‑86.
J. Exterior Lamp Controls on
page 6‑1.
K. Data Link Connector (DLC) (Out of View). See Malfunction
Indicator Lamp on page 5‑24.
L. Hood Release. See Hood on
page 10‑5.
M. Parking Brake on page 9‑60.
N. Dome Lamps on page 6‑8.
Fog Lamps on page 6‑6
(If Equipped).
O. Cruise Control on page 9‑66.
P. Steering Wheel Adjustment on
page 5‑2.
Q. Horn on page 5‑5. R.
Steering Wheel Controls on
page 5‑3 (If Equipped).
S. Automatic Transfer Case Control (If Equipped).
See Four-Wheel Drive on
page 10‑32.
T. Ashtray (If Equipped). See Ashtrays on page 5‑12
and Cigarette Lighter on
page 5‑11.
U. StabiliTrak
®System on
page 9‑62 (If Equipped).
Ultrasonic Parking Assist on
page 9‑68 (If Equipped).
Pedal Adjust Button
(If Equipped). See Adjustable
Throttle and Brake Pedal on
page 9‑26.
Exhaust Brake (If Equipped).
See “Brakes” in the Duramax
diesel supplement.
Page 13 of 584

Black plate (7,1)Chevrolet Silverado Owner Manual - 2012
In Brief 1-7
A.Air Vents on page 8‑11.
B. Turn and Lane‐Change Lever. See Turn and Lane-Change
Signals on page 6‑6.
Windshield Wiper/Washer on
page 5‑5.
C. Instrument Cluster on
page 5‑13.
D. Hazard Warning Flashers on
page 6‑5 (Out of View).
E. Shift Lever. See Automatic
Transmission on page 9‑38.
Range Selection Mode
(If Equipped). See Manual
Mode on page 9‑42.
F. Tow/Haul Mode on page 9‑43
(If Equipped).
G. Driver Information Center (DIC) Buttons. See Driver Information
Center (DIC) on page 5‑32.
H. Infotainment on page 7‑1.
I. Exterior Lamp Controls on
page 6‑1. J. Integrated Trailer Brake
Controller (If Equipped).
See Trailer Towing on
page 9‑86.
K. Dome Lamps on page 6‑8.
L. Automatic Transfer Case Control (If Equipped).
See Four-Wheel Drive on
page 10‑32.
M. Data Link Connector (DLC) (Out of View). See Malfunction
Indicator Lamp on page 5‑24.
N. Hood Release. See Hood on
page 10‑5.
O. Parking Brake on page 9‑60.
P. Cruise Control on page 9‑66.
Q. Steering Wheel Adjustment on
page 5‑2.
R. Horn on page 5‑5.
S. Steering Wheel Controls on
page 5‑3. T.
Climate Control Systems
(with Air Conditioning) on
page 8‑1 orClimate Control
Systems (with Heater Only) on
page 8‑4 (If Equipped).
Dual Automatic Climate
Control System on page 8‑5
(If Equipped).
U. Power Outlets on page 5‑10.
Cigarette Lighter (If Equipped).
See Ashtrays on page 5‑12 and
Cigarette Lighter on page 5‑11.
V. StabiliTrak
®System on
page 9‑62 (If Equipped).
Pedal Adjust Button
(If Equipped). See Adjustable
Throttle and Brake Pedal on
page 9‑26.
Ultrasonic Parking Assist on
page 9‑68 (If Equipped).
Exhaust Brake (If Equipped).
See “Brakes” in the Duramax
diesel supplement.
W. Passenger Airbag Off Control (If Equipped). See Airbag
On-Off Switch on page 3‑30.
Page 39 of 584

Black plate (33,1)Chevrolet Silverado Owner Manual - 2012
In Brief 1-33
Performance and
Maintenance
StabiliTrak®System
If equipped, the vehicle has a
traction control system that limits
wheel spin and the StabiliTrak
system that assists with directional
control of the vehicle in difficult
driving conditions. Both systems
turn on automatically every time the
vehicle is started.
.To turn off traction control, press
and release
gon the instrument
panel. The appropriate DIC
message displays. See Ride
Control System Messages on
page 5‑47.
.To turn off both traction control
and StabiliTrak, press and hold
guntilgilluminates and the
appropriate DIC message
displays. See Ride Control
System Messages on page 5‑47.
.Press and releasegagain to
turn on both systems.
For more information, see
StabiliTrak
®System on page 9‑62.
Tire Pressure Monitor
This vehicle may have a Tire
Pressure Monitor System (TPMS).
The TPMS warning light alerts you
to a significant loss in pressure of
one of the vehicle's tires. If the
warning light comes on, stop as soon as possible and inflate the
tires to the recommended pressure
shown on the Tire and Loading
Information label. See
Vehicle Load
Limits on page 9‑17. The warning
light will remain on until the tire
pressure is corrected.
During cooler conditions, the low tire
pressure warning light may appear
when the vehicle is first started and
then turn off. This may be an early
indicator that the tire pressures are
getting low and the tires need to be
inflated to the proper pressure.
The TPMS does not replace normal
monthly tire maintenance. It is the
driver ’s responsibility to maintain
correct tire pressures.
See Tire Pressure Monitor System
on page 10‑64.
Page 49 of 584

Black plate (7,1)Chevrolet Silverado Owner Manual - 2012
Keys, Doors, and Windows 2-7
The vehicle cannot be remote
started if the key is in the ignition,
the hood is not closed, or if there
is an emission control system
malfunction and the check engine
light is on.
Also, the engine will turn off during a
remote vehicle start if the coolant
temperature gets too high or if the
oil pressure gets low.
Remote Start Ready
If the vehicle does not have the
remote vehicle start feature, it may
have the remote start ready feature.
This feature allows your dealer to
add the manufacturer's remote
vehicle start feature.
See your dealer to add the
manufacturer's remote vehicle start
feature to the vehicle.
Door Locks
{WARNING
Unlocked doors can be
dangerous.
.Passengers, especially
children, can easily open the
doors and fall out of a moving
vehicle. When a door is
locked, the handle will not
open it. The chance of being
thrown out of the vehicle in a
crash is increased if the
doors are not locked. So, all
passengers should wear
safety belts properly and the
doors should be locked
whenever the vehicle is
driven.
.Young children who get into
unlocked vehicles may be
unable to get out. A child can
be overcome by extreme heat
and can suffer permanent(Continued)
WARNING (Continued)
injuries or even death from
heat stroke. Always lock the
vehicle whenever leaving it.
.Outsiders can easily enter
through an unlocked door
when you slow down or stop
the vehicle. Locking the doors
can help prevent this from
happening.
There are several ways to lock and
unlock the vehicle.
From outside, use the Remote
Keyless Entry (RKE) transmitter or
the key in the driver door.
From inside, use the power door
locks or manual door locks. To lock
or unlock the door with the manual
locks, push down or pull up on the
manual lock knob.
Page 52 of 584

Black plate (10,1)Chevrolet Silverado Owner Manual - 2012
2-10 Keys, Doors, and Windows
Tailgate
{WARNING
It is extremely dangerous to ride
on the tailgate, even when the
vehicle is operated at low speeds.
People riding on the tailgate can
easily lose their balance and
fall in response to vehicle
maneuvers. Falling from a
moving vehicle may result in
serious injuries or death. Do not
allow people to ride on the
tailgate. Be sure everyone in your
vehicle is in a seat and using a
safety belt properly.
On vehicles with a lock on the
tailgate, use the key to lock or
unlock the tailgate. Open the tailgate by lifting up
on its handle while pulling the
tailgate down.
To shut the tailgate, firmly push it
upward until it latches.
After closing the tailgate, pull it back
to be sure it latches securely.
Tailgate Removal
The tailgate can be removed to
allow for different loading situations.
Assistance may be needed with the
removal to avoid damage to the
vehicle.
On vehicles with a Rear Vision
Camera, it must be disconnected
before removing the tailgate.
See
Rear Vision Camera (RVC) on
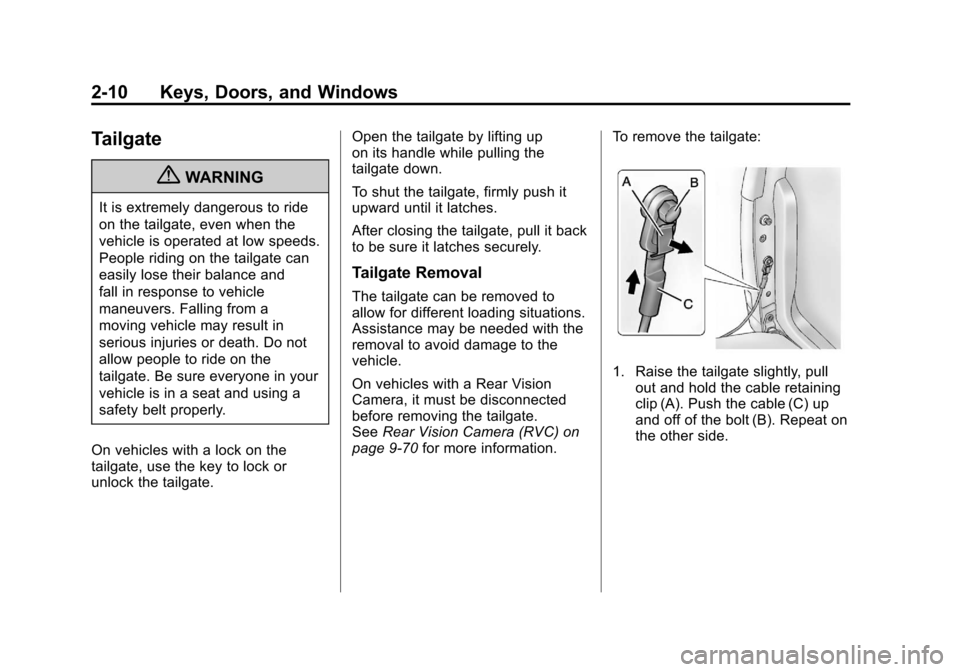
page 9‑70 for more information. To remove the tailgate:
1. Raise the tailgate slightly, pull
out and hold the cable retaining
clip (A). Push the cable (C) up
and off of the bolt (B). Repeat on
the other side.
Page 56 of 584

Black plate (14,1)Chevrolet Silverado Owner Manual - 2012
2-14 Keys, Doors, and Windows
4. Insert the new key to beprogrammed and turn it to
the ON/RUN position within
five seconds of turning the
ignition to the LOCK/OFF
position in Step 3.
The security light will turn off
once the key has been
programmed.
5. Repeat Steps 1 through 4 if additional keys are to be
programmed.
If you lose or damage your
PASS-Key III+ key, see your dealer
or a locksmith who can service
PASS-Key III+ to have a new
key made.
Do not leave the key or device
that disarms or deactivates the
theft-deterrent system in the vehicle.Exterior Mirrors
Convex Mirrors
{WARNING
A convex mirror can make things,
like other vehicles, look farther
away than they really are. If you
cut too sharply into the right lane,
you could hit a vehicle on the
right. Check the inside mirror or
glance over your shoulder before
changing lanes.
The passenger side mirror is convex
shaped. A convex mirror's surface is
curved so more can be seen from
the driver seat.
Manual Mirrors
Vehicles with outside manual
mirrors can be adjusted by moving
the mirror up and down or left to
right to see a little of the side of the
vehicle, and have a clear view
behind the vehicle.
Using hood-mounted air deflectors
and add-on convex mirror
attachments could decrease mirror
performance.