2012 CHEVROLET ORLANDO washer fluid
[x] Cancel search: washer fluidPage 5 of 378

Black plate (5,1)Chevrolet Orlando Owner Manual - 2012
Introduction v
Vehicle Symbol Chart
Here are some additional symbols
that may be found on the vehicle
and what they mean. For more
information on the symbol, refer to
the Index.
9:Airbag Readiness Light
#:Air Conditioning
!:Antilock Brake System (ABS)
%:Audio Steering Wheel Controls
or OnStar®
$: Brake System Warning Light
":Charging System
I:Cruise Control
B: Engine Coolant Temperature
O:Exterior Lamps
#:Fog Lamps
.: Fuel Gauge
+:Fuses
3: Headlamp High/Low-Beam
Changer
j: LATCH System Child
Restraints
*: Malfunction Indicator Lamp
::Oil Pressure
}:Power
/:Remote Vehicle Start
>:Safety Belt Reminders
7:Tire Pressure Monitor
d:Traction Control/StabiliTrak®
M:Windshield Washer Fluid
Page 18 of 378
Black plate (12,1)Chevrolet Orlando Owner Manual - 2012
1-12 In Brief
;:Turns on the parking lamps,
taillamps, license plate lamps,
sidemarker lamps, and instrument
panel lights.
5: Turns on the headlamps,
parking lamps, taillamps, license
plate lamps, sidemarker lamps, and
instrument panel lights. A warning
chime sounds if the driver door is
opened when the ignition switch is
off and the headlamps are on.
#: For vehicles with fog lamps,
press to turn the lamps on or off.
For more information, see:
.Exterior Lamp Controls on
page 6‑1.
.Daytime Running Lamps (DRL)
on page 6‑2.
.Front Fog Lamps on page 6‑4.
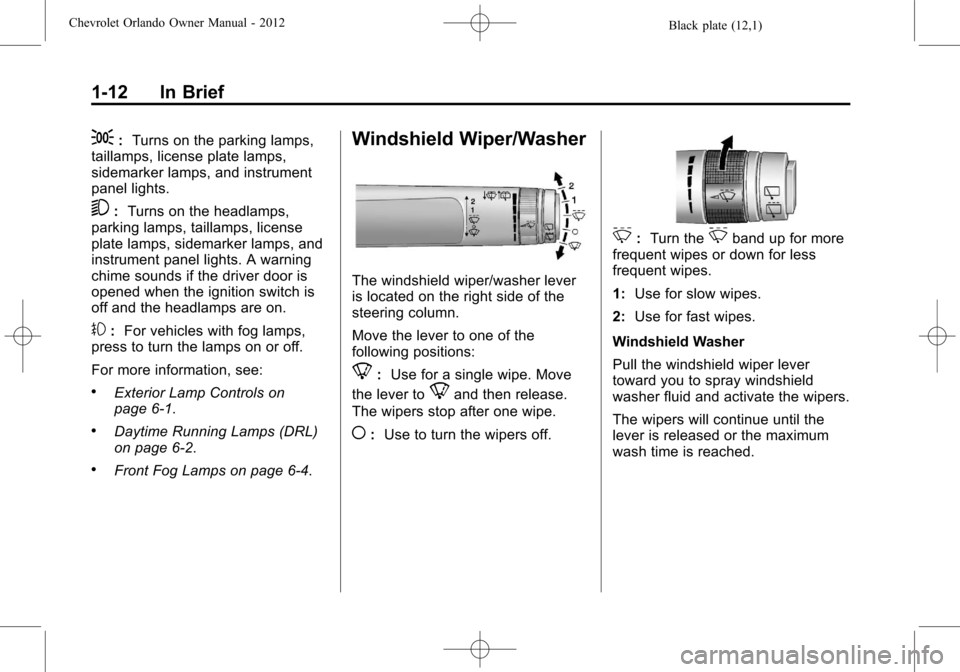
Windshield Wiper/Washer
The windshield wiper/washer lever
is located on the right side of the
steering column.
Move the lever to one of the
following positions:
8: Use for a single wipe. Move
the lever to
8and then release.
The wipers stop after one wipe.
(: Use to turn the wipers off.
3:Turn the3band up for more
frequent wipes or down for less
frequent wipes.
1: Use for slow wipes.
2: Use for fast wipes.
Windshield Washer
Pull the windshield wiper lever
toward you to spray windshield
washer fluid and activate the wipers.
The wipers will continue until the
lever is released or the maximum
wash time is reached.
Page 19 of 378
Black plate (13,1)Chevrolet Orlando Owner Manual - 2012
In Brief 1-13
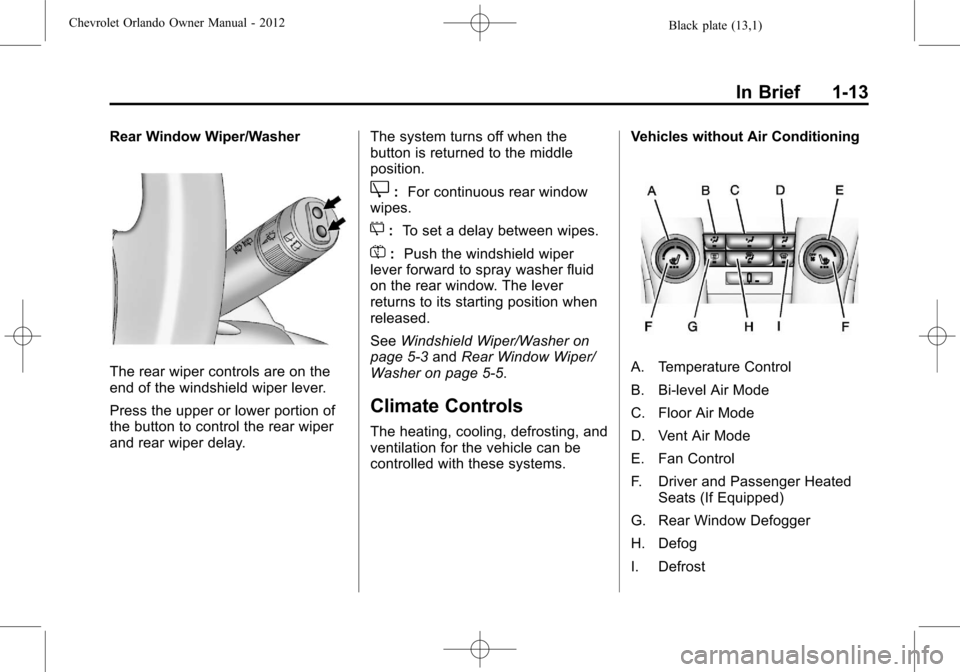
Rear Window Wiper/Washer
The rear wiper controls are on the
end of the windshield wiper lever.
Press the upper or lower portion of
the button to control the rear wiper
and rear wiper delay.The system turns off when the
button is returned to the middle
position.
Z:
For continuous rear window
wipes.
5: To set a delay between wipes.
=:Push the windshield wiper
lever forward to spray washer fluid
on the rear window. The lever
returns to its starting position when
released.
See Windshield Wiper/Washer on
page 5‑3 andRear Window Wiper/
Washer on page 5‑5.
Climate Controls
The heating, cooling, defrosting, and
ventilation for the vehicle can be
controlled with these systems. Vehicles without Air Conditioning
A. Temperature Control
B. Bi-level Air Mode
C. Floor Air Mode
D. Vent Air Mode
E. Fan Control
F. Driver and Passenger Heated
Seats (If Equipped)
G. Rear Window Defogger
H. Defog
I. Defrost
Page 108 of 378

Black plate (4,1)Chevrolet Orlando Owner Manual - 2012
5-4 Instruments and Controls
3(Adjustable Interval Wipes):
Turn the
3band up for more
frequent wipes or down for less
frequent wipes.
1 (Low Speed): Use for slow
wipes.
2 (High Speed): Use for fast wipes.
Clear snow and ice from the wiper
blades before using them. If frozen
to the windshield, carefully loosen or
thaw them. Damaged wiper blades
should be replaced. See Wiper
Blade Replacement on page 10‑24.
Heavy snow or ice can overload the
wiper motor. A circuit breaker will
stop the motor until it cools down. Wipe Parking
If the ignition is turned to LOCK/
OFF while the wipers are on 1, 2,
or
3, they will immediately stop.
If the windshield wiper lever is then
moved to OFF before the driver
door is opened, or within
10 minutes, the wipers will restart
and move to the base of the
windshield.
If the ignition is turned to LOCK/
OFF during a windshield wash, the
wipers will stop when they reach the
base of the windshield.
Windshield Washer
Pull the windshield wiper lever
toward you to spray windshield
washer fluid and activate the wipers.
The wipers will continue until the
lever is released or the maximum
wash time is reached. When the windshield wiper lever is
released, additional wipes may
occur depending on how long the
windshield washer had been
activated. See
Washer Fluid on
page 10‑18 for information on filling
the windshield washer fluid
reservoir.
{WARNING
In freezing weather, do not use
the washer until the windshield is
warmed. Otherwise the washer
fluid can form ice on the
windshield, blocking your vision.
Page 109 of 378

Black plate (5,1)Chevrolet Orlando Owner Manual - 2012
Instruments and Controls 5-5
Rear Window Wiper/
Washer
The rear wiper controls are on the
end of the windshield wiper lever.
Press the upper or lower portion of
the button to control the rear wiper
and rear wiper delay.
The system turns off when the
button is returned to the middle
position.
Z(Rear Wiper):Use for
continuous rear window wipes.
5(Rear Wiper Delay): Use to set
a delay between wipes.
=(Rear Washer): Push the
windshield wiper lever forward to
spray washer fluid on the rear
window. The lever returns to its
starting position when released.
The windshield washer reservoir is
used for the windshield and the rear
window. Check the fluid level in the
reservoir if either washer is not
working. See Washer Fluid on
page 10‑18.
Compass
The vehicle may have a compass
display in the Driver Information
Center (DIC). The compass receives
its heading and other information
from the Global Positioning
System (GPS) antenna, StabiliTrak,
and vehicle speed information.
Avoid covering the GPS antenna,
located on the roof, for long periods
of time with objects that may
interfere with the antenna's ability to receive a satellite signal. The
compass system is designed to
operate for a certain number of
miles or degrees of turn before
needing a signal from the GPS
satellites. When the compass
display shows CAL, drive the
vehicle for a short distance in an
open area where it can receive a
GPS signal. The compass system
will automatically determine when
the GPS signal is restored and
provide a heading again. See
Compass Messages on page 5‑27
for more information on the
messages that may be displayed for
the compass.
Clock
The infotainment system controls
are used to access the time and
date settings through the menu
system. See
Operation on page 7‑5
for information about how to use the
menu system. For vehicles with a
navigation system, see the separate
navigation manual.
Page 194 of 378
Black plate (6,1)Chevrolet Orlando Owner Manual - 2012
9-6 Driving and Operating
Driving on Wet Roads
Rain and wet roads can reduce
vehicle traction and affect your
ability to stop and accelerate.
Always drive slower in these types
of driving conditions and avoid
driving through large puddles and
deep‐standing or flowing water.
{WARNING
Wet brakes can cause crashes.
They might not work as well in a
quick stop and could cause
pulling to one side. You could
lose control of the vehicle.
After driving through a large
puddle of water or a car/vehicle
wash, lightly apply the brake
pedal until the brakes work
normally.(Continued)
WARNING (Continued)
Flowing or rushing water creates
strong forces. Driving through
flowing water could cause the
vehicle to be carried away. If this
happens, you and other vehicle
occupants could drown. Do not
ignore police warnings and be
very cautious about trying to drive
through flowing water.
Hydroplaning
Hydroplaning is dangerous. Water
can build up under the vehicle's
tires so they actually ride on the
water. This can happen if the road is
wet enough and you are going fast
enough. When the vehicle is
hydroplaning, it has little or no
contact with the road. There is no hard and fast rule about
hydroplaning. The best advice is to
slow down when the road is wet.
Other Rainy Weather Tips
Besides slowing down, other wet
weather driving tips include:
.Allow extra following distance.
.Pass with caution.
.Keep windshield wiping
equipment in good shape.
.Keep the windshield washer fluid
reservoir filled.
.Have good tires with proper
tread depth. See
Tires on
page 10‑38.
.Turn off cruise control.
Page 235 of 378
Black plate (1,1)Chevrolet Orlando Owner Manual - 2012
Vehicle Care 10-1
Vehicle Care
General Information
General Information . . . . . . . . . . 10-2
Accessories andModifications . . . . . . . . . . . . . . . 10-2
Vehicle Checks
Doing Your OwnService Work . . . . . . . . . . . . . . . 10-3
Hood . . . . . . . . . . . . . . . . . . . . . . . . 10-4
Engine Compartment Overview . . . . . . . . . . . . . . . . . . . 10-6
Engine Oil . . . . . . . . . . . . . . . . . . . 10-7
Engine Oil Life System . . . . . . 10-9
Automatic Transmission Fluid . . . . . . . . . . . . . . . . . . . . . . 10-10
Manual Transmission Fluid . . . . . . . . . . . . . . . . . . . . . . 10-11
Hydraulic Clutch . . . . . . . . . . . . 10-11
Engine Air Cleaner/Filter . . . . 10-11
Cooling System . . . . . . . . . . . . 10-13
Engine Coolant . . . . . . . . . . . . . 10-14
Engine Overheating . . . . . . . . 10-17
Washer Fluid . . . . . . . . . . . . . . . 10-18
Brakes . . . . . . . . . . . . . . . . . . . . . 10-19
Brake Fluid . . . . . . . . . . . . . . . . . 10-20 Battery . . . . . . . . . . . . . . . . . . . . . 10-21
Starter Switch Check . . . . . . . 10-22
Automatic Transmission Shift
Lock Control Function
Check . . . . . . . . . . . . . . . . . . . . . 10-23
Ignition Transmission Lock Check . . . . . . . . . . . . . . . . . . . . . 10-23
Park Brake and P (Park) Mechanism Check . . . . . . . . 10-23
Wiper Blade Replacement . . . . . . . . . . . . . . 10-24
Headlamp Aiming
Headlamp Aiming . . . . . . . . . . 10-25
Bulb Replacement
Bulb Replacement . . . . . . . . . . 10-25
Halogen Bulbs . . . . . . . . . . . . . . 10-25
Headlamps, Front TurnSignal, Sidemarker, and
Parking Lamps . . . . . . . . . . . . 10-26
Fog Lamps . . . . . . . . . . . . . . . . . 10-27
Taillamps, Turn Signal, Sidemarker, and
Stoplamps . . . . . . . . . . . . . . . . 10-27
Back-Up Lamps . . . . . . . . . . . . 10-29
License Plate Lamp . . . . . . . . 10-30
Replacement Bulbs . . . . . . . . . 10-30
Electrical System
Electrical System Overload . . . . . . . . . . . . . . . . . . 10-31
Fuses and Circuit Breakers . . . . . . . . . . . . . . . . . . 10-31
Engine Compartment Fuse
Block . . . . . . . . . . . . . . . . . . . . . 10-32
Instrument Panel Fuse Block . . . . . . . . . . . . . . . . . . . . . 10-35
Wheels and Tires
Tires . . . . . . . . . . . . . . . . . . . . . . . . 10-38
Winter Tires . . . . . . . . . . . . . . . . 10-38
Tire Sidewall Labeling . . . . . . 10-39
Tire Designations . . . . . . . . . . . 10-40
Tire Terminology andDefinitions . . . . . . . . . . . . . . . . 10-41
Tire Pressure . . . . . . . . . . . . . . . 10-44
Tire Pressure Monitor
System . . . . . . . . . . . . . . . . . . . 10-45
Tire Pressure Monitor Operation . . . . . . . . . . . . . . . . . 10-46
Tire Inspection . . . . . . . . . . . . . . 10-49
Tire Rotation . . . . . . . . . . . . . . . 10-49
When It Is Time for New Tires . . . . . . . . . . . . . . . . . . . . . . 10-50
Buying New Tires . . . . . . . . . . . 10-51
Page 241 of 378
Black plate (7,1)Chevrolet Orlando Owner Manual - 2012
Vehicle Care 10-7
A.Engine Air Cleaner/Filter on
page 10‑11.
B. Engine Cover.
C. Engine Cooling Fan (Out of View). See Cooling System on
page 10‑13.
D. Engine Oil Fill Cap. See Engine
Oil on page 10‑7.
E. Engine Oil Dipstick (Out of View). See Engine Oil on
page 10‑7.
F. Brake Fluid Reservoir. See Brakes on page 10‑19.
G. Engine Coolant Surge Tank and Pressure Cap. See Engine
Coolant on page 10‑14.
H. Battery on page 10‑21
(Out of View).
I. Remote Positive (+) Terminal. See Jump Starting on
page 10‑73.
J. Engine Compartment Fuse
Block on page 10‑32. K. Windshield Washer Fluid
Reservoir. See Washer Fluid on
page 10‑18.
Engine Oil
To ensure proper engine
performance and long life, careful
attention must be paid to engine oil.
Following these simple, but
important steps will help protect
your investment:
.Always use engine oil approved
to the proper specification and of
the proper viscosity grade. See
“Selecting the Right Engine Oil”
in this section.
.Check the engine oil level
regularly and maintain the
proper oil level. See “Checking
Engine Oil” and“When to Add
Engine Oil” in this section.
.Change the engine oil at the
appropriate time. See Engine Oil
Life System on page 10‑9.
.Always dispose of engine oil
properly. See “What to Do with
Used Oil” in this section.
Checking Engine Oil
It is a good idea to check the engine
oil level at each fuel fill. In order to
get an accurate reading, the vehicle
must be on level ground. The
engine oil dipstick handle is a yellow
loop. See Engine Compartment
Overview on page 10‑6 for the
location of the engine oil dipstick.
Obtaining an accurate oil level
reading is essential:
1. If the engine has been running recently, turn off the engine and
allow several minutes for the oil
to drain back into the oil pan.
Checking the oil level too soon
after engine shutoff will not
provide an accurate oil level
reading.