2012 CHEVROLET ORLANDO sensor
[x] Cancel search: sensorPage 9 of 378

Black plate (3,1)Chevrolet Orlando Owner Manual - 2012
In Brief 1-3
A.Air Vents on page 8‑6.
B. Turn and Lane-Change Lever. See Turn and Lane-Change
Signals on page 6‑4.
Headlamp High/Low-Beam
Changer on page 6‑2.
C. Instrument Cluster on page 5‑9.
D. Windshield Wiper/Washer on
page 5‑3.
Rear Window Wiper/Washer on
page 5‑5.
E. Infotainment on page 7‑1.
F. Infotainment Display.
G. Light Sensor. See Automatic
Headlamp System on page 6‑3.
H. Instrument Panel Storage on
page 4‑1.
USB Port and Auxiliary Input
Jack (Inside Instrument Panel
Storage). See Auxiliary Devices
on page 7‑18. I.
CD Player on page 7‑16.
J. TCS/StabiliTrak Button. See StabiliTrak
®System on
page 9‑31.
K. Exterior Lamp Controls on
page 6‑1.
Instrument Panel Illumination
Control on page 6‑5.
Front Fog Lamps on page 6‑4.
L. Front Storage on page 4‑1.
M. Data Link Connector (DLC) (Out of View). See Malfunction
Indicator Lamp on page 5‑13.
N. Cruise Control on page 9‑32.
O. Steering Wheel Adjustment on
page 5‑2.
P. Horn on page 5‑3.
Q. Steering Wheel Controls on
page 5‑3. R.
Power Door Locks on page 2‑7.
S. Heated Front Seats on page 3‑7
(If Equipped).
T. Climate Control Systems on
page 8‑1.
Automatic Climate Control
System on page 8‑3.
U. Shift Lever. See Automatic
Transmission on page 9‑23 or
Manual Transmission on
page 9‑25.
V. Parking Brake on page 9‑28.
W. Power Outlets on page 5‑6.
X. Hazard Warning Flashers on
page 6‑3.
Y. Passenger Safety Belt Reminder Light. See Safety Belt
Reminders on page 5‑11.
Page 20 of 378

Black plate (14,1)Chevrolet Orlando Owner Manual - 2012
1-14 In Brief
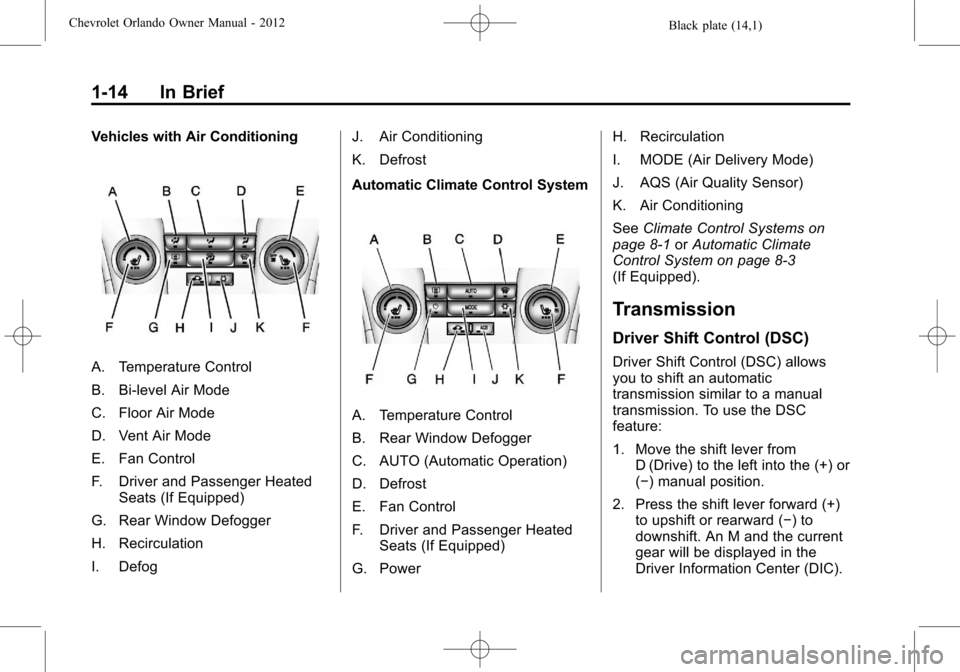
Vehicles with Air Conditioning
A. Temperature Control
B. Bi-level Air Mode
C. Floor Air Mode
D. Vent Air Mode
E. Fan Control
F. Driver and Passenger HeatedSeats (If Equipped)
G. Rear Window Defogger
H. Recirculation
I. Defog J. Air Conditioning
K. Defrost
Automatic Climate Control System
A. Temperature Control
B. Rear Window Defogger
C. AUTO (Automatic Operation)
D. Defrost
E. Fan Control
F. Driver and Passenger Heated
Seats (If Equipped)
G. Power H. Recirculation
I. MODE (Air Delivery Mode)
J. AQS (Air Quality Sensor)
K. Air Conditioning
See
Climate Control Systems on
page 8‑1 orAutomatic Climate
Control System on page 8‑3
(If Equipped).
Transmission
Driver Shift Control (DSC)
Driver Shift Control (DSC) allows
you to shift an automatic
transmission similar to a manual
transmission. To use the DSC
feature:
1. Move the shift lever from D (Drive) to the left into the (+) or
(−) manual position.
2. Press the shift lever forward (+) to upshift or rearward (−) to
downshift. An M and the current
gear will be displayed in the
Driver Information Center (DIC).
Page 24 of 378

Black plate (18,1)Chevrolet Orlando Owner Manual - 2012
1-18 In Brief
*:Press to disengage cruise
control without erasing the set
speed from memory.
See Cruise Control on page 9‑32.
Navigation System
If the vehicle has a navigation
system, there is a separate
navigation system manual that
includes information on the radio,
audio players, and navigation
system.
The navigation system provides
detailed maps of most major
freeways and roads. After a
destination has been set, the
system provides turn-by-turn
instructions for reaching the
destination. In addition, the system
can help locate a variety of points of
interest (POIs), such as banks,
airports, restaurants, and more.
See the navigation system manual
for more information.
Driver Information
Center (DIC)
The DIC display is located in the
center of the instrument panel
cluster. It shows the status of many
vehicle systems. The controls for
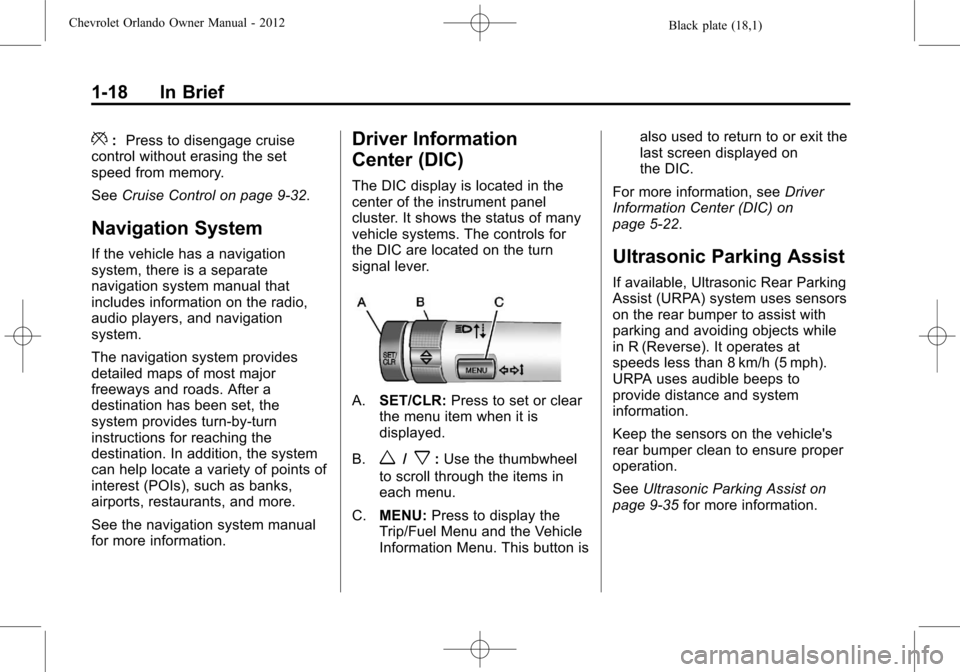
the DIC are located on the turn
signal lever.
A.SET/CLR: Press to set or clear
the menu item when it is
displayed.
B.
w/x: Use the thumbwheel
to scroll through the items in
each menu.
C. MENU: Press to display the
Trip/Fuel Menu and the Vehicle
Information Menu. This button is also used to return to or exit the
last screen displayed on
the DIC.
For more information, see Driver
Information Center (DIC) on
page 5‑22.
Ultrasonic Parking Assist
If available, Ultrasonic Rear Parking
Assist (URPA) system uses sensors
on the rear bumper to assist with
parking and avoiding objects while
in R (Reverse). It operates at
speeds less than 8 km/h (5 mph).
URPA uses audible beeps to
provide distance and system
information.
Keep the sensors on the vehicle's
rear bumper clean to ensure proper
operation.
See Ultrasonic Parking Assist on
page 9‑35 for more information.
Page 74 of 378

Black plate (28,1)Chevrolet Orlando Owner Manual - 2012
3-28 Seats and Restraints
{WARNING
If something is between an
occupant and an airbag, the
airbag might not inflate properly
or it might force the object into
that person causing severe injury
or even death. The path of an
inflating airbag must be kept
clear. Do not put anything
between an occupant and an
airbag, and do not attach or put
anything on the steering wheel
hub or on or near any other
airbag covering.
Do not use seat accessories that
block the inflation path of a
seat-mounted side impact airbag.
Never secure anything to the roof
of a vehicle with roof-rail airbags
by routing a rope or tie‐down
through any door or window
opening. If you do, the path of an
inflating roof-rail airbag will be
blocked.
When Should an Airbag
Inflate?
Frontal airbags are designed to
inflate in moderate to severe frontal
or near frontal crashes to help
reduce the potential for severe
injuries, mainly to the driver's or
right front passenger's head and
chest. However, they are only
designed to inflate if the impact
exceeds a predetermined
deployment threshold. Deployment
thresholds are used to predict how
severe a crash is likely to be in time
for the airbags to inflate and help
restrain the occupants.
Whether the frontal airbags will or
should inflate is not based primarily
on how fast the vehicle is traveling.
It depends largely on what is hit, the
direction of the impact, and how
quickly the vehicle slows down.
Frontal airbags may inflate at
different crash speeds depending on
whether the vehicle hits an object
straight on or at an angle, andwhether the object is fixed or
moving, rigid or deformable, narrow
or wide.
Thresholds can also vary with
specific vehicle design.
Frontal airbags are not intended to
inflate during vehicle rollovers, rear
impacts, or in many side impacts.
In addition, the vehicle has
dual-stage frontal airbags.
Dual-stage airbags adjust the
restraint according to crash severity.
The vehicle has electronic frontal
sensors, that help the sensing
system distinguish between a
moderate frontal impact and a more
severe frontal impact. For moderate
frontal impacts, dual-stage airbags
inflate at a level less than full
deployment. For more severe frontal
impacts, full deployment occurs.
The vehicle has seat-mounted side
impact and roof-rail airbags. See
Airbag System on page 3‑25.
Seat-mounted side impact and
roof-rail airbags are intended to
inflate in moderate to severe side
Page 78 of 378

Black plate (32,1)Chevrolet Orlando Owner Manual - 2012
3-32 Seats and Restraints
diagnostic module, steering wheel,
instrument panel, roof-rail airbag
modules, ceiling headliner or pillar
garnish trim, overhead console,
front sensors, side impact sensors,
or airbag wiring.
Your dealer and the service manual
have information about the location
of the airbag sensors, sensing and
diagnostic module, and airbag
wiring.
If the vehicle has rollover roof‐rail
airbags, seeDifferent Size Tires
and Wheels on page 10‑52 for
important information.
If you have to modify your vehicle
because you have a disability and
have questions about whether the
modifications will affect the vehicle's
airbag system, or if you have
questions about whether the airbag
system will be affected if the vehicle
is modified for any other reason, call
Customer Assistance. See
Customer Assistance Offices on
page 13‑3.Airbag System Check
The airbag system does not need
regularly scheduled maintenance or
replacement. Make sure the airbag
readiness light is working. See
Airbag Readiness Light on
page 5‑12 for more information.
Notice: If an airbag covering is
damaged, opened, or broken, the
airbag may not work properly. Do
not open or break the airbag
coverings. If there are any
opened or broken airbag covers,
have the airbag covering and/or
airbag module replaced. For the
location of the airbags, see
Where Are the Airbags? on
page 3‑27. See your dealer for
service.
Replacing Airbag System
Parts after a Crash
{WARNING
A crash can damage the airbag
systems in the vehicle.
A damaged airbag system
may not work properly and may
not protect you and your
passenger(s) in a crash, resulting
in serious injury or even death. To
help make sure the airbag
systems are working properly
after a crash, have them
inspected and any necessary
replacements made as soon as
possible.
Page 116 of 378

Black plate (12,1)Chevrolet Orlando Owner Manual - 2012
5-12 Instruments and Controls
Passenger Safety Belt
Reminder Light
When the vehicle is started, this
light flashes and a chime may come
on to remind front passengers to
fasten their safety belt. Then the
light stays on solid until the belt is
buckled.
This cycle continues several times if
the front passenger remains or
becomes unbuckled while the
vehicle is moving.
If the front passenger safety belt is
buckled, neither the chime nor the
light comes on.
The front passenger safety belt
reminder light and chime may turn
on if an object is put on the seat
such as a briefcase, handbag,
grocery bag, laptop, or otherelectronic device. To turn off the
reminder light and/or chime, remove
the object from the seat or buckle
the safety belt.
Airbag Readiness Light
This light shows if there is an
electrical problem. The system
check includes the airbag sensor(s),
the pretensioners (if equipped), the
airbag modules, the wiring, and the
crash sensing and diagnostic
module. For more information on the
airbag system, see
Airbag System
on page 3‑25.
The airbag readiness light comes on
and stays on for several seconds
when the vehicle is started. Then
the light goes out.
{WARNING
If the airbag readiness light stays
on after the vehicle is started or
comes on while driving, it means
the airbag system might not be
working properly. The airbags in
the vehicle might not inflate in a
crash, or they could even inflate
without a crash. To help avoid
injury, have the vehicle serviced
right away.
Charging System Light
The charging system light comes on
briefly when the ignition is turned
on, but the engine is not running, as
a check to show the light is working.
Page 128 of 378

Black plate (24,1)Chevrolet Orlando Owner Manual - 2012
5-24 Instruments and Controls
Reset the average consumption by
pressing SET/CLR when it is
displayed.
Instantaneous Fuel Economy
The Instantaneous Fuel Economy
display shows the current fuel
economy in liters per 100 kilometers
(L/100 km) or miles per gallon
(mpg). This number reflects only the
fuel economy that the vehicle has
right now and changes frequently as
driving conditions change. Unlike
average fuel economy, this display
cannot be reset.
Average Speed
This displays the average speed of
the vehicle in kilometers per hour
(km/h) or miles per hour (mph). This
average is based on the various
vehicle speeds recorded since the
last reset. On some models, this
display is shown as
ckm/h (mph).
Reset the average speed by
pressing SET/CLR when it is
displayed. Fuel Used
This display shows the approximate
liters (L) or gallons (gal) of fuel that
have been used since last reset.
The fuel used can be reset by
pressing the SET/CLR button while
the Fuel Used display is showing.
Digital Speed
The speedometer shows how fast
the vehicle is moving in either
kilometers per hour (km/h) or miles
per hour (mph). The speedometer
cannot be reset.
Vehicle Information Menu
Items
Press MENU on the turn signal
lever until the Vehicle Information
menu is displayed. Use
w/xto
scroll through the menu items. Not
all items are available on every
vehicle. The following is a list of all
of the possible menu items:
.Units
.Tire Pressure
.Remaining Oil Life
.Battery Voltage
.Blank Display
Units
Move
w/xto change between
metric or US when the Unit display
is active. Press SET/CLR to confirm
the setting. On some models, you
will have to select 1, 2, or 3 for the
Unit display. 1 is Imperial units, 2 is
US units, and 3 is metric units. This
will change the displays on the
cluster and DIC to the type of
measurements you select.
Tire Pressure
The display may show a vehicle
with the approximate pressures of
all four tires. Tire pressure is
displayed in either kilopascal (kPa)
or in pounds per square inch (psi).
On some models, this display only
allows for matching of the TPMS
sensors. In this case, the display
will show TIRE LEARN. See Tire
Pressure Monitor System on
Page 136 of 378

Black plate (32,1)Chevrolet Orlando Owner Manual - 2012
5-32 Instruments and Controls
Vehicle
Personalization
The audio system controls are used
to access the personalization
menus for customizing vehicle
features.
CONFIG (Configuration):Press to
access the Configuration
Settings menu.
MENU: Press the center of this
knob to enter the menus and select
menu items. Turn the knob to scroll
through the menus.
BACK: Press to exit or move
backward in a menu.
Entering the Personalization
Menus
1. Press CONFIG to access the
Configuration Settings menu.
2. Turn the MENU knob to highlight Vehicle Settings. Press the
CONFIG button until Vehicle is
highlighted on vehicles with a
navigation system only. 3. Press the center of the MENU
knob to select the Vehicle
Settings menu. The vehicle must
be in the run position.
The following list of menu items may
be available:
.Climate and Air Quality
.Comfort and Convenience
.Collision/Detection Systems
.Languages
.Lighting
.Power Door Locks
.Remote Locking, Unlocking,
Starting
.Return to Factory Settings
Turn the MENU knob to highlight the
menu. Press the knob to select it.
Each of the menus is detailed in the
following information.
Vehicles with a navigation system
will display a checkmark to indicate
this feature is on.
Climate and Air Quality
If equipped, select the Climate and
Air Quality menu and the following
will be displayed:
.Auto Fan Speed
.Air Quality Sensor
.Remote Start Auto Heat Seats
.Auto Defog
.Auto Rear Defog
Auto Fan Speed
This will allow you to select the
automatic fan speed. This feature
sets the climate control fan speed to
maintain the interior temperature.
Press the MENU knob when Auto
Fan Speed is highlighted to open
the menu. Turn the knob to highlight
High, Medium, or Low. Press the
BACK button to confirm the
selection and move back to the
last menu.