2012 CHEVROLET ORLANDO automatic transmission
[x] Cancel search: automatic transmissionPage 1 of 378

Black plate (1,1)Chevrolet Orlando Owner Manual - 2012
2012 Chevrolet Orlando Owner ManualM
In Brief. . . . . . . . . . . . . . . . . . . . . . . . 1-1
Instrument Panel . . . . . . . . . . . . . . 1-2
Initial Drive Information . . . . . . . . 1-4
Vehicle Features . . . . . . . . . . . . . 1-15
Performance and Maintenance . . . . . . . . . . . . . . . . 1-19
Keys, Doors, and Windows . . . . . . . . . . . . . . . . . . . . 2-1
Keys and Locks . . . . . . . . . . . . . . . 2-2
Doors . . . . . . . . . . . . . . . . . . . . . . . . . . 2-8
Vehicle Security . . . . . . . . . . . . . . . . 2-9
Exterior Mirrors . . . . . . . . . . . . . . . 2-11
Interior Mirrors . . . . . . . . . . . . . . . . 2-12
Windows . . . . . . . . . . . . . . . . . . . . . 2-14
Roof . . . . . . . . . . . . . . . . . . . . . . . . . . 2-17
Seats and Restraints . . . . . . . . . 3-1
Head Restraints . . . . . . . . . . . . . . . 3-2
Front Seats . . . . . . . . . . . . . . . . . . . . 3-4
Rear Seats . . . . . . . . . . . . . . . . . . . . 3-8
Safety Belts . . . . . . . . . . . . . . . . . . 3-16
Airbag System . . . . . . . . . . . . . . . . 3-25
Child Restraints . . . . . . . . . . . . . . 3-33 Storage
. . . . . . . . . . . . . . . . . . . . . . . 4-1
Storage Compartments . . . . . . . . 4-1
Additional Storage Features . . . 4-2
Roof Rack System . . . . . . . . . . . . . 4-5
Instruments and Controls . . . . 5-1
Controls . . . . . . . . . . . . . . . . . . . . . . . 5-2
Warning Lights, Gauges, and
Indicators . . . . . . . . . . . . . . . . . . . . 5-7
Information Displays . . . . . . . . . . 5-22
Vehicle Messages . . . . . . . . . . . . 5-26
Vehicle Personalization . . . . . . . 5-32
Lighting . . . . . . . . . . . . . . . . . . . . . . . 6-1
Exterior Lighting . . . . . . . . . . . . . . . 6-1
Interior Lighting . . . . . . . . . . . . . . . . 6-5
Lighting Features . . . . . . . . . . . . . . 6-6
Infotainment System . . . . . . . . . 7-1
Introduction . . . . . . . . . . . . . . . . . . . . 7-1
Radio . . . . . . . . . . . . . . . . . . . . . . . . . 7-10
Audio Players . . . . . . . . . . . . . . . . 7-16
Phone . . . . . . . . . . . . . . . . . . . . . . . . 7-21
Trademarks and License Agreements . . . . . . . . . . . . . . . . . 7-32 Climate Controls
. . . . . . . . . . . . . 8-1
Climate Control Systems . . . . . . 8-1
Air Vents . . . . . . . . . . . . . . . . . . . . . . . 8-6
Driving and Operating . . . . . . . . 9-1
Driving Information . . . . . . . . . . . . . 9-2
Starting and Operating . . . . . . . 9-14
Engine Exhaust . . . . . . . . . . . . . . 9-21
Automatic Transmission . . . . . . 9-23
Manual Transmission . . . . . . . . . 9-25
Brakes . . . . . . . . . . . . . . . . . . . . . . . 9-27
Ride Control Systems . . . . . . . . 9-29
Cruise Control . . . . . . . . . . . . . . . . 9-32
Object Detection Systems . . . . 9-35
Fuel . . . . . . . . . . . . . . . . . . . . . . . . . . 9-36
Towing . . . . . . . . . . . . . . . . . . . . . . . 9-40
Conversions and Add-Ons . . . 9-46
Page 9 of 378

Black plate (3,1)Chevrolet Orlando Owner Manual - 2012
In Brief 1-3
A.Air Vents on page 8‑6.
B. Turn and Lane-Change Lever. See Turn and Lane-Change
Signals on page 6‑4.
Headlamp High/Low-Beam
Changer on page 6‑2.
C. Instrument Cluster on page 5‑9.
D. Windshield Wiper/Washer on
page 5‑3.
Rear Window Wiper/Washer on
page 5‑5.
E. Infotainment on page 7‑1.
F. Infotainment Display.
G. Light Sensor. See Automatic
Headlamp System on page 6‑3.
H. Instrument Panel Storage on
page 4‑1.
USB Port and Auxiliary Input
Jack (Inside Instrument Panel
Storage). See Auxiliary Devices
on page 7‑18. I.
CD Player on page 7‑16.
J. TCS/StabiliTrak Button. See StabiliTrak
®System on
page 9‑31.
K. Exterior Lamp Controls on
page 6‑1.
Instrument Panel Illumination
Control on page 6‑5.
Front Fog Lamps on page 6‑4.
L. Front Storage on page 4‑1.
M. Data Link Connector (DLC) (Out of View). See Malfunction
Indicator Lamp on page 5‑13.
N. Cruise Control on page 9‑32.
O. Steering Wheel Adjustment on
page 5‑2.
P. Horn on page 5‑3.
Q. Steering Wheel Controls on
page 5‑3. R.
Power Door Locks on page 2‑7.
S. Heated Front Seats on page 3‑7
(If Equipped).
T. Climate Control Systems on
page 8‑1.
Automatic Climate Control
System on page 8‑3.
U. Shift Lever. See Automatic
Transmission on page 9‑23 or
Manual Transmission on
page 9‑25.
V. Parking Brake on page 9‑28.
W. Power Outlets on page 5‑6.
X. Hazard Warning Flashers on
page 6‑3.
Y. Passenger Safety Belt Reminder Light. See Safety Belt
Reminders on page 5‑11.
Page 20 of 378
Black plate (14,1)Chevrolet Orlando Owner Manual - 2012
1-14 In Brief
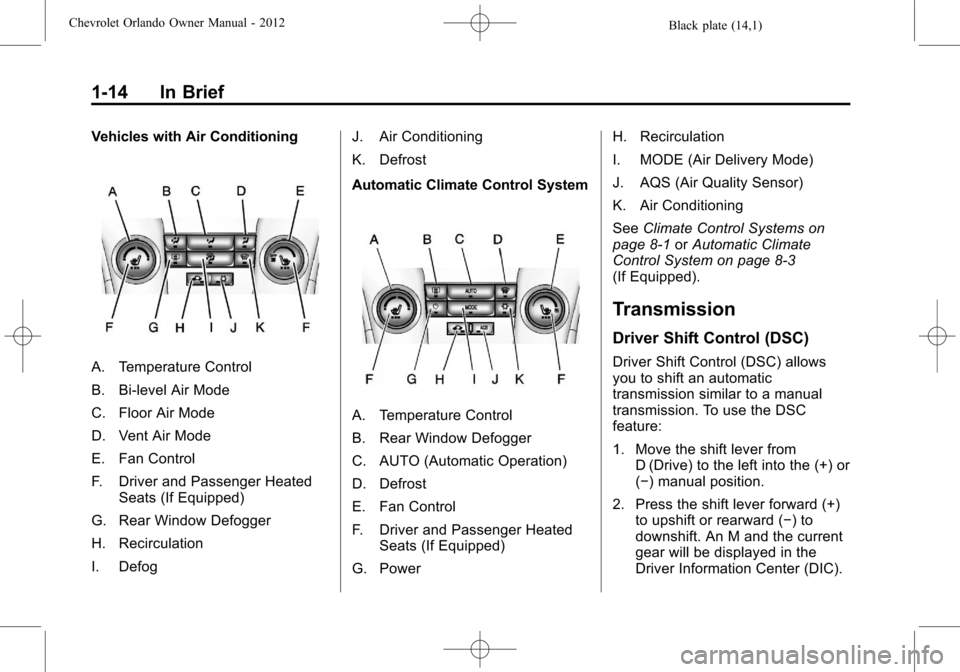
Vehicles with Air Conditioning
A. Temperature Control
B. Bi-level Air Mode
C. Floor Air Mode
D. Vent Air Mode
E. Fan Control
F. Driver and Passenger HeatedSeats (If Equipped)
G. Rear Window Defogger
H. Recirculation
I. Defog J. Air Conditioning
K. Defrost
Automatic Climate Control System
A. Temperature Control
B. Rear Window Defogger
C. AUTO (Automatic Operation)
D. Defrost
E. Fan Control
F. Driver and Passenger Heated
Seats (If Equipped)
G. Power H. Recirculation
I. MODE (Air Delivery Mode)
J. AQS (Air Quality Sensor)
K. Air Conditioning
See
Climate Control Systems on
page 8‑1 orAutomatic Climate
Control System on page 8‑3
(If Equipped).
Transmission
Driver Shift Control (DSC)
Driver Shift Control (DSC) allows
you to shift an automatic
transmission similar to a manual
transmission. To use the DSC
feature:
1. Move the shift lever from D (Drive) to the left into the (+) or
(−) manual position.
2. Press the shift lever forward (+) to upshift or rearward (−) to
downshift. An M and the current
gear will be displayed in the
Driver Information Center (DIC).
Page 113 of 378

Black plate (9,1)Chevrolet Orlando Owner Manual - 2012
Instruments and Controls 5-9
Instrument Cluster
Automatic Transmission Cluster Shown
Page 189 of 378
Black plate (1,1)Chevrolet Orlando Owner Manual - 2012
Driving and Operating 9-1
Driving and
Operating
Driving Information
Distracted Driving . . . . . . . . . . . . . 9-2
Defensive Driving . . . . . . . . . . . . . 9-2
Drunk Driving . . . . . . . . . . . . . . . . . 9-3
Control of a Vehicle . . . . . . . . . . . 9-3
Braking . . . . . . . . . . . . . . . . . . . . . . . 9-3
Steering . . . . . . . . . . . . . . . . . . . . . . . 9-3
Off-Road Recovery . . . . . . . . . . . . 9-4
Loss of Control . . . . . . . . . . . . . . . . 9-5
Driving on Wet Roads . . . . . . . . . 9-6
Highway Hypnosis . . . . . . . . . . . . 9-7
Hill and Mountain Roads . . . . . . 9-7
Winter Driving . . . . . . . . . . . . . . . . . 9-8
If the Vehicle Is Stuck . . . . . . . . . 9-9
Vehicle Load Limits . . . . . . . . . . 9-10
Starting and Operating
New Vehicle Break-In . . . . . . . . 9-14
Ignition Positions . . . . . . . . . . . . 9-15
Starting the Engine . . . . . . . . . . 9-17
Engine Heater . . . . . . . . . . . . . . . 9-18
Retained AccessoryPower (RAP) . . . . . . . . . . . . . . . 9-19 Shifting Into Park (Automatic
Transmission) . . . . . . . . . . . . . . 9-19
Shifting out of Park . . . . . . . . . . 9-20
Parking . . . . . . . . . . . . . . . . . . . . . . 9-21
Parking over Things That Burn . . . . . . . . . . . . . . . . . . 9-21
Engine Exhaust
Engine Exhaust . . . . . . . . . . . . . . 9-21
Running the Vehicle WhileParked . . . . . . . . . . . . . . . . . . . . . 9-22
Automatic Transmission
Automatic Transmission . . . . . 9-23
Manual Mode . . . . . . . . . . . . . . . . 9-24
Manual Transmission
Manual Transmission . . . . . . . . 9-25
Brakes
Antilock BrakeSystem (ABS) . . . . . . . . . . . . . . 9-27
Parking Brake . . . . . . . . . . . . . . . 9-28
Brake Assist . . . . . . . . . . . . . . . . . 9-29
Ride Control Systems
Traction Control System (TCS) . . . . . . . . . . . . . . 9-29
StabiliTrak
®System . . . . . . . . . 9-31
Cruise Control
Cruise Control . . . . . . . . . . . . . . . 9-32
Object Detection Systems
Ultrasonic Parking Assist . . . . 9-35
Fuel
Fuel . . . . . . . . . . . . . . . . . . . . . . . . . 9-36
Recommended Fuel . . . . . . . . . 9-37
Gasoline Specifications . . . . . . 9-37
Fuels in Foreign Countries . . . 9-37
Fuel Additives . . . . . . . . . . . . . . . 9-37
Filling the Tank . . . . . . . . . . . . . . 9-38
Filling a Portable Fuel Container . . . . . . . . . . . . . . . . . . . 9-40
Towing
General TowingInformation . . . . . . . . . . . . . . . . . 9-40
Driving Characteristics and Towing Tips . . . . . . . . . . . . . . . . 9-41
Trailer Towing . . . . . . . . . . . . . . . . 9-44
Towing Equipment . . . . . . . . . . . 9-45
Conversions and Add-Ons
Add-On Electrical Equipment . . . . . . . . . . . . . . . . . 9-46
Page 204 of 378
Black plate (16,1)Chevrolet Orlando Owner Manual - 2012
9-16 Driving and Operating
2. Shift the vehicle to neutral. Thiscan be done while the vehicle is
moving. After shifting to neutral,
firmly apply the brakes and steer
the vehicle to a safe location.
3. Come to a complete stop. Shift to P (Park) with an automatic
transmission, or Neutral with a
manual transmission. Turn the
ignition to LOCK/OFF.
4. Set the parking brake. See Parking Brake on page 9‑28.
{WARNING
Turning off the vehicle while
moving may cause loss of power
assist in the brake and steering
systems and disable the airbags.
While driving, only shut the
vehicle off in an emergency.
If the vehicle cannot be pulled over,
and must be shut off while driving,
turn the ignition to ACC/
ACCESSORY. The ignition switch can bind in the
LOCK/OFF position with the key
removed and wheels turned off
center. If this happens, move the
steering wheel from right to left
while turning the key to ACC/
ACCESSORY. If this does not work,
then the vehicle needs service.
B (ACC/ACCESSORY):
This
position provides power to some of
the electrical accessories. It unlocks
the steering wheel. To move the key
from ACC/ACCESSORY to LOCK/
OFF, the shift lever must be in
P (Park).
C (ON/RUN): The ignition switch
stays in this position when the
engine is running. This position can
be used to operate the electrical
accessories, as well as to display
some warning and indicator lights. This position can also be used for
service and diagnostics, and to
verify the proper operation of the
malfunction indicator lamp as may
be required for emission inspection
purposes.
The battery could be drained if the
key is left in the ACC/ACCESSORY
or ON/RUN position with the engine
off. The vehicle might not restart if
the battery is allowed to drain for an
extended period of time.
D (START):
This position starts the
engine. When the engine starts,
release the key. The ignition switch
will return to ON/RUN for normal
driving.
A warning tone sounds when the
driver door is opened and the key is
in the ignition.
Page 205 of 378
Black plate (17,1)Chevrolet Orlando Owner Manual - 2012
Driving and Operating 9-17
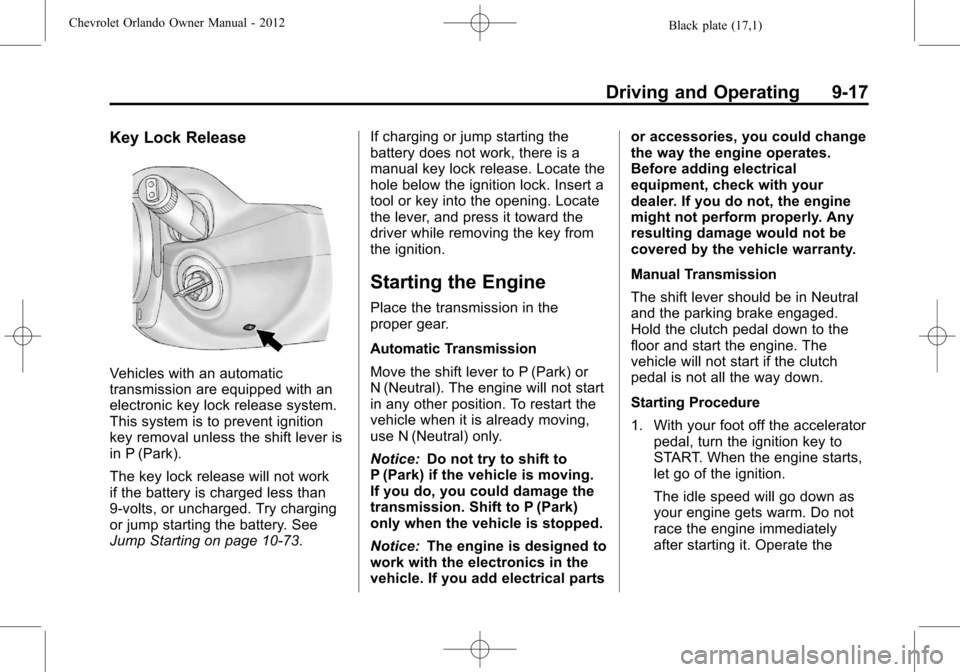
Key Lock Release
Vehicles with an automatic
transmission are equipped with an
electronic key lock release system.
This system is to prevent ignition
key removal unless the shift lever is
in P (Park).
The key lock release will not work
if the battery is charged less than
9‐volts, or uncharged. Try charging
or jump starting the battery. See
Jump Starting on page 10‑73.If charging or jump starting the
battery does not work, there is a
manual key lock release. Locate the
hole below the ignition lock. Insert a
tool or key into the opening. Locate
the lever, and press it toward the
driver while removing the key from
the ignition.
Starting the Engine
Place the transmission in the
proper gear.
Automatic Transmission
Move the shift lever to P (Park) or
N (Neutral). The engine will not start
in any other position. To restart the
vehicle when it is already moving,
use N (Neutral) only.
Notice:
Do not try to shift to
P (Park) if the vehicle is moving.
If you do, you could damage the
transmission. Shift to P (Park)
only when the vehicle is stopped.
Notice: The engine is designed to
work with the electronics in the
vehicle. If you add electrical parts or accessories, you could change
the way the engine operates.
Before adding electrical
equipment, check with your
dealer. If you do not, the engine
might not perform properly. Any
resulting damage would not be
covered by the vehicle warranty.
Manual Transmission
The shift lever should be in Neutral
and the parking brake engaged.
Hold the clutch pedal down to the
floor and start the engine. The
vehicle will not start if the clutch
pedal is not all the way down.
Starting Procedure
1. With your foot off the accelerator
pedal, turn the ignition key to
START. When the engine starts,
let go of the ignition.
The idle speed will go down as
your engine gets warm. Do not
race the engine immediately
after starting it. Operate the
Page 207 of 378
Black plate (19,1)Chevrolet Orlando Owner Manual - 2012
Driving and Operating 9-19
{WARNING
Plugging the cord into an
ungrounded outlet could cause an
electrical shock. Also, the wrong
kind of extension cord could
overheat and cause a fire. You
could be seriously injured. Plug
the cord into a properly grounded
three-prong 110-volt AC outlet.
If the cord will not reach, use a
heavy-duty three-prong extension
cord rated for at least 15 amps.
4. Before starting the engine, be sure to unplug and store the
cord as it was before to keep it
away from moving engine parts.
If you do not it could be
damaged.
The length of time the heater should
remain plugged in depends on
several factors. Ask a dealer in the
area where you will be parking the
vehicle for the best advice on this.
Retained Accessory
Power (RAP)
These vehicle accessories may be
used for up to 10 minutes after the
engine is turned off:
.Audio System
.Power Windows
.Sunroof
The power windows and sunroof
will continue to work for up to
10 minutes or until any door is
opened. The radio will work when
the key is in ON/RUN or ACC/
ACCESSORY. Once the key is
turned from ON/RUN to LOCK/OFF,
the radio will continue to work for
10 minutes, or until the driver door is
opened.
Shifting Into Park
(Automatic Transmission)
{WARNING
It can be dangerous to get out of
the vehicle if the shift lever is not
fully in P (Park) with the parking
brake firmly set. The vehicle can
roll. If you have left the engine
running, the vehicle can move
suddenly. You or others could be
injured. To be sure the vehicle will
not move, even when you are on
fairly level ground, use the steps
that follow. If you are pulling a
trailer, see Driving Characteristics
and Towing Tips on page 9‑41.
Use this procedure to shift into
P (Park):
1. Hold the brake pedal down and set the parking brake.
See Parking Brake on page 9‑28
for more information.