2012 CHEVROLET ORLANDO service
[x] Cancel search: servicePage 273 of 378

Black plate (39,1)Chevrolet Orlando Owner Manual - 2012
Vehicle Care 10-39
Winter tires, in general, are
designed for increased traction on
snow and ice covered roads. With
winter tires, there may be decreased
dry road traction, increased road
noise, and shorter tread life. After
changing to winter tires, be alert for
changes in vehicle handling and
braking.
See your dealer for details
regarding winter tire availability and
proper tire selection. Also, see
Buying New Tires on page 10‑51.
If using snow tires:
.Use tires of the same brand and
tread type on all four wheel
positions.
.Use only radial ply tires of the
same size, load range, and
speed rating as the original
equipment tires.
Winter tires with the same speed
rating as the original equipment tires
may not be available for H, V, W, Y,
and ZR speed rated tires. If winter tires with a lower speed rating are
chosen, never exceed the tire's
maximum speed capability.
Tire Sidewall Labeling
Useful information about a tire is
molded into its sidewall. The
examples show a typical
passenger tire sidewall.
Passenger (P‐Metric) Tire Example
(A) Tire Size:The tire size is a
combination of letters and
numbers used to define a
particular tire's width, height, aspect ratio, construction type,
and service description. See the
“Tire Size”
illustration later in this
section for more detail.
(B) TPC Spec (Tire
Performance Criteria
Specification)
:Original
equipment tires designed to
GM's specific tire performance
criteria have a TPC specification
code molded onto the sidewall.
GM's TPC specifications meet or
exceed all federal safety
guidelines.
(C) DOT (Department of
Transportation)
:The
Department of Transportation
(DOT) code indicates that the
tire is in compliance with the
U.S. Department of
Transportation Motor Vehicle
Safety Standards.
(D) Tire Identification Number
(TIN)
:The letters and numbers
following the DOT code are the
Page 274 of 378
Black plate (40,1)Chevrolet Orlando Owner Manual - 2012
10-40 Vehicle Care
Tire Identification Number
(TIN). The TIN shows the
manufacturer and plant code,
tire size, and date the tire was
manufactured. The TIN is
molded onto both sides of the
tire, although only one side may
have the date of manufacture.
(E) Tire Ply Material
:The type
of cord and number of plies in
the sidewall and under the tread.
(F) Uniform Tire Quality
Grading (UTQG)
:Tire
manufacturers are required to
grade tires based on three
performance factors: treadwear,
traction, and temperature
resistance. For more information
see Uniform Tire Quality
Grading on page 10‑53.
(G) Maximum Cold Inflation
Load Limit
:Maximum load
that can be carried and the
maximum pressure needed to
support that load.
Tire Designations
Tire Size
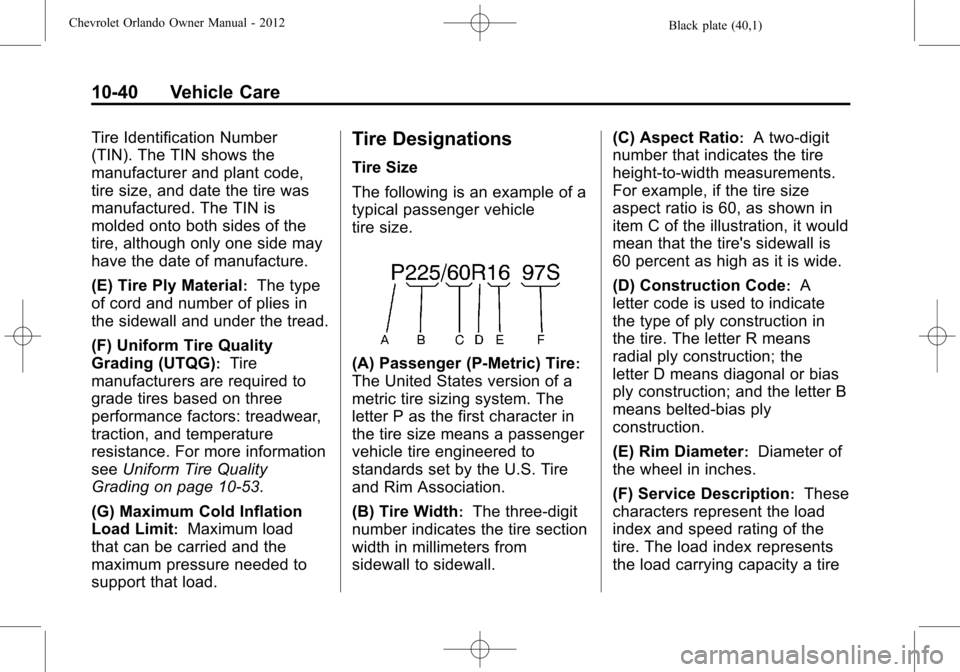
The following is an example of a
typical passenger vehicle
tire size.
(A) Passenger (P‐Metric) Tire:
The United States version of a
metric tire sizing system. The
letter P as the first character in
the tire size means a passenger
vehicle tire engineered to
standards set by the U.S. Tire
and Rim Association.
(B) Tire Width
:The three‐digit
number indicates the tire section
width in millimeters from
sidewall to sidewall. (C) Aspect Ratio
:A two‐digit
number that indicates the tire
height‐to‐width measurements.
For example, if the tire size
aspect ratio is 60, as shown in
item C of the illustration, it would
mean that the tire's sidewall is
60 percent as high as it is wide.
(D) Construction Code
:A
letter code is used to indicate
the type of ply construction in
the tire. The letter R means
radial ply construction; the
letter D means diagonal or bias
ply construction; and the letter B
means belted‐bias ply
construction.
(E) Rim Diameter
:Diameter of
the wheel in inches.
(F) Service Description
:These
characters represent the load
index and speed rating of the
tire. The load index represents
the load carrying capacity a tire
Page 281 of 378
Black plate (47,1)Chevrolet Orlando Owner Manual - 2012
Vehicle Care 10-47
A Tire and Loading Information label
shows the size of the original
equipment tires and the correct
inflation pressure for the tires when
they are cold. SeeVehicle Load
Limits on page 9‑10, for an example
of the Tire and Loading Information
label and its location. Also see Tire
Pressure on page 10‑44.
The TPMS can warn about a low
tire pressure condition but it does
not replace normal tire
maintenance. See Tire Inspection
on page 10‑49, Tire Rotation on
page 10‑49 andTires on
page 10‑38.
Notice: Tire sealant materials are
not all the same. A non-approved
tire sealant could damage the
TPMS sensors. TPMS sensor
damage caused by using an
incorrect tire sealant is not
covered by the vehicle warranty.
Always use only the
GM-approved tire sealant
available through your dealer or
included in the vehicle. Factory-installed Tire Inflator Kits
use a GM-approved liquid tire
sealant. Using non-approved tire
sealants could damage the TPMS
sensors. See
Tire Sealant and
Compressor Kit on page 10‑58 for
information regarding the inflator kit
materials and instructions.
TPMS Malfunction Light and
Message
The TPMS will not function properly
if one or more of the TPMS sensors
are missing or inoperable. When the
system detects a malfunction, the
low tire warning light flashes for
about one minute and then stays on
for the remainder of the ignition
cycle. A DIC warning message also
displays. The malfunction light and
DIC warning message come on at
each ignition cycle until the problem
is corrected. Some of the conditions
that can cause these to come
on are:
.One of the road tires has been
replaced with the spare tire. The
spare tire does not have a TPMS sensor. The malfunction
light and DIC message should
go off after the road tire is
replaced and the sensor
matching process is performed
successfully. See "TPMS Sensor
Matching Process" later in this
section.
.The TPMS sensor matching
process was not done or not
completed successfully after
rotating the tires. The
malfunction light and the DIC
message should go off after
successfully completing the
sensor matching process. See
"TPMS Sensor Matching
Process" later in this section.
.One or more TPMS sensors are
missing or damaged. The DIC
message and the malfunction
light should go off when the
TPMS sensors are installed and
the sensor matching process is
performed successfully. See
your dealer for service.
Page 282 of 378
Black plate (48,1)Chevrolet Orlando Owner Manual - 2012
10-48 Vehicle Care
.Replacement tires or wheels do
not match the original equipment
tires or wheels. Tires and wheels
other than those recommended
could prevent the TPMS from
functioning properly. SeeBuying
New Tires on page 10‑51.
.Operating electronic devices or
being near facilities using radio
wave frequencies similar to the
TPMS could cause the TPMS
sensors to malfunction.
If the TPMS is not functioning
properly, it cannot detect or signal a
low tire condition. See your dealer
for service if the TPMS malfunction
light and DIC message come on
and stay on.
TPMS Sensor Matching
Process
Each TPMS sensor has a unique
identification code. The identification
code needs to be matched to a new
tire/wheel position after rotating the
tires or replacing one or more of the TPMS sensors. The TPMS sensor
matching process should also be
performed after replacing a spare
tire with a road tire containing the
TPMS sensor. The malfunction light
and the DIC message should go off
at the next ignition cycle. The
sensors are matched to the tire/
wheel positions, using a TPMS
relearn tool, in the following order:
driver side front tire, passenger side
front tire, passenger side rear tire,
and driver side rear. See your
dealer for service or to purchase a
relearn tool.
There are two minutes to match
the first tire/wheel position, and
five minutes overall to match all
four tire/wheel positions. If it takes
longer, the matching process stops
and must be restarted.
The TPMS sensor matching
process is:
1. Set the parking brake.
2. Turn the ignition to ON/RUN with
the engine off. 3. Use the MENU button to select
the Vehicle Information menu in
the Driver Information
Center (DIC).
4. Use the thumbwheel to scroll to the Tire Pressure Menu item
screen.
5. Press the SET/CLR button to begin the sensor matching
process.
A message requesting
acceptance of the process
should display.
6. Press the SET/CLR button again to confirm the selection.
The horn sounds twice to signal
the receiver is in relearn mode
and the TIRE LEARNING
ACTIVE message displays on
the DIC screen.
7. Start with the driver side front tire.
8. Place the relearn tool against the tire sidewall, near the valve
stem. Then press the button to
activate the TPMS sensor.
Page 286 of 378
Black plate (52,1)Chevrolet Orlando Owner Manual - 2012
10-52 Vehicle Care
If the tires have an all‐season tread
design, the TPC spec number will
be followed by MS, for mud and
snow. SeeTire Sidewall Labeling on
page 10‑39 for additional
information.
GM recommends replacing all the
tires at the same time. Uniform tread
depth on all tires will help to
maintain the performance of the
vehicle. Braking and handling
performance may be adversely
affected if all the tires are not
replaced at the same time. See Tire
Inspection on page 10‑49 andTire
Rotation on page 10‑49 for
information on proper tire rotation.
{WARNING
Tires could explode during
improper service. Attempting
to mount or dismount a tire
could cause injury or death.
Only your dealer or authorized
tire service center should
mount or dismount the tires.
{WARNING
Mixing tires of different sizes,
brands, or types may cause
loss of control of the vehicle,
resulting in a crash or other
vehicle damage. Use the
correct size, brand, and type
of tire on all wheels.
{WARNING
Using bias-ply tires on the
vehicle may cause the wheel
rim flanges to develop cracks
after many miles of driving.
A tire and/or wheel could fail
suddenly and cause a crash.
Use only radial-ply tires with
the wheels on the vehicle.
If the vehicle tires must be replaced
with a tire that does not have a TPC
Spec number, make sure they are the same size, load range, speed
rating, and construction (radial) as
the original tires.
Vehicles that have a tire pressure
monitoring system could give an
inaccurate low‐pressure warning if
non‐TPC Spec rated tires are
installed. See
Tire Pressure Monitor
System on page 10‑45.
The Tire and Loading Information
Label indicates the original
equipment tires on the vehicle. See
Vehicle Load Limits on page 9‑10,
for the label location and more
information about the Tire and
Loading Information label.
Different Size Tires and
Wheels
If wheels or tires are installed that
are a different size than the original
equipment wheels and tires, vehicle
performance, including its braking,
ride and handling characteristics,
stability, and resistance to rollover
may be affected. If the vehicle has
electronic systems such as antilock
Page 288 of 378
Black plate (54,1)Chevrolet Orlando Owner Manual - 2012
10-54 Vehicle Care
Treadwear
The treadwear grade is a
comparative rating based on the
wear rate of the tire when tested
under controlled conditions on a
specified government test
course. For example, a tire
graded 150 would wear one and
a half (1½) times as well on the
government course as a tire
graded 100. The relative
performance of tires depends
upon the actual conditions of
their use, however, and may
depart significantly from the
norm due to variations in driving
habits, service practices and
differences in road
characteristics and climate.Traction
–AA, A, B, C
The traction grades, from
highest to lowest, are AA, A, B,
and C. Those grades represent
the tire's ability to stop on wet
pavement as measured under
controlled conditions on
specified government test
surfaces of asphalt and
concrete. A tire marked C may
have poor traction performance.
Warning: The traction grade
assigned to this tire is based on
straight-ahead braking traction
tests, and does not include
acceleration, cornering,
hydroplaning, or peak traction
characteristics.
Temperature –A, B, C
The temperature grades are A
(the highest), B, and C,
representing the tire's resistance
to the generation of heat and its
ability to dissipate heat when
tested under controlled conditions on a specified indoor
laboratory test wheel. Sustained
high temperature can cause the
material of the tire to degenerate
and reduce tire life, and
excessive temperature can
lead to sudden tire failure. The
grade C corresponds to a level
of performance which all
passenger car tires must meet
under the Federal Motor Safety
Standard No. 109. Grades B and
A represent higher levels of
performance on the laboratory
test wheel than the minimum
required by law. Warning: The
temperature grade for this tire is
established for a tire that is
properly inflated and not
overloaded. Excessive speed,
underinflation, or excessive
loading, either separately or in
combination, can cause heat
buildup and possible tire failure.
Page 290 of 378
Black plate (56,1)Chevrolet Orlando Owner Manual - 2012
10-56 Vehicle Care
Tire Chains
{WARNING
Do not use tire chains. There is
not enough clearance. Tire chains
used on a vehicle without the
proper amount of clearance can
cause damage to the brakes,
suspension, or other vehicle
parts. The area damaged by the
tire chains could cause loss of
control and a crash.
Use another type of traction
device only if its manufacturer
recommends it for the vehicle's
tire size combination and road
conditions. Follow that
manufacturer's instructions. To
avoid vehicle damage, drive slow
and readjust or remove the
traction device if it contacts the
vehicle. Do not spin the wheels.
If traction devices are used, install
them on the front tires.
If a Tire Goes Flat
It is unusual for a tire to blow out
while driving, especially if the tires
are maintained properly. SeeTires
on page 10‑38. If air goes out of a
tire, it is much more likely to leak
out slowly. But if there is ever a
blowout, here are a few tips about
what to expect and what to do:
If a front tire fails, the flat tire
creates a drag that pulls the vehicle
toward that side. Take your foot off
the accelerator pedal and grip the
steering wheel firmly. Steer to
maintain lane position, and then
gently brake to a stop, well off the
road, if possible.
A rear blowout, particularly on a
curve, acts much like a skid and
may require the same correction as
used in a skid. Stop pressing the
accelerator pedal and steer to
straighten the vehicle. It may be
very bumpy and noisy. Gently
brake to a stop, well off the road,
if possible.{WARNING
Driving on a flat tire will cause
permanent damage to the tire.
Re-inflating a tire after it has
been driven on while severely
underinflated or flat may cause a
blowout and a serious crash.
Never attempt to re-inflate a tire
that has been driven on while
severely underinflated or flat.
Have your dealer or an authorized
tire service center repair or
replace the flat tire as soon as
possible.
{WARNING
Lifting a vehicle and getting
under it to do maintenance or
repairs is dangerous without the
appropriate safety equipment and
training. If a jack is provided with
the vehicle, it is designed only for
(Continued)
Page 309 of 378
Black plate (75,1)Chevrolet Orlando Owner Manual - 2012
Vehicle Care 10-75
{WARNING
Fans or other moving engine
parts can injure you badly. Keep
your hands away from moving
parts once the engine is running.
5. Connect one end of the redpositive (+) cable to the jump
start positive (+) post (B).
6. Connect the other end of the red positive (+) cable to the
positive (+) terminal of the good
battery (A). 7. Connect one end of the black
negative (–) cable to the
negative (–) terminal of the good
battery (C).
8. Connect the other end of the black negative (–) cable to the
negative (–) grounding point (D).
9. Start the engine in the vehicle with the good battery and run
the engine at idle speed for at
least four minutes.
10. Try to start the vehicle that had the dead battery. If it will not
start after a few tries, it
probably needs service.
Notice: If the jumper cables are
connected or removed in the
wrong order, electrical shorting
may occur and damage the
vehicle. The repairs would not be
covered by the vehicle warranty.
Always connect and remove the
jumper cables in the correct
order, making sure that the
cables do not touch each other or
other metal.
Jumper Cable Removal
A. Heavy, Unpainted Metal Engine Part or Remote Negative (–)
Terminal
B. Good Battery or Remote Positive (+) and Remote
Negative (–) Terminals
C. Dead Battery or Remote Positive (+) Terminal