2012 CHEVROLET ORLANDO display
[x] Cancel search: displayPage 152 of 378
Black plate (6,1)Chevrolet Orlando Owner Manual - 2012
7-6 Infotainment System
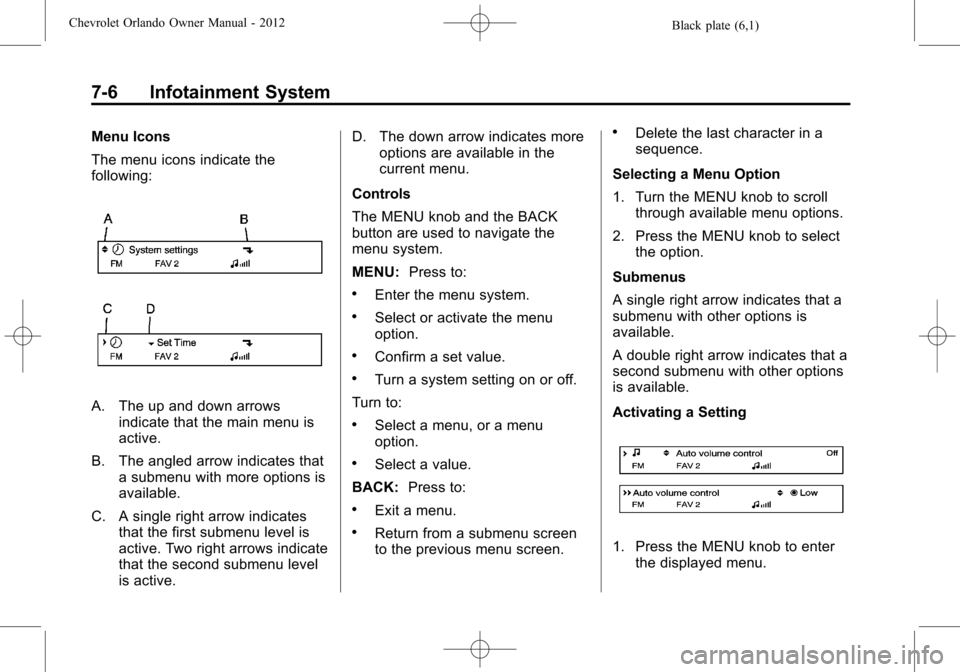
Menu Icons
The menu icons indicate the
following:
A. The up and down arrowsindicate that the main menu is
active.
B. The angled arrow indicates that a submenu with more options is
available.
C. A single right arrow indicates that the first submenu level is
active. Two right arrows indicate
that the second submenu level
is active. D. The down arrow indicates more
options are available in the
current menu.
Controls
The MENU knob and the BACK
button are used to navigate the
menu system.
MENU: Press to:
.Enter the menu system.
.Select or activate the menu
option.
.Confirm a set value.
.Turn a system setting on or off.
Turn to:
.Select a menu, or a menu
option.
.Select a value.
BACK: Press to:
.Exit a menu.
.Return from a submenu screen
to the previous menu screen.
.Delete the last character in a
sequence.
Selecting a Menu Option
1. Turn the MENU knob to scroll through available menu options.
2. Press the MENU knob to select the option.
Submenus
A single right arrow indicates that a
submenu with other options is
available.
A double right arrow indicates that a
second submenu with other options
is available.
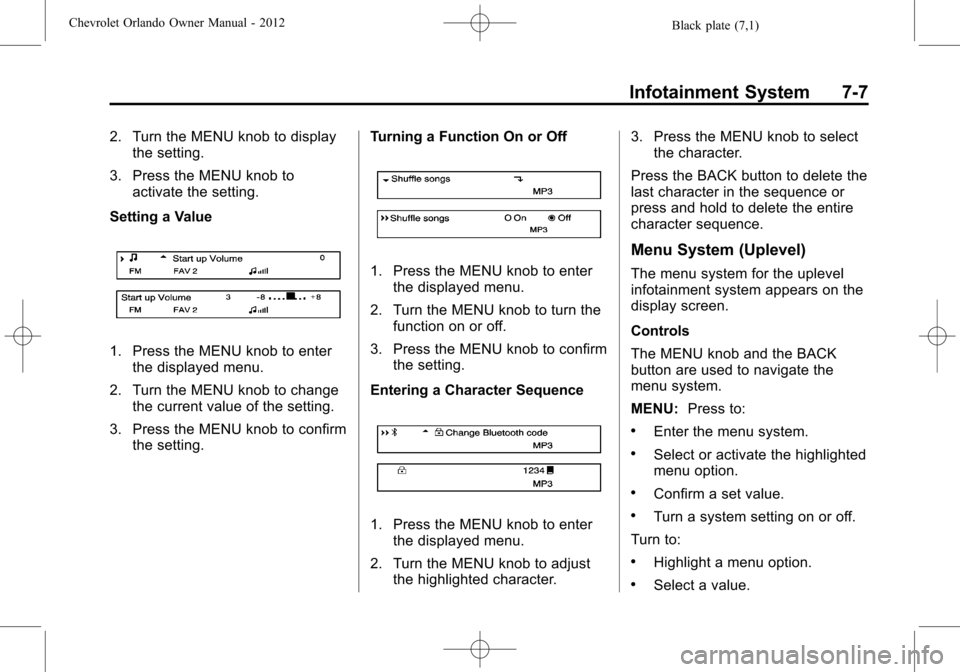
Activating a Setting
1. Press the MENU knob to enter the displayed menu.
Page 153 of 378
Black plate (7,1)Chevrolet Orlando Owner Manual - 2012
Infotainment System 7-7
2. Turn the MENU knob to displaythe setting.
3. Press the MENU knob to activate the setting.
Setting a Value
1. Press the MENU knob to enter the displayed menu.
2. Turn the MENU knob to change the current value of the setting.
3. Press the MENU knob to confirm the setting. Turning a Function On or Off
1. Press the MENU knob to enter
the displayed menu.
2. Turn the MENU knob to turn the function on or off.
3. Press the MENU knob to confirm the setting.
Entering a Character Sequence
1. Press the MENU knob to enter the displayed menu.
2. Turn the MENU knob to adjust the highlighted character. 3. Press the MENU knob to select
the character.
Press the BACK button to delete the
last character in the sequence or
press and hold to delete the entire
character sequence.
Menu System (Uplevel)
The menu system for the uplevel
infotainment system appears on the
display screen.
Controls
The MENU knob and the BACK
button are used to navigate the
menu system.
MENU: Press to:
.Enter the menu system.
.Select or activate the highlighted
menu option.
.Confirm a set value.
.Turn a system setting on or off.
Turn to:
.Highlight a menu option.
.Select a value.
Page 156 of 378
Black plate (10,1)Chevrolet Orlando Owner Manual - 2012
7-10 Infotainment System
Maximum Startup Volume
The maximum volume played when
the radio is first turned on can
be set.
1. Press the CONFIG button.
2. Select Radio Settings.
3. Select Maximum StartupVolume.
4. Select the setting.
5. Press the BACK button to go back to the System
Configuration menu.Radio
AM-FM Radio
Control Buttons
The buttons used to control the
radio are:
BAND: Press to turn the radio on
and choose between AM, FM, and
XM™, if equipped.
MENU: Turn to navigate the
available menus and to search for
stations.
INFO: Press to display additional
information that may be available for
the current song.
gorl: Press to search for
stations.
FAV: Press to open the favorites
list and select the favorites page.
1 to 6: Press to select preset
stations.
AS (Autostore): Press to open the
autostore list.
RDS (Radio Data System)
The radio may have RDS. The RDS
feature is available for use only on
FM stations that broadcast RDS
information. This feature only works
when the information from the radio
station is available. In rare cases,
a radio station could broadcast
incorrect information that causes the
radio features to work improperly.
If this happens, contact the radio
station.
While the radio is tuned to an
FM-RDS station, the station name
or call letters display.
Radio Menus
Radio menus are available for AM
and FM.
Turn the MENU knob to open the
main radio menu for that band.
Selecting a Band
Press the BAND button to choose
AM, FM, or XM, if equipped. The
last station that was playing starts
playing again.
Page 157 of 378

Black plate (11,1)Chevrolet Orlando Owner Manual - 2012
Infotainment System 7-11
Selecting a Station
Seek Tuning
If the radio station is not known:
Briefly press
gorlto
automatically search for the next
available station. If a station is not
found, the radio switches to a more
sensitive search level. If a station
still is not found, the frequency that
was last active begins to play.
If the radio station is known:
Press and hold
gorluntil the
station on the display is reached,
then release the button.
Manual Tuning
Turn the TUNE knob to select the
frequency on the display.
Favorites List
1. Turn the MENU knob.
2. Select Favorites List.
3. Select the station. Station List
1. Turn the MENU knob.
2. Select AM or FM Station List. All
receivable stations in the current
reception area are displayed. If a
station list has not been created,
an automatic station search
is done.
3. Select the station.
Category Lists
Most stations that broadcast an
RDS program type code specify the
type of programming transmitted.
Some stations change the program
type code depending on the
content. The system stores the RDS
stations sorted by program type in
the FM category list. To search for a programming type
determined by station:
1. Turn the MENU knob.
2. Select FM category list. A list of
all programming types available
displays.
3. Select the programming type. A list of stations that transmit
programming of the selected
type displays.
4. Select the station.
The category lists are updated when
the station lists are updated.
Updating Station & Category Lists
If stations stored in the station list
can no longer be received:
1. Turn the MENU knob.
2. Select Update AM or FM Station List. A station search will be
completed and the first station in
the updated list will play.
To cancel the station search, press
the MENU knob.
Page 158 of 378
Black plate (12,1)Chevrolet Orlando Owner Manual - 2012
7-12 Infotainment System
Storing a Station as a Favorite
Stations from all bands can be
stored in any order in the favorite
pages.
Up to six stations can be stored in
each favorite page and the number
of available favorite pages can
be set.
Storing Stations
To store the station to a position in
the list, press the corresponding
button 1 to 6 until a beep is heard.
Retrieving Stations
Press the FAV button to open a
favorite page or to switch to another
favorite page. Briefly press one of
the 1 to 6 buttons to retrieve the
station.
Autostore Stations
AS (Autostore):Autostore
searches and stores six FM and
six AM stations with the strongest
signal. To use autostore:
1. Press BAND to select FM or AM.
2. Press AS for at least two seconds until a beep
sounds. SEARCH displays on
the radio, followed by the
number of stations found.
3. The radio will automatically store the six strongest stations found
as autostore presets.
Press the AS button to alternate
between the autostore stations and
favorites.
AS displays on the radio when using
autostore presets.
Autostore does not delete
previously stored favorite stations.
Autostore does not function with XM
radio stations.
Satellite Radio
Vehicles with an XM Satellite Radio
tuner and a valid XM Satellite Radio
subscription can receive XM
programming.
XM Satellite Radio Service
XM is a satellite radio service based
in the 48 contiguous United States
and 10 Canadian provinces. XM
Satellite Radio has a wide variety of
programming and commercial-free
music, coast to coast, and in
digital-quality sound. A service fee
is required to receive XM service.
If XM service needs to be
reactivated, the radio will display
"No Subscription Please Renew" on
channel XM1. For more information,
contact XM at www.xmradio.com or
1-800-929-2100 in the U.S. and
www.xmradio.ca or
1-877-438-9677 in Canada.
Page 159 of 378
Black plate (13,1)Chevrolet Orlando Owner Manual - 2012
Infotainment System 7-13
Control Buttons
The buttons used to control the XM
radio are:
BAND:Press to turn the radio on
and choose between AM, FM,
and XM.
gorl: Press to go to the
previous or next channel.
FAV: Press to open the
favorites list.
1 to 6: Press to select a favorite.
MENU: Turn to select a channel.
INFO: Press to display additional
information that may be available
about the current song.
k(Play/Pause): Press to pause
time shifted content, if equipped.
Selecting the XM Band
Press the BAND button to choose
between the AM, FM, and XM
bands. The last channel played in
that band begins to play when that
band is selected.
XM Categories
XM channels are organized in
categories.
Removing or Adding Categories
Channels in a category that have
been removed can still be accessed
by using the
gorlbuttons,
or the MENU knob.
To add or remove categories:
1. Press the CONFIG button.
2. Select Radio Settings.
3. Select XM Categories.
4. Turn the MENU knob to highlight the category.
5. Press the MENU knob to remove or add the category.
Selecting an XM Channel
XM channels can be selected by
using
g,l, the MENU knob,
or the menu system. Selecting a Channel Using
g
orl
.Press and releasegorlto
go to the previous or next
channel.
.Press and holdgorlto
scroll through the previous or
next channel until the channel is
reached.
Selecting a Channel Using the
MENU Knob
To select an XM channel using the
MENU knob:
Turn the MENU knob to highlight an
XM channel. The channel is
selected after a short delay.
To select a channel using the menu:
1. Turn the MENU knob and select Channel List.
2. Select the desired channel.
Page 163 of 378
Black plate (17,1)Chevrolet Orlando Owner Manual - 2012
Infotainment System 7-17
mild neutral detergent solution
mixed with water, and clean it. Wipe
the disc from the center to the
outer edge.
Care of the CD Player
Do not add a label to a disc, as it
could get caught in the CD player.
If a label is needed, label the top of
the recorded disc with a
marking pen.
Do not use disc lens cleaners
because they could contaminate the
lens of the disc optics and damage
the CD player.
Notice:If a label is added to a
CD, more than one CD is inserted
into the slot at a time, or an
attempt is made to play scratched
or damaged CDs, the CD player
could be damaged. While using
the CD player, use only CDs in
good condition without any label,
load one CD at a time, and keep
the CD player and the loading slot
free of foreign materials, liquids,
and debris.Control Buttons
The buttons used to control the CD
player are:
CD/AUX: Press to use the CD
player.
lorg: Press to select tracks or
to fast forward or rewind within a
track.
INFO: Press to display additional
information about the current track
that may be available.
TUNE: Turn to select tracks.
MENU: Turn to enter the menu.
SELECT: Press to select an item.
Y(Eject):Press to eject the disc.
Inserting a CD
With the printed side facing up,
insert a disc into the CD slot until it
is drawn in.
Removing a CD
PressY.
The disc is pushed out of the
CD slot.
If the disc is not removed after it is
ejected, it is pulled back in after a
few seconds.
Playing a CD or MP3 CD
Press the CD/AUX button if there is
a disc in the player; it begins
playing.
Information about the disc and
current track is shown on the
display depending on the data
stored.
Selecting a CD Track
Using the control buttons:
.Pressgorlto select the
previous or next track.
.Turn the TUNE knob.
Page 164 of 378
Black plate (18,1)Chevrolet Orlando Owner Manual - 2012
7-18 Infotainment System
Using the CD Menu:
1. Turn the MENU knob.
2. Select Tracks list.
3. Select the track.
Playing Tracks in Random Order
Turn the MENU knob and then set
Shuffle Songs to On.
Fast Forward and Rewind
Press and hold
lorgto fast
forward or rewind within the current
track.
Selecting an MP3 Track
Using the control buttons:
.Pressgorlto select the
previous or next track.
.Turn the TUNE knob.
Using the CD Menu:
1. Turn the MENU knob.
2. Select Playlists/Folders.
3. Select the playlist or folder.
4. Select the track. Searching for MP3 Tracks
The search feature may take some
time to display the information after
reading the disc due to the amount
of information stored on the disc.
FM automatically plays while the
disc is being read.
Tracks can be searched by:
.Playlists
.Artists
.Albums
.Song Titles
.Genres
.Folder View
To search for tracks:
1. Turn the MENU knob.
2. Select Search.
3. Select: Playlists, Artists, Albums, Song Titles, Genres, or
Folder View.
4. Select the track.
Auxiliary Devices
The optional AUX input allows
portable devices to connect to the
vehicle using the 3.5 mm (1/8 in)
auxiliary jack or USB port.
Portable devices are controlled by
using the menu system described in
Operation on page 7‑5.
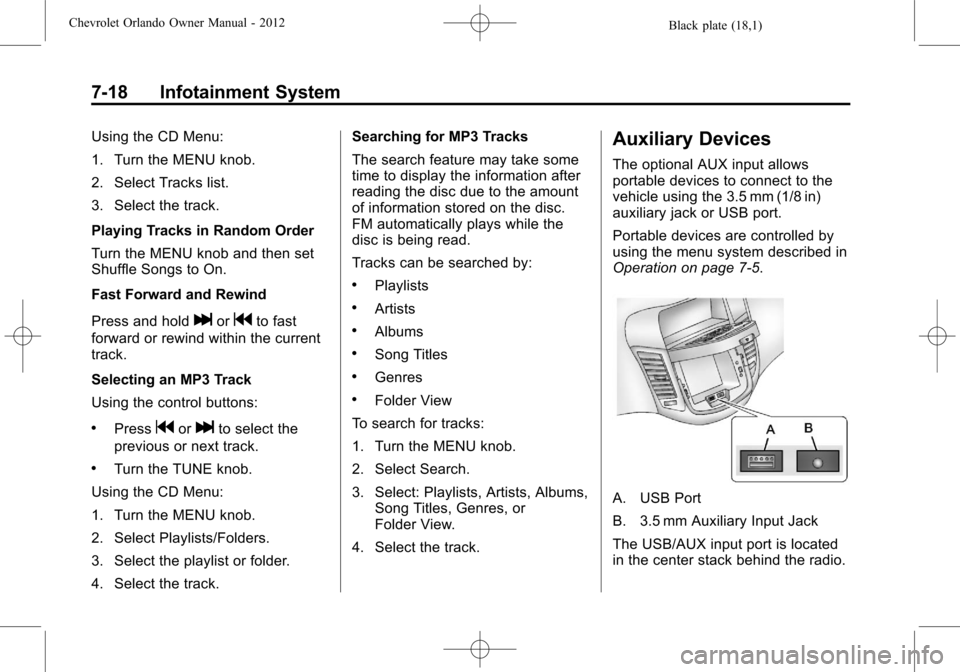
A. USB Port
B. 3.5 mm Auxiliary Input Jack
The USB/AUX input port is located
in the center stack behind the radio.