2012 CHEVROLET ORLANDO change wheel
[x] Cancel search: change wheelPage 215 of 378
Black plate (27,1)Chevrolet Orlando Owner Manual - 2012
Driving and Operating 9-27
If the gear does not engage, shift
the transmission to neutral, release
the clutch pedal and press it back
down. Repeat the gear selection.
{WARNING
If you skip a gear when you
downshift, you could lose control
of the vehicle. You could injure
yourself or others. Do not shift
down more than one gear at a
time when you downshift.
Notice: Do not skip gears while
upshifting. This can cause
premature wear in the
transmission. The repairs would
not be covered by the vehicle
warranty.
Brakes
Antilock Brake
System (ABS)
This vehicle has the Antilock Brake
System (ABS), an advanced
electronic braking system that helps
prevent a braking skid.
When the engine is started and the
vehicle begins to drive away, ABS
checks itself. A momentary motor or
clicking noise might be heard while
this test is going on, and it might
even be noticed that the brake
pedal moves a little. This is normal.
If there is a problem with ABS, this
warning light stays on. See Antilock
Brake System (ABS) Warning Light
on page 5‑16. If driving safely on a wet road and it
becomes necessary to slam on the
brakes and continue braking to
avoid a sudden obstacle, a
computer senses that the wheels
are slowing down. If one of the
wheels is about to stop rolling, the
computer will separately work the
brakes at each wheel.
ABS can change the brake pressure
to each wheel, as required, faster
than any driver could. This can help
the driver steer around the obstacle
while braking hard.
As the brakes are applied, the
computer keeps receiving updates
on wheel speed and controls
braking pressure accordingly.
Remember: ABS does not change
the time needed to get a foot up to
the brake pedal or always decrease
stopping distance. If you get too
close to the vehicle in front of you,
there will not be enough time to
apply the brakes if that vehicle
Page 221 of 378
Black plate (33,1)Chevrolet Orlando Owner Manual - 2012
Driving and Operating 9-33
{WARNING
Cruise control can be dangerous
where you cannot drive safely at
a steady speed. So, do not use
the cruise control on winding
roads or in heavy traffic.
Cruise control can be dangerous
on slippery roads. On such roads,
fast changes in tire traction can
cause excessive wheel slip, and
you could lose control. Do not use
cruise control on slippery roads.
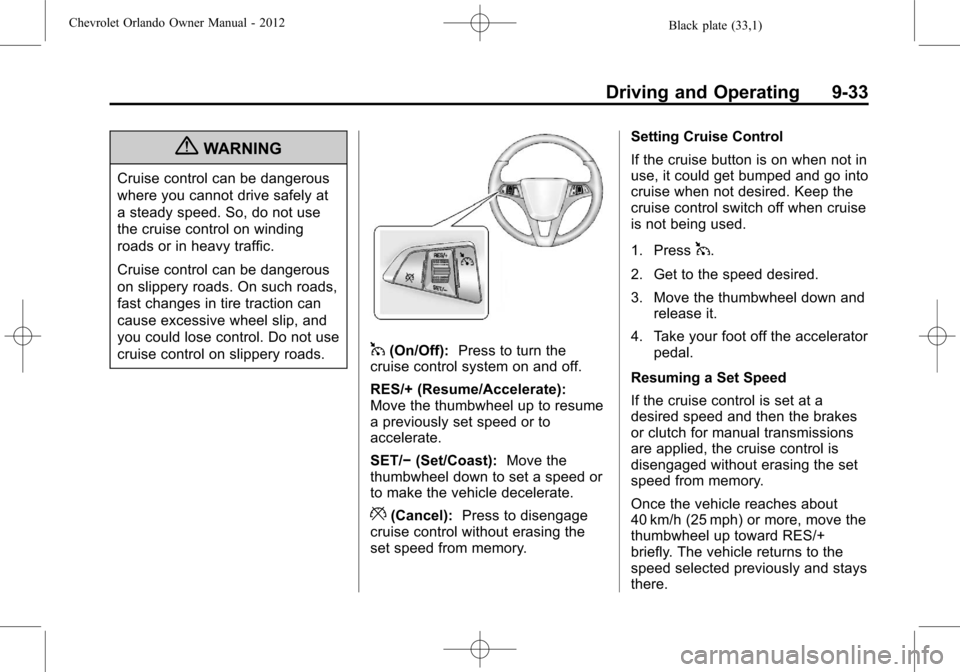
1(On/Off):Press to turn the
cruise control system on and off.
RES/+ (Resume/Accelerate):
Move the thumbwheel up to resume
a previously set speed or to
accelerate.
SET/− (Set/Coast): Move the
thumbwheel down to set a speed or
to make the vehicle decelerate.
*(Cancel): Press to disengage
cruise control without erasing the
set speed from memory. Setting Cruise Control
If the cruise button is on when not in
use, it could get bumped and go into
cruise when not desired. Keep the
cruise control switch off when cruise
is not being used.
1. Press
1.
2. Get to the speed desired.
3. Move the thumbwheel down and release it.
4. Take your foot off the accelerator pedal.
Resuming a Set Speed
If the cruise control is set at a
desired speed and then the brakes
or clutch for manual transmissions
are applied, the cruise control is
disengaged without erasing the set
speed from memory.
Once the vehicle reaches about
40 km/h (25 mph) or more, move the
thumbwheel up toward RES/+
briefly. The vehicle returns to the
speed selected previously and stays
there.
Page 229 of 378
Black plate (41,1)Chevrolet Orlando Owner Manual - 2012
Driving and Operating 9-41
vehicle such as a motor home, see
Recreational Vehicle Towing on
page 10‑76.
Driving Characteristics
and Towing Tips
{WARNING
The driver can lose control when
pulling a trailer if the correct
equipment is not used or the
vehicle is not driven properly. For
example, if the trailer is too
heavy, the brakes may not work
well—or even at all. The driver
and passengers could be
seriously injured. The vehicle may
also be damaged; the resulting
repairs would not be covered by
the vehicle warranty. Pull a trailer
only if all the steps in this section
have been followed. Ask your
dealer for advice and information
about towing a trailer with the
vehicle. The vehicle can tow a trailer if it is
equipped with the proper trailer
towing equipment. To identify the
trailering capacity of the vehicle, see
Trailer Towing on page 9‑44.
Trailering changes handling,
acceleration, braking, durability, and
fuel economy. With the added
weight, the engine, transmission,
wheel assemblies, and tires are
forced to work harder and under
greater loads. The trailer also adds
wind resistance, increasing the
pulling requirements. For safe
trailering, correctly use the proper
trailering equipment.
The following information has
important trailering tips and rules
for your safety and that of your
passengers. Read this section
carefully before pulling a trailer.
Pulling a Trailer
Here are some important points:
.There are many laws, including
speed limit restrictions that apply
to trailering. Check for legal
requirements with state or
provincial police.
.Do not tow a trailer at all during
the first 1 600 km (1,000 mi) the
new vehicle is driven. The
engine or other parts could be
damaged.
.During the first 800 km (500 mi)
that a trailer is towed, do not
drive over 80 km/h (50 mph) and
do not make starts at full throttle.
This reduces wear on the
vehicle.
.Vehicles with automatic
transmissions can tow in
D (Drive) but M (Manual Mode)
is recommended. See
Manual
Mode on page 9‑24 for more
information. Use a lower gear if
the transmission shifts too often.
Page 244 of 378

Black plate (10,1)Chevrolet Orlando Owner Manual - 2012
10-10 Vehicle Care
year. The engine oil and filter must
be changed at least once a year
and, at this time, the system must
be reset. Your dealer has trained
service people who will perform this
work and reset the system. It is also
important to check the oil regularly
over the course of an oil drain
interval and keep it at the proper
level.
If the system is ever reset
accidentally, the oil must be
changed at 5 000 km (3,000 mi)
since the last oil change.
Remember to reset the oil life
system whenever the oil is changed.
How to Reset the Engine Oil
Life System
Reset the system whenever the
engine oil is changed so that the
system can calculate the next
engine oil change. To reset the
system:
1. Turn the ignition to ON/RUN withthe engine off. 2. Press the DIC MENU button on
the turn signal lever to enter the
Vehicle Information Menu. Use
the thumbwheel to scroll through
the menu items until you reach
REMAINING OIL LIFE.
3. Press the SET/CLR button to reset the oil life at 100%.
4. Turn the ignition to LOCK/OFF.
The system is reset when the
CHANGE ENGINE OIL SOON DIC
message or Code 82 DIC message
is off and the REMAINING OIL LIFE
100% message is displayed.
If the CHANGE ENGINE OIL SOON
DIC message or Code 82 DIC
message comes back on when the
vehicle is started, the engine oil life
system has not been reset. Repeat
the procedure.
Automatic Transmission
Fluid
How to Check Automatic
Transmission Fluid
It is not necessary to check the
transmission fluid level. A
transmission fluid leak is the only
reason for fluid loss. If a leak
occurs, take the vehicle to your
dealer and have it repaired as soon
as possible.
There is a special procedure for
checking and changing the
transmission fluid. Because this
procedure is difficult, this should be
done at your dealer. Contact your
dealer for additional information or
the procedure can be found in the
service manual. To purchase a
service manual, see Service
Publications Ordering Information
on page 13‑11.
Page 273 of 378

Black plate (39,1)Chevrolet Orlando Owner Manual - 2012
Vehicle Care 10-39
Winter tires, in general, are
designed for increased traction on
snow and ice covered roads. With
winter tires, there may be decreased
dry road traction, increased road
noise, and shorter tread life. After
changing to winter tires, be alert for
changes in vehicle handling and
braking.
See your dealer for details
regarding winter tire availability and
proper tire selection. Also, see
Buying New Tires on page 10‑51.
If using snow tires:
.Use tires of the same brand and
tread type on all four wheel
positions.
.Use only radial ply tires of the
same size, load range, and
speed rating as the original
equipment tires.
Winter tires with the same speed
rating as the original equipment tires
may not be available for H, V, W, Y,
and ZR speed rated tires. If winter tires with a lower speed rating are
chosen, never exceed the tire's
maximum speed capability.
Tire Sidewall Labeling
Useful information about a tire is
molded into its sidewall. The
examples show a typical
passenger tire sidewall.
Passenger (P‐Metric) Tire Example
(A) Tire Size:The tire size is a
combination of letters and
numbers used to define a
particular tire's width, height, aspect ratio, construction type,
and service description. See the
“Tire Size”
illustration later in this
section for more detail.
(B) TPC Spec (Tire
Performance Criteria
Specification)
:Original
equipment tires designed to
GM's specific tire performance
criteria have a TPC specification
code molded onto the sidewall.
GM's TPC specifications meet or
exceed all federal safety
guidelines.
(C) DOT (Department of
Transportation)
:The
Department of Transportation
(DOT) code indicates that the
tire is in compliance with the
U.S. Department of
Transportation Motor Vehicle
Safety Standards.
(D) Tire Identification Number
(TIN)
:The letters and numbers
following the DOT code are the
Page 284 of 378
Black plate (50,1)Chevrolet Orlando Owner Manual - 2012
10-50 Vehicle Care
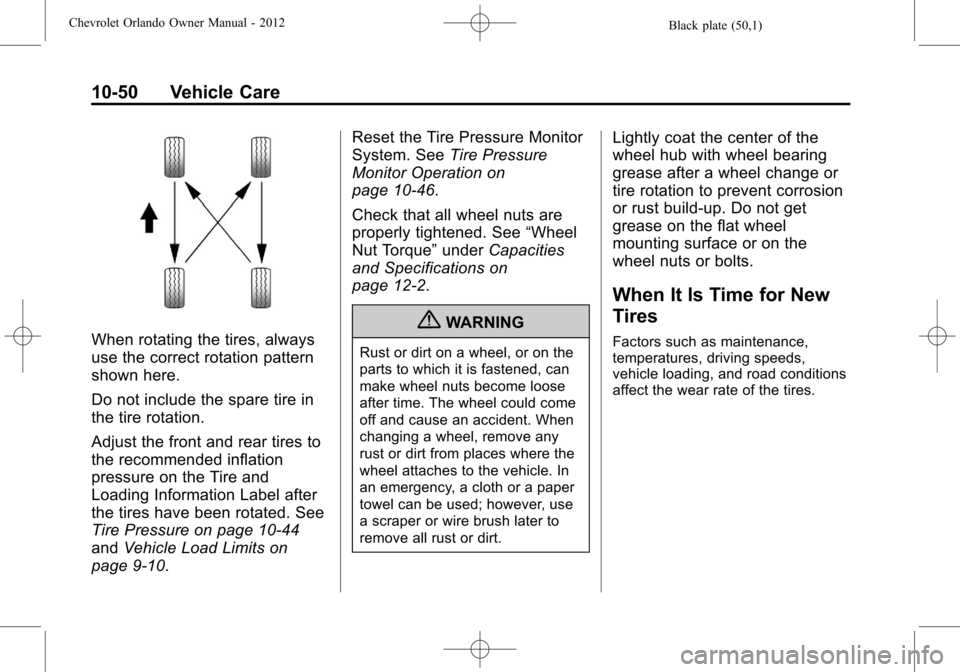
When rotating the tires, always
use the correct rotation pattern
shown here.
Do not include the spare tire in
the tire rotation.
Adjust the front and rear tires to
the recommended inflation
pressure on the Tire and
Loading Information Label after
the tires have been rotated. See
Tire Pressure on page 10‑44
andVehicle Load Limits on
page 9‑10. Reset the Tire Pressure Monitor
System. See
Tire Pressure
Monitor Operation on
page 10‑46.
Check that all wheel nuts are
properly tightened. See “Wheel
Nut Torque” underCapacities
and Specifications on
page 12‑2.
{WARNING
Rust or dirt on a wheel, or on the
parts to which it is fastened, can
make wheel nuts become loose
after time. The wheel could come
off and cause an accident. When
changing a wheel, remove any
rust or dirt from places where the
wheel attaches to the vehicle. In
an emergency, a cloth or a paper
towel can be used; however, use
a scraper or wire brush later to
remove all rust or dirt.
Lightly coat the center of the
wheel hub with wheel bearing
grease after a wheel change or
tire rotation to prevent corrosion
or rust build-up. Do not get
grease on the flat wheel
mounting surface or on the
wheel nuts or bolts.
When It Is Time for New
Tires
Factors such as maintenance,
temperatures, driving speeds,
vehicle loading, and road conditions
affect the wear rate of the tires.
Page 291 of 378
Black plate (57,1)Chevrolet Orlando Owner Manual - 2012
Vehicle Care 10-57
WARNING (Continued)
changing a flat tire. If it is used for
anything else, you or others could
be badly injured or killed if the
vehicle slips off the jack. If a jack
is provided with the vehicle, only
use it for changing a flat tire.
If a tire goes flat, avoid further tire
and wheel damage by driving slowly
to a level place, well off the road,
if possible. Turn on the hazard
warning flashers. See Hazard
Warning Flashers on page 6‑3.
{WARNING
Changing a tire can be
dangerous. The vehicle can slip
off the jack and roll over or fall
causing injury or death. Find a
level place to change the tire. To
help prevent the vehicle from
moving:
1. Set the parking brake firmly.
2. Put an automatic transmission in P (Park) or a
manual transmission in
1 (First) or R (Reverse).
3. Turn off the engine and do not restart while the vehicle
is raised.
4. Do not allow passengers to remain in the vehicle.
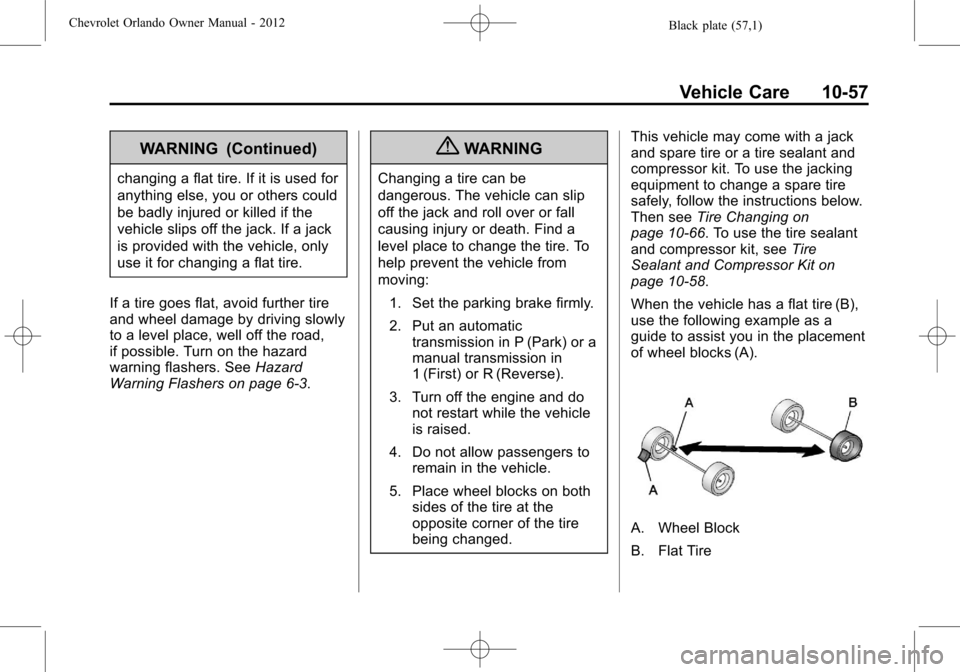
5. Place wheel blocks on both sides of the tire at the
opposite corner of the tire
being changed. This vehicle may come with a jack
and spare tire or a tire sealant and
compressor kit. To use the jacking
equipment to change a spare tire
safely, follow the instructions below.
Then see
Tire Changing on
page 10‑66. To use the tire sealant
and compressor kit, see Tire
Sealant and Compressor Kit on
page 10‑58.
When the vehicle has a flat tire (B),
use the following example as a
guide to assist you in the placement
of wheel blocks (A).
A. Wheel Block
B. Flat Tire
Page 292 of 378
Black plate (58,1)Chevrolet Orlando Owner Manual - 2012
10-58 Vehicle Care
The following information explains
how to repair or change a tire.
Tire Sealant and
Compressor Kit
{WARNING
Idling a vehicle in an enclosed
area with poor ventilation is
dangerous. Engine exhaust may
enter the vehicle. Engine exhaust
contains carbon monoxide (CO)
which cannot be seen or smelled.
It can cause unconsciousness
and even death. Never run the
engine in an enclosed area that
has no fresh air ventilation. For
more information, seeEngine
Exhaust on page 9‑21.
{WARNING
Overinflating a tire could cause
the tire to rupture and you or
others could be injured. Be sure
to read and follow the tire sealant
and compressor kit instructions
and inflate the tire to its
recommended pressure. Do not
exceed the recommended
pressure.
{WARNING
Storing the tire sealant and
compressor kit or other
equipment in the passenger
compartment of the vehicle could
cause injury. In a sudden stop or
collision, loose equipment could
strike someone. Store the tire
sealant and compressor kit in its
original location. If this vehicle has a tire sealant
and compressor kit, there may not
be a spare tire or tire changing
equipment, and on some vehicles
there may not be a place to store
a tire.
The tire sealant and compressor
can be used to temporarily seal
punctures up to 6 mm (0.25 in) in
the tread area of the tire. It can also
be used to inflate an
underinflated tire.
If the tire has been separated from
the wheel, has damaged sidewalls,
or has a large puncture, the tire is
too severely damaged for the tire
sealant and compressor kit to be
effective. See
Roadside Assistance
Program on page 13‑5.
Read and follow all of the tire
sealant and compressor kit
instructions.