2012 CHEVROLET ORLANDO Engine compartment
[x] Cancel search: Engine compartmentPage 1 of 378

Black plate (1,1)Chevrolet Orlando Owner Manual - 2012
2012 Chevrolet Orlando Owner ManualM
In Brief. . . . . . . . . . . . . . . . . . . . . . . . 1-1
Instrument Panel . . . . . . . . . . . . . . 1-2
Initial Drive Information . . . . . . . . 1-4
Vehicle Features . . . . . . . . . . . . . 1-15
Performance and Maintenance . . . . . . . . . . . . . . . . 1-19
Keys, Doors, and Windows . . . . . . . . . . . . . . . . . . . . 2-1
Keys and Locks . . . . . . . . . . . . . . . 2-2
Doors . . . . . . . . . . . . . . . . . . . . . . . . . . 2-8
Vehicle Security . . . . . . . . . . . . . . . . 2-9
Exterior Mirrors . . . . . . . . . . . . . . . 2-11
Interior Mirrors . . . . . . . . . . . . . . . . 2-12
Windows . . . . . . . . . . . . . . . . . . . . . 2-14
Roof . . . . . . . . . . . . . . . . . . . . . . . . . . 2-17
Seats and Restraints . . . . . . . . . 3-1
Head Restraints . . . . . . . . . . . . . . . 3-2
Front Seats . . . . . . . . . . . . . . . . . . . . 3-4
Rear Seats . . . . . . . . . . . . . . . . . . . . 3-8
Safety Belts . . . . . . . . . . . . . . . . . . 3-16
Airbag System . . . . . . . . . . . . . . . . 3-25
Child Restraints . . . . . . . . . . . . . . 3-33 Storage
. . . . . . . . . . . . . . . . . . . . . . . 4-1
Storage Compartments . . . . . . . . 4-1
Additional Storage Features . . . 4-2
Roof Rack System . . . . . . . . . . . . . 4-5
Instruments and Controls . . . . 5-1
Controls . . . . . . . . . . . . . . . . . . . . . . . 5-2
Warning Lights, Gauges, and
Indicators . . . . . . . . . . . . . . . . . . . . 5-7
Information Displays . . . . . . . . . . 5-22
Vehicle Messages . . . . . . . . . . . . 5-26
Vehicle Personalization . . . . . . . 5-32
Lighting . . . . . . . . . . . . . . . . . . . . . . . 6-1
Exterior Lighting . . . . . . . . . . . . . . . 6-1
Interior Lighting . . . . . . . . . . . . . . . . 6-5
Lighting Features . . . . . . . . . . . . . . 6-6
Infotainment System . . . . . . . . . 7-1
Introduction . . . . . . . . . . . . . . . . . . . . 7-1
Radio . . . . . . . . . . . . . . . . . . . . . . . . . 7-10
Audio Players . . . . . . . . . . . . . . . . 7-16
Phone . . . . . . . . . . . . . . . . . . . . . . . . 7-21
Trademarks and License Agreements . . . . . . . . . . . . . . . . . 7-32 Climate Controls
. . . . . . . . . . . . . 8-1
Climate Control Systems . . . . . . 8-1
Air Vents . . . . . . . . . . . . . . . . . . . . . . . 8-6
Driving and Operating . . . . . . . . 9-1
Driving Information . . . . . . . . . . . . . 9-2
Starting and Operating . . . . . . . 9-14
Engine Exhaust . . . . . . . . . . . . . . 9-21
Automatic Transmission . . . . . . 9-23
Manual Transmission . . . . . . . . . 9-25
Brakes . . . . . . . . . . . . . . . . . . . . . . . 9-27
Ride Control Systems . . . . . . . . 9-29
Cruise Control . . . . . . . . . . . . . . . . 9-32
Object Detection Systems . . . . 9-35
Fuel . . . . . . . . . . . . . . . . . . . . . . . . . . 9-36
Towing . . . . . . . . . . . . . . . . . . . . . . . 9-40
Conversions and Add-Ons . . . 9-46
Page 7 of 378
Black plate (1,1)Chevrolet Orlando Owner Manual - 2012
In Brief 1-1
In Brief
Instrument Panel
Instrument Panel . . . . . . . . . . . . . . 1-2
Initial Drive Information
Initial Drive Information . . . . . . . . 1-4
Remote Keyless Entry (RKE)System . . . . . . . . . . . . . . . . . . . . . . 1-4
Remote Vehicle Start . . . . . . . . . 1-4
Door Locks . . . . . . . . . . . . . . . . . . . 1-5
Liftgate . . . . . . . . . . . . . . . . . . . . . . . . 1-6
Windows . . . . . . . . . . . . . . . . . . . . . . 1-6
Seat Adjustment . . . . . . . . . . . . . . 1-6
Second Row Seats . . . . . . . . . . . 1-8
Third Row Seats . . . . . . . . . . . . . . 1-8
Heated Seats . . . . . . . . . . . . . . . . . 1-8
Head Restraint Adjustment . . . . 1-8
Safety Belts . . . . . . . . . . . . . . . . . . . 1-9 Mirror Adjustment . . . . . . . . . . . . . 1-9
Steering Wheel
Adjustment . . . . . . . . . . . . . . . . . 1-10
Interior Lighting . . . . . . . . . . . . . . 1-11
Exterior Lighting . . . . . . . . . . . . . 1-11
Windshield Wiper/Washer . . . . 1-12
Climate Controls . . . . . . . . . . . . . 1-13
Transmission . . . . . . . . . . . . . . . . 1-14
Vehicle Features
Radio(s) . . . . . . . . . . . . . . . . . . . . . 1-15
Satellite Radio . . . . . . . . . . . . . . . 1-16
Portable Audio Devices . . . . . . 1-16
Bluetooth
®. . . . . . . . . . . . . . . . . . . 1-16
Steering Wheel Controls . . . . . 1-17
Cruise Control . . . . . . . . . . . . . . . 1-17
Navigation System . . . . . . . . . . . 1-18
Driver Information Center (DIC) . . . . . . . . . . . . . . . 1-18
Ultrasonic Parking Assist . . . . 1-18
Storage Compartments . . . . . . 1-19
Power Outlets . . . . . . . . . . . . . . . 1-19
Performance and Maintenance
Traction Control System (TCS) . . . . . . . . . . . . . . 1-19
StabiliTrak
®System . . . . . . . . . 1-20
Tire Pressure Monitor . . . . . . . . 1-20
Tire Sealant and Compressor Kit . . . . . . . . . . . . . 1-20
Engine Oil Life System . . . . . . 1-21
Driving for Better Fuel Economy . . . . . . . . . . . . . . . . . . . 1-21
Roadside Assistance Program . . . . . . . . . . . . . . . . . . . . 1-21
OnStar
®. . . . . . . . . . . . . . . . . . . . . 1-22
Page 197 of 378
Black plate (9,1)Chevrolet Orlando Owner Manual - 2012
Driving and Operating 9-9
WARNING (Continued)
If the vehicle is stuck in the snow:
.Clear away snow from around
the base of your vehicle,
especially any that is blocking
the exhaust pipe.
.Check again from time to
time to be sure snow does
not collect there.
.Open a window about 5 cm
(2 in) on the side of the
vehicle that is away from the
wind to bring in fresh air.
.Fully open the air outlets on
or under the instrument
panel.
.Adjust the climate control
system to a setting that
circulates the air inside the
vehicle and set the fan speed
to the highest setting.
See“Climate Control
Systems”in the Index.
(Continued)
WARNING (Continued)
For more information about
carbon monoxide, see Engine
Exhaust on page 9‑21.
Run the engine for short periods
only as needed to keep warm, but
be careful.
To save fuel, run the engine for only
short periods as needed to warm
the vehicle and then shut the engine
off and close the window most of
the way to save heat. Repeat this
until help arrives but only when you
feel really uncomfortable from the
cold. Moving about to keep warm
also helps.
If it takes some time for help to
arrive, now and then when you run
the engine, push the accelerator
pedal slightly so the engine runs
faster than the idle speed. This
keeps the battery charged to restart
the vehicle and to signal for help
with the headlamps. Do this as little
as possible to save fuel.
If the Vehicle Is Stuck
Slowly and cautiously spin the
wheels to free the vehicle when
stuck in sand, mud, ice, or snow.
If the vehicle has a traction system,
it can often help to free a stuck
vehicle. Refer to the vehicle's
traction system in the Index. If stuck
too severely for the traction system
to free the vehicle, turn the traction
system off and use the rocking
method.
{WARNING
If the vehicle's tires spin at high
speed, they can explode, and you
or others could be injured. The
vehicle can overheat, causing an
engine compartment fire or other
damage. Spin the wheels as little
as possible and avoid going
above 55 km/h (35 mph).
Page 235 of 378
Black plate (1,1)Chevrolet Orlando Owner Manual - 2012
Vehicle Care 10-1
Vehicle Care
General Information
General Information . . . . . . . . . . 10-2
Accessories andModifications . . . . . . . . . . . . . . . 10-2
Vehicle Checks
Doing Your OwnService Work . . . . . . . . . . . . . . . 10-3
Hood . . . . . . . . . . . . . . . . . . . . . . . . 10-4
Engine Compartment Overview . . . . . . . . . . . . . . . . . . . 10-6
Engine Oil . . . . . . . . . . . . . . . . . . . 10-7
Engine Oil Life System . . . . . . 10-9
Automatic Transmission Fluid . . . . . . . . . . . . . . . . . . . . . . 10-10
Manual Transmission Fluid . . . . . . . . . . . . . . . . . . . . . . 10-11
Hydraulic Clutch . . . . . . . . . . . . 10-11
Engine Air Cleaner/Filter . . . . 10-11
Cooling System . . . . . . . . . . . . 10-13
Engine Coolant . . . . . . . . . . . . . 10-14
Engine Overheating . . . . . . . . 10-17
Washer Fluid . . . . . . . . . . . . . . . 10-18
Brakes . . . . . . . . . . . . . . . . . . . . . 10-19
Brake Fluid . . . . . . . . . . . . . . . . . 10-20 Battery . . . . . . . . . . . . . . . . . . . . . 10-21
Starter Switch Check . . . . . . . 10-22
Automatic Transmission Shift
Lock Control Function
Check . . . . . . . . . . . . . . . . . . . . . 10-23
Ignition Transmission Lock Check . . . . . . . . . . . . . . . . . . . . . 10-23
Park Brake and P (Park) Mechanism Check . . . . . . . . 10-23
Wiper Blade Replacement . . . . . . . . . . . . . . 10-24
Headlamp Aiming
Headlamp Aiming . . . . . . . . . . 10-25
Bulb Replacement
Bulb Replacement . . . . . . . . . . 10-25
Halogen Bulbs . . . . . . . . . . . . . . 10-25
Headlamps, Front TurnSignal, Sidemarker, and
Parking Lamps . . . . . . . . . . . . 10-26
Fog Lamps . . . . . . . . . . . . . . . . . 10-27
Taillamps, Turn Signal, Sidemarker, and
Stoplamps . . . . . . . . . . . . . . . . 10-27
Back-Up Lamps . . . . . . . . . . . . 10-29
License Plate Lamp . . . . . . . . 10-30
Replacement Bulbs . . . . . . . . . 10-30
Electrical System
Electrical System Overload . . . . . . . . . . . . . . . . . . 10-31
Fuses and Circuit Breakers . . . . . . . . . . . . . . . . . . 10-31
Engine Compartment Fuse
Block . . . . . . . . . . . . . . . . . . . . . 10-32
Instrument Panel Fuse Block . . . . . . . . . . . . . . . . . . . . . 10-35
Wheels and Tires
Tires . . . . . . . . . . . . . . . . . . . . . . . . 10-38
Winter Tires . . . . . . . . . . . . . . . . 10-38
Tire Sidewall Labeling . . . . . . 10-39
Tire Designations . . . . . . . . . . . 10-40
Tire Terminology andDefinitions . . . . . . . . . . . . . . . . 10-41
Tire Pressure . . . . . . . . . . . . . . . 10-44
Tire Pressure Monitor
System . . . . . . . . . . . . . . . . . . . 10-45
Tire Pressure Monitor Operation . . . . . . . . . . . . . . . . . 10-46
Tire Inspection . . . . . . . . . . . . . . 10-49
Tire Rotation . . . . . . . . . . . . . . . 10-49
When It Is Time for New Tires . . . . . . . . . . . . . . . . . . . . . . 10-50
Buying New Tires . . . . . . . . . . . 10-51
Page 240 of 378
Black plate (6,1)Chevrolet Orlando Owner Manual - 2012
10-6 Vehicle Care
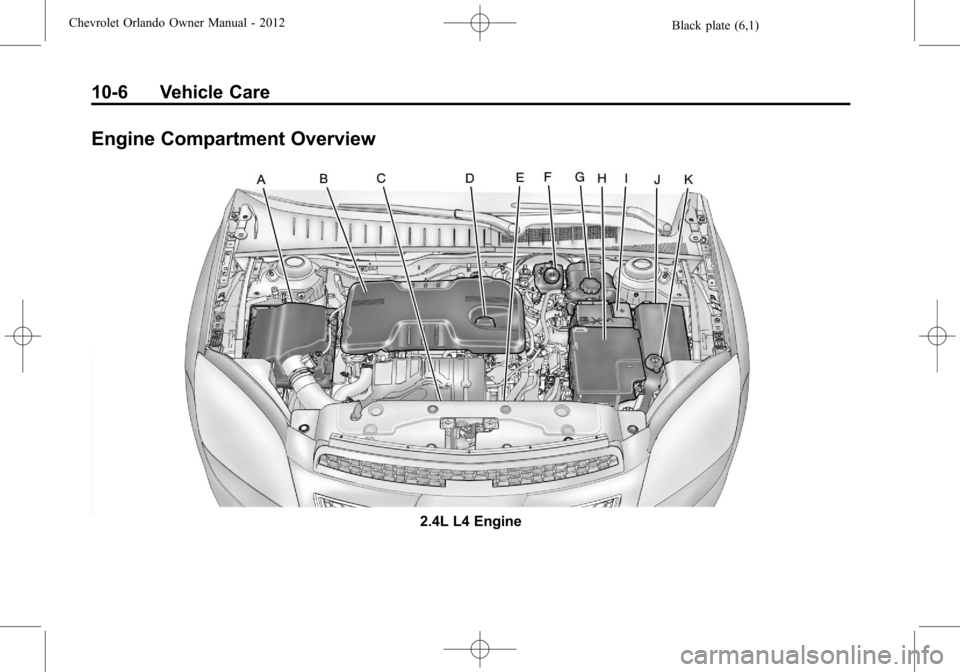
Engine Compartment Overview
2.4L L4 Engine
Page 241 of 378
Black plate (7,1)Chevrolet Orlando Owner Manual - 2012
Vehicle Care 10-7
A.Engine Air Cleaner/Filter on
page 10‑11.
B. Engine Cover.
C. Engine Cooling Fan (Out of View). See Cooling System on
page 10‑13.
D. Engine Oil Fill Cap. See Engine
Oil on page 10‑7.
E. Engine Oil Dipstick (Out of View). See Engine Oil on
page 10‑7.
F. Brake Fluid Reservoir. See Brakes on page 10‑19.
G. Engine Coolant Surge Tank and Pressure Cap. See Engine
Coolant on page 10‑14.
H. Battery on page 10‑21
(Out of View).
I. Remote Positive (+) Terminal. See Jump Starting on
page 10‑73.
J. Engine Compartment Fuse
Block on page 10‑32. K. Windshield Washer Fluid
Reservoir. See Washer Fluid on
page 10‑18.
Engine Oil
To ensure proper engine
performance and long life, careful
attention must be paid to engine oil.
Following these simple, but
important steps will help protect
your investment:
.Always use engine oil approved
to the proper specification and of
the proper viscosity grade. See
“Selecting the Right Engine Oil”
in this section.
.Check the engine oil level
regularly and maintain the
proper oil level. See “Checking
Engine Oil” and“When to Add
Engine Oil” in this section.
.Change the engine oil at the
appropriate time. See Engine Oil
Life System on page 10‑9.
.Always dispose of engine oil
properly. See “What to Do with
Used Oil” in this section.
Checking Engine Oil
It is a good idea to check the engine
oil level at each fuel fill. In order to
get an accurate reading, the vehicle
must be on level ground. The
engine oil dipstick handle is a yellow
loop. See Engine Compartment
Overview on page 10‑6 for the
location of the engine oil dipstick.
Obtaining an accurate oil level
reading is essential:
1. If the engine has been running recently, turn off the engine and
allow several minutes for the oil
to drain back into the oil pan.
Checking the oil level too soon
after engine shutoff will not
provide an accurate oil level
reading.
Page 242 of 378
Black plate (8,1)Chevrolet Orlando Owner Manual - 2012
10-8 Vehicle Care
2. Pull out the dipstick and clean itwith a paper towel or cloth, then
push it back in all the way.
Remove it again, keeping the tip
down, and check the level.
When to Add Engine Oil
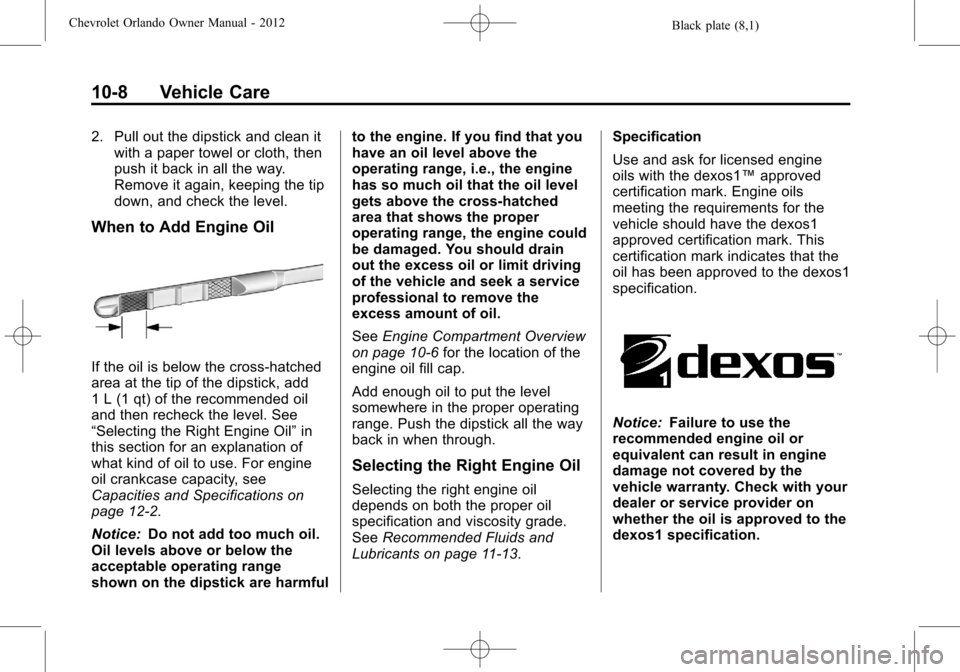
If the oil is below the cross-hatched
area at the tip of the dipstick, add
1 L (1 qt) of the recommended oil
and then recheck the level. See
“Selecting the Right Engine Oil” in
this section for an explanation of
what kind of oil to use. For engine
oil crankcase capacity, see
Capacities and Specifications on
page 12‑2.
Notice: Do not add too much oil.
Oil levels above or below the
acceptable operating range
shown on the dipstick are harmful to the engine. If you find that you
have an oil level above the
operating range, i.e., the engine
has so much oil that the oil level
gets above the cross-hatched
area that shows the proper
operating range, the engine could
be damaged. You should drain
out the excess oil or limit driving
of the vehicle and seek a service
professional to remove the
excess amount of oil.
See
Engine Compartment Overview
on page 10‑6 for the location of the
engine oil fill cap.
Add enough oil to put the level
somewhere in the proper operating
range. Push the dipstick all the way
back in when through.
Selecting the Right Engine Oil
Selecting the right engine oil
depends on both the proper oil
specification and viscosity grade.
See Recommended Fluids and
Lubricants on page 11‑13. Specification
Use and ask for licensed engine
oils with the dexos1™
approved
certification mark. Engine oils
meeting the requirements for the
vehicle should have the dexos1
approved certification mark. This
certification mark indicates that the
oil has been approved to the dexos1
specification.
Notice: Failure to use the
recommended engine oil or
equivalent can result in engine
damage not covered by the
vehicle warranty. Check with your
dealer or service provider on
whether the oil is approved to the
dexos1 specification.
Page 245 of 378
Black plate (11,1)Chevrolet Orlando Owner Manual - 2012
Vehicle Care 10-11
Change the fluid and filter at the
intervals listed inMaintenance
Schedule on page 11‑3, and be
sure to use the fluid listed in
Recommended Fluids and
Lubricants on page 11‑13.
Manual Transmission
Fluid
How to Check Manual
Transmission Fluid
It is not necessary to check the
manual transmission fluid level.
A transmission fluid leak is the only
reason for fluid loss. If a leak
occurs, take the vehicle to your
dealer and have it repaired as soon
as possible. See Recommended
Fluids and Lubricants on page 11‑13
for the proper fluid to use.
Hydraulic Clutch
For vehicles with a manual
transmission, it is not necessary to
regularly check brake/clutch fluid
unless there is a leak suspected. Adding fluid will not correct a leak.
A fluid loss in this system could
indicate a problem. Have the
system inspected and repaired.
When to Check and What
to Use
The brake/hydraulic clutch fluid
reservoir cap has this symbol on it.
The common brake/clutch fluid
reservoir is filled with DOT 4 brake
fluid as indicated on the reservoir
cap. See
Engine Compartment
Overview on page 10‑6 for reservoir
location.
How to Check and Add Fluid
Visually check the brake/clutch fluid
reservoir to make sure the fluid level
is at the MIN (minimum) line on the side of the reservoir. The brake/
hydraulic clutch fluid system should
be closed and sealed.
Do not remove the cap to check
the fluid level or to top‐off the fluid
level. Remove the cap only when
necessary to add the proper fluid
until the level reaches the MIN line.
Engine Air Cleaner/Filter
See
Engine Compartment Overview
on page 10‑6 for the location of the
engine air cleaner/filter.
When to Inspect the Engine Air
Cleaner/Filter
Inspect or replace the air cleaner/
filter at the scheduled maintenance
intervals. See Maintenance
Schedule on page 11‑3 for more
information. If driving in dusty/dirty
conditions, inspect the filter at each
engine oil change.