2012 CHEVROLET MALIBU low beam
[x] Cancel search: low beamPage 5 of 398

Black plate (5,1)Chevrolet Malibu Owner Manual - 2012
Introduction v
Vehicle Symbol Chart
Here are some additional symbols
that may be found on the vehicle
and what they mean. For more
information on the symbol, refer to
the Index.
9:Airbag Readiness Light
#:Air Conditioning
!:Antilock Brake System (ABS)
%:Audio Steering Wheel Controls
or OnStar®
$: Brake System Warning Light
":Charging System
I:Cruise Control
B: Engine Coolant Temperature
O:Exterior Lamps
#:Fog Lamps
.: Fuel Gauge
+:Fuses
3: Headlamp High/Low-Beam
Changer
j: LATCH System Child
Restraints
*: Malfunction Indicator Lamp
::Oil Pressure
}:Power
/:Remote Vehicle Start
>:Safety Belt Reminders
7:Tire Pressure Monitor
d:Traction Control/Electronic
Stability Control (ESC)
M: Windshield Washer Fluid
Page 129 of 398
Black plate (23,1)Chevrolet Malibu Owner Manual - 2012
Instruments and Controls 5-23
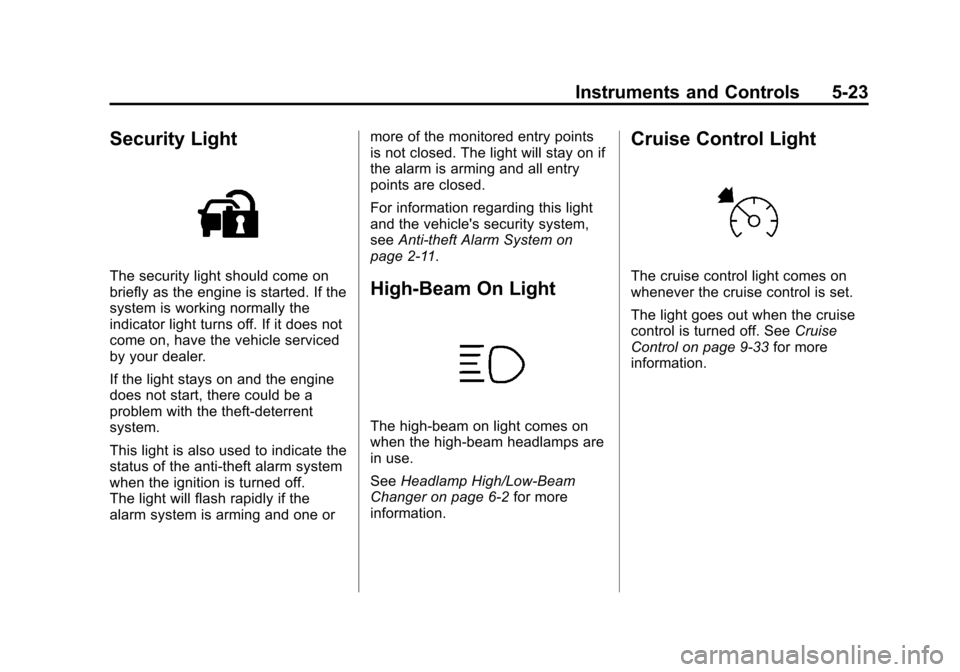
Security Light
The security light should come on
briefly as the engine is started. If the
system is working normally the
indicator light turns off. If it does not
come on, have the vehicle serviced
by your dealer.
If the light stays on and the engine
does not start, there could be a
problem with the theft-deterrent
system.
This light is also used to indicate the
status of the anti-theft alarm system
when the ignition is turned off.
The light will flash rapidly if the
alarm system is arming and one ormore of the monitored entry points
is not closed. The light will stay on if
the alarm is arming and all entry
points are closed.
For information regarding this light
and the vehicle's security system,
see
Anti-theft Alarm System on
page 2‑11.High-Beam On Light
The high‐beam on light comes on
when the high-beam headlamps are
in use.
See Headlamp High/Low-Beam
Changer on page 6‑2 for more
information.
Cruise Control Light
The cruise control light comes on
whenever the cruise control is set.
The light goes out when the cruise
control is turned off. See Cruise
Control on page 9‑33 for more
information.
Page 143 of 398
Black plate (1,1)Chevrolet Malibu Owner Manual - 2012
Lighting 6-1
Lighting
Exterior Lighting
Exterior Lamp Controls . . . . . . . . 6-1
Exterior Lamps OffReminder . . . . . . . . . . . . . . . . . . . . 6-2
Headlamp High/Low-Beam Changer . . . . . . . . . . . . . . . . . . . . . 6-2
Flash-to-Pass . . . . . . . . . . . . . . . . . 6-2
Daytime Running Lamps (DRL) . . . . . . . . . . . . . . . . 6-2
Automatic Headlamp System . . . . . . . . . . . . . . . . . . . . . . 6-3
Delayed Headlamps . . . . . . . . . . 6-4
Hazard Warning Flashers . . . . . 6-4
Turn and Lane-Change Signals . . . . . . . . . . . . . . . . . . . . . . 6-4
Fog Lamps . . . . . . . . . . . . . . . . . . . . 6-5
Interior Lighting
Instrument Panel Illumination Control . . . . . . . . . . . . . . . . . . . . . . 6-5
Dome Lamps . . . . . . . . . . . . . . . . . 6-6
Reading Lamps . . . . . . . . . . . . . . . 6-6
Lighting Features
Entry/Exit Lighting . . . . . . . . . . . . . 6-6
Parade Dimming . . . . . . . . . . . . . . 6-6
Battery Load Management . . . . 6-6
Battery Power Protection . . . . . . 6-7
Exterior Lighting
Exterior Lamp Controls
The band on the lever located on
the left side of the steering column,
operates the exterior lamps.
The exterior lamp control has the
following four positions:
2(Headlamps): Turns on the
headlamps, parking lamps, and
taillamps.
;(Parking Lamps): Turns on the
parking lamps and taillamps only.
AUTO (Automatic Headlamp
System): Automatically turns on
the Daytime Running Lamps during
daytime, and the headlamps,
parking lamps, and taillamps at
night.
Page 144 of 398
Black plate (2,1)Chevrolet Malibu Owner Manual - 2012
6-2 Lighting
P(Off/On):Turn the band to this
position to turn on the Automatic
Headlamp System. In Canada,
this position only works when a
vehicle is in the P (Park) position.
To turn on the Automatic Headlamp
System, turn the switch to off/on.
To turn them off, turn the switch to
off/on again. This is a momentary
control switch that springs back
when released. The Automatic
Headlamp System always turns on
at the beginning of an ignition cycle.
Exterior Lamps Off
Reminder
If the drivers door is opened and the
ignition is turned off while leaving
the lamps on, a warning chime will
sound.
Headlamp High/
Low-Beam Changer
To change the headlamps from low
beam to high beam, push the turn
signal/multifunction lever away
from you.
This instrument panel cluster
light
3comes on if the high beam
lamps are turned on while the
ignition is in ON/RUN.
To change the headlamps from
high beam to low beam, pull the
turn signal lever toward you.
Flash-to-Pass
This feature lets the high-beam
headlamps be used to signal a
driver in front of you that you want
to pass.
Pull the turn signal/multifunction
lever toward you until the high-beam
headlamps come on, then release
the lever to turn them off.
Daytime Running
Lamps (DRL)
Daytime Running Lamps (DRL) can
make it easier for others to see the
front of your vehicle during the day.
Fully functional DRL are required on
all vehicles first sold in Canada.
The vehicle has a light sensor on
top of the instrument panel that
controls the DRL. Do not cover this
sensor or the head lamps will be on
when they are not needed.
The DRL system makes the
low-beam headlamps come on at
a reduced brightness when the
following conditions are met:
.The ignition is on.
.The exterior lamps control is
in AUTO.
.The exterior lamps control is in
the parking lamps only position
(This applies only to vehicles
that are first sold in Canada).
Page 149 of 398
Black plate (7,1)Chevrolet Malibu Owner Manual - 2012
Lighting 6-7
This is because the generator
(alternator) may not be spinning
fast enough at idle to produce all of
the power needed for very high
electrical loads.
A high electrical load occurs when
several of the following are on, such
as: headlamps, high beams, fog
lamps, rear window defogger,
climate control fan at high speed,
heated seats, engine cooling fans,
trailer loads, and loads plugged into
accessory power outlets.
EPM works to prevent excessive
discharge of the battery. It does this
by balancing the generator's output
and the vehicle's electrical needs.
It can increase engine idle speed to
generate more power whenever
needed. It can temporarily reduce
the power demands of some
accessories.Normally, these actions occur in
steps or levels, without being
noticeable. In rare cases at the
highest levels of corrective action,
this action may be noticeable to the
driver. If so, a DIC message might
be displayed, such as BATTERY
SAVER ACTIVE, BATTERY
VOLTAGE LOW, or LOW BATTERY.
If one of these messages displays,
it is recommended that the driver
reduce the electrical loads as much
as possible. See
Driver Information
Center (DIC) on page 5‑24.
Battery Power Protection
The vehicle has a battery run-down
protection feature designed to
protect the vehicle's battery.
When any interior lamp (trunk,
reading, or visor vanity) is left on
while the ignition is turned off, the
battery run-down protection system
will automatically shut the lamp(s)
off after 20 minutes. This will avoid
draining the battery. To reactivate the interior lamps,
do one of the following:
.Turn on the ignition.
.Turn the exterior lamp control off
and then on.
.Open a door.
.Press any Remote Keyless
Entry (RKE) transmitter button
(if equipped).
.Press the remote trunk release
button.
.Press the power door lock
switch.
The battery run-down feature will
also be activated when any door
on the vehicle is left open and the
ignition is in LOCK/OFF.
Page 270 of 398
Black plate (30,1)Chevrolet Malibu Owner Manual - 2012
10-30 Vehicle Care
Headlamp Aiming
Headlamp aim has been preset at
the factory and should need no
further adjustment.
However, if the vehicle is damaged
in a crash, the headlamp aim may
be affected. Aim adjustment to the
low-beam headlamps may be
necessary if oncoming drivers flash
their high-beam headlamps at you
(for vertical aim).
If the headlamps need to be
re-aimed, it is recommended that
the vehicle be taken to a dealer for
service.
Bulb Replacement
For the proper type of replacement
bulbs, seeReplacement Bulbs on
page 10‑33.
For any bulb‐changing procedure
not listed in this section, contact
your dealer.
Halogen Bulbs
{WARNING
Halogen bulbs have pressurized
gas inside and can burst if you
drop or scratch the bulb. You or
others could be injured. Be sure
to read and follow the instructions
on the bulb package.
Taillamps, Turn Signal,
and Stoplamps
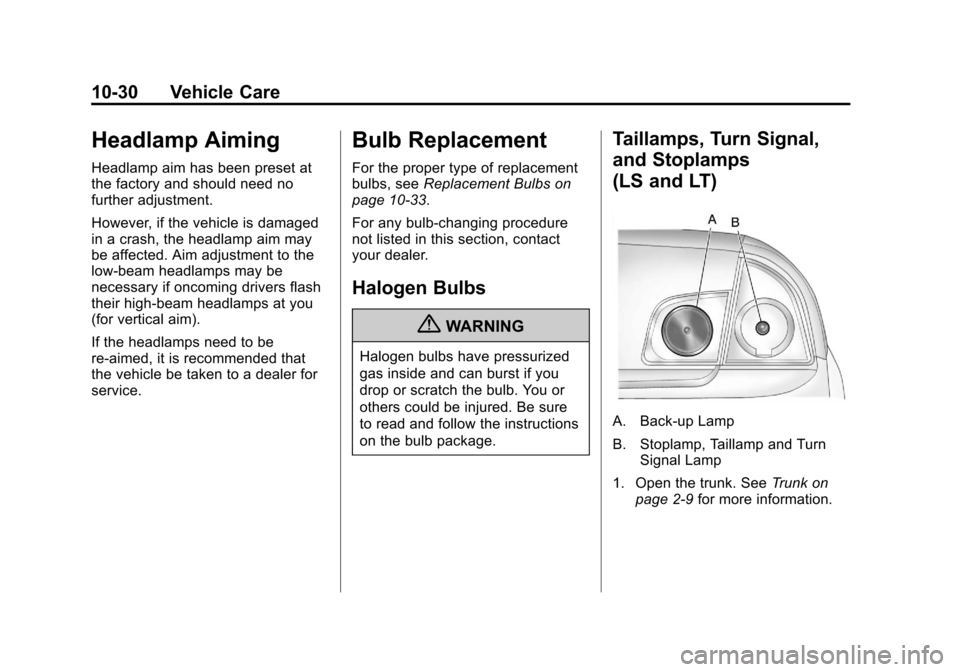
(LS and LT)
A. Back‐up Lamp
B. Stoplamp, Taillamp and Turn
Signal Lamp
1. Open the trunk. See Trunk on
page 2‑9 for more information.
Page 276 of 398
Black plate (36,1)Chevrolet Malibu Owner Manual - 2012
10-36 Vehicle Care
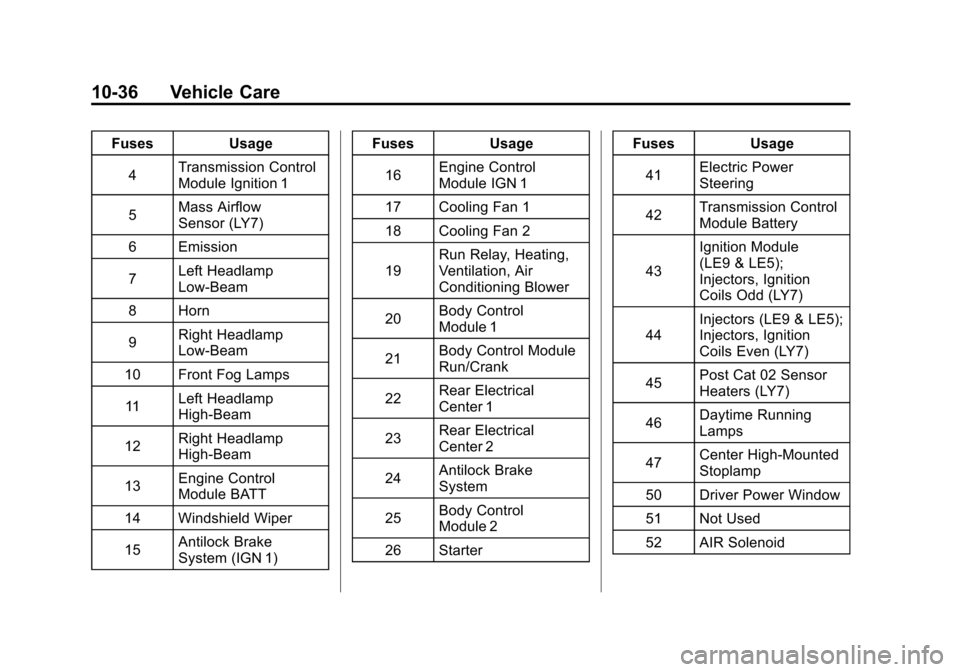
FusesUsage
4 Transmission Control
Module Ignition 1
5 Mass Airflow
Sensor (LY7)
6 Emission
7 Left Headlamp
Low-Beam
8 Horn
9 Right Headlamp
Low-Beam
10 Front Fog Lamps
11 Left Headlamp
High-Beam
12 Right Headlamp
High-Beam
13 Engine Control
Module BATT
14 Windshield Wiper
15 Antilock Brake
System (IGN 1) Fuses
Usage
16 Engine Control
Module IGN 1
17 Cooling Fan 1
18 Cooling Fan 2
19 Run Relay, Heating,
Ventilation, Air
Conditioning Blower
20 Body Control
Module 1
21 Body Control Module
Run/Crank
22 Rear Electrical
Center 1
23 Rear Electrical
Center 2
24 Antilock Brake
System
25 Body Control
Module 2
26 Starter Fuses
Usage
41 Electric Power
Steering
42 Transmission Control
Module Battery
43 Ignition Module
(LE9 & LE5);
Injectors, Ignition
Coils Odd (LY7)
44 Injectors (LE9 & LE5);
Injectors, Ignition
Coils Even (LY7)
45 Post Cat 02 Sensor
Heaters (LY7)
46 Daytime Running
Lamps
47 Center High-Mounted
Stoplamp
50 Driver Power Window
51 Not Used
52 AIR Solenoid
Page 277 of 398
Black plate (37,1)Chevrolet Malibu Owner Manual - 2012
Vehicle Care 10-37
FusesUsage
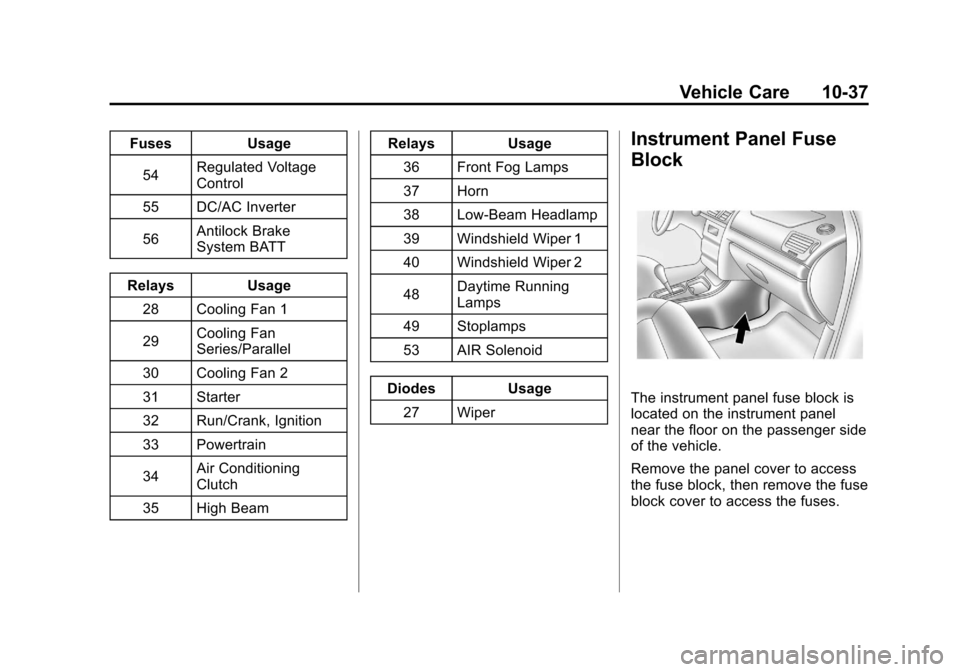
54 Regulated Voltage
Control
55 DC/AC Inverter
56 Antilock Brake
System BATT
Relays Usage
28 Cooling Fan 1
29 Cooling Fan
Series/Parallel
30 Cooling Fan 2
31 Starter
32 Run/Crank, Ignition
33 Powertrain
34 Air Conditioning
Clutch
35 High Beam Relays
Usage
36 Front Fog Lamps
37 Horn
38 Low-Beam Headlamp
39 Windshield Wiper 1
40 Windshield Wiper 2
48 Daytime Running
Lamps
49 Stoplamps
53 AIR Solenoid
Diodes Usage 27 WiperInstrument Panel Fuse
Block
The instrument panel fuse block is
located on the instrument panel
near the floor on the passenger side
of the vehicle.
Remove the panel cover to access
the fuse block, then remove the fuse
block cover to access the fuses.