2012 CHEVROLET MALIBU mirror
[x] Cancel search: mirrorPage 1 of 398

Black plate (1,1)Chevrolet Malibu Owner Manual - 2012
2012 Chevrolet Malibu Owner ManualM
In Brief. . . . . . . . . . . . . . . . . . . . . . . . 1-1
Instrument Panel . . . . . . . . . . . . . . 1-2
Initial Drive Information . . . . . . . . 1-4
Vehicle Features . . . . . . . . . . . . . 1-16
Performance and Maintenance . . . . . . . . . . . . . . . . 1-20
Keys, Doors, and Windows . . . . . . . . . . . . . . . . . . . . 2-1
Keys and Locks . . . . . . . . . . . . . . . 2-2
Doors . . . . . . . . . . . . . . . . . . . . . . . . . . 2-9
Vehicle Security . . . . . . . . . . . . . . 2-11
Exterior Mirrors . . . . . . . . . . . . . . . 2-13
Interior Mirrors . . . . . . . . . . . . . . . . 2-14
Windows . . . . . . . . . . . . . . . . . . . . . 2-15
Roof . . . . . . . . . . . . . . . . . . . . . . . . . . 2-18
Seats and Restraints . . . . . . . . . 3-1
Head Restraints . . . . . . . . . . . . . . . 3-2
Front Seats . . . . . . . . . . . . . . . . . . . . 3-3
Rear Seats . . . . . . . . . . . . . . . . . . . . 3-8 Safety Belts . . . . . . . . . . . . . . . . . . . . 3-9
Airbag System . . . . . . . . . . . . . . . . 3-19
Child Restraints . . . . . . . . . . . . . . 3-33
Storage . . . . . . . . . . . . . . . . . . . . . . . 4-1
Storage Compartments . . . . . . . . 4-1
Additional Storage Features . . . . . . . . . . . . . . . . . . . . . 4-3
Instruments and Controls . . . . 5-1
Controls . . . . . . . . . . . . . . . . . . . . . . . 5-2
Warning Lights, Gauges, and Indicators . . . . . . . . . . . . . . . . . . . . 5-9
Information Displays . . . . . . . . . . 5-24
Vehicle Messages . . . . . . . . . . . . 5-26
Vehicle Personalization . . . . . . . 5-31
Lighting . . . . . . . . . . . . . . . . . . . . . . . 6-1
Exterior Lighting . . . . . . . . . . . . . . . 6-1
Interior Lighting . . . . . . . . . . . . . . . . 6-5
Lighting Features . . . . . . . . . . . . . . 6-6 Infotainment System
. . . . . . . . . 7-1
Introduction . . . . . . . . . . . . . . . . . . . . 7-1
Radio . . . . . . . . . . . . . . . . . . . . . . . . . . 7-6
Audio Players . . . . . . . . . . . . . . . . 7-15
Phone . . . . . . . . . . . . . . . . . . . . . . . . 7-25
Climate Controls . . . . . . . . . . . . . 8-1
Climate Control Systems . . . . . . 8-1
Air Vents . . . . . . . . . . . . . . . . . . . . . . . 8-9
Driving and Operating . . . . . . . . 9-1
Driving Information . . . . . . . . . . . . . 9-2
Starting and Operating . . . . . . . 9-16
Engine Exhaust . . . . . . . . . . . . . . 9-23
Automatic Transmission . . . . . . 9-24
Brakes . . . . . . . . . . . . . . . . . . . . . . . 9-28
Ride Control Systems . . . . . . . . 9-30
Cruise Control . . . . . . . . . . . . . . . . 9-33
Fuel . . . . . . . . . . . . . . . . . . . . . . . . . . 9-36
Towing . . . . . . . . . . . . . . . . . . . . . . . 9-42
Conversions and Add-Ons . . . 9-48
Page 7 of 398
Black plate (1,1)Chevrolet Malibu Owner Manual - 2012
In Brief 1-1
In Brief
Instrument Panel
Instrument Panel . . . . . . . . . . . . . . 1-2
Initial Drive Information
Initial Drive Information . . . . . . . . 1-4
Remote Keyless Entry (RKE)System . . . . . . . . . . . . . . . . . . . . . . 1-4
Remote Vehicle Start . . . . . . . . . 1-4
Door Locks . . . . . . . . . . . . . . . . . . . 1-5
Trunk Release . . . . . . . . . . . . . . . . 1-5
Windows . . . . . . . . . . . . . . . . . . . . . . 1-6
Seat Adjustment . . . . . . . . . . . . . . 1-7
Second Row Seats . . . . . . . . . . . 1-9
Heated Seats . . . . . . . . . . . . . . . . . 1-9
Head Restraint Adjustment . . . . . . . . . . . . . . . . . 1-10
Safety Belts . . . . . . . . . . . . . . . . . . 1-10
Passenger Sensing System . . . . . . . . . . . . . . . . . . . . . 1-10 Mirror Adjustment . . . . . . . . . . . . 1-11
Steering Wheel
Adjustment . . . . . . . . . . . . . . . . . 1-12
Interior Lighting . . . . . . . . . . . . . . 1-12
Exterior Lighting . . . . . . . . . . . . . 1-13
Windshield Wiper/Washer . . . . 1-13
Climate Controls . . . . . . . . . . . . . 1-14
Transmission . . . . . . . . . . . . . . . . 1-15
Vehicle Features
Radio(s) . . . . . . . . . . . . . . . . . . . . . 1-16
Satellite Radio . . . . . . . . . . . . . . . 1-17
Portable Audio Devices (Auxiliary Input or
USB Port) . . . . . . . . . . . . . . . . . . 1-18
Bluetooth
®. . . . . . . . . . . . . . . . . . . 1-18
Steering Wheel Controls . . . . . 1-18
Cruise Control . . . . . . . . . . . . . . . 1-19
Driver Information
Center (DIC) . . . . . . . . . . . . . . . 1-19
Power Outlets . . . . . . . . . . . . . . . 1-20
Performance and Maintenance
Traction Control System (TCS) . . . . . . . . . . . . . . 1-20
Electronic Stability Control (ESC) . . . . . . . . . . . . . . 1-20
Tire Pressure Monitor . . . . . . . . 1-21
Tire Sealant and
Compressor Kit . . . . . . . . . . . . . 1-21
Engine Oil Life System . . . . . . 1-22
Fuel E85 (85% Ethanol) . . . . . 1-22
Driving for Better Fuel Economy . . . . . . . . . . . . . . . . . . . 1-22
Roadside Assistance Program . . . . . . . . . . . . . . . . . . . . 1-23
OnStar
®. . . . . . . . . . . . . . . . . . . . . 1-23
Page 17 of 398
Black plate (11,1)Chevrolet Malibu Owner Manual - 2012
In Brief 1-11
United States
Canada and Mexico
See Passenger Sensing System on
page 3‑26 for important information.
Mirror Adjustment
Exterior Mirrors
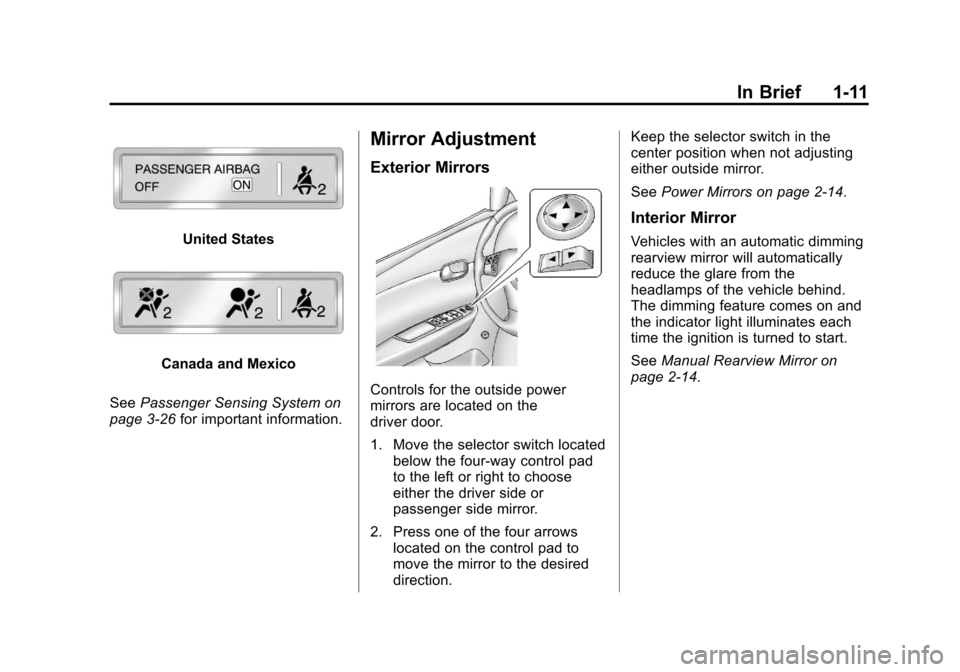
Controls for the outside power
mirrors are located on the
driver door.
1. Move the selector switch located
below the four-way control pad
to the left or right to choose
either the driver side or
passenger side mirror.
2. Press one of the four arrows located on the control pad to
move the mirror to the desired
direction. Keep the selector switch in the
center position when not adjusting
either outside mirror.
See
Power Mirrors on page 2‑14.
Interior Mirror
Vehicles with an automatic dimming
rearview mirror will automatically
reduce the glare from the
headlamps of the vehicle behind.
The dimming feature comes on and
the indicator light illuminates each
time the ignition is turned to start.
SeeManual Rearview Mirror on
page 2‑14.
Page 31 of 398
Black plate (1,1)Chevrolet Malibu Owner Manual - 2012
Keys, Doors, and Windows 2-1
Keys, Doors, and
Windows
Keys and Locks
Keys . . . . . . . . . . . . . . . . . . . . . . . . . . 2-2
Remote Keyless Entry (RKE)System . . . . . . . . . . . . . . . . . . . . . . 2-2
Remote Keyless Entry (RKE) System Operation . . . . . . . . . . . 2-3
Remote Vehicle Start . . . . . . . . . 2-5
Door Locks . . . . . . . . . . . . . . . . . . . 2-7
Power Door Locks . . . . . . . . . . . . 2-7
Door Ajar Reminder . . . . . . . . . . . 2-8
Delayed Locking . . . . . . . . . . . . . . 2-8
Automatic Door Locks . . . . . . . . . 2-8
Lockout Protection . . . . . . . . . . . . 2-8
Safety Locks . . . . . . . . . . . . . . . . . . 2-8
Doors
Trunk . . . . . . . . . . . . . . . . . . . . . . . . . 2-9
Vehicle Security
Vehicle Security . . . . . . . . . . . . . . 2-11
Anti-theft Alarm System . . . . . . 2-11
Immobilizer . . . . . . . . . . . . . . . . . . 2-12
Immobilizer Operation . . . . . . . 2-12
Exterior Mirrors
Convex Mirrors . . . . . . . . . . . . . . 2-13
Power Mirrors . . . . . . . . . . . . . . . . 2-14
Heated Mirrors . . . . . . . . . . . . . . . 2-14
Interior Mirrors
Manual Rearview Mirror . . . . . . 2-14
Automatic Dimming Rearview Mirror . . . . . . . . . . . . . . . . . . . . . . . 2-14
Windows
Windows . . . . . . . . . . . . . . . . . . . . . 2-15
Power Windows . . . . . . . . . . . . . 2-16
Sun Visors . . . . . . . . . . . . . . . . . . . 2-17
Roof
Sunroof . . . . . . . . . . . . . . . . . . . . . . 2-18
Page 43 of 398
Black plate (13,1)Chevrolet Malibu Owner Manual - 2012
Keys, Doors, and Windows 2-13
damaged. See your dealer who can
service the theft-deterrent system
and have a new key made.
It is possible for the theft-deterrent
system decoder to learn the
transponder value of a new or
replacement key. Up to 10 keys can
be programmed for the vehicle.
The following procedure is for
programming additional keys only.
To program the new key:
1. Verify that the new key hasa
1stamped on it.
2. Insert the already programmed key in the ignition and start the
engine. If the engine will not
start, see your dealer for service.
3. After the engine has started, turn the key to LOCK/OFF, and
remove the key. 4. Insert the key to be programmed
and turn it to ON/RUN within
five seconds of the original key
being turned to LOCK/OFF in
Step 3.
The security light will turn off
once the key has been
programmed. It may not be
apparent that the security light
went on due to how quickly the
key is programmed.
5. Repeat Steps 1 through 4 if additional keys are to be
programmed.
Do not leave the key or device that
disarms or deactivates the theft
deterrent system in the vehicle.
Exterior Mirrors
Convex Mirrors
{WARNING
A convex mirror can make things,
like other vehicles, look farther
away than they really are. If you
cut too sharply into the right lane,
you could hit a vehicle on the
right. Check the inside mirror or
glance over your shoulder before
changing lanes.
The passenger side mirror is convex
shaped. A convex mirror's surface is
curved so more can be seen from
the driver seat.
Page 44 of 398
Black plate (14,1)Chevrolet Malibu Owner Manual - 2012
2-14 Keys, Doors, and Windows
Power Mirrors
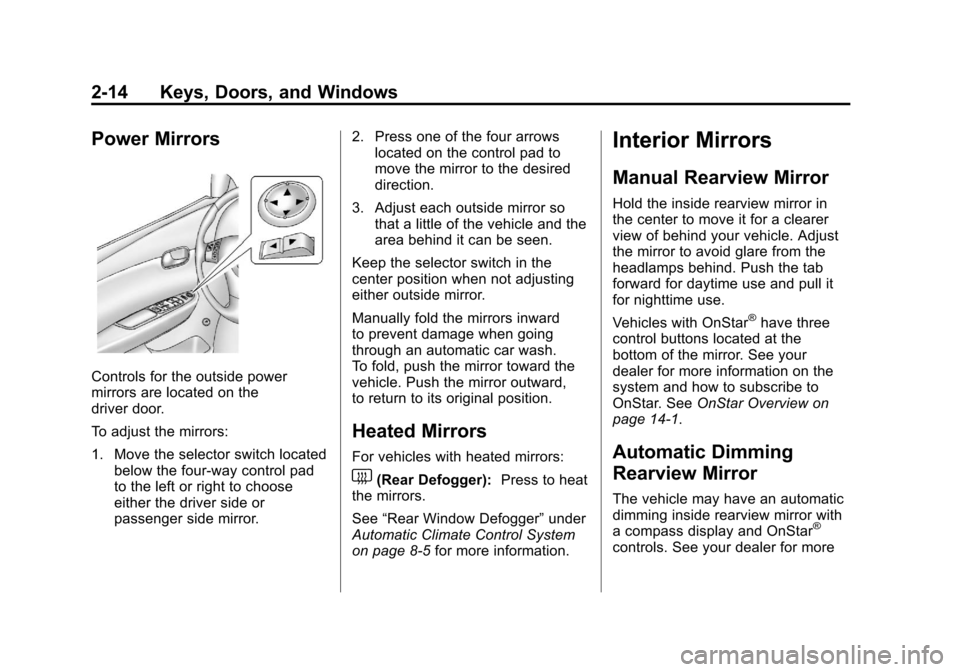
Controls for the outside power
mirrors are located on the
driver door.
To adjust the mirrors:
1. Move the selector switch locatedbelow the four-way control pad
to the left or right to choose
either the driver side or
passenger side mirror. 2. Press one of the four arrows
located on the control pad to
move the mirror to the desired
direction.
3. Adjust each outside mirror so that a little of the vehicle and the
area behind it can be seen.
Keep the selector switch in the
center position when not adjusting
either outside mirror.
Manually fold the mirrors inward
to prevent damage when going
through an automatic car wash.
To fold, push the mirror toward the
vehicle. Push the mirror outward,
to return to its original position.
Heated Mirrors
For vehicles with heated mirrors:
1(Rear Defogger): Press to heat
the mirrors.
See “Rear Window Defogger” under
Automatic Climate Control System
on page 8‑5 for more information.
Interior Mirrors
Manual Rearview Mirror
Hold the inside rearview mirror in
the center to move it for a clearer
view of behind your vehicle. Adjust
the mirror to avoid glare from the
headlamps behind. Push the tab
forward for daytime use and pull it
for nighttime use.
Vehicles with OnStar
®have three
control buttons located at the
bottom of the mirror. See your
dealer for more information on the
system and how to subscribe to
OnStar. See OnStar Overview on
page 14‑1.
Automatic Dimming
Rearview Mirror
The vehicle may have an automatic
dimming inside rearview mirror with
a compass display and OnStar
®
controls. See your dealer for more
Page 45 of 398
Black plate (15,1)Chevrolet Malibu Owner Manual - 2012
Keys, Doors, and Windows 2-15
information on the system and
how to subscribe to OnStar®.
See OnStar Overview on page 14‑1.
See Compass on page 5‑5 for more
information.
O(On/Off): Press to turn the
dimming feature on or off.
Automatic Dimming Mirror
Operation
Automatic dimming reduces the
glare of lights from behind the
vehicle. The dimming feature comes
on and the indicator light illuminates
each time the vehicle is started.
Cleaning the Mirror
Do not spray glass cleaner directly
on the mirror. Use a soft towel
dampened with water.
Windows
{WARNING
Leaving children, helpless adults,
or pets in a vehicle with the
windows closed is dangerous.
They can be overcome by the
extreme heat and suffer
permanent injuries or even death
from heat stroke. Never leave a
child, a helpless adult, or a pet
alone in a vehicle, especially with
the windows closed in warm or
hot weather.
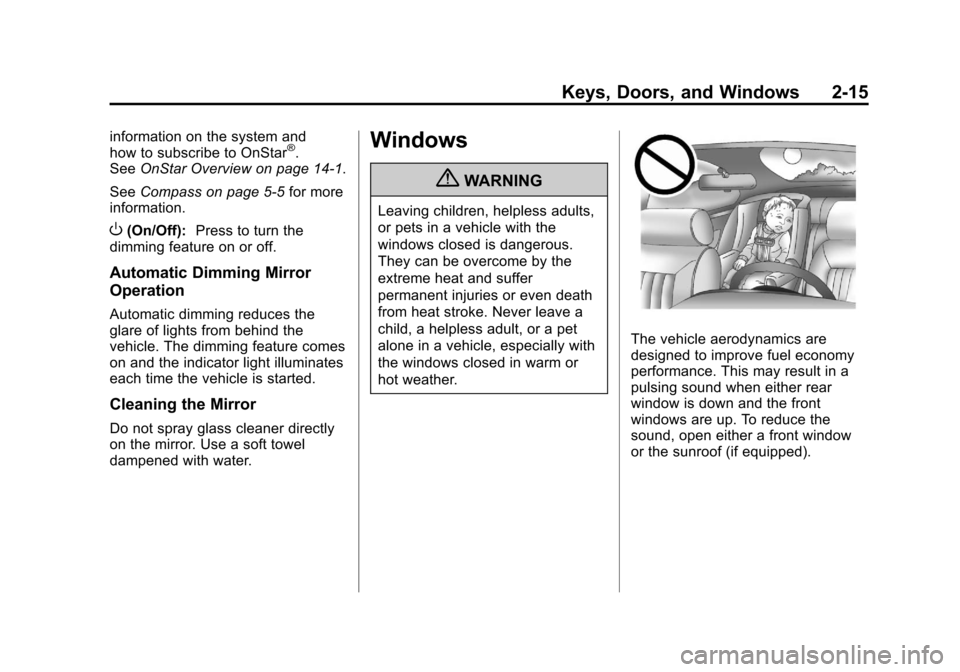
The vehicle aerodynamics are
designed to improve fuel economy
performance. This may result in a
pulsing sound when either rear
window is down and the front
windows are up. To reduce the
sound, open either a front window
or the sunroof (if equipped).
Page 111 of 398
Black plate (5,1)Chevrolet Malibu Owner Manual - 2012
Instruments and Controls 5-5
Compass
Compass Operation
PressOon the rearview mirror to
turn the compass display on or off.
When the ignition and the compass
feature are on, the compass
displays the current compass
direction after a few seconds.
Compass Calibration
If after a few seconds the display
does not show a compass direction,
(N for North for example), there
may be a strong magnetic field
interfering with the compass.
Interference can be caused
by a magnetic antenna mount,
note pad holder, or similar object. If the letter C appears in the
compass window, the compass
may need to be reset or calibrated.
The mirror can be calibrated by
driving the vehicle very slowly, in
circles, until the display reads a
direction.
Compass Variance
The mirror is set in zone eight.
It is necessary to adjust the
compass to compensate for
compass variance if the vehicle is
driven outside zone eight. Under
certain circumstances, such as a
long distance, cross-country trip,
it is necessary to adjust the
compass variance.
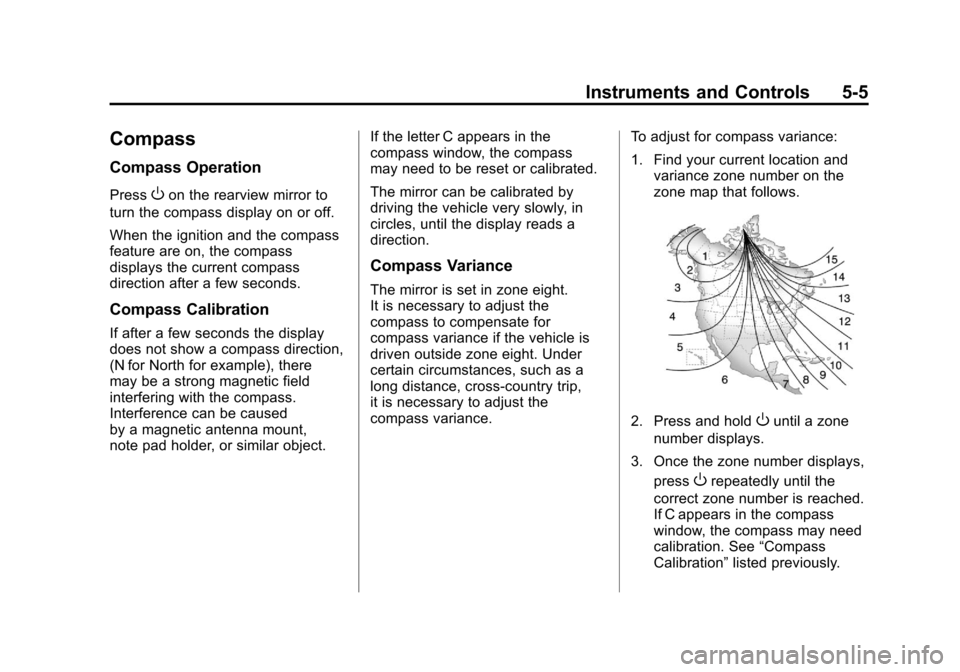
To adjust for compass variance:
1. Find your current location and
variance zone number on the
zone map that follows.
2. Press and holdOuntil a zone
number displays.
3. Once the zone number displays, press
Orepeatedly until the
correct zone number is reached.
If C appears in the compass
window, the compass may need
calibration. See “Compass
Calibration” listed previously.