2012 CHEVROLET EXPRESS CARGO VAN front tran
[x] Cancel search: front tranPage 36 of 430
Black plate (8,1)Chevrolet Express Owner Manual - 2012
2-8 Keys, Doors, and Windows
Delayed Locking
When locking the doors with the
power lock switch and a door open,
the doors will lock five seconds after
the last door is closed. You will hear
three chimes to signal that the
delayed locking feature is in use.
Pressing
etwice orQon the
RKE transmitter twice will override
the delayed locking feature and
immediately lock all the doors.
This feature will not operate if the
key is in the ignition.
This feature can be programmed
using the Driver Information
Center (DIC). See “Delay Door
Lock” inVehicle Personalization on
page 5‑42.
Automatic Door Locks
The vehicle may have an automatic
lock/unlock feature. This feature can
be programmed using the Driver
Information Center (DIC).
See Vehicle Personalization on
page 5‑42 for more information on
DIC programming.
Lockout Protection
This feature protects you from
locking the key in the vehicle when
the key is in the ignition and a door
is open.
If the power lock switch is pressed
when either the driver, passenger,
or rear door is open, all the doors
will lock and then the driver door will
unlock. This feature does not
include the side cargo door.
If the vehicle has an ambulance
package, this feature is disabled.
Safety Locks
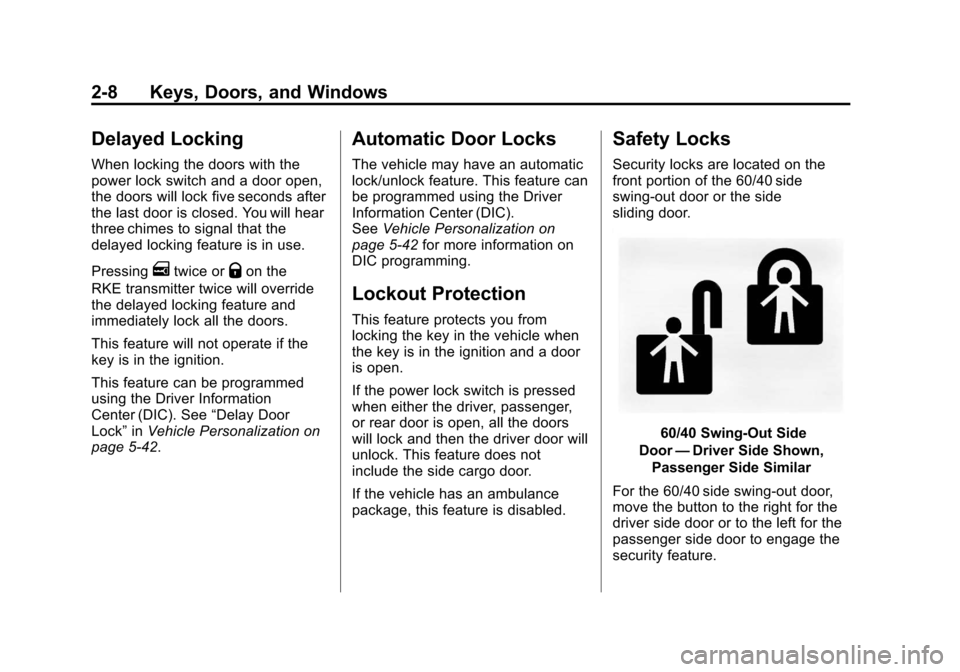
Security locks are located on the
front portion of the 60/40 side
swing-out door or the side
sliding door.
60/40 Swing-Out Side
Door —Driver Side Shown,
Passenger Side Similar
For the 60/40 side swing-out door,
move the button to the right for the
driver side door or to the left for the
passenger side door to engage the
security feature.
Page 163 of 430
Black plate (3,1)Chevrolet Express Owner Manual - 2012
Lighting 6-3
Flash-to-Pass
This feature is used to signal to the
vehicle ahead that you want
to pass.
If the headlamps are off or in the
low‐beam position, pull the turn
signal lever toward you to
momentarily switch to high beams.
Release the lever to turn the
high-beam headlamps off.
Daytime Running
Lamps (DRL)
DRL can make it easier for others to
see the front of the vehicle during
the day. Fully functional daytime
running lamps are required on all
vehicles first sold in Canada.
The DRL system comes on in
daylight when the following
conditions are met:
.The ignition is on.
.The exterior lamp control is in
the AUTO position.
.The shift lever is not in P (Park).
.The light sensor determines it
is daytime.When the DRL are on, the taillamps,
sidemarker, instrument panel lights,
and other lamps will not be on.
The automatic headlamp system
automatically switches from DRL to
the headlamps depending on the
darkness of the surroundings.
To turn off the DRL, turn the exterior
lamp control to
Oand then release
it. For vehicles first sold in Canada,
the transmission must be in the
P (Park) position, before the DRL
can be turned off.
Page 217 of 430
Black plate (11,1)Chevrolet Express Owner Manual - 2012
Driving and Operating 9-11
Rocking the Vehicle to Get
it Out
Turn the steering wheel left and
right to clear the area around the
front wheels. Turn off any traction or
stability system. Shift back and forth
between R (Reverse) and a forward
gear, spinning the wheels as little as
possible. To prevent transmission
wear, wait until the wheels stop
spinning before shifting gears.
Release the accelerator pedal while
shifting, and press lightly on the
accelerator pedal when the
transmission is in gear. Slowly
spinning the wheels in the forward
and reverse directions causes a
rocking motion that could free the
vehicle. If that does not get the
vehicle out after a few tries, it might
need to be towed out. If the vehicle
does need to be towed out, see
Towing the Vehicle on page 10‑90.
Vehicle Load Limits
It is very important to know how
much weight the vehicle can
carry. This weight is called the
vehicle capacity weight and
includes the weight of all
occupants, cargo, and all
nonfactory-installed options.
Two labels on the vehicle show
how much weight it was
designed to carry, the Tire and
Loading Information label and
the Certification/Tire label.{WARNING
Do not load the vehicle any
heavier than the Gross
Vehicle Weight Rating
(GVWR), or either the
maximum front or rear Gross
Axle Weight Rating (GAWR).
This can cause systems to
break and change the way the
vehicle handles. This could
cause loss of control and a
crash. Overloading can also
shorten the life of the vehicle.
Page 265 of 430
Black plate (1,1)Chevrolet Express Owner Manual - 2012
Vehicle Care 10-1
Vehicle Care
General Information
General Information . . . . . . . . . . 10-2
California Proposition65 Warning . . . . . . . . . . . . . . . . . 10-2
California Perchlorate Materials Requirements . . . . 10-2
Accessories and Modifications . . . . . . . . . . . . . . . 10-3
Vehicle Checks
Doing Your OwnService Work . . . . . . . . . . . . . . . 10-4
Hood . . . . . . . . . . . . . . . . . . . . . . . . 10-4
Engine Compartment Overview . . . . . . . . . . . . . . . . . . . 10-6
Engine Oil . . . . . . . . . . . . . . . . . . . 10-7
Engine Oil Life System . . . . . 10-10
Automatic Transmission Fluid (4-Speed Transmission) . . . 10-11
Automatic Transmission Fluid (6-Speed
Transmission) . . . . . . . . . . . . . 10-13
Engine Air Cleaner/Filter . . . . 10-16
Cooling System . . . . . . . . . . . . 10-18
Engine Coolant . . . . . . . . . . . . . 10-18
Engine Overheating . . . . . . . . 10-22 Engine Fan . . . . . . . . . . . . . . . . . 10-24
Power Steering Fluid . . . . . . . 10-24
Washer Fluid . . . . . . . . . . . . . . . 10-25
Brakes . . . . . . . . . . . . . . . . . . . . . 10-26
Brake Fluid . . . . . . . . . . . . . . . . . 10-27
Battery . . . . . . . . . . . . . . . . . . . . . 10-28
All-Wheel Drive . . . . . . . . . . . . . 10-29
Front Axle . . . . . . . . . . . . . . . . . . 10-30
Rear Axle . . . . . . . . . . . . . . . . . . 10-31
Noise Control System . . . . . . 10-31
Starter Switch Check . . . . . . . 10-33
Automatic Transmission Shift
Lock Control Function
Check . . . . . . . . . . . . . . . . . . . . . 10-33
Ignition Transmission Lock Check . . . . . . . . . . . . . . . . . . . . . 10-33
Park Brake and P (Park) Mechanism Check . . . . . . . . 10-34
Wiper Blade Replacement . . . . . . . . . . . . . . 10-34
Bulb Replacement
Bulb Replacement . . . . . . . . . . 10-35
Halogen Bulbs . . . . . . . . . . . . . . 10-35
Headlamps . . . . . . . . . . . . . . . . . 10-35
Front Turn Signal,Sidemarker, and Parking
Lamps . . . . . . . . . . . . . . . . . . . . 10-37
Taillamps . . . . . . . . . . . . . . . . . . . 10-38 Center High-Mounted
Stoplamp (CHMSL) . . . . . . . 10-39
License Plate Lamp . . . . . . . . 10-40
Replacement Bulbs . . . . . . . . . 10-40
Electrical System
Electrical System Overload . . . . . . . . . . . . . . . . . . 10-41
Fuses and Circuit Breakers . . . . . . . . . . . . . . . . . . 10-41
Engine Compartment Fuse Block . . . . . . . . . . . . . . . . . . . . . 10-42
Floor Console Fuse Block . . . . . . . . . . . . . . . . . . . . . 10-46
Wheels and Tires
Tires . . . . . . . . . . . . . . . . . . . . . . . . 10-49
Tire Sidewall Labeling . . . . . . 10-50
Tire Designations . . . . . . . . . . . 10-52
Tire Terminology andDefinitions . . . . . . . . . . . . . . . . 10-54
Tire Pressure . . . . . . . . . . . . . . . 10-56
Tire Pressure Monitor System . . . . . . . . . . . . . . . . . . . 10-58
Tire Pressure Monitor Operation . . . . . . . . . . . . . . . . . 10-59
Tire Inspection . . . . . . . . . . . . . . 10-62
Tire Rotation . . . . . . . . . . . . . . . 10-62
Dual Tire Rotation . . . . . . . . . . 10-64
Page 298 of 430
Black plate (34,1)Chevrolet Express Owner Manual - 2012
10-34 Vehicle Care
Park Brake and P (Park)
Mechanism Check
{WARNING
When you are doing this check,
the vehicle could begin to move.
You or others could be injured
and property could be damaged.
Make sure there is room in front
of the vehicle in case it begins to
roll. Be ready to apply the regular
brake at once should the vehicle
begin to move.
Park on a fairly steep hill, with the
vehicle facing downhill. Keeping
your foot on the regular brake, set
the parking brake.
.To check the parking brake's
holding ability: With the engine
running and the transmission in
N (Neutral), slowly remove foot
pressure from the regular brake
pedal. Do this until the vehicle is
held by the parking brake only.
.To check the P (Park)
mechanism's holding ability:
With the engine running, shift to
P (Park). Then release the
parking brake followed by the
regular brake.
Contact your dealer if service is
required.
Wiper Blade Replacement
Windshield wiper blades should be
inspected for wear and cracking.
See Maintenance Schedule on
page 11‑3 for more information.
Replacement blades come in
different types and are removed
in different ways. For proper type
and length, see Maintenance
Replacement Parts on page 11‑14.
Notice: Allowing the wiper blade
arm to touch the windshield when
no wiper blade is installed could
damage the windshield. Any
damage that occurs would not be
covered by your warranty. Do not
allow the wiper blade arm to
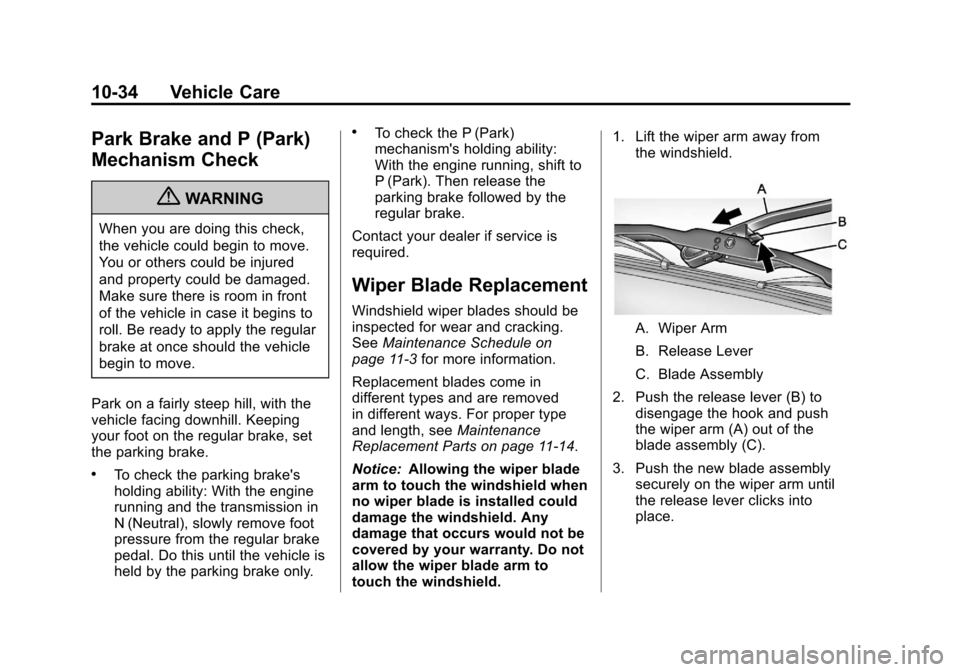
touch the windshield. 1. Lift the wiper arm away from
the windshield.
A. Wiper Arm
B. Release Lever
C. Blade Assembly
2. Push the release lever (B) to disengage the hook and push
the wiper arm (A) out of the
blade assembly (C).
3. Push the new blade assembly securely on the wiper arm until
the release lever clicks into
place.
Page 318 of 430

Black plate (54,1)Chevrolet Express Owner Manual - 2012
10-54 Vehicle Care
Tire Terminology and
Definitions
Air Pressure:The amount of
air inside the tire pressing
outward on each square inch
of the tire. Air pressure is
expressed in kPa (kilopascal)
or psi (pounds per square inch).
Accessory Weight
:The
combined weight of optional
accessories. Some examples of
optional accessories are
automatic transmission, power
steering, power brakes, power
windows, power seats, and air
conditioning.
Aspect Ratio
:The relationship
of a tire's height to its width.
Belt
:A rubber coated layer of
cords that is located between
the plies and the tread. Cords
may be made from steel or other
reinforcing materials. Bead
:The tire bead contains
steel wires wrapped by steel
cords that hold the tire onto
the rim.
Bias Ply Tire
:A pneumatic tire
in which the plies are laid at
alternate angles less than
90 degrees to the centerline of
the tread.
Cold Tire Pressure
:
The amount of air pressure
in a tire, measured in
kPa (kilopascal) or psi (pounds
per square inch) before a tire
has built up heat from driving.
See Tire Pressure on
page 10‑56.
Curb Weight
:The weight of a
motor vehicle with standard and
optional equipment including the
maximum capacity of fuel, oil,
and coolant, but without
passengers and cargo. DOT Markings
:A code molded
into the sidewall of a tire
signifying that the tire is in
compliance with the U.S.
Department of Transportation
(DOT) Motor Vehicle Safety
Standards. The DOT code
includes the Tire Identification
Number (TIN), an alphanumeric
designator which can also
identify the tire manufacturer,
production plant, brand, and
date of production.
GVWR
:Gross Vehicle Weight
Rating. See Vehicle Load Limits
on page 9‑11.
GAWR FRT
:Gross Axle Weight
Rating for the front axle.
See Vehicle Load Limits on
page 9‑11.
GAWR RR
:Gross Axle Weight
Rating for the rear axle.
See Vehicle Load Limits on
page 9‑11.
Page 325 of 430
Black plate (61,1)Chevrolet Express Owner Manual - 2012
Vehicle Care 10-61
.Operating electronic devices or
being near facilities using radio
wave frequencies similar to the
TPMS could cause the TPMS
sensors to malfunction.
If the TPMS is not functioning
properly, it cannot detect or signal a
low tire condition. See your dealer
for service if the TPMS malfunction
light and DIC message come on
and stay on.
TPMS Sensor Matching
Process
Each TPMS sensor has a unique
identification code. The identification
code needs to be matched to a
new tire/wheel position after rotating
the vehicle’ s tires or replacing one
or more of the TPMS sensors. Also,
the TPMS sensor matching process
should be performed after replacing
a spare tire with a road tire
containing the TPMS sensor.
The malfunction light and the DIC
message should go off at the next
ignition cycle. The sensors are
matched to the tire/wheel positions, using a TPMS relearn tool, in the
following order: driver side front tire,
passenger side front tire, passenger
side rear tire, and driver side rear.
See your dealer for service or to
purchase a relearn tool.
There are two minutes to match
the first tire/wheel position, and
five minutes overall to match all
four tire/wheel positions. If it takes
longer, the matching process stops
and must be restarted.
The TPMS sensor matching
process is:
1. Set the parking brake.
2. Turn the ignition to ON/RUN with
the engine off.
3. Press the Remote Keyless Entry (RKE) transmitter's LOCK
and UNLOCK buttons at the
same time for approximately
five seconds. The horn sounds
twice to signal the receiver is
in relearn mode and TIRE
LEARNING ACTIVE message
displays on the DIC screen. If the vehicle does not have
RKE, press the Driver
Information Center (DIC) vehicle
information button until the
PRESS
VTO RELEARN TIRE
POSITIONS message displays.
The horn sounds twice to signal
the receiver is in relearn mode
and TIRE LEARNING ACTIVE
message displays on the DIC
screen.
If the vehicle does not have RKE
or DIC buttons, press the trip
odometer reset stem located on
the instrument panel cluster until
the PRESS
VTO RELEARN
TIRE POSITIONS message
displays. The horn sounds twice
to signal the receiver is in
relearn mode and TIRE
LEARNING ACTIVE message
displays on the DIC screen.
4. Start with the driver side front tire.
Page 356 of 430
Black plate (92,1)Chevrolet Express Owner Manual - 2012
10-92 Vehicle Care
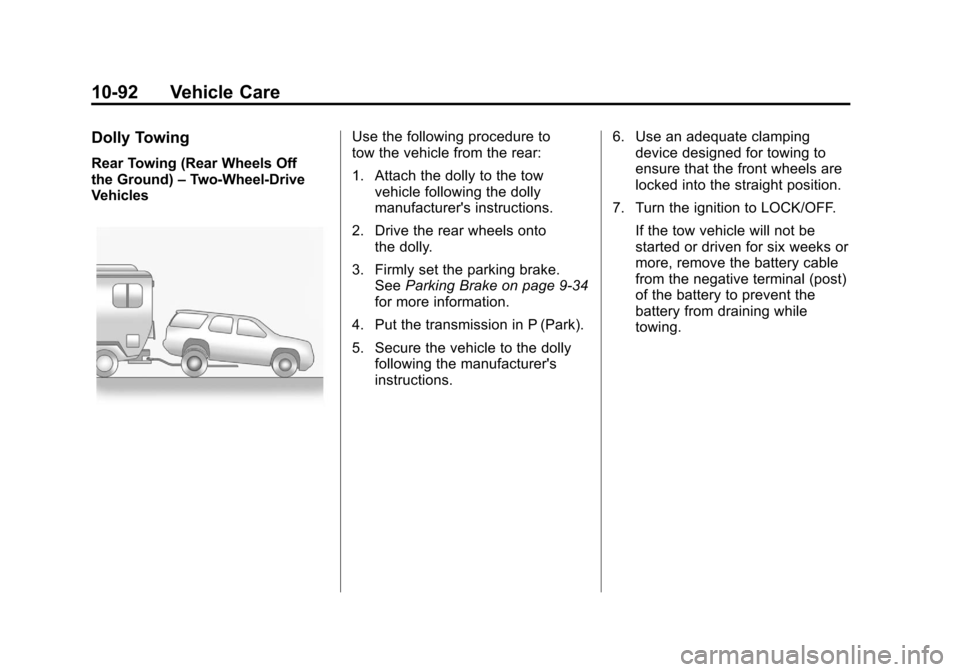
Dolly Towing
Rear Towing (Rear Wheels Off
the Ground)–Two‐Wheel‐Drive
Vehicles
Use the following procedure to
tow the vehicle from the rear:
1. Attach the dolly to the tow
vehicle following the dolly
manufacturer's instructions.
2. Drive the rear wheels onto the dolly.
3. Firmly set the parking brake. See Parking Brake on page 9‑34
for more information.
4. Put the transmission in P (Park).
5. Secure the vehicle to the dolly following the manufacturer's
instructions. 6. Use an adequate clamping
device designed for towing to
ensure that the front wheels are
locked into the straight position.
7. Turn the ignition to LOCK/OFF. If the tow vehicle will not be
started or driven for six weeks or
more, remove the battery cable
from the negative terminal (post)
of the battery to prevent the
battery from draining while
towing.