Black plate (84,1)Chevrolet Express Owner Manual - 2012
10-84 Vehicle Care
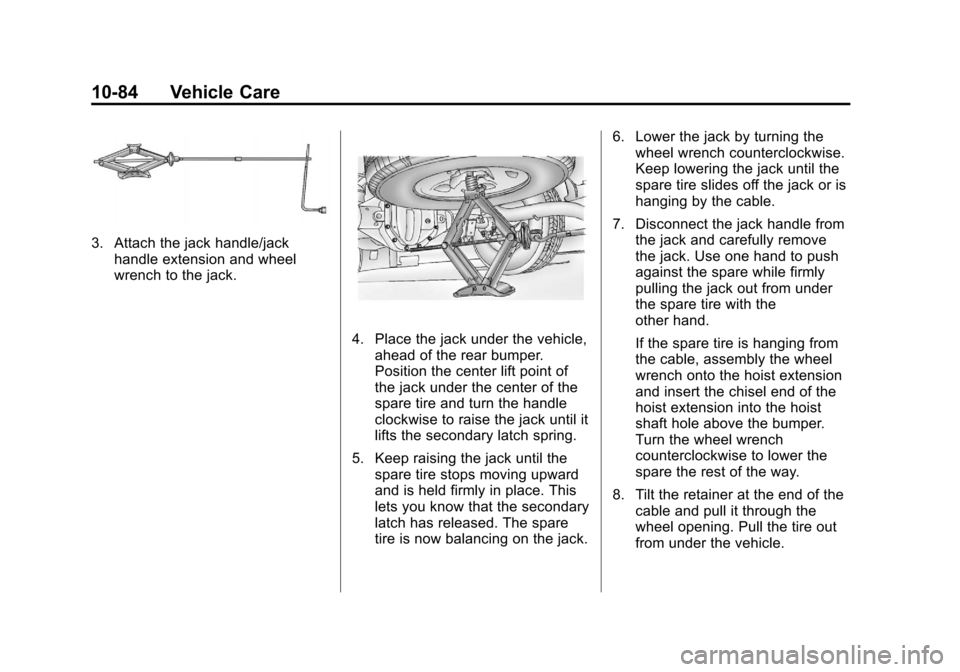
3. Attach the jack handle/jackhandle extension and wheel
wrench to the jack.
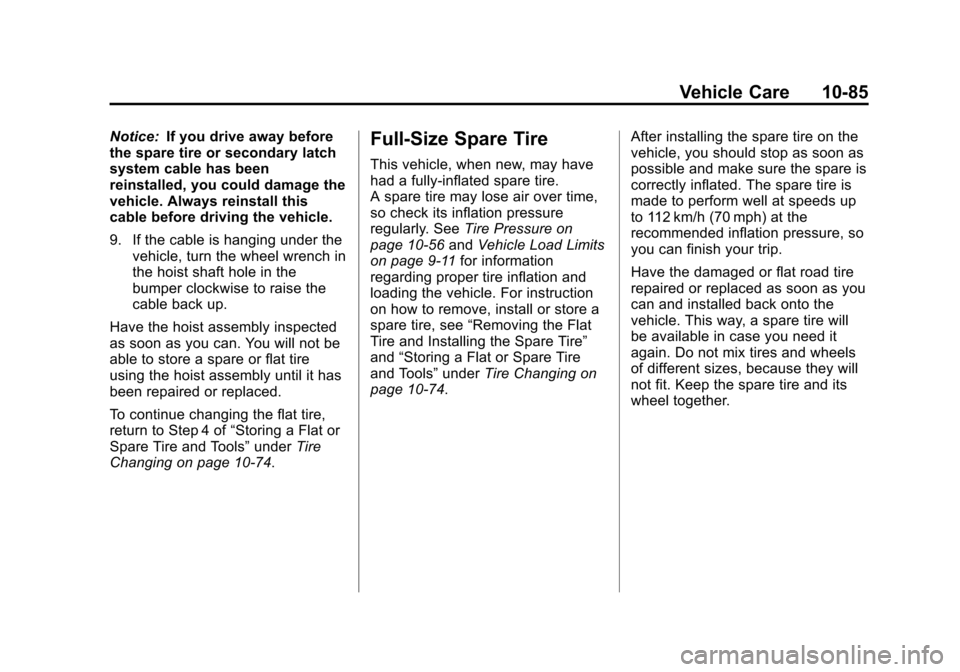
4. Place the jack under the vehicle,ahead of the rear bumper.
Position the center lift point of
the jack under the center of the
spare tire and turn the handle
clockwise to raise the jack until it
lifts the secondary latch spring.
5. Keep raising the jack until the spare tire stops moving upward
and is held firmly in place. This
lets you know that the secondary
latch has released. The spare
tire is now balancing on the jack. 6. Lower the jack by turning the
wheel wrench counterclockwise.
Keep lowering the jack until the
spare tire slides off the jack or is
hanging by the cable.
7. Disconnect the jack handle from the jack and carefully remove
the jack. Use one hand to push
against the spare while firmly
pulling the jack out from under
the spare tire with the
other hand.
If the spare tire is hanging from
the cable, assembly the wheel
wrench onto the hoist extension
and insert the chisel end of the
hoist extension into the hoist
shaft hole above the bumper.
Turn the wheel wrench
counterclockwise to lower the
spare the rest of the way.
8. Tilt the retainer at the end of the cable and pull it through the
wheel opening. Pull the tire out
from under the vehicle.
Black plate (85,1)Chevrolet Express Owner Manual - 2012
Vehicle Care 10-85
Notice:If you drive away before
the spare tire or secondary latch
system cable has been
reinstalled, you could damage the
vehicle. Always reinstall this
cable before driving the vehicle.
9. If the cable is hanging under the
vehicle, turn the wheel wrench in
the hoist shaft hole in the
bumper clockwise to raise the
cable back up.
Have the hoist assembly inspected
as soon as you can. You will not be
able to store a spare or flat tire
using the hoist assembly until it has
been repaired or replaced.
To continue changing the flat tire,
return to Step 4 of “Storing a Flat or
Spare Tire and Tools” underTire
Changing on page 10‑74.Full-Size Spare Tire
This vehicle, when new, may have
had a fully-inflated spare tire.
A spare tire may lose air over time,
so check its inflation pressure
regularly. See Tire Pressure on
page 10‑56 andVehicle Load Limits
on page 9‑11 for information
regarding proper tire inflation and
loading the vehicle. For instruction
on how to remove, install or store a
spare tire, see “Removing the Flat
Tire and Installing the Spare Tire”
and “Storing a Flat or Spare Tire
and Tools” underTire Changing on
page 10‑74. After installing the spare tire on the
vehicle, you should stop as soon as
possible and make sure the spare is
correctly inflated. The spare tire is
made to perform well at speeds up
to 112 km/h (70 mph) at the
recommended inflation pressure, so
you can finish your trip.
Have the damaged or flat road tire
repaired or replaced as soon as you
can and installed back onto the
vehicle. This way, a spare tire will
be available in case you need it
again. Do not mix tires and wheels
of different sizes, because they will
not fit. Keep the spare tire and its
wheel together.
Black plate (10,1)Chevrolet Express Owner Manual - 2012
i-10 INDEX
Service (cont'd)Publications Ordering
Information . . . . . . . . . . . . . . . . 13-18
Scheduling Appointments . . . 13-13
Vehicle Messages . . . . . . . . . . . . 5-40
Servicing the Airbag . . . . . . . . . . . 3-35
Shift Lock Control Function Check, Automatic
Transmission . . . . . . . . . . . . . . . . 10-33
Shifting Into Park . . . . . . . . . . . . . . . . . . . . . . 9-21
Out of Park . . . . . . . . . . . . . . . . . . . 9-23
Side Door . . . . . . . . . . . . . . . . . . . . . . 2-9
Sidemarker Bulb Replacement . . . . . . . . . . 10-37
Signals, Turn and Lane-Change . . . . . . . . . . . . . . . . . 6-5
Sliding Door . . . . . . . . . . . . . . . . . . . 2-10
Specifications and
Capacities . . . . . . . . . . . . . . . . . . . . 12-2
Speedometer . . . . . . . . . . . . . . . . . . 5-13 StabiliTrak
OFF Light . . . . . . . . . . . . . . . . . . . . . 5-25
System . . . . . . . . . . . . . . . . . . . . . . . 9-35
Start Vehicle, Remote . . . . . . . . . . 2-5
Starter Switch Check . . . . . . . . . 10-33
Starting the Engine . . . . . . . . . . . . 9-18
Steering . . . . . . . . . . . . . . . . . . . . . . . . 9-4 Fluid, Power . . . . . . . . . . . . . . . . 10-24
Wheel Adjustment . . . . . . . . . . . . . 5-2
Wheel Controls . . . . . . . . . . . . . . . . 5-2
Storage Areas
Front . . . . . . . . . . . . . . . . . . . . . . . . . . 4-1
Stuck Vehicle . . . . . . . . . . . . . . . . . . 9-10
Sun Visors . . . . . . . . . . . . . . . . . . . . . 2-19
Swing-out Windows . . . . . . . . . . . . 2-18
Switches Airbag On-Off . . . . . . . . . . . . . . . . . 3-26
Symbols . . . . . . . . . . . . . . . . . . . . . . . . . . iv
System Infotainment . . . . . . . . . . . . . . . . . . . 7-1
Noise Control . . . . . . . . . . . . . . . 10-31T
Taillamps . . . . . . . . . . . . . . . . . . . . . 10-38
Text Telephone (TTY) Users . . . 13-6
Theft-Deterrent Systems . . . . . . . 2-12Immobilizer . . . . . . . . . . . . . . . . . . . 2-12
Time . . . . . . . . . . . . . . . . . . . . . . . . . . . . 5-8
Tires Buying New Tires . . . . . . . . . . . 10-65
Chains . . . . . . . . . . . . . . . . . . . . . . 10-71
Changing . . . . . . . . . . . . . . . . . . . 10-74
Designations . . . . . . . . . . . . . . . 10-52
Different Size . . . . . . . . . . . . . . . 10-67
Dual Rotation . . . . . . . . . . . . . . . 10-64
Full-Size Spare . . . . . . . . . . . . . 10-85
If a Tire Goes Flat . . . . . . . . . . 10-72
Inflation Monitor System . . . . 10-59
Inspection . . . . . . . . . . . . . . . . . . 10-62
Messages . . . . . . . . . . . . . . . . . . . . 5-41
Pressure Light . . . . . . . . . . . . . . . . 5-26
Pressure Monitor System . . . 10-58