2012 CHEVROLET CRUZE battery
[x] Cancel search: batteryPage 334 of 400
Black plate (80,1)Chevrolet Cruze Owner Manual - 2012
10-80 Vehicle Care
Compact Spare Tire
{WARNING
Driving with more than one
compact spare tire at a time could
result in loss of braking and
handling. This could lead to a
crash and you or others could be
injured. Use only one compact
spare tire at a time.
If this vehicle has a compact spare
tire, it was fully inflated when the
vehicle was new; however, it can
lose air after a time. Check the
inflation pressure regularly.
It should be 420 kPa (60 psi).
After installing the compact spare
on the vehicle, stop as soon as
possible and make sure the spare
tire is correctly inflated. The
compact spare is made to perform
well at speeds up to 105 km/h
(65 mph) for distances up to
5 000 km (3,000 mi), so you can
finish your trip and have the full-size tire repaired or replaced at your
convenience. Of course, it is best to
replace the spare with a full-size tire
as soon as possible. The spare tire
will last longer and be in good
shape in case it is needed again.
Notice:
When the compact spare
is installed, do not take the
vehicle through an automatic car
wash with guide rails. The
compact spare can get caught on
the rails which can damage the
tire, wheel, and other parts of the
vehicle.
Do not use the compact spare on
other vehicles.
Do not mix the compact spare tire or
wheel with other wheels or tires.
They will not fit. Keep the spare tire
and its wheel together.
Notice: Tire chains will not fit the
compact spare. Using them can
damage the vehicle and can
damage the chains too. Do not
use tire chains on the compact
spare.
Jump Starting
For more information about the
vehicle battery, see Battery on
page 10‑25.
If the battery has run down, try to
use another vehicle and some
jumper cables to start your vehicle.
Be sure to use the following steps to
do it safely.
{WARNING
Batteries can hurt you. They can
be dangerous because:
.They contain acid that can
burn you.
.They contain gas that can
explode or ignite.
.They contain enough
electricity to burn you.
If you do not follow these steps
exactly, some or all of these
things can hurt you.
Page 335 of 400
Black plate (81,1)Chevrolet Cruze Owner Manual - 2012
Vehicle Care 10-81
Notice:Ignoring these steps
could result in costly damage to
the vehicle that would not be
covered by the warranty.
Trying to start the vehicle by
pushing or pulling it will not
work, and it could damage the
vehicle.
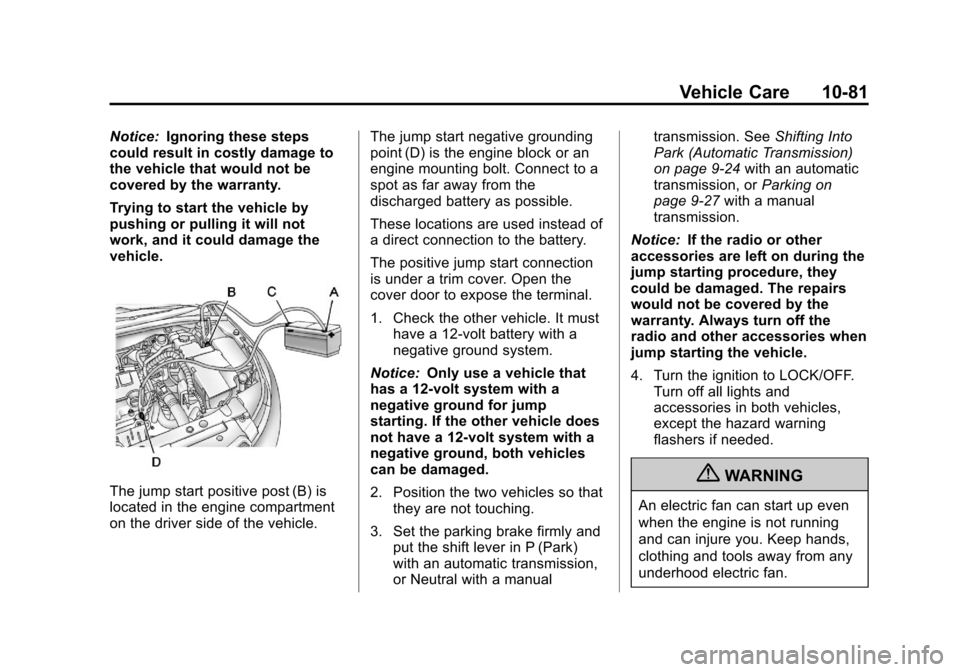
The jump start positive post (B) is
located in the engine compartment
on the driver side of the vehicle. The jump start negative grounding
point (D) is the engine block or an
engine mounting bolt. Connect to a
spot as far away from the
discharged battery as possible.
These locations are used instead of
a direct connection to the battery.
The positive jump start connection
is under a trim cover. Open the
cover door to expose the terminal.
1. Check the other vehicle. It must
have a 12-volt battery with a
negative ground system.
Notice: Only use a vehicle that
has a 12-volt system with a
negative ground for jump
starting. If the other vehicle does
not have a 12-volt system with a
negative ground, both vehicles
can be damaged.
2. Position the two vehicles so that they are not touching.
3. Set the parking brake firmly and put the shift lever in P (Park)
with an automatic transmission,
or Neutral with a manual transmission. See
Shifting Into
Park (Automatic Transmission)
on page 9‑24 with an automatic
transmission, or Parking on
page 9‑27 with a manual
transmission.
Notice: If the radio or other
accessories are left on during the
jump starting procedure, they
could be damaged. The repairs
would not be covered by the
warranty. Always turn off the
radio and other accessories when
jump starting the vehicle.
4. Turn the ignition to LOCK/OFF. Turn off all lights and
accessories in both vehicles,
except the hazard warning
flashers if needed.{WARNING
An electric fan can start up even
when the engine is not running
and can injure you. Keep hands,
clothing and tools away from any
underhood electric fan.
Page 336 of 400
Black plate (82,1)Chevrolet Cruze Owner Manual - 2012
10-82 Vehicle Care
{WARNING
Using a match near a battery can
cause battery gas to explode.
People have been hurt doing this,
and some have been blinded.
Use a flashlight if you need
more light.
Be sure the battery has enough
water. You do not need to add
water to the battery installed in
your new vehicle. But if a battery
has filler caps, be sure the right
amount of fluid is there. If it is low,
add water to take care of that
first. If you don't, explosive gas
could be present.
Battery fluid contains acid that
can burn you. Do not get it on
you. If you accidentally get it in
your eyes or on your skin, flush
the place with water and get
medical help immediately.
{WARNING
Fans or other moving engine
parts can injure you badly. Keep
your hands away from moving
parts once the engine is running.
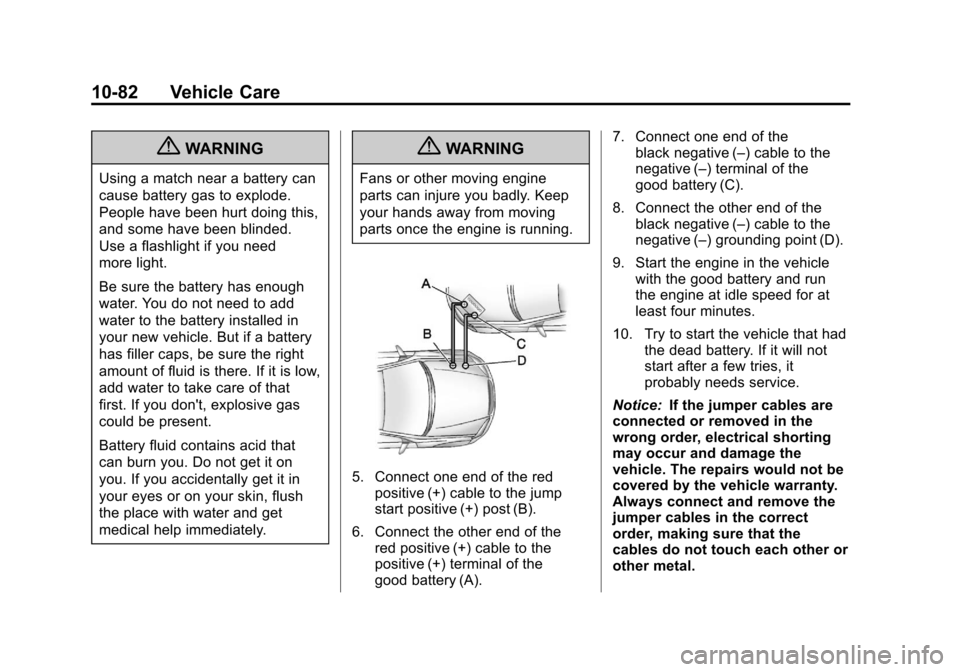
5. Connect one end of the redpositive (+) cable to the jump
start positive (+) post (B).
6. Connect the other end of the red positive (+) cable to the
positive (+) terminal of the
good battery (A). 7. Connect one end of the
black negative (–) cable to the
negative (–) terminal of the
good battery (C).
8. Connect the other end of the black negative (–) cable to the
negative (–) grounding point (D).
9. Start the engine in the vehicle with the good battery and run
the engine at idle speed for at
least four minutes.
10. Try to start the vehicle that had the dead battery. If it will not
start after a few tries, it
probably needs service.
Notice: If the jumper cables are
connected or removed in the
wrong order, electrical shorting
may occur and damage the
vehicle. The repairs would not be
covered by the vehicle warranty.
Always connect and remove the
jumper cables in the correct
order, making sure that the
cables do not touch each other or
other metal.
Page 337 of 400
Black plate (83,1)Chevrolet Cruze Owner Manual - 2012
Vehicle Care 10-83
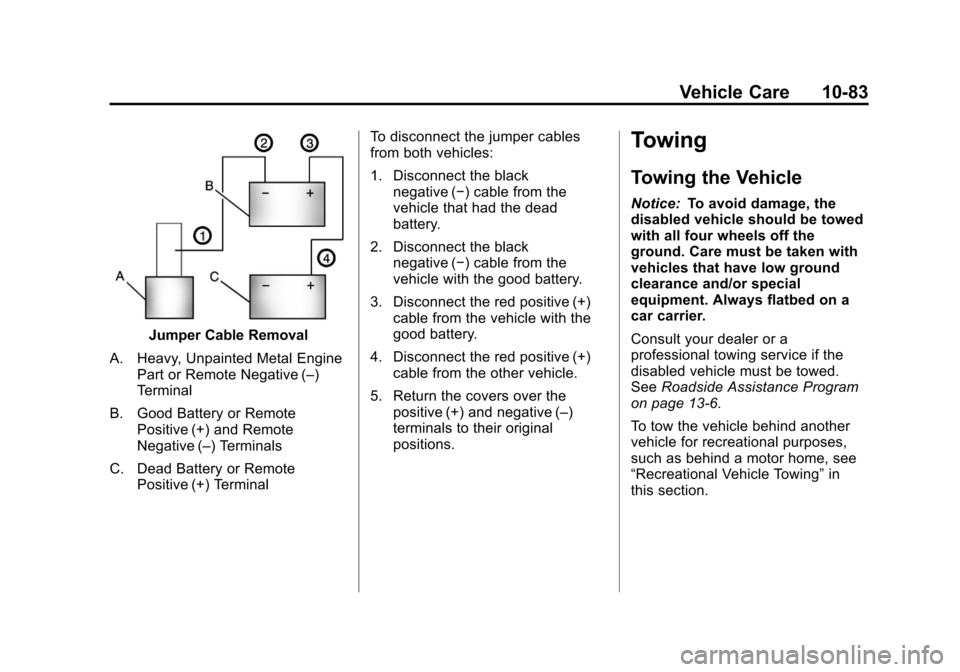
Jumper Cable Removal
A. Heavy, Unpainted Metal Engine Part or Remote Negative (–)
Terminal
B. Good Battery or Remote Positive (+) and Remote
Negative (–) Terminals
C. Dead Battery or Remote Positive (+) Terminal To disconnect the jumper cables
from both vehicles:
1. Disconnect the black
negative (−) cable from the
vehicle that had the dead
battery.
2. Disconnect the black negative (−) cable from the
vehicle with the good battery.
3. Disconnect the red positive (+) cable from the vehicle with the
good battery.
4. Disconnect the red positive (+) cable from the other vehicle.
5. Return the covers over the positive (+) and negative (–)
terminals to their original
positions.
Towing
Towing the Vehicle
Notice: To avoid damage, the
disabled vehicle should be towed
with all four wheels off the
ground. Care must be taken with
vehicles that have low ground
clearance and/or special
equipment. Always flatbed on a
car carrier.
Consult your dealer or a
professional towing service if the
disabled vehicle must be towed.
See Roadside Assistance Program
on page 13‑6.
To tow the vehicle behind another
vehicle for recreational purposes,
such as behind a motor home, see
“Recreational Vehicle Towing” in
this section.
Page 339 of 400
Vehicle Care 10-85
Vehicles with an automatic
transmission should not be
towed with all four wheels on the
ground. If the vehicle must be
towed, a dolly should be used.
See“Dolly Towing” that follows for
more information.
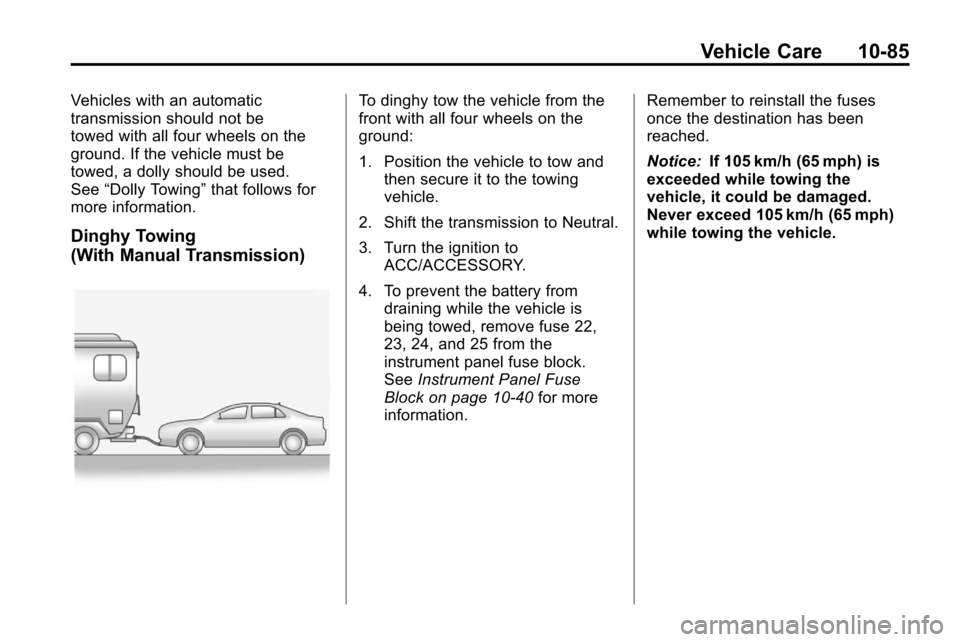
Dinghy Towing
(With Manual Transmission)
To dinghy tow the vehicle from the
front with all four wheels on the
ground:
1. Position the vehicle to tow and then secure it to the towing
vehicle.
2. Shift the transmission to Neutral.
3. Turn the ignition to ACC/ACCESSORY.
4. To prevent the battery from draining while the vehicle is
being towed, remove fuse 22,
23, 24, and 25 from the
instrument panel fuse block.
See Instrument Panel Fuse
Block on page 10‑40 for more
information. Remember to reinstall the fuses
once the destination has been
reached.
Notice:
If 105 km/h (65 mph) is
exceeded while towing the
vehicle, it could be damaged.
Never exceed 105 km/h (65 mph)
while towing the vehicle.
Page 358 of 400
Black plate (10,1)Chevrolet Cruze Owner Manual - 2012
11-10 Service and Maintenance
Additional
Maintenance and Care
Your vehicle is an important
investment and caring for it properly
may help to avoid future costly
repairs. To maintain vehicle
performance, additional
maintenance services may be
required. It is recommended that
your dealer perform these
services—their trained dealer
technicians know your vehicle best.
Your dealer can also perform a
thorough assessment with a
multi‐point inspection to recommend
when your vehicle may need
attention. The following list is
intended to explain the services and
conditions to look for that may
indicate services are required. Battery
The battery supplies power to start
the engine and operate any
additional electrical accessories.
.To avoid break‐down or failure to
start the vehicle, maintain a
battery with full cranking power.
.Trained dealer technicians have
the diagnostic equipment to test
the battery and ensure that the
connections and cables are
corrosion‐free.
Belts
.Belts may need replacing if
they squeak or show signs of
cracking or splitting.
.Trained dealer technicians
can inspect the belts and
recommend replacement
when necessary. Brakes
Brakes stop the vehicle and are
crucial to safe driving.
.Signs of brake wear may include
chirping, grinding, or squealing
noises, or difficulty stopping.
.Trained dealer technicians have
access to tools and equipment
to inspect the brakes and
recommend quality parts
engineered for the vehicle.
Fluids
Proper fluid levels and approved
fluids protect the vehicle’s systems
and components. See
Recommended Fluids and
Lubricants on page 11‑13 for
GM approved fluids.
.Engine oil and windshield
washer fluid levels should be
checked at every fuel fill.
.Instrument cluster lights may
come on to indicate that
fluids may be low and need
to be filled.
Page 379 of 400
Black plate (7,1)Chevrolet Cruze Owner Manual - 2012
Customer Information 13-7
.Flat Tire Change:Service to
change a flat tire with the spare
tire. The spare tire, if equipped,
must be in good condition and
properly inflated. It is the owner's
responsibility for the repair or
replacement of the tire if it is not
covered by the warranty.
.Battery Jump Start: Service to
jump start a dead battery.
Services Not Included in
Roadside Assistance
.Impound towing caused by
violation of any laws.
.Legal fines.
.Mounting, dismounting,
or changing of snow tires,
chains, or other traction devices.
.Towing or services for vehicles
driven on a non-public road or
highway.
Services Specific to
Canadian-Purchased Vehicles
.Fuel Delivery: Reimbursement
is approximately $5 Canadian.
Diesel fuel delivery may be
restricted. Propane and other
fuels are not provided through
this service.
.Lock-Out Service: Vehicle
registration is required.
.Trip Routing Service: Detailed
maps of North America are
provided when requested either
with the most direct route or the
most scenic route. There is a
limit of six requests per year.
Additional travel information is
also available. Allow three
weeks for delivery.
.Trip Interruption Benefits and
Assistance: Must be over
250 kilometers from where your
trip was started to qualify.
General Motors of
Canada Limited requires
pre-authorization, original
detailed receipts, and a
copy of the repair orders. Once
authorization has been received,
the Roadside Assistance advisor
will help to make arrangements
and explain how to receive
payment.
.Alternative Service:
If assistance cannot be
provided right away, the
Roadside Assistance advisor
may give permission to get local
emergency road service. You will
receive payment, up to $100,
after sending the original receipt
to Roadside Assistance.
Mechanical failures may be
covered, however any cost for
parts and labor for repairs not
covered by the warranty are the
owner responsibility.
Page 389 of 400

Black plate (1,1)Chevrolet Cruze Owner Manual - 2012
INDEX i-1
A
Accessories andModifications . . . . . . . . . . . . . . . . . 10-3
Accessory Power . . . . . . . . . . . . . . 9-23
Add-On Electrical Equipment . . . . . . . . . . . . . . . . . . . 9-55
Air Cleaner/Filter, Engine . . . . . 10-14
Air Conditioning . . . . . . . . . . . . . . . . 8-3
Air Vents . . . . . . . . . . . . . . . . . . . . . . . 8-6
Airbag Adding Equipment to the
Vehicle . . . . . . . . . . . . . . . . . . . . . . 3-31
Airbag System Check . . . . . . . . . . . . . . . . . . . . . . . . 3-32
How Does an AirbagRestrain? . . . . . . . . . . . . . . . . . . . 3-24
Passenger Sensing System . . . . . . . . . . . . . . . . . . . . . . 3-26
What Makes an Airbag Inflate? . . . . . . . . . . . . . . . . . . . . . . 3-24
What Will You See after an Airbag Inflates? . . . . . . . . . . . . . 3-24
When Should an Airbag Inflate? . . . . . . . . . . . . . . . . . . . . . . 3-23
Where Are the Airbags? . . . . . . 3-21 Airbags
Passenger Status Indicator . . . 5-12
Readiness Light . . . . . . . . . . . . . . 5-11
Servicing Airbag-Equipped
Vehicles . . . . . . . . . . . . . . . . . . . . . 3-30
System Check . . . . . . . . . . . . . . . . 3-19
Alarm
Vehicle Security . . . . . . . . . . . . . . 2-14
AM-FM Radio . . . . . . . . . . . . . . . . . . 7-12
Antenna Multi-band . . . . . . . . . . . . . . . . . . . . 7-18
Satellite Radio . . . . . . . . . . . . . . . . 7-18
Antilock Brake System (ABS) . . . . . . . . . . . . . . . . 9-35
Warning Light . . . . . . . . . . . . . . . . . 5-17
Appearance Care
Exterior . . . . . . . . . . . . . . . . . . . . . 10-86
Interior . . . . . . . . . . . . . . . . . . . . . . 10-90
Ashtrays . . . . . . . . . . . . . . . . . . . . . . . . 5-7
Assistance Program, Roadside . . . . . . . . . . . . . . . . . . . . . 13-6
Audio Players . . . . . . . . . . . . . . . . . 7-18 CD . . . . . . . . . . . . . . . . . . . . . . . . . . . 7-18
Audio System Radio Reception . . . . . . . . . . . . . . 7-17
Theft-Deterrent Feature . . . . . . . . 7-2 Automatic
Climate Control System . . . . . . . . 8-3
Door Locks . . . . . . . . . . . . . . . . . . . 2-11
Headlamp System . . . . . . . . . . . . . 6-3
Automatic Transmission . . . . . . . 9-29 Fluid . . . . . . . . . . . . . . . . . . . . . . . . 10-13
Manual Mode . . . . . . . . . . . . . . . . . 9-31
Shift Lock ControlFunction Check . . . . . . . . . . . 10-26
Auxiliary Devices . . . . . . . . . . . . . . 7-20
B
Battery . . . . . . . . . . . . . . . . . . . . . . . 10-25 Jump Starting . . . . . . . . . . . . . . . 10-80
Power Protection . . . . . . . . . . . . . . 6-6
Voltage and ChargingMessages . . . . . . . . . . . . . . . . . . . 5-28
Blade Replacement, Wiper . . . 10-28
Bluetooth . . . . . . . . . . 7-23, 7-25, 7-29
Brake System Warning Light . . . 5-16
Brakes . . . . . . . . . . . . . . . . . . . . . . . . 10-22
Antilock . . . . . . . . . . . . . . . . . . . . . . . 9-35
Assist . . . . . . . . . . . . . . . . . . . . . . . . . 9-36
Fluid . . . . . . . . . . . . . . . . . . . . . . . . 10-23
Parking . . . . . . . . . . . . . . . . . . . . . . . 9-36
System Messages . . . . . . . . . . . . 5-29