2012 CHEVROLET CRUZE spare tire
[x] Cancel search: spare tirePage 328 of 400
Black plate (74,1)Chevrolet Cruze Owner Manual - 2012
10-74 Vehicle Care
If needed, finish loosening them
with your fingers. The plastic nut
caps will not come off.
If needed, use the flat end of the
wheel wrench and pry along the
edge of the cover until it comes off.
The edge of the wheel cover could
be sharp, so do not try to remove it
with your bare hands. Do not drop
the cover or lay it face down, as it
could become scratched or
damaged. Store the wheel cover in
the trunk until the flat tire is repaired
or replaced.
Once you have removed the wheel
cover, use the following procedure
to remove the flat tire and install the
spare tire.
1. Do a safety check beforeproceeding. See If a Tire Goes
Flat on page 10‑63 for more
information.
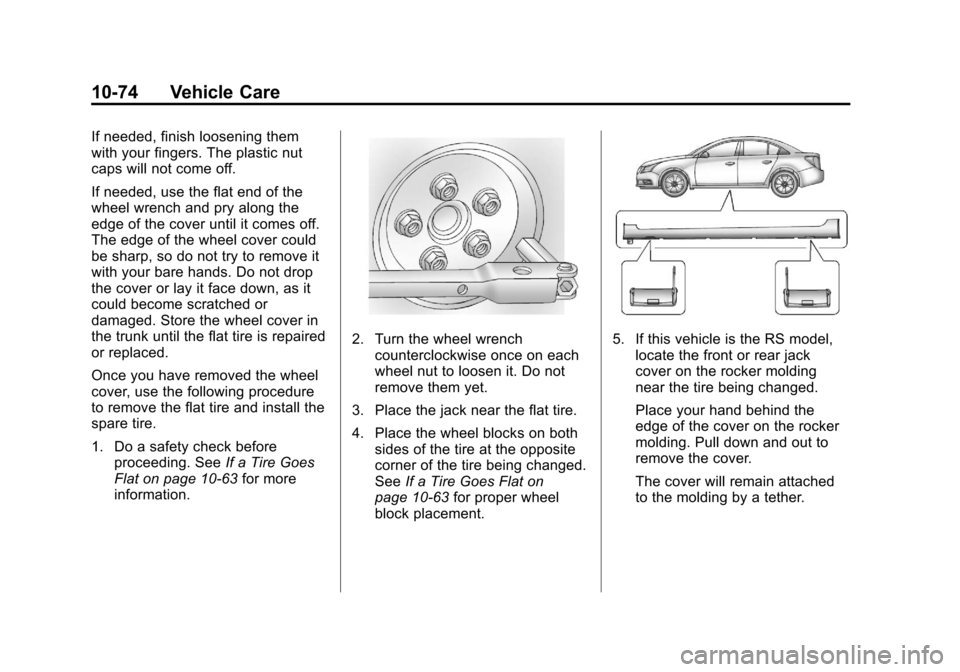
2. Turn the wheel wrench counterclockwise once on each
wheel nut to loosen it. Do not
remove them yet.
3. Place the jack near the flat tire.
4. Place the wheel blocks on both sides of the tire at the opposite
corner of the tire being changed.
See If a Tire Goes Flat on
page 10‑63 for proper wheel
block placement.5. If this vehicle is the RS model, locate the front or rear jack
cover on the rocker molding
near the tire being changed.
Place your hand behind the
edge of the cover on the rocker
molding. Pull down and out to
remove the cover.
The cover will remain attached
to the molding by a tether.
Page 331 of 400
Black plate (77,1)Chevrolet Cruze Owner Manual - 2012
Vehicle Care 10-77
{WARNING
Rust or dirt on a wheel, or on the
parts to which it is fastened, can
make wheel nuts become loose
after time. The wheel could come
off and cause an accident. When
changing a wheel, remove any
rust or dirt from places where the
wheel attaches to the vehicle.
In an emergency, a cloth or a
paper towel can be used;
however, use a scraper or wire
brush later to remove all rust
or dirt.
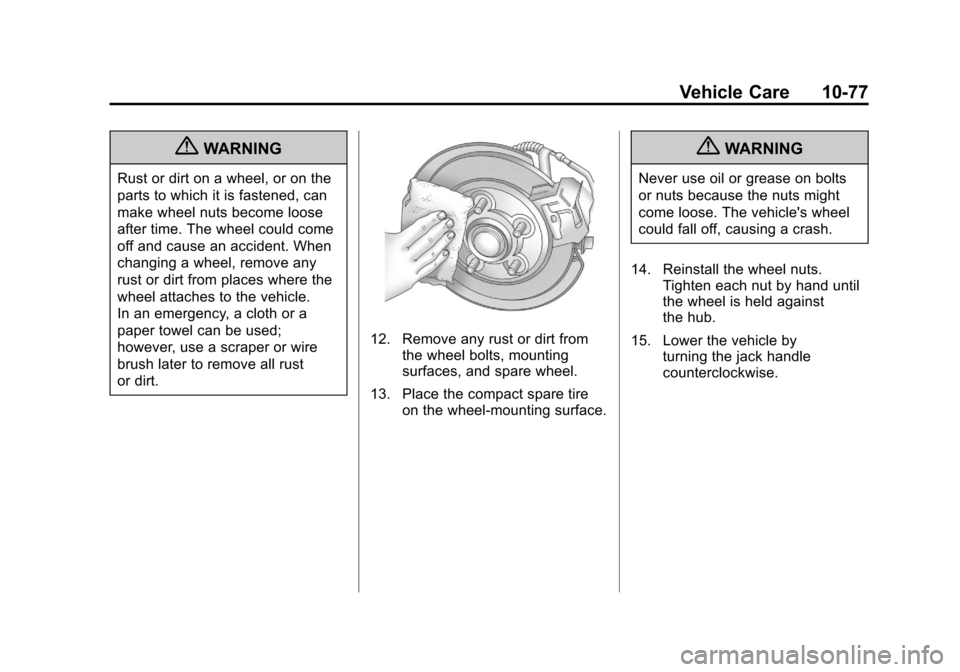
12. Remove any rust or dirt fromthe wheel bolts, mounting
surfaces, and spare wheel.
13. Place the compact spare tire on the wheel-mounting surface.
{WARNING
Never use oil or grease on bolts
or nuts because the nuts might
come loose. The vehicle's wheel
could fall off, causing a crash.
14. Reinstall the wheel nuts. Tighten each nut by hand until
the wheel is held against
the hub.
15. Lower the vehicle by turning the jack handle
counterclockwise.
Page 333 of 400
Black plate (79,1)Chevrolet Cruze Owner Manual - 2012
Vehicle Care 10-79
Notice:Wheel covers will not fit
on the vehicle's compact spare.
If you try to put a wheel cover on
the compact spare, the cover or
the spare could be damaged.
Storing a Flat or Spare Tire
and Tools
{WARNING
Storing a jack, a tire, or other
equipment in the passenger
compartment of the vehicle could
cause injury. In a sudden stop or
collision, loose equipment could
strike someone. Store all these in
the proper place.
Storing the Flat Tire and Tools
1. Replace the wheel wrench and wheel blocks in the tool bag.
2. Remove the foam container from the rear storage compartment.
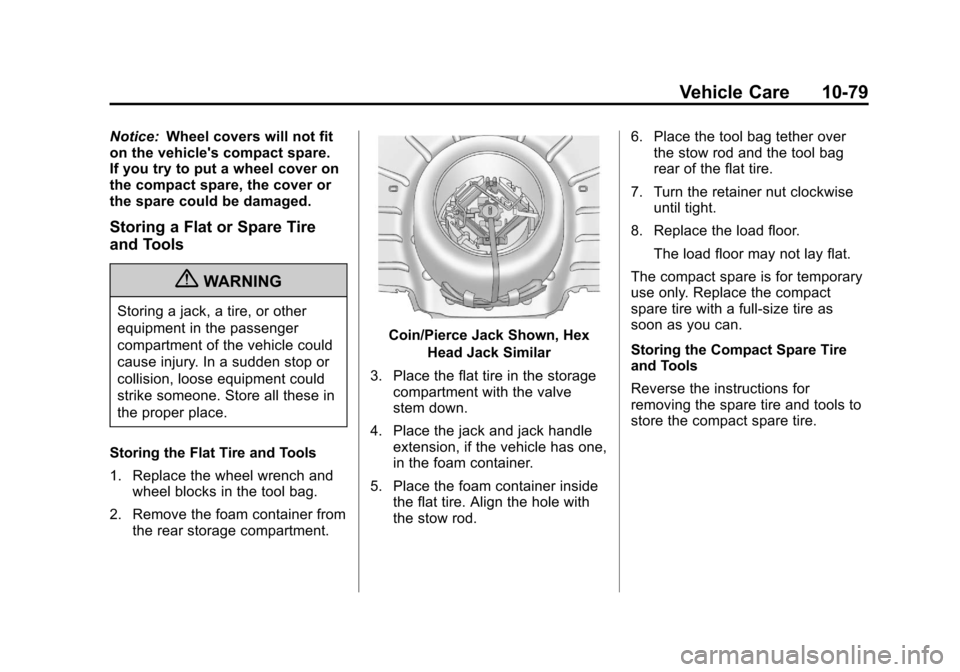
Coin/Pierce Jack Shown, Hex
Head Jack Similar
3. Place the flat tire in the storage compartment with the valve
stem down.
4. Place the jack and jack handle extension, if the vehicle has one,
in the foam container.
5. Place the foam container inside the flat tire. Align the hole with
the stow rod. 6. Place the tool bag tether over
the stow rod and the tool bag
rear of the flat tire.
7. Turn the retainer nut clockwise until tight.
8. Replace the load floor.
The load floor may not lay flat.
The compact spare is for temporary
use only. Replace the compact
spare tire with a full-size tire as
soon as you can.
Storing the Compact Spare Tire
and Tools
Reverse the instructions for
removing the spare tire and tools to
store the compact spare tire.
Page 334 of 400
Black plate (80,1)Chevrolet Cruze Owner Manual - 2012
10-80 Vehicle Care
Compact Spare Tire
{WARNING
Driving with more than one
compact spare tire at a time could
result in loss of braking and
handling. This could lead to a
crash and you or others could be
injured. Use only one compact
spare tire at a time.
If this vehicle has a compact spare
tire, it was fully inflated when the
vehicle was new; however, it can
lose air after a time. Check the
inflation pressure regularly.
It should be 420 kPa (60 psi).
After installing the compact spare
on the vehicle, stop as soon as
possible and make sure the spare
tire is correctly inflated. The
compact spare is made to perform
well at speeds up to 105 km/h
(65 mph) for distances up to
5 000 km (3,000 mi), so you can
finish your trip and have the full-size tire repaired or replaced at your
convenience. Of course, it is best to
replace the spare with a full-size tire
as soon as possible. The spare tire
will last longer and be in good
shape in case it is needed again.
Notice:
When the compact spare
is installed, do not take the
vehicle through an automatic car
wash with guide rails. The
compact spare can get caught on
the rails which can damage the
tire, wheel, and other parts of the
vehicle.
Do not use the compact spare on
other vehicles.
Do not mix the compact spare tire or
wheel with other wheels or tires.
They will not fit. Keep the spare tire
and its wheel together.
Notice: Tire chains will not fit the
compact spare. Using them can
damage the vehicle and can
damage the chains too. Do not
use tire chains on the compact
spare.
Jump Starting
For more information about the
vehicle battery, see Battery on
page 10‑25.
If the battery has run down, try to
use another vehicle and some
jumper cables to start your vehicle.
Be sure to use the following steps to
do it safely.
{WARNING
Batteries can hurt you. They can
be dangerous because:
.They contain acid that can
burn you.
.They contain gas that can
explode or ignite.
.They contain enough
electricity to burn you.
If you do not follow these steps
exactly, some or all of these
things can hurt you.
Page 379 of 400
Black plate (7,1)Chevrolet Cruze Owner Manual - 2012
Customer Information 13-7
.Flat Tire Change:Service to
change a flat tire with the spare
tire. The spare tire, if equipped,
must be in good condition and
properly inflated. It is the owner's
responsibility for the repair or
replacement of the tire if it is not
covered by the warranty.
.Battery Jump Start: Service to
jump start a dead battery.
Services Not Included in
Roadside Assistance
.Impound towing caused by
violation of any laws.
.Legal fines.
.Mounting, dismounting,
or changing of snow tires,
chains, or other traction devices.
.Towing or services for vehicles
driven on a non-public road or
highway.
Services Specific to
Canadian-Purchased Vehicles
.Fuel Delivery: Reimbursement
is approximately $5 Canadian.
Diesel fuel delivery may be
restricted. Propane and other
fuels are not provided through
this service.
.Lock-Out Service: Vehicle
registration is required.
.Trip Routing Service: Detailed
maps of North America are
provided when requested either
with the most direct route or the
most scenic route. There is a
limit of six requests per year.
Additional travel information is
also available. Allow three
weeks for delivery.
.Trip Interruption Benefits and
Assistance: Must be over
250 kilometers from where your
trip was started to qualify.
General Motors of
Canada Limited requires
pre-authorization, original
detailed receipts, and a
copy of the repair orders. Once
authorization has been received,
the Roadside Assistance advisor
will help to make arrangements
and explain how to receive
payment.
.Alternative Service:
If assistance cannot be
provided right away, the
Roadside Assistance advisor
may give permission to get local
emergency road service. You will
receive payment, up to $100,
after sending the original receipt
to Roadside Assistance.
Mechanical failures may be
covered, however any cost for
parts and labor for repairs not
covered by the warranty are the
owner responsibility.
Page 390 of 400

Black plate (2,1)Chevrolet Cruze Owner Manual - 2012
i-2 INDEX
Braking . . . . . . . . . . . . . . . . . . . . . . . . . 9-4
Break-In, New Vehicle . . . . . . . . . 9-15
Bulb Replacement . . . . . . . . . . . . 10-34Headlamp Aiming . . . . . . . . . . . 10-29
Headlamps . . . . . . . . . . . . . . . . . 10-29
Headlamps, Front TurnSignal, and Parking
Lamps . . . . . . . . . . . . . . . . . . . . 10-29
License Plate Lamps . . . . . . . 10-34
Taillamps, Turn Signal, Sidemarker, Stoplamps,
and Backup Lamps . . . . . . . . 10-31
Buying New Tires . . . . . . . . . . . . . 10-57
C
Calibration . . . . . . . . . . . . . . . . . . . . . . 5-4
California Fuel Requirements . . . . . . . . . . . 9-45
Perchlorate Materials
Requirements . . . . . . . . . . . . . . . 10-3
Warning . . . . . . . . . . . . . . . . . . . . . . 10-3
Canadian Vehicle Owners . . . . . . . . iii
Capacities and Specifications . . . . . . . . . . . . . . . . 12-2 Carbon Monoxide
Engine Exhaust . . . . . . . . . . . . . . . 9-27
Trunk . . . . . . . . . . . . . . . . . . . . . . . . . 2-12
Winter Driving . . . . . . . . . . . . . . . . . 9-8
Cargo Tie-Downs . . . . . . . . . . . . . . . . . . . . . 4-2
Cautions, Danger, and
Warnings . . . . . . . . . . . . . . . . . . . . . . . . iv
CD Player . . . . . . . . . . . . . . . . . . . . . 7-18
Center Console Storage . . . . . . . . 4-2
Chains, Tire . . . . . . . . . . . . . . . . . . 10-62
Charging System Light . . . . . . . . 5-13
Check Engine Light . . . . . . . . . . . . . . . . . . 5-13
IgnitionTransmission Lock . . . . . . . . 10-27
Child Restraints Infants and YoungChildren . . . . . . . . . . . . . . . . . . . . . 3-35
Lower Anchors and Tethers for Children . . . . . . . . . 3-41
Older Children . . . . . . . . . . . . . . . . 3-33
Securing . . . . . . . . . . . . . . . . 3-48, 3-50
Systems . . . . . . . . . . . . . . . . . . . . . . 3-37
Cigarette Lighter . . . . . . . . . . . . . . . . 5-6
Circuit Breakers . . . . . . . . . . . . . . 10-35 Cleaning
Exterior Care . . . . . . . . . . . . . . . 10-86
Interior Care . . . . . . . . . . . . . . . . 10-90
Climate Control Systems . . . . . . . 8-1 Air Conditioning . . . . . . . . . . . . . . . 8-1
Automatic . . . . . . . . . . . . . . . . . . . . . . 8-3
Heating . . . . . . . . . . . . . . . . . . . . . . . . 8-1
Clock . . . . . . . . . . . . . . . . . . . . . . . . . . . 5-5
Cluster, Instrument . . . . . . . . . . . . . 5-8
Clutch, Hydraulic . . . . . . . . . . . . . 10-14
Collision Damage Repair . . . . . . 13-9
Compact Spare Tire . . . . . . . . . . 10-80
Compass . . . . . . . . . . . . . . . . . . . . . . . 5-4 Messages . . . . . . . . . . . . . . . . . . . . 5-29
Compressor Kit, Tire Sealant . . . . . . . . . . . . . . . . . . . . . . 10-65
Control of a Vehicle . . . . . . . . . . . . . 9-4
Convex Mirrors . . . . . . . . . . . . . . . . 2-15
Coolant Engine . . . . . . . . . . . . . . . . . . . . . . 10-16
Engine TemperatureGauge . . . . . . . . . . . . . . . . . . . . . . 5-10
Cooling System . . . . . . . . . . . . . . . 10-16 Engine Messages . . . . . . . . . . . . 5-30
Courtesy Lamps . . . . . . . . . . . . . . . . 6-5
Page 398 of 400

Black plate (10,1)Chevrolet Cruze Owner Manual - 2012
i-10 INDEX
Service (cont.)Scheduling Appointments . . . . . 13-8
Vehicle Messages . . . . . . . . . . . . 5-32
Vehicle Soon Light . . . . . . . . . . . . 5-16
Servicing the Airbag . . . . . . . . . . . 3-30
Shift Lock Control Function Check, Automatic
Transmission . . . . . . . . . . . . . . . . 10-26
Shifting
Into Park . . . . . . . . . . . . . . . . . . . . . . 9-24
Out of Park . . . . . . . . . . . . . . . . . . . 9-25
Sidemarker Bulb Replacement . . . . . . . . . . 10-31
Signals, Turn and
Lane-Change . . . . . . . . . . . . . . . . . 6-4
Spare Tire Compact . . . . . . . . . . . . . . . . . . . . 10-80
Specifications and
Capacities . . . . . . . . . . . . . . . . . . . . 12-2
Speedometer . . . . . . . . . . . . . . . . . . . 5-9
StabiliTrak OFF Light . . . . . . . . . . . . . . . . . . . . . 5-18
System . . . . . . . . . . . . . . . . . . . . . . . 9-38
Start Vehicle, Remote . . . . . . . . . . 2-9 Starter Switch Check . . . . . . . . . 10-26
Starting the Engine . . . . . . . . . . . . 9-20
Starting the Vehicle
Messsages . . . . . . . . . . . . . . . . . . . 5-33
Steering . . . . . . . . . . . . . . . . . . . . . . . . 9-4 Power, Warning Lights . . . . . . . . 5-17
Wheel Adjustment . . . . . . . . . . . . . 5-2
Wheel Controls . . . . . . . . . . . . . . . . 5-2
Stoplamps and Back-Up Lamps Bulb Replacement . . . . . . . . . . 10-31
Storage Areas
Center Console . . . . . . . . . . . . . . . . 4-2
Glove Box . . . . . . . . . . . . . . . . . . . . . 4-1
Instrument Panel . . . . . . . . . . . . . . 4-1
Storing the Tire Sealant and Compressor Kit . . . . . . . . . 10-72
Stuck Vehicle . . . . . . . . . . . . . . . . . . 9-10
Sun Visors . . . . . . . . . . . . . . . . . . . . . 2-20
Sunroof . . . . . . . . . . . . . . . . . . . . . . . . 2-21
Symbols . . . . . . . . . . . . . . . . . . . . . . . . . . iv
System Infotainment . . . . . . . . . . . . . . . . . . . 7-2T
Tachometer . . . . . . . . . . . . . . . . . . . . . 5-9
TaillampsBulb Replacement . . . . . . . . . . 10-31
Text Telephone (TTY) Users . . . 13-4
Theft-Deterrent Systems . . . . . . . 2-14 Immobilizer . . . . . . . . . . . . . . . . . . . 2-14
Time . . . . . . . . . . . . . . . . . . . . . . . . . . . . 5-5
Tires Buying New Tires . . . . . . . . . . . 10-57
Chains . . . . . . . . . . . . . . . . . . . . . . 10-62
Changing . . . . . . . . . . . . . . . . . . . 10-72
Compact Spare . . . . . . . . . . . . . 10-80
Designations . . . . . . . . . . . . . . . 10-46
Different Size . . . . . . . . . . . . . . . 10-59
If a Tire Goes Flat . . . . . . . . . . 10-63
Inflation Monitor System . . . . 10-52
Inspection . . . . . . . . . . . . . . . . . . 10-55
Low Profile . . . . . . . . . . . . . . . . . 10-43
Messages . . . . . . . . . . . . . . . . . . . . 5-33
Pressure Light . . . . . . . . . . . . . . . . 5-19
Pressure Monitor System . . . 10-50
Rotation . . . . . . . . . . . . . . . . . . . . 10-55
Sealant andCompressor Kit . . . . . . . . . . . 10-65