2012 CHEVROLET CRUZE spare tire
[x] Cancel search: spare tirePage 309 of 400

Black plate (55,1)Chevrolet Cruze Owner Manual - 2012
Vehicle Care 10-55
11. Proceed to the driver side reartire, and repeat the procedure
in Step 8. The horn sounds
two times to indicate the
sensor identification code has
been matched to the driver
side rear tire, and the TPMS
sensor matching process is no
longer active. The TIRE
LEARNING ACTIVE message
on the DIC display screen
goes off.
12. Turn the ignition to LOCK/OFF.
13. Set all four tires to the recommended air pressure
level as indicated on the Tire
and Loading Information label.Tire Inspection
We recommend that the tires,
including the spare tire, if the
vehicle has one, be inspected
for signs of wear or damage at
least once a month.
Replace the tire if:
.The indicators at three or
more places around the tire
can be seen.
.There is cord or fabric
showing through the tire's
rubber.
.The tread or sidewall is
cracked, cut, or snagged
deep enough to show cord or
fabric.
.The tire has a bump, bulge,
or split.
.The tire has a puncture, cut,
or other damage that cannot
be repaired well because of
the size or location of the
damage.
Tire Rotation
Tires should be rotated every
12 000 km (7,500 mi). See
Maintenance Schedule on
page 11‑3.
Tires are rotated to achieve
a uniform wear for all tires.
The first rotation is the most
important.
Any time unusual wear is
noticed, rotate the tires as soon
as possible and check the wheel
alignment. Also check for
damaged tires or wheels.
Page 310 of 400
Black plate (56,1)Chevrolet Cruze Owner Manual - 2012
10-56 Vehicle Care
SeeWhen It Is Time for New
Tires on page 10‑57 andWheel
Replacement on page 10‑61.
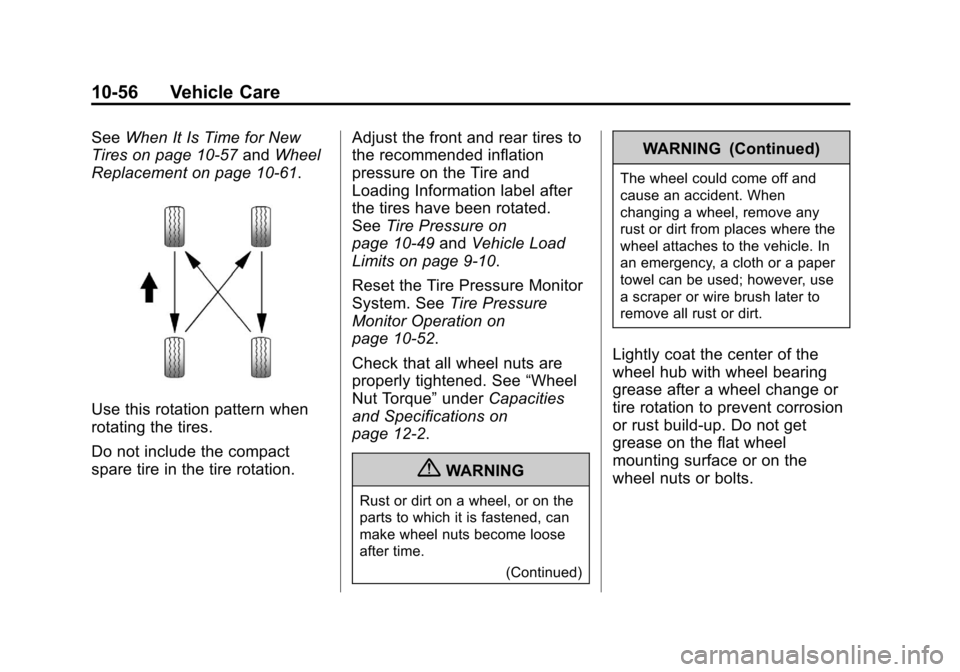
Use this rotation pattern when
rotating the tires.
Do not include the compact
spare tire in the tire rotation. Adjust the front and rear tires to
the recommended inflation
pressure on the Tire and
Loading Information label after
the tires have been rotated.
See
Tire Pressure on
page 10‑49 andVehicle Load
Limits on page 9‑10.
Reset the Tire Pressure Monitor
System. See Tire Pressure
Monitor Operation on
page 10‑52.
Check that all wheel nuts are
properly tightened. See “Wheel
Nut Torque” underCapacities
and Specifications on
page 12‑2.
{WARNING
Rust or dirt on a wheel, or on the
parts to which it is fastened, can
make wheel nuts become loose
after time.
(Continued)
WARNING (Continued)
The wheel could come off and
cause an accident. When
changing a wheel, remove any
rust or dirt from places where the
wheel attaches to the vehicle. In
an emergency, a cloth or a paper
towel can be used; however, use
a scraper or wire brush later to
remove all rust or dirt.
Lightly coat the center of the
wheel hub with wheel bearing
grease after a wheel change or
tire rotation to prevent corrosion
or rust build-up. Do not get
grease on the flat wheel
mounting surface or on the
wheel nuts or bolts.
Page 311 of 400
Black plate (57,1)Chevrolet Cruze Owner Manual - 2012
Vehicle Care 10-57
When It Is Time for New
Tires
Factors such as maintenance,
temperatures, driving speeds,
vehicle loading, and road conditions
affect the wear rate of the tires.
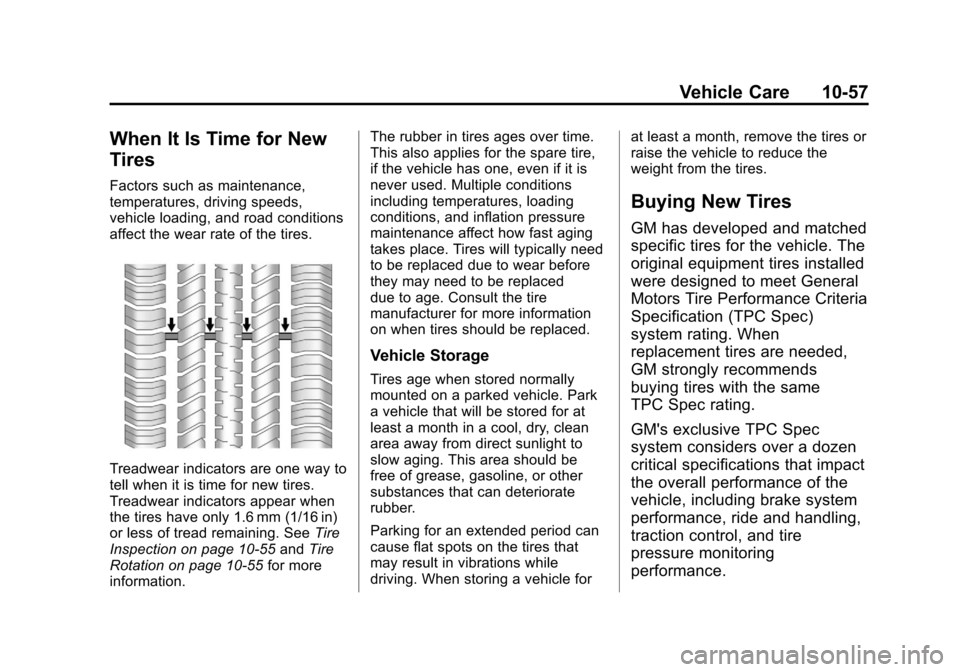
Treadwear indicators are one way to
tell when it is time for new tires.
Treadwear indicators appear when
the tires have only 1.6 mm (1/16 in)
or less of tread remaining. SeeTire
Inspection on page 10‑55 andTire
Rotation on page 10‑55 for more
information. The rubber in tires ages over time.
This also applies for the spare tire,
if the vehicle has one, even if it is
never used. Multiple conditions
including temperatures, loading
conditions, and inflation pressure
maintenance affect how fast aging
takes place. Tires will typically need
to be replaced due to wear before
they may need to be replaced
due to age. Consult the tire
manufacturer for more information
on when tires should be replaced.
Vehicle Storage
Tires age when stored normally
mounted on a parked vehicle. Park
a vehicle that will be stored for at
least a month in a cool, dry, clean
area away from direct sunlight to
slow aging. This area should be
free of grease, gasoline, or other
substances that can deteriorate
rubber.
Parking for an extended period can
cause flat spots on the tires that
may result in vibrations while
driving. When storing a vehicle for
at least a month, remove the tires or
raise the vehicle to reduce the
weight from the tires.
Buying New Tires
GM has developed and matched
specific tires for the vehicle. The
original equipment tires installed
were designed to meet General
Motors Tire Performance Criteria
Specification (TPC Spec)
system rating. When
replacement tires are needed,
GM strongly recommends
buying tires with the same
TPC Spec rating.
GM's exclusive TPC Spec
system considers over a dozen
critical specifications that impact
the overall performance of the
vehicle, including brake system
performance, ride and handling,
traction control, and tire
pressure monitoring
performance.
Page 314 of 400
Black plate (60,1)Chevrolet Cruze Owner Manual - 2012
10-60 Vehicle Care
The Uniform Tire Quality
Grading (UTQG) system does
not apply to deep tread,
winter-type snow tires,
space-saver, or temporary use
spare tires, tires with nominal
rim diameters of 10 to 12 inches
(25 to 30 cm), or to some
limited-production tires.
While the tires available on
General Motors passenger cars
and light trucks may vary with
respect to these grades, they
must also conform to federal
safety requirements and
additional General Motors Tire
Performance Criteria (TPC)
standards.
All Passenger Car Tires Must
Conform to Federal Safety
Requirements In Addition To
These Grades.Treadwear
The treadwear grade is a
comparative rating based on the
wear rate of the tire when tested
under controlled conditions on a
specified government test
course. For example, a tire
graded 150 would wear one and
a half (1½) times as well on the
government course as a tire
graded 100. The relative
performance of tires depends
upon the actual conditions of
their use, however, and may
depart significantly from the
norm due to variations in driving
habits, service practices and
differences in road
characteristics and climate.
Traction
–AA, A, B, C
The traction grades, from
highest to lowest, are AA, A, B,
and C. Those grades represent
the tire's ability to stop on wet
pavement as measured under controlled conditions on
specified government test
surfaces of asphalt and
concrete. A tire marked C may
have poor traction performance.
Warning: The traction grade
assigned to this tire is based on
straight-ahead braking traction
tests, and does not include
acceleration, cornering,
hydroplaning, or peak traction
characteristics.
Temperature
–A, B, C
The temperature grades are
A (the highest), B, and C,
representing the tire's resistance
to the generation of heat and its
ability to dissipate heat when
tested under controlled
conditions on a specified indoor
laboratory test wheel. Sustained
high temperature can cause the
material of the tire to degenerate
and reduce tire life, and
excessive temperature can lead
Page 318 of 400
Black plate (64,1)Chevrolet Cruze Owner Manual - 2012
10-64 Vehicle Care
{WARNING
Changing a tire can be
dangerous. The vehicle can slip
off the jack and roll over or fall
causing injury or death. Find a
level place to change the tire.
To help prevent the vehicle
from moving:1. Set the parking brake firmly.
2. Put an automatic transmission in P (Park) or
a manual transmission in
1 (First) or R (Reverse).
3. Turn off the engine and do not restart while the vehicle
is raised.
4. Do not allow passengers to remain in the vehicle.
5. Place wheel blocks on both sides of the tire at the
opposite corner of the tire
being changed. This vehicle may come with a jack,
spare tire, and wheel block(s) or a
tire sealant and compressor kit.
To use the jacking equipment to
change a spare tire safely, follow
the instructions below. Then see
Tire Changing on page 10‑72. To
use the tire sealant and compressor
kit, see
Tire Sealant and
Compressor Kit on page 10‑65.
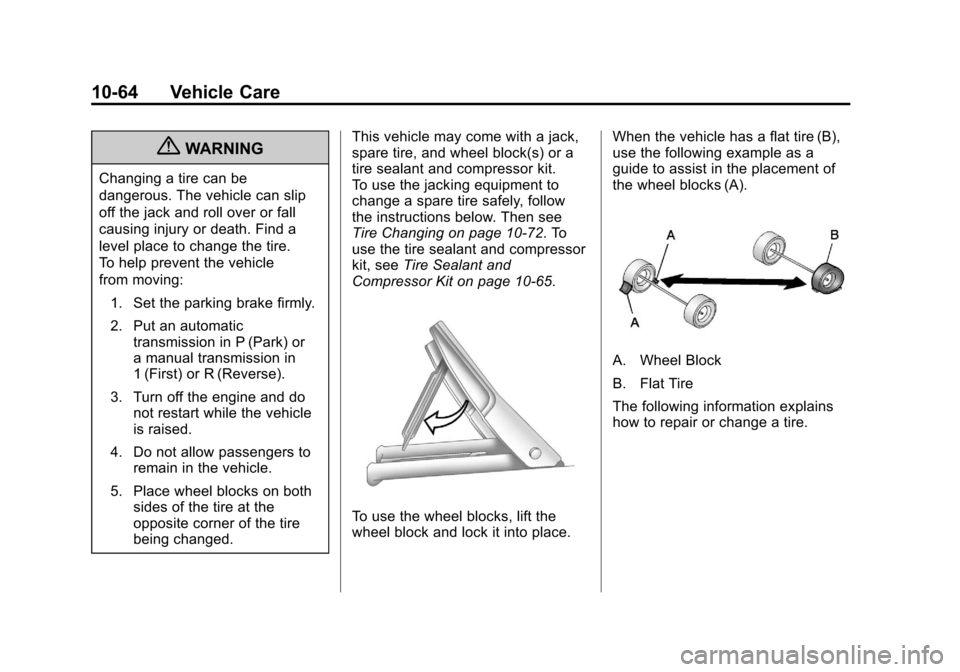
To use the wheel blocks, lift the
wheel block and lock it into place. When the vehicle has a flat tire (B),
use the following example as a
guide to assist in the placement of
the wheel blocks (A).
A. Wheel Block
B. Flat Tire
The following information explains
how to repair or change a tire.
Page 319 of 400
Black plate (65,1)Chevrolet Cruze Owner Manual - 2012
Vehicle Care 10-65
Tire Sealant and
Compressor Kit
{WARNING
Idling a vehicle in an enclosed
area with poor ventilation is
dangerous. Engine exhaust may
enter the vehicle. Engine exhaust
contains carbon monoxide (CO)
which cannot be seen or smelled.
It can cause unconsciousness
and even death. Never run the
engine in an enclosed area that
has no fresh air ventilation. For
more information, seeEngine
Exhaust on page 9‑27.
{WARNING
Overinflating a tire could cause
the tire to rupture and you or
others could be injured. Be sure
to read and follow the tire sealant
and compressor kit instructions
and inflate the tire to its
recommended pressure. Do not
exceed the recommended
pressure.
{WARNING
Storing the tire sealant and
compressor kit or other
equipment in the passenger
compartment of the vehicle could
cause injury. In a sudden stop or
collision, loose equipment could
strike someone. Store the tire
sealant and compressor kit in its
original location. If this vehicle has a tire sealant and
compressor kit, there may not be a
spare tire, tire changing equipment,
and on some vehicles there may not
be a place to store a tire.
The tire sealant and compressor
can be used to temporarily seal
punctures up to 6 mm (¼ inch) in
the tread area of the tire. It can also
be used to inflate an under
inflated tire.
If the tire has been separated from
the wheel, has damaged sidewalls,
or has a large puncture, the tire is
too severely damaged for the tire
sealant and compressor kit to be
effective. See
Roadside Assistance
Program on page 13‑6.
Read and follow all of the tire
sealant and compressor kit
instructions.
Page 326 of 400
Black plate (72,1)Chevrolet Cruze Owner Manual - 2012
10-72 Vehicle Care
Storing the Tire Sealant
and Compressor Kit
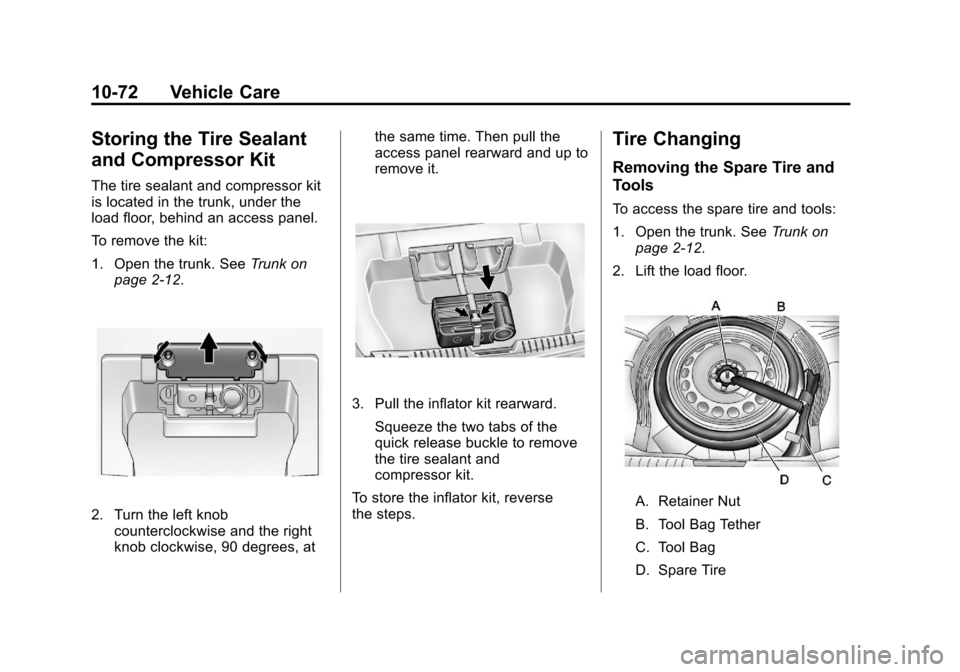
The tire sealant and compressor kit
is located in the trunk, under the
load floor, behind an access panel.
To remove the kit:
1. Open the trunk. SeeTrunk on
page 2‑12.
2. Turn the left knob counterclockwise and the right
knob clockwise, 90 degrees, at the same time. Then pull the
access panel rearward and up to
remove it.
3. Pull the inflator kit rearward.
Squeeze the two tabs of the
quick release buckle to remove
the tire sealant and
compressor kit.
To store the inflator kit, reverse
the steps.
Tire Changing
Removing the Spare Tire and
Tools
To access the spare tire and tools:
1. Open the trunk. See Trunk on
page 2‑12.
2. Lift the load floor.
A. Retainer Nut
B. Tool Bag Tether
C. Tool Bag
D. Spare Tire
Page 327 of 400
Black plate (73,1)Chevrolet Cruze Owner Manual - 2012
Vehicle Care 10-73
3. Turn the retainer nut (A)counterclockwise to remove it.
Then remove the tool bag
tether (B) from the stow rod, the
tool bag (C) containing the
wheel wrench and wheel blocks,
and the spare tire (D).
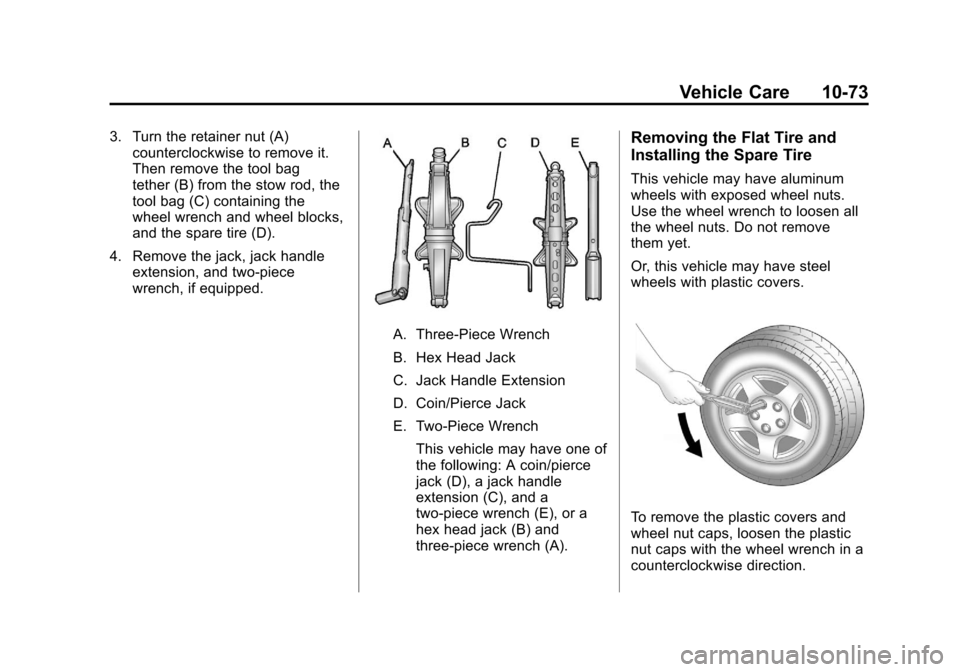
4. Remove the jack, jack handle extension, and two-piece
wrench, if equipped.
A. Three-Piece Wrench
B. Hex Head Jack
C. Jack Handle Extension
D. Coin/Pierce Jack
E. Two-Piece Wrench
This vehicle may have one of
the following: A coin/pierce
jack (D), a jack handle
extension (C), and a
two-piece wrench (E), or a
hex head jack (B) and
three-piece wrench (A).
Removing the Flat Tire and
Installing the Spare Tire
This vehicle may have aluminum
wheels with exposed wheel nuts.
Use the wheel wrench to loosen all
the wheel nuts. Do not remove
them yet.
Or, this vehicle may have steel
wheels with plastic covers.
To remove the plastic covers and
wheel nut caps, loosen the plastic
nut caps with the wheel wrench in a
counterclockwise direction.