2012 CHEVROLET CRUZE child lock
[x] Cancel search: child lockPage 100 of 400
Black plate (48,1)Chevrolet Cruze Owner Manual - 2012
3-48 Seats and Restraints
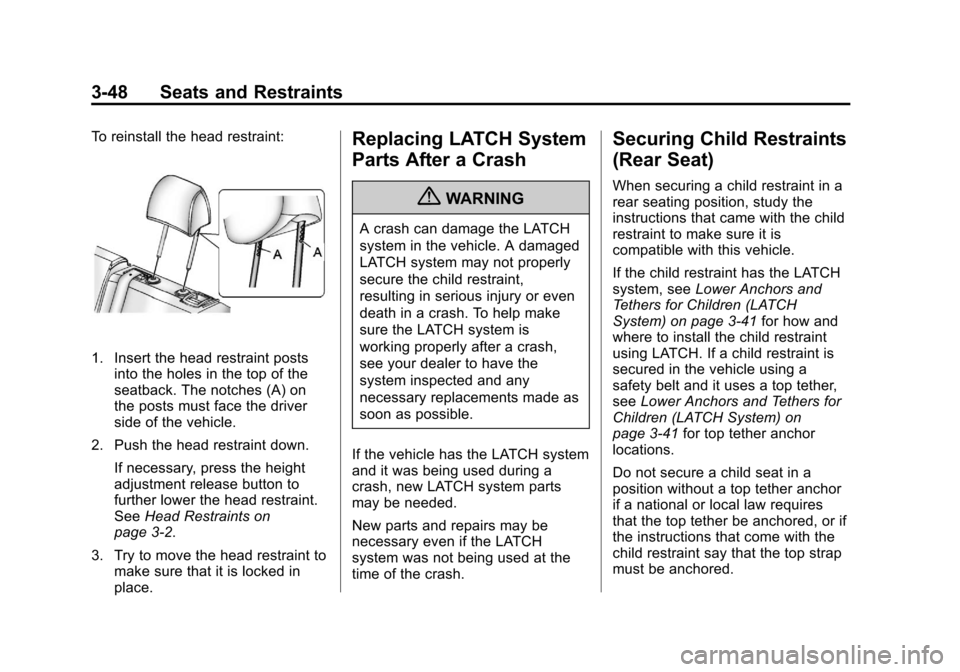
To reinstall the head restraint:
1. Insert the head restraint postsinto the holes in the top of the
seatback. The notches (A) on
the posts must face the driver
side of the vehicle.
2. Push the head restraint down. If necessary, press the height
adjustment release button to
further lower the head restraint.
See Head Restraints on
page 3‑2.
3. Try to move the head restraint to make sure that it is locked in
place.
Replacing LATCH System
Parts After a Crash
{WARNING
A crash can damage the LATCH
system in the vehicle. A damaged
LATCH system may not properly
secure the child restraint,
resulting in serious injury or even
death in a crash. To help make
sure the LATCH system is
working properly after a crash,
see your dealer to have the
system inspected and any
necessary replacements made as
soon as possible.
If the vehicle has the LATCH system
and it was being used during a
crash, new LATCH system parts
may be needed.
New parts and repairs may be
necessary even if the LATCH
system was not being used at the
time of the crash.
Securing Child Restraints
(Rear Seat)
When securing a child restraint in a
rear seating position, study the
instructions that came with the child
restraint to make sure it is
compatible with this vehicle.
If the child restraint has the LATCH
system, see Lower Anchors and
Tethers for Children (LATCH
System) on page 3‑41 for how and
where to install the child restraint
using LATCH. If a child restraint is
secured in the vehicle using a
safety belt and it uses a top tether,
see Lower Anchors and Tethers for
Children (LATCH System) on
page 3‑41 for top tether anchor
locations.
Do not secure a child seat in a
position without a top tether anchor
if a national or local law requires
that the top tether be anchored, or if
the instructions that come with the
child restraint say that the top strap
must be anchored.
Page 101 of 400
Black plate (49,1)Chevrolet Cruze Owner Manual - 2012
Seats and Restraints 3-49
In Canada, the law requires that
forward-facing child restraints have
a top tether, and that the tether be
attached.
If the child restraint does not have
the LATCH system, you will be
using the safety belt to secure the
child restraint in this position. Be
sure to follow the instructions that
came with the child restraint. Secure
the child in the child restraint when
and as the instructions say.
If more than one child restraint
needs to be installed in the rear
seat, be sure to readWhere to Put
the Restraint on page 3‑40.
1. Put the child restraint on the seat.
If the head restraint interferes
with the proper installation of the
child restraint, the head restraint
may be removed. See “Head
Restraint Removal and
Reinstallation” underLower
Anchors and Tethers for
Children (LATCH System) on
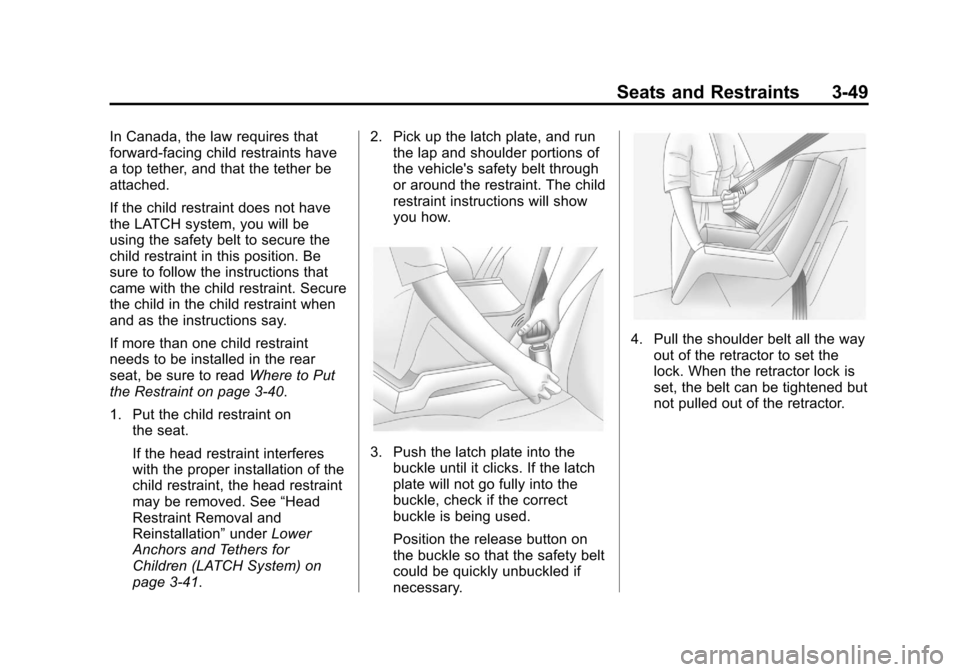
page 3‑41. 2. Pick up the latch plate, and run
the lap and shoulder portions of
the vehicle's safety belt through
or around the restraint. The child
restraint instructions will show
you how.
3. Push the latch plate into thebuckle until it clicks. If the latch
plate will not go fully into the
buckle, check if the correct
buckle is being used.
Position the release button on
the buckle so that the safety belt
could be quickly unbuckled if
necessary.
4. Pull the shoulder belt all the way
out of the retractor to set the
lock. When the retractor lock is
set, the belt can be tightened but
not pulled out of the retractor.
Page 102 of 400
Black plate (50,1)Chevrolet Cruze Owner Manual - 2012
3-50 Seats and Restraints
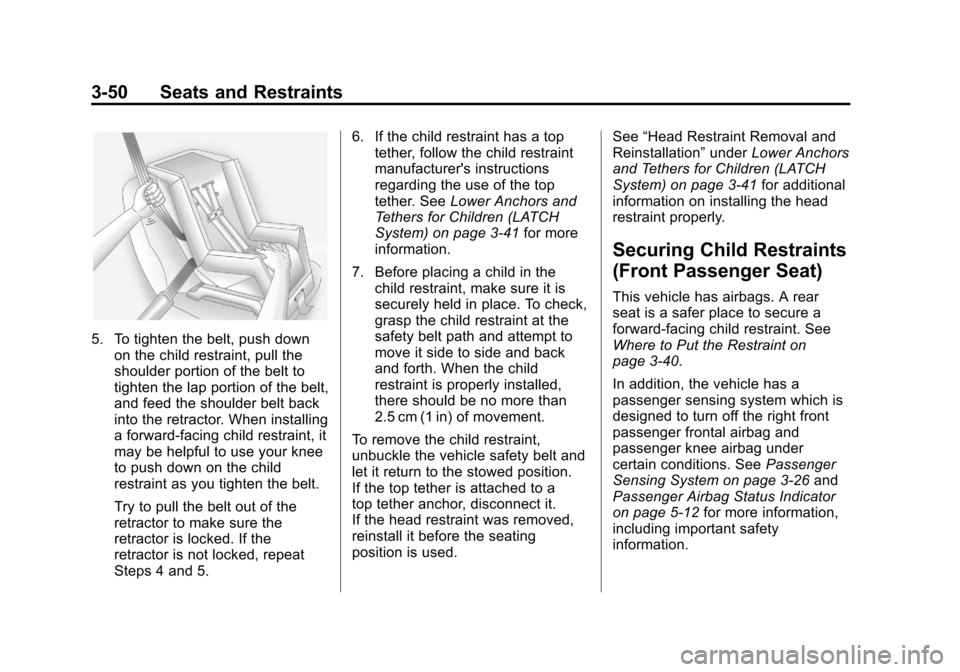
5. To tighten the belt, push downon the child restraint, pull the
shoulder portion of the belt to
tighten the lap portion of the belt,
and feed the shoulder belt back
into the retractor. When installing
a forward-facing child restraint, it
may be helpful to use your knee
to push down on the child
restraint as you tighten the belt.
Try to pull the belt out of the
retractor to make sure the
retractor is locked. If the
retractor is not locked, repeat
Steps 4 and 5. 6. If the child restraint has a top
tether, follow the child restraint
manufacturer's instructions
regarding the use of the top
tether. See Lower Anchors and
Tethers for Children (LATCH
System) on page 3‑41 for more
information.
7. Before placing a child in the child restraint, make sure it is
securely held in place. To check,
grasp the child restraint at the
safety belt path and attempt to
move it side to side and back
and forth. When the child
restraint is properly installed,
there should be no more than
2.5 cm (1 in) of movement.
To remove the child restraint,
unbuckle the vehicle safety belt and
let it return to the stowed position.
If the top tether is attached to a
top tether anchor, disconnect it.
If the head restraint was removed,
reinstall it before the seating
position is used. See
“Head Restraint Removal and
Reinstallation” underLower Anchors
and Tethers for Children (LATCH
System) on page 3‑41 for additional
information on installing the head
restraint properly.
Securing Child Restraints
(Front Passenger Seat)
This vehicle has airbags. A rear
seat is a safer place to secure a
forward-facing child restraint. See
Where to Put the Restraint on
page 3‑40.
In addition, the vehicle has a
passenger sensing system which is
designed to turn off the right front
passenger frontal airbag and
passenger knee airbag under
certain conditions. See Passenger
Sensing System on page 3‑26 and
Passenger Airbag Status Indicator
on page 5‑12 for more information,
including important safety
information.
Page 104 of 400
Black plate (52,1)Chevrolet Cruze Owner Manual - 2012
3-52 Seats and Restraints
You will be using the lap-shoulder
belt to secure the child restraint in
this position. Follow the instructions
that came with the child restraint.
1. Move the seat as far back as itwill go before securing the
forward-facing child restraint.
When the passenger sensing
system has turned off the right
front passenger frontal airbag
and passenger knee airbag, the
off indicator on the passenger
airbag status indicator should
light and stay lit when you start
the vehicle. See Passenger
Airbag Status Indicator on
page 5‑12.
2. Put the child restraint on the seat.
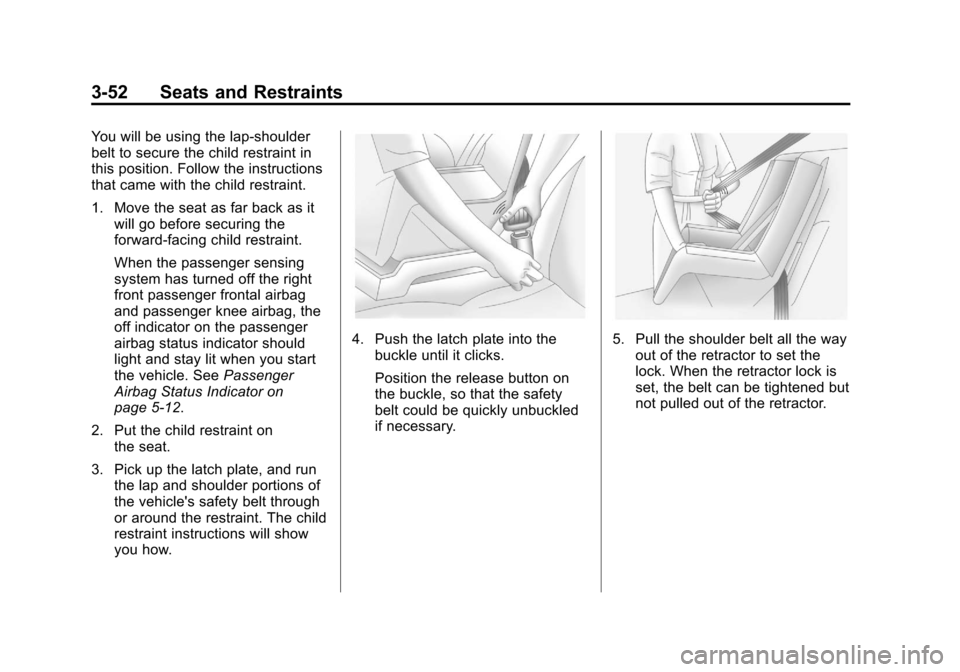
3. Pick up the latch plate, and run the lap and shoulder portions of
the vehicle's safety belt through
or around the restraint. The child
restraint instructions will show
you how.
4. Push the latch plate into thebuckle until it clicks.
Position the release button on
the buckle, so that the safety
belt could be quickly unbuckled
if necessary.5. Pull the shoulder belt all the wayout of the retractor to set the
lock. When the retractor lock is
set, the belt can be tightened but
not pulled out of the retractor.
Page 105 of 400
Black plate (53,1)Chevrolet Cruze Owner Manual - 2012
Seats and Restraints 3-53
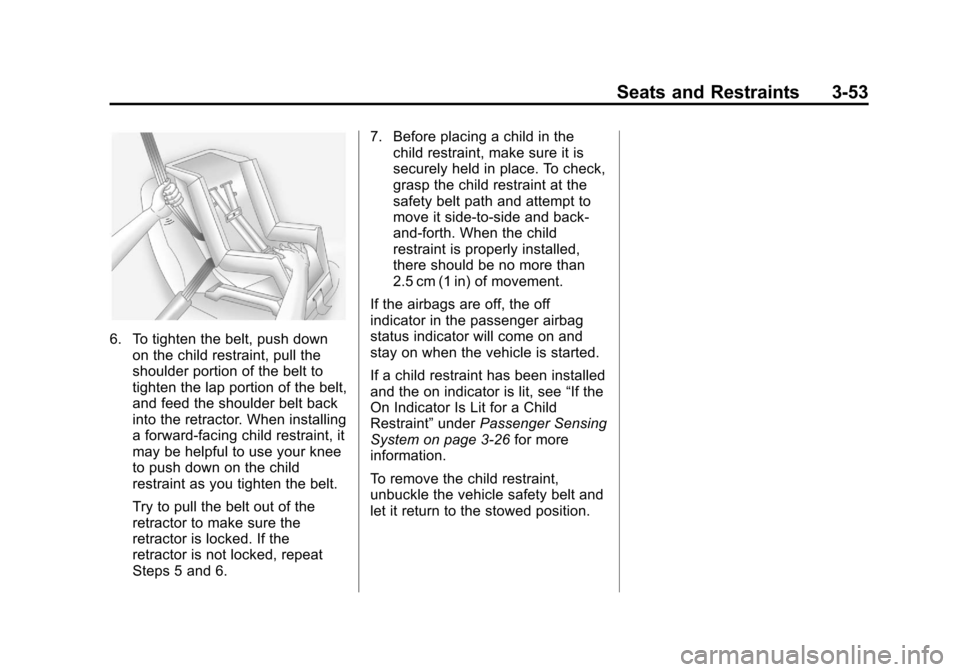
6. To tighten the belt, push downon the child restraint, pull the
shoulder portion of the belt to
tighten the lap portion of the belt,
and feed the shoulder belt back
into the retractor. When installing
a forward-facing child restraint, it
may be helpful to use your knee
to push down on the child
restraint as you tighten the belt.
Try to pull the belt out of the
retractor to make sure the
retractor is locked. If the
retractor is not locked, repeat
Steps 5 and 6. 7. Before placing a child in the
child restraint, make sure it is
securely held in place. To check,
grasp the child restraint at the
safety belt path and attempt to
move it side‐to‐side and back‐
and‐forth. When the child
restraint is properly installed,
there should be no more than
2.5 cm (1 in) of movement.
If the airbags are off, the off
indicator in the passenger airbag
status indicator will come on and
stay on when the vehicle is started.
If a child restraint has been installed
and the on indicator is lit, see “If the
On Indicator Is Lit for a Child
Restraint” underPassenger Sensing
System on page 3‑26 for more
information.
To remove the child restraint,
unbuckle the vehicle safety belt and
let it return to the stowed position.
Page 244 of 400
Black plate (46,1)Chevrolet Cruze Owner Manual - 2012
9-46 Driving and Operating
Gasolines containing oxygenates,
such as ethers and ethanol, and
reformulated gasolines might be
available in your area. We
recommend that you use these
gasolines, if they comply with the
specifications described earlier.
However, E85 (85% ethanol) and
other fuels containing more than
15% ethanol must not be used in
vehicles that were not designed
for those fuels.
Notice:This vehicle was not
designed for fuel that contains
methanol. Do not use fuel
containing methanol. It can
corrode metal parts in the fuel
system and also damage plastic
and rubber parts. That damage
would not be covered under the
vehicle warranty.
Some gasolines that are
not reformulated for low
emissions can contain an
octane-enhancing additive called
methylcyclopentadienyl manganese
tricarbonyl (MMT); ask the attendant
where you buy gasoline whether the fuel contains MMT. We recommend
against the use of such gasolines.
Fuels containing MMT can reduce
spark plug life and affect emission
control system performance. The
malfunction indicator lamp might
turn on. If this occurs, return to your
dealer for service.
Filling the Tank
{WARNING
Fuel vapor burns violently and a
fuel fire can cause bad injuries.
To help avoid injuries to you and
others, read and follow all the
instructions on the fuel pump
island. Turn off the engine when
refueling. Do not smoke near fuel
or when refueling the vehicle.
Do not use cellular phones.
Keep sparks, flames, and
smoking materials away from fuel.
Do not leave the fuel pump
unattended when refueling the
(Continued)
WARNING (Continued)
vehicle. This is against the law in
some places. Do not re-enter the
vehicle while pumping fuel. Keep
children away from the fuel pump;
never let children pump fuel.
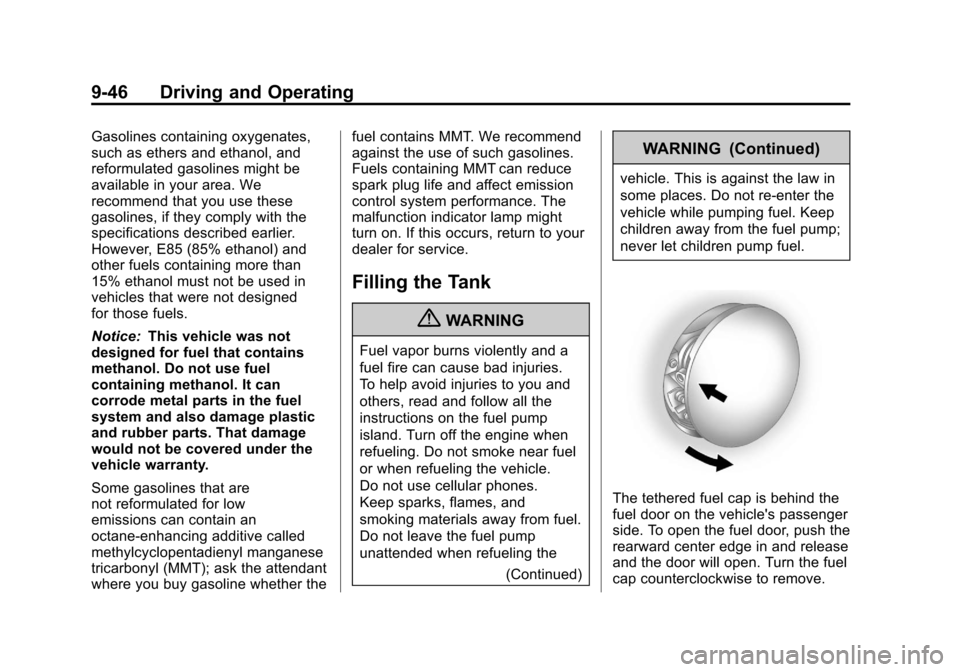
The tethered fuel cap is behind the
fuel door on the vehicle's passenger
side. To open the fuel door, push the
rearward center edge in and release
and the door will open. Turn the fuel
cap counterclockwise to remove.
Page 390 of 400

Black plate (2,1)Chevrolet Cruze Owner Manual - 2012
i-2 INDEX
Braking . . . . . . . . . . . . . . . . . . . . . . . . . 9-4
Break-In, New Vehicle . . . . . . . . . 9-15
Bulb Replacement . . . . . . . . . . . . 10-34Headlamp Aiming . . . . . . . . . . . 10-29
Headlamps . . . . . . . . . . . . . . . . . 10-29
Headlamps, Front TurnSignal, and Parking
Lamps . . . . . . . . . . . . . . . . . . . . 10-29
License Plate Lamps . . . . . . . 10-34
Taillamps, Turn Signal, Sidemarker, Stoplamps,
and Backup Lamps . . . . . . . . 10-31
Buying New Tires . . . . . . . . . . . . . 10-57
C
Calibration . . . . . . . . . . . . . . . . . . . . . . 5-4
California Fuel Requirements . . . . . . . . . . . 9-45
Perchlorate Materials
Requirements . . . . . . . . . . . . . . . 10-3
Warning . . . . . . . . . . . . . . . . . . . . . . 10-3
Canadian Vehicle Owners . . . . . . . . iii
Capacities and Specifications . . . . . . . . . . . . . . . . 12-2 Carbon Monoxide
Engine Exhaust . . . . . . . . . . . . . . . 9-27
Trunk . . . . . . . . . . . . . . . . . . . . . . . . . 2-12
Winter Driving . . . . . . . . . . . . . . . . . 9-8
Cargo Tie-Downs . . . . . . . . . . . . . . . . . . . . . 4-2
Cautions, Danger, and
Warnings . . . . . . . . . . . . . . . . . . . . . . . . iv
CD Player . . . . . . . . . . . . . . . . . . . . . 7-18
Center Console Storage . . . . . . . . 4-2
Chains, Tire . . . . . . . . . . . . . . . . . . 10-62
Charging System Light . . . . . . . . 5-13
Check Engine Light . . . . . . . . . . . . . . . . . . 5-13
IgnitionTransmission Lock . . . . . . . . 10-27
Child Restraints Infants and YoungChildren . . . . . . . . . . . . . . . . . . . . . 3-35
Lower Anchors and Tethers for Children . . . . . . . . . 3-41
Older Children . . . . . . . . . . . . . . . . 3-33
Securing . . . . . . . . . . . . . . . . 3-48, 3-50
Systems . . . . . . . . . . . . . . . . . . . . . . 3-37
Cigarette Lighter . . . . . . . . . . . . . . . . 5-6
Circuit Breakers . . . . . . . . . . . . . . 10-35 Cleaning
Exterior Care . . . . . . . . . . . . . . . 10-86
Interior Care . . . . . . . . . . . . . . . . 10-90
Climate Control Systems . . . . . . . 8-1 Air Conditioning . . . . . . . . . . . . . . . 8-1
Automatic . . . . . . . . . . . . . . . . . . . . . . 8-3
Heating . . . . . . . . . . . . . . . . . . . . . . . . 8-1
Clock . . . . . . . . . . . . . . . . . . . . . . . . . . . 5-5
Cluster, Instrument . . . . . . . . . . . . . 5-8
Clutch, Hydraulic . . . . . . . . . . . . . 10-14
Collision Damage Repair . . . . . . 13-9
Compact Spare Tire . . . . . . . . . . 10-80
Compass . . . . . . . . . . . . . . . . . . . . . . . 5-4 Messages . . . . . . . . . . . . . . . . . . . . 5-29
Compressor Kit, Tire Sealant . . . . . . . . . . . . . . . . . . . . . . 10-65
Control of a Vehicle . . . . . . . . . . . . . 9-4
Convex Mirrors . . . . . . . . . . . . . . . . 2-15
Coolant Engine . . . . . . . . . . . . . . . . . . . . . . 10-16
Engine TemperatureGauge . . . . . . . . . . . . . . . . . . . . . . 5-10
Cooling System . . . . . . . . . . . . . . . 10-16 Engine Messages . . . . . . . . . . . . 5-30
Courtesy Lamps . . . . . . . . . . . . . . . . 6-5
Page 393 of 400

Black plate (5,1)Chevrolet Cruze Owner Manual - 2012
INDEX i-5
G
GasolineSpecifications . . . . . . . . . . . . . . . . . 9-44
Gauges Engine CoolantTemperature . . . . . . . . . . . . . . . . 5-10
Fuel . . . . . . . . . . . . . . . . . . . . . . . . . . . 5-9
Odometer . . . . . . . . . . . . . . . . . . . . . . 5-9
Speedometer . . . . . . . . . . . . . . . . . . 5-9
Tachometer . . . . . . . . . . . . . . . . . . . . 5-9
Trip Odometer . . . . . . . . . . . . . . . . . 5-9
Warning Lights and
Indicators . . . . . . . . . . . . . . . . . . . . 5-7
General Information Service and Maintenance . . . . . 11-1
Towing . . . . . . . . . . . . . . . . . . . . . . . . 9-48
Vehicle Care . . . . . . . . . . . . . . . . . . 10-2
Glove Box . . . . . . . . . . . . . . . . . . . . . . 4-1
GM Mobility Reimbursement Program . . . . . . . . . . . . . . . . . . . . . . 13-5
H
Hazard Warning Flashers . . . . . . . 6-3
Head Restraints . . . . . . . . . . . . . . . . 3-2
Headlamps
Aiming . . . . . . . . . . . . . . . . . . . . . . 10-29
Automatic . . . . . . . . . . . . . . . . . . . . . . 6-3
Bulb Replacement . . . . . . . . . . 10-29
Daytime RunningLamps (DRL) . . . . . . . . . . . . . . . . . 6-2
Daytime Running Lamps (DRL) Indicator Light . . . . . . . . 5-22
Flash-to-Pass . . . . . . . . . . . . . . . . . . 6-2
High-Beam On Light . . . . . . . . . . 5-21
High/Low Beam Changer . . . . . . 6-2
Lamps On Reminder . . . . . . . . . 5-22
Heated Front Seats . . . . . . . . . . . . . 3-7
Heated Mirrors . . . . . . . . . . . . . . . . . 2-16
Heater
Engine . . . . . . . . . . . . . . . . . . . . . . . . 9-22
Heating and Air
Conditioning . . . . . . . . . . . . . . . 8-1, 8-3
High-Beam On Light . . . . . . . . . . . 5-21
Highway Hypnosis . . . . . . . . . . . . . . 9-7
Hill and Mountain Roads . . . . . . . . 9-7 Hood . . . . . . . . . . . . . . . . . . . . . . . . . . 10-4
Horn . . . . . . . . . . . . . . . . . . . . . . . . . . . . 5-3
How to Wear Safety Belts
Properly . . . . . . . . . . . . . . . . . . . . . . 3-11
Hydraulic Clutch . . . . . . . . . . . . . . 10-14
I
Ignition Positions . . . . . . . . 9-15, 9-18
Ignition Transmission Lock Check . . . . . . . . . . . . . . . . . . . . . . . 10-27
Immobilizer . . . . . . . . . . . . . . . . . . . . 2-14
Infants and Young Children, Restraints . . . . . . . . . . . . . . . . . . . . 3-35
Infotainment . . . . . . . . . . . . . . . . . . . . 7-2
Instrument Cluster . . . . . . . . . . . . . . 5-8
Instrument Panel Storage Area . . . . . . . . . . . . . . . . . . 4-1
Instrument Panel Overview . . . . . 1-2
Introduction . . . . . . . . . . . . . . . . . . . . . . . iii
J
Jump Starting . . . . . . . . . . . . . . . . . 10-80