2012 CHEVROLET CORVETTE display
[x] Cancel search: displayPage 200 of 434
Black plate (14,1)Chevrolet Corvette Owner Manual - 2012
7-14 Infotainment System
R(Song List):The Song List
feature can save 20 track selections.
To save tracks:
1. If S-LIST is displayed, press
R
to turn it off.
2. Select the desired CD by pressing the numbered
pushbutton and then use
u
orO/eknob to select the
track to be saved.
3. Press and hold
Runtil a beep
sounds and ADDED SONG
displays.
4. Repeat Steps 2 and 3 to save other selections.
SONGLIST FULL displays if more
than 20 selections are stored.
To play tracks:
1. Press
R. One beep sounds and
S-LIST displays. The recorded
tracks begin to play in the order
they were saved. 2. Press
toruto go back or
forward within the saved tracks.
To delete tracks:
1. Press
Rto turn song list on.
S-LIST displays.
2. Press
toru, and use
the
O/eknob to select the
desired track to be deleted.
3. Press and hold
Runtil SONG
REMOVED displays.
After a track has been deleted, the
remaining tracks are moved up the
list. When another track is added to
the song list, the track is added to
the end of the list.
To delete the entire song list:
1. Press
Rto turn song list on.
S-LIST displays.
2. Press and hold
Rfor more than
four seconds. One beep sounds
and SONGLIST EMPTY displays
to confirm that the song list has
been deleted. If a CD is ejected, and the song list
contains saved tracks from that CD,
those tracks are automatically
deleted from the song list. Any
tracks saved to the song list again
are added to the bottom of the list.
To end song list mode, press
R.
One beep sounds and S-LIST is
removed from the display.
MP3 Format
Radios with the MP3 feature can
only play CD-R discs. Do not mix
standard audio and MP3 files on
the same disc.
Supported File Structure
Radios with the MP3 feature support
up to:
.50 folders
.11 folders in depth
.50 playlists
.255 files
.10 sessions
Page 201 of 434
Black plate (15,1)Chevrolet Corvette Owner Manual - 2012
Infotainment System 7-15
Root Directory:
The root directory is treated as a
folder. Files are stored in the root
directory when the disc or storage
device does not contain folders.
Files accessed from the root
directory display as F1 ROOT.
Empty Folder:
Folders that do not contain files are
skipped, and the player advances to
the next folder that contains files.
Supported Bit Rates
The following bit rates are
supported: 32 kbps, 40 kbps,
56 kbps, 64 kbps, 80 kbps, 96 kbps,
112 kbps, 128 kbps, 160 kbps,
192 kbps, 224 kbps, 256 kbps, and
320 kbps or a variable bit rate.File Naming
ID3v1 and ID3v2 tags are
supported. The track name
contained in the ID3 tag is shown
on the display. The display only
shows up to 32 characters for
track and file names.
If the track name is not contained in
the ID3 tag, the display shows the
file name without the file extension.
Playlists
Playlists that do not have a .m3u or
.wpl extension may not work.
Preprogrammed playlists created
by WinAmp™, MusicMatch™,
or Real Jukebox™
software are
supported and cannot be edited
using the radio.Playing an MP3
Insert a CD partway into the slot,
label side up. The player pulls it in,
and READING displays. The CD
should begin playing and the CD
symbol displays.
If the ignition or radio is turned off
with a CD-R in the player, it stays in
the player. When the ignition or
radio is turned on, the CD-R starts
to play where it stopped, if it was
the last selected audio source.
As each new track starts to play, the
track number displays.
Page 202 of 434
Black plate (16,1)Chevrolet Corvette Owner Manual - 2012
7-16 Infotainment System
Order of Play
Tracks are played sequentially in
the following order:
1. Playlists.
2. Files contained in the rootdirectory.
3. Files contained in folders.
O/e(Tune): Turn to go to the
next or previous track.
{(Previous Folder): Press to go
to the first track in the previous
folder. Press and hold to reverse
through the current track.
|(Next Folder): Press to go to
the first track in the next folder.
Press and hold to fast forward the
current track. RDM (Random):
Press to hear
the tracks in random, rather than
sequential order.
Press and release RDM until:
.RANDOM DISC PLAY displays
to play the tracks on the CD in
random order.
.RANDOM FOLDER displays to
play the tracks in the folder in
random order.
.RANDOM OFF displays to turn
off random play. RPT (Repeat):
Press to hear a
track, CD, or folder over again.
Press and release RPT until:
.REPEAT displays to repeat a
track.
.REPEAT ONE DISC displays to
repeat a CD.
.REPEAT FOLDER displays to
repeat a folder.
.REPEAT OFF displays to turn off
repeated play.
tSEEKu: Presstto go to the
start of the current track, if more
than eight seconds have played.
Press
¨to go to the next track.
Press
tor¨more than once to
continue moving backward or
forward through the CD.
Page 203 of 434
Black plate (17,1)Chevrolet Corvette Owner Manual - 2012
Infotainment System 7-17
V(Information):Press to display
the artist name and album contained
in the ID3 tag.
BAND: Press to listen to the radio
when a CD is playing. The inactive
CD remains inside the radio for
future listening.
CD AUX (Auxiliary): Press to play
a CD when listening to the radio.
The CD symbol displays when a
CD is loaded.Auxiliary Devices
Using the Auxiliary Input Jack
The radio system has an auxiliary
input jack located on the right side
of the faceplate. This is not an audio
output; do not plug the headphone
set into the front auxiliary input jack.
An external audio device can be
connected to the auxiliary input jack
for use as another source for audio
listening.
Drivers are encouraged to set up
any auxiliary device while the
vehicle is in P (Park). See Defensive
Driving on page 9‑3.
Connect a 3.5 mm (1/8 in) cable to
the radio’s front auxiliary input jack
to use a portable audio player. The
radio displays AUX INPUT DEVICE
when a device is connected and
begins playing audio from that
device. Top Knob (Power/Volume):
Turn
to increase or decrease the volume
of the portable player. Additional
volume adjustments can be made
from the portable device.
BAND: Press to listen to the radio
while a portable audio device is
playing. The portable audio device
continues playing.
CD/AUX (CD/Auxiliary): Press to
play a CD while a portable audio
device is playing. Press again and
the system begins playing audio
from the connected portable audio
player. If a portable audio player is
connected, AUX INPUT DEVICE
displays. If a portable audio player
is not connected, AUX INPUT
DEVICE does not display.
Page 213 of 434
Black plate (1,1)Chevrolet Corvette Owner Manual - 2012
Climate Controls 8-1
Climate Controls
Climate Control Systems
Dual Automatic Climate ControlSystem . . . . . . . . . . . . . . . . . . . . . . 8-1
Air Vents
Air Vents . . . . . . . . . . . . . . . . . . . . . . 8-6
Maintenance
Passenger Compartment AirFilter . . . . . . . . . . . . . . . . . . . . . . . . . 8-6
Climate Control Systems
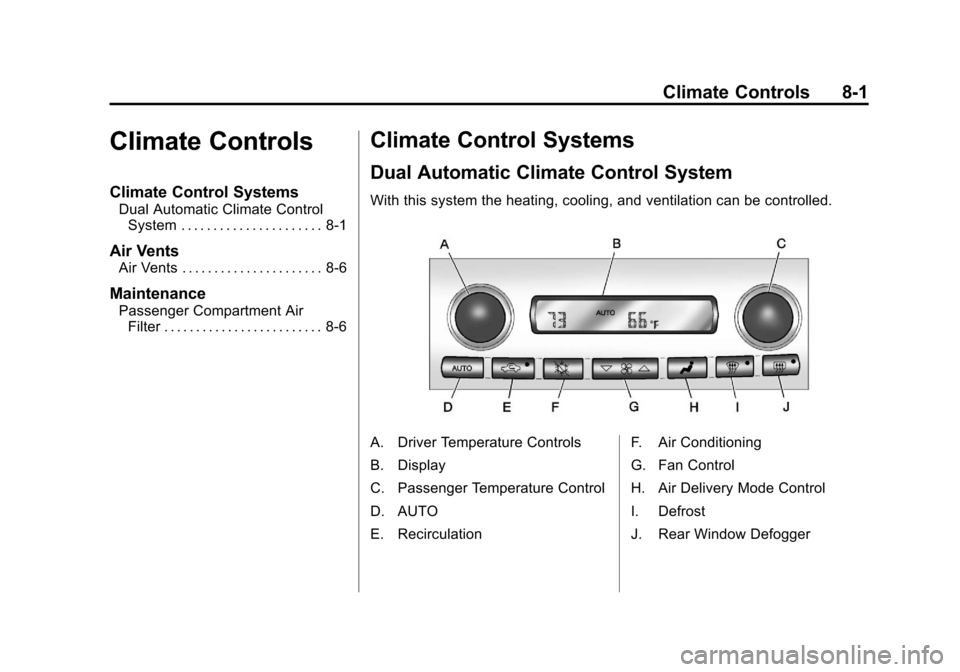
Dual Automatic Climate Control System
With this system the heating, cooling, and ventilation can be controlled.
A. Driver Temperature Controls
B. Display
C. Passenger Temperature Control
D. AUTO
E. Recirculation F. Air Conditioning
G. Fan Control
H. Air Delivery Mode Control
I. Defrost
J. Rear Window Defogger
Page 214 of 434

Black plate (2,1)Chevrolet Corvette Owner Manual - 2012
8-2 Climate Controls
When the vehicle is first started,
the display shows the driver's
temperature setting, the outside
temperature, the fan speed, and the
air delivery, for about 10 seconds.
The outside temperature is shown in
the center of the display. The digital
display will show the readings in
Fahrenheit or Celsius. See
“Personal Options”underVehicle
Personalization on page 5‑55 for
information on changing your
display.
Automatic Operation
AUTO (Automatic): Press the
AUTO button to place the entire
system in the automatic mode.
When automatic operation is active,
the system automatically controls
the inside temperature, the air
delivery mode, and the fan speed.
After a 10 second display of the
current settings, the word AUTO,
the driver's temperature setting and
the outside temperature will be
shown. The system operates to
reach the set temperature as quickly as possible. The AUTO control
system works best with the windows
up and the removable roof installed
or the convertible top up.
1. Press the AUTO button.
2. Adjust the temperature to a
comfortable setting between
16°C (60°F) and 32°C (90°F).
Choosing the coldest or warmest
temperature setting will not
cause the system to heat or cool
any faster. A setting of 23°C
(73°F) is suggested.
In cold weather, the system will
start at reduced fan speeds to
avoid blowing cold air into your
vehicle until warmer air is
available. The system starts out
blowing air at the floor but may
change modes automatically as
the vehicle warms up to maintain
the chosen temperature setting.
The length of time needed for
warm up depends on the outside
temperature and the length of
time that has elapsed since the
vehicle was last driven. 3. Wait for the system to regulate.
This may take from 10 to
30 minutes. Then adjust the
temperature, if necessary.
Do not cover the solar sensor
located in the center of the
instrument panel, near the
windshield. For more information on
the solar sensor, see “Sensors”later
in this section.
Manual Operation
Driver Power/Temperature: Press
the driver temperature knob to turn
the climate control system off. This
is the only setting that completely
shuts off the fan. The digital display
shows only the outside temperature.
The driver and the passenger set
temperature and the air intake mode
can still be adjusted when the
climate control is off.
Passenger Power/Temperature:
Press the passenger temperature
knob to turn the passenger's climate
control system on or off. Turn the
knob to increase or decrease the
temperature for the passenger.
Page 215 of 434

Black plate (3,1)Chevrolet Corvette Owner Manual - 2012
Climate Controls 8-3
If the passenger's climate control
system is off, the driver's
temperature knob will control the
temperature for the entire vehicle.
x 9 w(Fan):Press to increase
or decrease the fan speed. The fan
speed setting will appear in the
display.
Pressing the arrows will delete
AUTO from the digital display. The
fan graphics with the fan speed bars
will be shown. The AUTO button
must be pressed to return to the
automatic fan control.
If the airflow seems low when the
fan speed is at the highest setting,
the passenger compartment air filter
may need to be replaced. For more
information, see Passenger
Compartment Air Filter on page 8‑6.
N(Air Delivery Mode Control):
Press this button to manually lock in
the current air delivery setting and
to stop the automatic mode control.
Pressing
Ndeletes AUTO from
the digital display and the mode
graphics will be shown. To change the setting, press
N
again. The AUTO button must be
pressed to return to the automatic
mode selection.
To change the current mode, select
one of the following:
H(Vent):
Air is directed to the
instrument panel outlets, with some
air directed to the floor outlets.
%(Bi-Level): Air is divided
between the instrument panel and
floor outlets.
6(Floor): Air is directed to the
floor outlets, with some air directed
to the windshield and side window
defogger outlets.
-(Floor/Defog): This mode clears
the windows of fog or moisture. Air
is directed to the windshield and the
floor outlets, with a small amount to
the side window outlets. In this
mode, the system automatically
turns off the recirculation and runs
the air conditioning compressor
unless the outside temperature is at or below freezing. The recirculation
mode cannot be selected while in
the defog mode.
1(Defrost):
This mode clears the
windows of fog or frost more quickly.
Air is directed to the windshield, with
a small amount directed to the side
window outlets. The indicator light
comes on and the digital display will
show the defrost mode symbol and
fan speed when the front defrost
mode is being used. In this mode,
the system automatically turns off
the recirculation and runs the air
conditioning compressor, unless the
outside temperature is at or below
freezing. Recirculation cannot be
selected while in the defrost mode.
Pressing
1again will return the
system to the last operating mode.
For severe ice conditions, turn the
driver's temperature knob to 32°C
(90°F) while in defrost mode.
Do not drive the vehicle until all the
windows are clear.
Page 217 of 434

Black plate (5,1)Chevrolet Corvette Owner Manual - 2012
Climate Controls 8-5
Do not cover the solar sensor
located on the top of the instrument
panel near the windshield or the
system will not work properly.
There is also a sensor located
behind the front bumper. This
sensor reads the outside air
temperature and helps to maintain
the temperature inside the vehicle.
Any cover on the front of the vehicle
could give a false reading in the
temperature.
If the outside temperature goes up,
the displayed temperature will not
change until:
.The vehicle's speed is above
19 km/h (12 mph) for
five minutes.
.The vehicle's speed is above
52 km/h (32 mph) for two and
one‐half minutes.
These delays prevent false
readings. If the temperature goes
down, the outside temperature will
be shown when you start the
vehicle. If it has been turned off for less than three hours, the
temperature will be recalled from the
previous vehicle operation.
There is also an inside temperature
sensor located to the left of the
ignition switch. The automatic
climate control system uses this
sensor to receive information, so if
you block or cover it, the system will
not function properly.
Rear Window Defogger
The rear window defogger uses a
warming grid to remove fog or frost
from the rear window.
The rear window defogger only
works when the engine is running.
=(Rear Window Defogger):
Press to turn the rear window
defogger on or off. Be sure to clear
as much snow from the rear window
as possible. An indicator light
comes on to show that the rear
window defogger is on.
The rear window defogger turns off
about 10 minutes after the button is
pressed when traveling less than 48 km/h (30 mph). If turned on
again, the defogger only runs for
about five minutes before turning
off. The defogger can also be turned
off by turning off the engine.
The vehicle has heated outside
rearview mirrors. The mirrors will
heat to help clear fog or frost from
the surface of the mirrors when the
rear window defogger button is
pressed.
For vehicles with a power
convertible top, the rear window
defogger and heated mirrors are
automatically disabled when the
power convertible top is moving
or down.
Notice:
Do not use anything
sharp on the inside of the rear
window. If you do, you could cut
or damage the warming grid, and
the repairs would not be covered
by the vehicle warranty. Do not
attach a temporary vehicle
license, tape, a decal, or anything
similar to the defogger grid.