2012 CHEVROLET AVALANCHE buttons
[x] Cancel search: buttonsPage 187 of 508

Black plate (57,1)Chevrolet Avalanche Owner Manual - 2012
Instruments and Controls 5-57
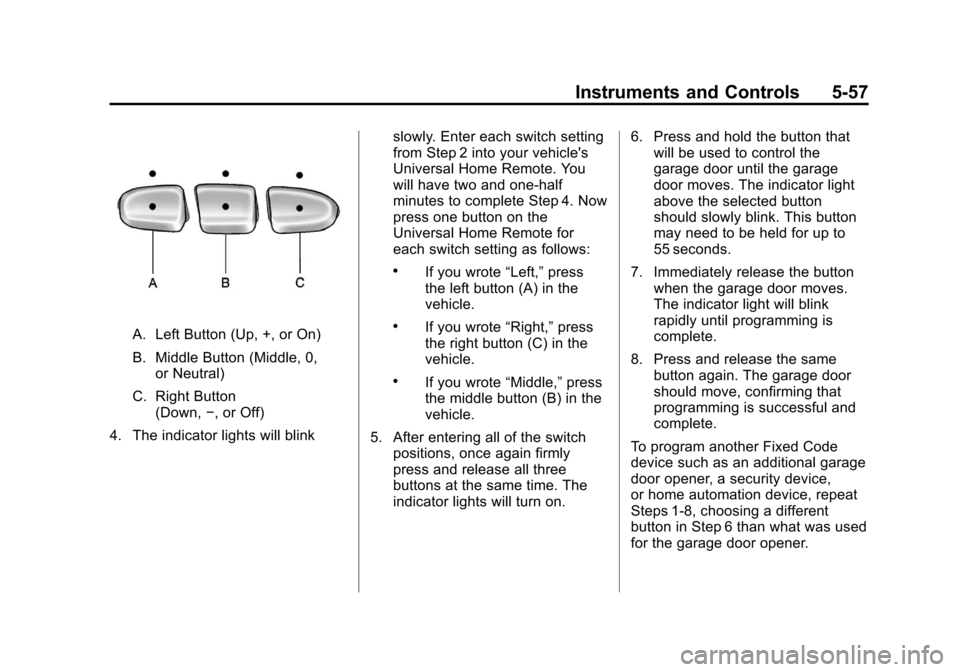
A. Left Button (Up, +, or On)
B. Middle Button (Middle, 0,or Neutral)
C. Right Button (Down, −, or Off)
4. The indicator lights will blink slowly. Enter each switch setting
from Step 2 into your vehicle's
Universal Home Remote. You
will have two and one-half
minutes to complete Step 4. Now
press one button on the
Universal Home Remote for
each switch setting as follows:
.If you wrote
“Left,”press
the left button (A) in the
vehicle.
.If you wrote “Right,”press
the right button (C) in the
vehicle.
.If you wrote “Middle,”press
the middle button (B) in the
vehicle.
5. After entering all of the switch positions, once again firmly
press and release all three
buttons at the same time. The
indicator lights will turn on. 6. Press and hold the button that
will be used to control the
garage door until the garage
door moves. The indicator light
above the selected button
should slowly blink. This button
may need to be held for up to
55 seconds.
7. Immediately release the button when the garage door moves.
The indicator light will blink
rapidly until programming is
complete.
8. Press and release the same button again. The garage door
should move, confirming that
programming is successful and
complete.
To program another Fixed Code
device such as an additional garage
door opener, a security device,
or home automation device, repeat
Steps 1-8, choosing a different
button in Step 6 than what was used
for the garage door opener.
Page 188 of 508

Black plate (58,1)Chevrolet Avalanche Owner Manual - 2012
5-58 Instruments and Controls
Universal Remote System
Operation
Press and hold the appropriate
button for at least half of a second.
The indicator light will come on
while the signal is being transmitted.
Reprogramming Universal
Home Remote Buttons
Any of the three buttons can be
reprogrammed by repeating the
instructions.
Erasing Universal Home
Remote Buttons
The programmed buttons should be
erased when the vehicle is sold or
the lease ends.
To erase either Rolling Code or
Fixed Code settings on the
Universal Home Remote device:
1. Press and hold the two outsidebuttons at the same time for
approximately 20 seconds, until
the indicator lights, located
directly above the buttons, begin
to blink rapidly. 2. Once the indicator lights begin to
blink, release both buttons. The
codes from all buttons will be
erased.
For help or information on the
Universal Home Remote System,
call the customer assistance phone
number under Customer Assistance
Offices (U.S. and Canada) on
page 13‑4 orCustomer Assistance
Offices (Mexico) on page 13‑5.
Page 191 of 508

Black plate (3,1)Chevrolet Avalanche Owner Manual - 2012
Lighting 6-3
Exterior Lamps Off
Reminder
If a door is open, a reminder chime
sounds when the headlamps or
parking lamps are manually turned
on and the key is out of the ignition.
To turn off the chime, turn the
headlamp switch to off or AUTO and
then back on, or close and re-open
the door. In the AUTO mode, the
headlamps turn off once the ignition
is in LOCK/OFF or remains on until
the headlamp delay ends (if enabled
in the DIC). See“Exit Lighting”
under Vehicle Personalization (With
DIC Buttons) on page 5‑45.
Headlamp High/
Low-Beam Changer
5 3
(Headlamp High/Low
Beam Changer): To change the
headlamps from low to high beam,
push the lever toward the instrument
panel. To return to low-beam
headlamps, pull the multifunction
lever toward you. Then release it.
When the high beams are on, this
indicator light on the instrument
panel cluster will also be on.
Flash-to-Pass
Use your high-beam headlamps to
signal to a driver in front that you
want to pass. It works even if the
headlamps are in the automatic
position.
To use it, pull the turn signal lever
toward you, then release it.
If the headlamps are in the
automatic position or on low beam,
the high-beam headlamps turn on.
They stay on as long as the lever is
held. The high-beam indicator on
the instrument panel cluster comes
on. Release the lever to return to
normal operation.
Daytime Running
Lamps (DRL)
Daytime Running Lamps (DRL) can
make it easier for others to see the
front of your vehicle during the day.
Fully functional daytime running
lamps are required on all vehicles
first sold in Canada.
The DRL system comes on when
the following conditions are met:
.The ignition is on.
.The exterior lamps control is
in AUTO.
.The transmission is not in Park.
.The light sensor determines it is
daytime.
When the DRL system is on,
only the DRL lamps are on. The
taillamps, sidemarker, instrument
panel lights, and other lamps will not
be on.
When it begins to get dark, the
automatic headlamp system
switches from DRL to the
headlamps.
Page 206 of 508

Black plate (10,1)Chevrolet Avalanche Owner Manual - 2012
7-10 Infotainment System
Finding a Channel
BAND:Press to switch between
AM, FM, or XM™, if equipped.
f(Tune): Turn to manually select
an XM channel.
©SEEK: Press to go to the
previous XM channel.
¨SEEK: Press to go to the next
XM channel.
sREV: Press to go to the
previous XM category.
\FWD: Press to go to the next
XM category.
FAV (Favorites): Press to select
different favorites pages for stored
radio stations.
CAT (Category): The CAT button is
used to find XM channels when the
radio is in the XM mode.
Finding a Category (CAT)
Station
To find XM channels in a category:
1. Press the CAT button to display the category tabs. Continue
pressing the CAT button until the
desired category name displays.
.Radios with CD and DVD
can also navigate the
category list by pressing the
\FWD or thesREV
buttons.
2. Press either of the two softkeys below the desired category tab
to immediately tune to the first
XM station in that category. To go to the previous or next XM
station in the selected category,
do one of the following:
.Turn thefknob.
.Press the softkey below the
right or left arrows in the
category tab.
.Press©SEEK or¨SEEK.
3. To exit the category search mode, press the FAV button or
BAND button to display the
favorites again.
Adding and Removing Categories
Categories cannot be added or
removed while the vehicle is moving
faster than 8 km/h (5 mph).
To add or remove a category:
1. Press the MENU button.
2. Press the softkey located below the XM CAT tab.
3. Turn the
fknob to display the
category to add or remove.
Page 211 of 508

Black plate (15,1)Chevrolet Avalanche Owner Manual - 2012
Infotainment System 7-15
Playing a CD
If the ignition or radio is turned off,
with a CD in the player, it stays in
the player. When the ignition or
radio is turned on, the CD starts
playing where it stopped, if it was
the last selected audio source. The
CD is controlled by the buttons on
the radio faceplate or by the RSA
unit. SeeRear Seat Audio (RSA)
System on page 7‑45 for more
information.
When a CD is inserted, the CD
symbol displays on the left side of
the radio display. As each new track
starts to play, the track number
displays.
The CD player can play the smaller
8 cm (3 inch) single CDs with an
adapter ring. Full-size CDs and the
smaller CDs are loaded in the same
manner. CD/AUX (CD/Auxiliary):
Press to
cycle through CD or Auxiliary when
listening to the radio. The CD icon
and a message showing the disc
and/or track number displays when
a CD is in the player. Press again
and the system automatically
searches for an auxiliary input
device, see, Auxiliary Devices on
page 7‑30 for more information. If a
portable audio player is not
connected, “No Input Device Found”
displays.
4(Information): Press to display
additional text information related to
the current song. If information is
available, the song title information
displays on the top line of the
display and artist information
displays on the bottom line. When
information is not available, “NO
INFO” displays.
f(Tune): Turn to select tracks on
the CD that is currently playing.
©SEEK: Press to go to the start of
the current track, if more than ten
seconds on the CD have played.
Press to go to the previous track if
less than ten seconds on the CD
have played.
Press and hold, or press multiple
times to continue moving backward
through the tracks on the CD.
¨SEEK: Press to go to the next
track.
Press and hold, or press multiple
times to continue moving forward
through the tracks on the CD.
sREV (Fast Reverse): Press
and hold to reverse playback quickly
within a track.
\FWD (Fast Forward): Press
and hold to advance playback
quickly within a track.
Page 217 of 508

Black plate (21,1)Chevrolet Avalanche Owner Manual - 2012
Infotainment System 7-21
Ejecting a Disc
ZCD (Eject):Press and release
to eject the disc that is currently
playing. The CD ejects from the
bottom slot. A beep sounds and
Ejecting Disc displays. Once the
disc is ejected, Remove Disc
displays. The disc can be removed.
If the disc is not removed, after
several seconds the disc
automatically pulls back into the
player.
ZDVD (Eject): Press and
release to eject the disc that is
currently playing in the top slot.
A beep sounds and Ejecting Disc
displays.
If loading and reading of a disc
cannot be completed, due to
unknown format, etc., and the disc
fails to eject, press and hold for
more than five seconds to force the
disc to eject.
Playing a CD (in Either the
DVD or CD Slot)
If the ignition or radio is turned off
with a CD in the player, it stays in
the player. When the ignition or
radio is turned on, the CD starts
playing where it stopped, if it was
the last selected audio source. The
CD is controlled by the buttons on
the radio faceplate or by the RSA
unit. See Rear Seat Audio (RSA)
System on page 7‑45 for more
information. The DVD/CD decks
(the upper slot is the DVD deck and
the lower slot is the CD deck) of the
radio are compatible with most
audio CDs, CD-Rs, CD-RWs,
and MP3s.
When a CD is inserted, the text tab
DVD or CD symbol displays on the
left side of the radio display. As
each new track starts to play, the
track number displays. The CD player can play the smaller
8 cm (3 in) single CDs with an
adapter ring. Full-size CDs and the
smaller CDs are loaded in the same
manner.
DVD/CD AUX (Auxiliary):
Press to
cycle through DVD, CD, or Auxiliary
when listening to the radio. The
DVD/CD text tab and a message
showing the track or chapter
number will display when a disc is in
either slot. Press the DVD/CD AUX
button again and the system
automatically searches for an
auxiliary input device; see Auxiliary
Devices on page 7‑30 for more
information. If a portable audio
player is not connected, “No Aux
Input Device” displays. If a disc is in
both the DVD slot and the CD slot,
the DVD/CD AUX button cycles
between the two sources and does
not indicate “No Aux Input Device.”
Page 219 of 508

Black plate (23,1)Chevrolet Avalanche Owner Manual - 2012
Infotainment System 7-23
The CD player reads both
uncompressed audio and MP3/
WMA files on a mixed mode disc.
Uncompressd audio is played
before MP3/WMA files. Press the
CAT (category) button to toggle
between uncompressed audio and
MP3/WMA files.
CD‐R or CD‐RW Supported File
and Folder Structure
The DVD player supports:
.Up to 255 folders.
.Up to eight folders in depth.
.Up to 15 playlists.
.Up to 40 sessions.
.Playlists with an .m3u or .wpl
extension.
.Files with an .mp3, .wma, or .cda
file extension.The CD player supports:
.Up to 512 files and folders.
.Up to 8 folders in depth.
.Playlists with an .m3u or .wpl
extension.
.Files with an .mp3, .wma, or .cda
file extension.
Root Directory
The root directory of the disc is
treated as a folder. If the root
directory has compressed audio
files, the directory displays as F1
ROOT on the radio.
If a disc contains both
uncompressed CD audio and MP3/
WMA files, a folder under the root
directory called CD accesses all of
the CD audio tracks on the disc.
Empty Folder
Folders that do not contain files are
skipped, and the player advances to
the next folder that contains files. No Folder
When the disc contains only
compressed files, the files are
located under the root folder. The
next and previous folder function
does not function on a disc that was
recorded without folders or playlists.
When displaying the name of the
folder, the radio displays ROOT.
When the disc contains only
playlists and compressed audio
files, but no folders, all files are
located under the root folder. The
folder down and the folder up
buttons search playlists first and
then go to the root folder. When the
radio displays the name of the
folder, the radio displays ROOT.
Order of Play
Compressed audio files are
accessed in the following order:
.Playlists (Px).
.Files stored in the root directory.
.Files stored in folders in the root
directory.
Page 222 of 508

Black plate (26,1)Chevrolet Avalanche Owner Manual - 2012
7-26 Infotainment System
Using the DVD Player
The DVD player can be controlled
by the buttons on the remote
control, the RSA system, or by the
buttons on the radio faceplate. See
“Remote Control”underRear Seat
Entertainment (RSE) System on
page 7‑35 andRear Seat Audio
(RSA) System on page 7‑45 for
more information.
The DVD player is only compatible
with DVDs of the appropriate region
code printed on the jacket of
most DVDs.
The DVD slot of the radio is
compatible with most audio CDs
and CD-R/RW, DVD-Video,
DVD-Audio, DVD-R/RW, and DVD
+R/RW media, along with MP3 and
WMA formats.
If an error message displays on the
video screen or the radio, see “DVD
Display Error Messages” under
Rear Seat Entertainment (RSE)
System on page 7‑35, and “CD/DVD
Player Messages” later in this
section for more information.
Inserting a Disc
Insert a disc partway into the top
slot, label side up. The player pulls
it in and the disc should begin
playing. “Loading Disc” shows on
the radio display. At the same time,
the radio displays a softkey menu of
option(s). Some discs automatically
play the movie while others default
to the softkey menu display,
which requires the Play, Enter,
or Navigation softkeys to be
pressed, either by softkey or by the
rear seat passenger using the
remote control.
Loading a disc into the system,
depending on media type and
format, ranges from 5 to 20 seconds
for a CD, and up to 30 seconds for
a DVD.
Ejecting a Disc
ZDVD (Eject): Press and
release to eject the disc currently
playing in the top slot. A beep
sounds and Ejecting Disc displays. If loading and reading of a disc
cannot be completed, due to
unknown format, etc., and the disc
fails to eject, press and hold for
more than five seconds to force the
disc to eject.
Playing a DVD
DVD/CD AUX (Auxiliary):
Press to
cycle through DVD, CD, or Auxiliary
when listening to the radio. The
DVD/CD text tab and a message
showing the track or chapter
number will display when a disc is in
either slot. Press the DVD/CD AUX
button again and the system
automatically searches for an
auxiliary input device; see Auxiliary
Devices on page 7‑30 for more
information. If a portable audio
player is not connected, “No Aux
Input Device” displays. If a disc is in
both the DVD slot and the CD slot,
the DVD/CD AUX button cycles
between the two sources and does
not indicate “No Aux Input Device.”