2012 CADILLAC ESCALADE EXT automatic
[x] Cancel search: automaticPage 231 of 494

Black plate (51,1)Cadillac Escalade EXT Owner Manual - 2012
Infotainment System 7-51
To enter a destination by inputting
the city name first:
1. Press DEST.
2. Select
2(Address Entry).
3. Select the state/province screen button, if needed, to change the
current state or province. A list
of all of the available states and
provinces appear. Select the
state or province.
4. Once a state or province has been selected the City name
category is automatically
selected for entry. Enter the City Name or press the
Last 5 Cities screen button.
The Last 5 Cities screen
displays a list of the last five city
names that had been entered.
Select a city from the list and it
appears in the City name area.
If using the alpha keyboard,
finish entering the city name.
If five or fewer names are
available, a list displays. If more
than five are available, the List
screen button displays a
number. This number represents
the number of available cities.
Press this button to view the list
and select a city.
5. Once a city has been selected the Street name category is
automatically selected for entry.
Start entering the street name.
If five or fewer names are
available, a list displays. If more
than five are available, the List
screen button displays a number. This number represents
the number of available streets.
Press this button to view the list.
6. Once a street has been selected, press House to enter
the house number. The system
displays the house number
range that is available for the
street.
7. Press GO. The map screen, with the destination marked displays.
8. Select the route preference for Fastest, Shortest, or Other. The
system calculates and highlights
the route.
9. Press Start Guidance. The route is now ready to be started.
See “Getting Started on Your
Route” in this section for more
information.
To enter a destination by entering
the street name first:
1. Press DEST.
2. Select
2.
Page 232 of 494

Black plate (52,1)Cadillac Escalade EXT Owner Manual - 2012
7-52 Infotainment System
3. Select the state/province screenbutton, if needed, to change the
current state or province. A list
of all of the available states and
provinces appear. Select the
state or province.
4. Select Street and start entering the street name or press the
Last 5 Streets screen button.
If the street name is common,
the city might need to be entered
first.
The Last 5 Streets screen
displays a list of the last five
street names that had been
entered. Select a street from the
list and it appears in the Street
name area.
If using the alpha keyboard,
finish entering the street name.
If five or fewer names are
available, a list displays. If more
than five are available, the
List screen button displays a
number. This number represents the number of available streets.
Press this button to view the list
and select a street.
5. Once a street has been selected, select House to enter
the house number. The system
displays the house number
range that is available for the
street.
6. Once the house number is selected, the city name
automatically populates. If there
is more than one city available
for selection, a list of cities
display. Select the city.
7. Press GO. The map screen, with the destination marked displays.
8. Select the route preference for Fastest, Shortest, or Other. The
system calculates and highlights
the route.
9. Press Start Guidance. The route is now ready to be started.
See “Getting Started on Your
Route” in this section for more
information. To enter a destination by entering a
cross street:
1. Press DEST.
2. Press
2.
3. Select the state/province screen button, if needed, to change the
current state or province. A list
of all of the available states and
provinces appear. Select the
state or province.
4. Select Street and start entering the street name or press the
Last 5 Streets screen button.
If the street name is common,
the city might need to be entered
first.
The Last 5 Streets screen
displays a list of the last five
street names that had been
entered. Select a street from the
list and it appears in the Street
name area.
If using the alpha keyboard,
finish entering the street name.
If five or fewer names are
Page 235 of 494

Black plate (55,1)Cadillac Escalade EXT Owner Manual - 2012
Infotainment System 7-55
gAddress Book:Press to
access the Address Book screen.
From this screen an address that
already exists can be selected as
the destination.
To use the address book entry
method:
1. Press DEST.
2. Press
g.
A list of the address book
addresses display. 3. Press GO, located next to the
destination. The map screen,
with the destination marked
displays.
4. Select the route preference for Fastest, Shortest, or Other. The
system calculates and highlights
the route.
5. Press Start Guidance. The route is now ready to be started.
See “Getting Started on Your
Route” in this section for more
information.
See “Adding Destinations to the
Address Book” in this section.
Previous Destination
The previous destination entry
method lets you select a destination
from a list of previous destination
points.
/Previous Destination: Press to
access the Previous Destination
screen. The system stores up to 20
points that have been previously
entered. As new destinations are
entered, the system automatically
deletes the oldest destinations and
adds the new destinations.
To use the previous destination
entry method:
1. Press DEST.
2. Press
/.
Page 240 of 494
Black plate (60,1)Cadillac Escalade EXT Owner Manual - 2012
7-60 Infotainment System
Important Notes regarding OnStar
Destination Download:
.If the navigation system is
turned off when the destination
download is attempted, the
navigation system will
automatically turn on and display
the OnStar Destination
Download Screen. The radio will
remain on after the download
occurs.
.If OnStar downloads a
destination and the address is
not found in the mapping disc’s
database and routing by
coordinates is not available, the
GO and Map buttons gray out
and routing will not be available.
Press the blue OnStar button for
further assistance.
.The Call button grays out when
there is no phone number
available for your destination
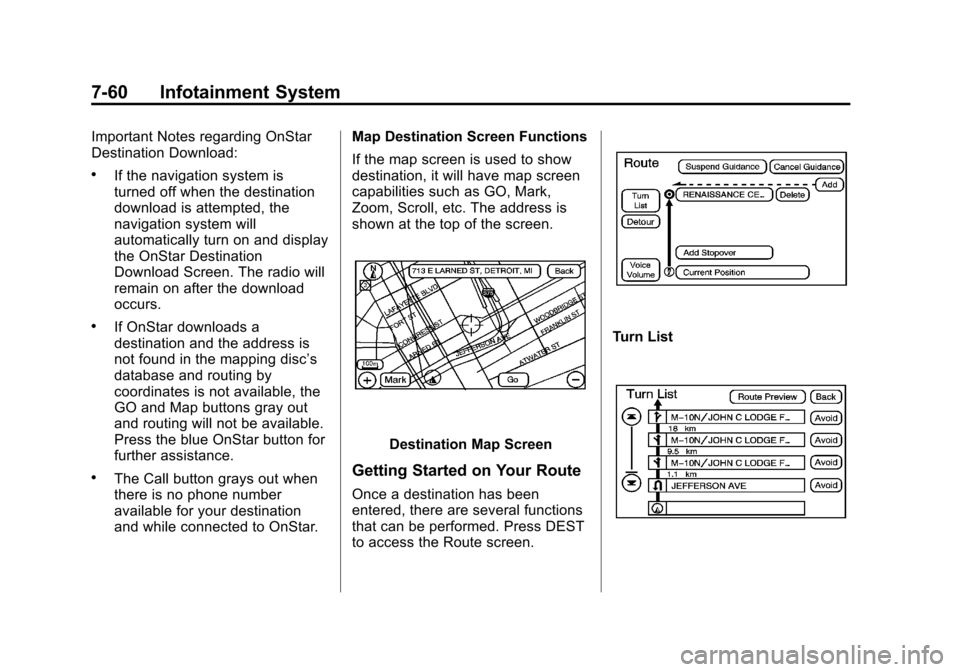
and while connected to OnStar.Map Destination Screen Functions
If the map screen is used to show
destination, it will have map screen
capabilities such as GO, Mark,
Zoom, Scroll, etc. The address is
shown at the top of the screen.
Destination Map Screen
Getting Started on Your Route
Once a destination has been
entered, there are several functions
that can be performed. Press DEST
to access the Route screen.
Turn List
Page 242 of 494

Black plate (62,1)Cadillac Escalade EXT Owner Manual - 2012
7-62 Infotainment System
the current route between the start
point and final destination. Once a
stopover has been added, the
points can be edited or deleted.
To add a stopover:
1. Press DEST.
2. Press the Add Stopover screenbutton. This button only appears
if a route has been calculated.
3. Using the desired method of entering a destination, enter the
stopover. See “Destination”
previously for more information.
4. Select the route preference for Fastest, Shortest, or Other. The
system calculates and highlights
the route.
5. Press Start Guidance. The route is now ready to be started.
6. To add the second and third stopovers, press DEST, then
press the Add screen button,
where the next waypoint should
appear on the route. 7. Select the route preference for
Fastest, Shortest, or Other. The
system calculates and highlights
the route.
8. Press Start Guidance. The route is now ready to be started.
To delete a stopover from the
current route:
1. Press DEST.
2. Press Delete for the desired stopover to delete.
3. The system displays a pop-up confirmation message. Press
Yes to delete the stopover; press
No to cancel this operation.
4. Select the route preference for Fastest, Shortest, or Other. The
system calculates and highlights
the route.
5. Press Start Guidance. The route is now ready to be started.
Suspend Guidance
Press this screen button, from the
Route screen, to put the current
route on hold. Resume Guidance
Press this screen button, from the
Route screen, to resume guidance
on the current route.
Cancel Guidance
Press this screen button, from the
Route screen, to cancel the current
route.
Adding Destinations to the
Address Book
There are two ways to add a
destination to the address book:
.To add the current vehicle
position to the address book,
press the Mark screen button
from the map screen. The
system automatically saves the
current vehicle information in the
address book. When scrolling on
the map the Mark screen button
automatically adds the current
scrolled position information in
the address book.
Page 243 of 494
Black plate (63,1)Cadillac Escalade EXT Owner Manual - 2012
Infotainment System 7-63
.Press the Add to Address Book
screen button when available on
POI information screens,
Destination Entry screens,
or POI screens. The system
automatically saves this
information in the address book.
See “Nav” under Configure Menu on
page 7‑64 for information on editing
address book entries.
Adding or Changing Preset
Destinations
This feature allows additions or
changes one of five preset
destinations. When a destination
has been added as a preset
destination, it is available to select
from the Destination Entry screen.
See “Preset Destination” previously
for information on how to select a
preset destination as a final
destination. To store the current vehicle position
as a preset destination:
1. Press Mark from the map screen
to add the current vehicle
position to the address book.
The Address Book screen
appears.
2. Press Name. An alpha-keyboard displays. Enter the name. Press
OK then press Back to return to
the address book information
screen.
3. Press and hold one of the buttons at the bottom of the
screen until the name appears in
that preset destination screen
button. It is now available to
select from the Destination Entry
screen. To store an address book entry as a
preset destination:
1. Press CONFIG.
2. Press the Nav screen button.
3. Press Edit/View.
4. Select the address book entry to
be stored as the preset
destination. Press Name to add
a name, if needed.
5. Press and hold one of the buttons at the bottom of the
screen until the name appears in
that preset destination screen
button. It is now available to
select from the Destination Entry
screen.
Page 255 of 494

Black plate (75,1)Cadillac Escalade EXT Owner Manual - 2012
Infotainment System 7-75
Display
Press CONFIG to enter the
configure menu options, then press
CONFIG repeatedly until Display is
selected or press the Display screen
button.
Display OFF
Press this screen button to turn the
display off. Press any control button
to view the display.Brightness/Contrast/ModePress this screen button to change
the brightness, contrast, and mode
of the display.
](Brightness):
Press + or−to
increase or decrease the brightness
of the screen.
_(Contrast): Press + or−to
increase or decrease the contrast of
the screen.
Auto (Automatic): Press so the
system can automatically adjust the
screen background depending on
exterior lighting conditions. Night:
Press to make the map
background darker.
Day: Press to make the map
background brighter.
Rear Vision Camera (If Equipped)
Rear Camera Options: Press to
display options available.
The available options are:
Video: Press to turn on or off.
Symbols: Press to turn on or off.
Guiding Lines: Press to turn on
or off.
Page 258 of 494

Black plate (78,1)Cadillac Escalade EXT Owner Manual - 2012
7-78 Infotainment System
.Vehicle is driving in heavy traffic
where driving is at low speeds,
and the vehicle is stopped and
started repeatedly.
See your dealer if other problems
occur.
Problems with Route
Guidance
Inappropriate route guidance may
occur under one or more of the
following conditions:
.You have not turned onto the
road indicated.
.Route guidance may not be
available when using automatic
rerouting for the next right or
left turn.
.The route may not be changed
when using automatic rerouting.
.There is no route guidance when
turning at an intersection.
.Plural names of places may be
announced occasionally.
.It may take a long time to
operate automatic rerouting
during high-speed driving.
.Automatic rerouting may display
a route returning to the set
stopover if you are heading for a
destination without passing
through a set stopover.
.The route prohibits the entry of a
vehicle due to a regulation by
time or season or any other
regulation which may be given.
.Some routes may not be
searched.
.The route to the destination may
not be shown if there are new
roads, if roads have recently
changed, or if certain roads are
not listed on the map DVD. See
Database Coverage
Explanations on page 7‑78
To recalibrate the vehicle's position
on the map, see your dealer.
If the System Needs
Service
If the navigation system needs
service and the steps listed here
have been followed but there are
still problems, see your dealer for
assistance.
Database Coverage
Explanations
Coverage area depends upon the
map detail available. Some areas
have greater map detail than others.
The navigation system works only
as well as the information provided
on the stored map data. See Map
Data Updates on page 7‑76 on how
to obtain updated map information.