2012 CADILLAC ESCALADE EXT automatic
[x] Cancel search: automaticPage 176 of 494
Black plate (6,1)Cadillac Escalade EXT Owner Manual - 2012
6-6 Lighting
To turn off the DRL lamps, turn the
exterior lamps control to the OFF
position and then release. For
vehicles first sold in Canada, the
transmission must be in the P (Park)
position before the DRL lamps can
be turned off.
Automatic Headlamp
System
When it is dark enough outside and
the headlamp switch is in AUTO,
the automatic headlamp system
turns on the headlamps along with
other lamps such as the taillamps,
sidemarker, parking lamps, roof
marker lamps, and the instrument
panel lights. The radio lights will
also be dim.
To turn off the automatic headlamp
system, turn the exterior lamps
switch to the off position and then
release. For vehicles first sold in
Canada, the transmission must bein the P (Park) position, before the
automatic headlamp system can be
turned off.
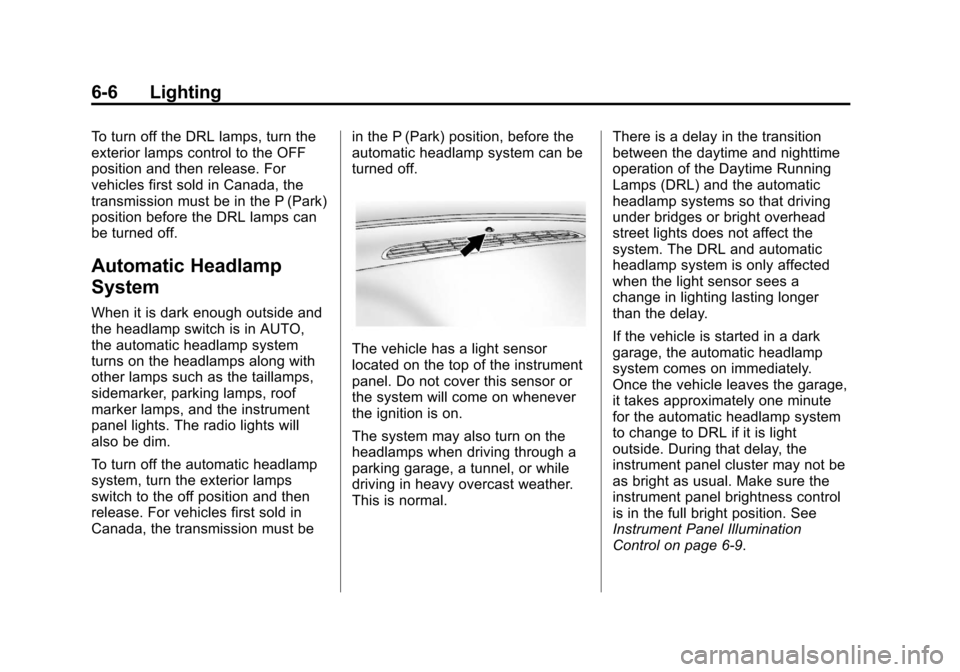
The vehicle has a light sensor
located on the top of the instrument
panel. Do not cover this sensor or
the system will come on whenever
the ignition is on.
The system may also turn on the
headlamps when driving through a
parking garage, a tunnel, or while
driving in heavy overcast weather.
This is normal.
There is a delay in the transition
between the daytime and nighttime
operation of the Daytime Running
Lamps (DRL) and the automatic
headlamp systems so that driving
under bridges or bright overhead
street lights does not affect the
system. The DRL and automatic
headlamp system is only affected
when the light sensor sees a
change in lighting lasting longer
than the delay.
If the vehicle is started in a dark
garage, the automatic headlamp
system comes on immediately.
Once the vehicle leaves the garage,
it takes approximately one minute
for the automatic headlamp system
to change to DRL if it is light
outside. During that delay, the
instrument panel cluster may not be
as bright as usual. Make sure the
instrument panel brightness control
is in the full bright position. See
Instrument Panel Illumination
Control on page 6‑9.
Page 177 of 494

Black plate (7,1)Cadillac Escalade EXT Owner Manual - 2012
Lighting 6-7
Hazard Warning Flashers
|(Hazard Warning Flashers):
Press this button located on top of
the steering column, to make the
front and rear turn signal lamps
flash on and off. This warns others
that you are having trouble. Press
again to turn the flashers off.
When the hazard warning flashers
are on, the vehicle's turn signals will
not work.
Turn and Lane-Change
Signals
An arrow on the instrument panel
cluster flashes in the direction of the
turn or lane change.
Move the turn signal lever all the
way up or down to signal a turn.
Raise or lower the lever until the
arrow starts to flash to signal a lane
change. The turn signals
automatically flash three times.
It will flash six times if the tow-haul
mode is active. Holding the turn
signal lever for more than
one second causes the turn signals
to flash until the lever is released. The lever returns to its starting
position when it is released.
If after signaling a turn or a lane
change the arrows flash rapidly or
do not come on, a signal bulb may
be burned out.
Have the bulbs replaced. If the bulb
is not burned out, check the fuse.
See
Instrument Panel Fuse Block
on page 10‑41 andEngine
Compartment Fuse Block on
page 10‑36.
Turn Signal On Chime
If the turn signal is left on for more
than 1.2 km (0.75 mi), a chime
sounds at each flash of the turn
signal and the message TURN
SIGNAL ON also appears in the
DIC. See Lamp Messages on
page 5‑32. To turn the chime and
message off, move the turn signal
lever to the off position.
Page 186 of 494

Black plate (6,1)Cadillac Escalade EXT Owner Manual - 2012
7-6 Infotainment System
Setting the Clock
The navigation system time and the
analog clock operate independently.
Changing the time through the
navigation system does not change
the time on the analog clock. See
Clock on page 5‑7to change the
analog clock time.
To set the time for the navigation
system:
1. Press CONFIG to enter the
configure menu options, then
press CONFIG again, repeatedly
until the time is selected or touch
the time screen button.
2. Press the Hours and Minutes −and + to decrease or
to increase the time.
See “Setting the Clock” under
Configure Menu on page 7‑64 for
more information.
Entering an Address and Point
of Interest, and Storing Preset
Destinations
Entering an Address
Enter a destination by inputting the
city name first:
1. Press
Oto turn the system on.
2. A caution may appear. Press OK to proceed.
3. Press DEST.
4. Press
2(Address Entry).
5. Select the state/province screen button, if needed, to change the
current state or province. A list
of all of the available states and
provinces appear. Select the
state or province.
6. Once a state or province has been selected the City name
category is automatically
selected for entry. If five or fewer names are
available, a list displays. If
more than five are available, the
List screen button displays a
number. This number represents
the number of available cities.
Press this button to view the list
and select a city.
7. Once a city has been selected the Street name category is
automatically selected for entry.
If five or fewer streets are
available for the selected city,
the system displays the list of
streets. If more than five streets
are available the system
displays the alpha keyboard.
Start entering the street name.
If five or fewer names are
available, a list displays. If
more than five are available, the
List screen button displays a
number. This button represents
the number of available streets.
Select this button to view the list
and select a street.
Page 193 of 494

Black plate (13,1)Cadillac Escalade EXT Owner Manual - 2012
Infotainment System 7-13
Sound Menu
e(Sound):Press this key or press
CONFIG to access the Sound menu
to adjust the treble, midrange, bass,
fade, balance, and Digital Signal
Processing (DSP). The system
automatically stores audio
adjustment settings as changes
are made for each audio source
including AM, FM, XM (if equipped),
CD, and AUX. Setting the Tone
TREBLE:
Press + or−to increase
or decrease the treble. If a station is
weak or has static, decrease the
treble.
MID (Midrange): Press + or−to
increase or decrease the midrange.
BASS: Press + or −to increase or
decrease the bass.
Adjusting the Speakers
L/R (Left/Right) (Balance): To
adjust the balance between the left
and the right speakers, press and
hold the L or R screen buttons.
Front/Rear (Fade): To adjust the
fade between the front and the rear
speakers, press and hold the Front
or Rear screen buttons. Digital Signal Processing (DSP)
The system has Digital Signal
Processing (DSP). DSP provides a
choice of four different listening
experiences. DSP can be used
while listening to the audio system.
Not all DSP modes are available for
all source types. The type of DSP
selected is displayed on the
status line.
Select from the following DSP
settings:
Normal:
Adjusts the audio for
normal mode. This provides the best
sound quality for all seating
positions.
Surround (Centerpoint
®):
Enables Bose®Centerpoint signal
processing that produces a
surround sound listening experience
from a CD or XM (if equipped)
stereo digital audio source.
Page 195 of 494

Black plate (15,1)Cadillac Escalade EXT Owner Manual - 2012
Infotainment System 7-15
Bose AudioPilot
AudioPilot:The Bose AudioPilot
noise compensation technology.
To use AudioPilot
®:
1. Press CONFIG to enter the menu screen, then press
CONFIG repeatedly until Radio
is selected or press the Radio
screen button
2. Press Automatic Volume Control to access the AudioPilot menu.
3. Press ON.
To turn it off, press OFF. When on,
AudioPilot continuously adjusts the
audio system equalization, to
compensate for background
noise, so that the music sound is
consistent at the set volume level.
This feature is most effective at
lower volume settings where
background noise can affect how
well the music being played is heard
through the vehicle's audio system. At higher volume settings, where
the music is much louder than the
background noise, there may
be little or no adjustments by
AudioPilot. For more information on
AudioPilot, visit www.bose.com/
audiopilot.
Remove/Add XM Categories
(US and Canada)
Press the Remove/Add XM
Categories screen button to
remove or add XM categories when
selecting XM categories from the
category list screen. The list of XM
categories appear on the screen.
Use the arrow screen buttons
to scroll through the list. The
categories to remove are highlighted
and the categories to add are dark
in color. Press the category to be
added or removed. Press the
Restore All Categories screen
button to add all categories that
have been removed.
Radio Data System (RDS)
The audio system has a Radio Data
System (RDS). RDS features are
available for use only on FM
stations that broadcast RDS
information. With RDS, the radio
can do the following:
.Receive announcements
concerning local and national
emergencies
.Display messages from radio
stations
This system relies on receiving
specific information from these
stations and only works when the
information is available. In rare
cases, a radio station may
broadcast incorrect information that
causes the radio features to work
improperly. If this happens, contact
the radio station.
The RDS system is always on.
When information is broadcast from
the FM station that is playing, the
station name or call letters displays
on the audio screen.
Page 197 of 494

Black plate (17,1)Cadillac Escalade EXT Owner Manual - 2012
Infotainment System 7-17
XM Theftlocked:The XM receiver
may have previously been in
another vehicle. For security
purposes, XM receivers cannot be
swapped between vehicles. If this
message is received after having
your vehicle serviced, check with
your dealer.
XM Radio ID: If tuned to channel 0,
this message will alternate with the
XM Radio eight digit radio ID label.
This label is needed to activate the
service.
Unknown: If this message is
received when tuned to channel 0,
there may be a receiver fault.
Consult with your dealer.
Check XM Receiver: If this
message does not clear within a
short period of time, the receiver
may have a fault. Consult with your
dealer.
No Subscription Please Renew:
The XM subscription needs to be
reactivated. Contact XM at
www.xmradio.com or call
1-800-929-2100.Radio Reception
Frequency interference and static
can occur during normal radio
reception if items such as cell phone
chargers, vehicle convenience
accessories, and external electronic
devices are plugged into the
accessory power outlet. If there is
interference or static, unplug the
item from the accessory power
outlet.
AM
The range for most AM stations is
greater than for FM, especially at
night. The longer range can cause
station frequencies to interfere with
each other. For better radio
reception, most AM radio stations
boost the power levels during the
day, and then reduce these levels
during the night. Static can also
occur when things like storms and
power lines interfere with radio
reception. When this happens, try
reducing the treble on the radio.
FM Stereo
FM signals only reach about
16 to 65 km (10 to 40 mi). Although
the radio has a built-in electronic
circuit that automatically works to
reduce interference, some static
can occur, especially around tall
buildings or hills, causing the sound
to fade in and out.
XM™ Satellite Radio Service
XM Satellite Radio Service gives
digital radio reception from coast to
coast in the 48 contiguous United
States, and in Canada. Just as with
FM, tall buildings or hills can
interfere with satellite radio signals,
causing the sound to fade in and
out. In addition, traveling or standing
under heavy foliage, bridges,
garages, or tunnels may cause loss
of the XM signal for a period of time.
Page 200 of 494

Black plate (20,1)Cadillac Escalade EXT Owner Manual - 2012
7-20 Infotainment System
2. Press the down arrow to go tothe start of the current track,
if more than eight seconds have
played.
3. If either arrow is pressed more than once, the player continues
moving backward or forward
through the CD. The sound
mutes while seeking.
w(Tuning Knob):
1. Turn counterclockwise one notch to go to the start of the current
track, turn it again to go to the
previous track.
2. Turn clockwise to go to the next track.
Playing a DVD
DVD video does not display on the
navigation screen unless the vehicle
is in P (Park). It will operate on the
rear seat entertainment screens
while the vehicle is moving. The
Rear Seat Entertainment (RSE)
video screen starts play of the
DVD when a DVD video has been
inserted into the CD/DVD slot. The DVD player can be controlled
by the buttons on the navigation
system, the Rear Seat Audio (RSA)
system, and the remote control. The
DVD player can also be used for the
rear seat passengers with the radio
off. The rear seat passengers can
power on the video screen and use
the remote control to navigate the
disc. See the Rear Seat
Infotainment user guide for more
information.
The DVD player is only compatible
with DVDs of the appropriate region
code that is printed on the jacket of
most DVDs.
The CD/DVD slot is compatible with
most audio CDs, CD-R, CD-RW,
DVD-Video, DVD-R/RW, DVD+R/
RW media along with MP3 and
WMA formats.
If an error appears on the display,
see
“CD/DVD Messages” in this
section.
Once a DVD starts to play, the
menu options and cursor screen
buttons will automatically appear. To display the menu Options screen
button while a DVD is playing, touch
anywhere on the screen.
There are three ways to play
a DVD:
.Once a DVD is inserted, the
system will automatically start
play of the DVD.
.If you are on a map screen,
press the DVD screen button.
.Press AUDIO, then press the
DVD screen button.
When a DVD is loaded, the rear
seat passengers can power on the
RSE video screen and use the
remote control to navigate through
the DVD.
O/3(Power/Volume):
1. Press to turn the system on and off.
2. Turn the knob to increase or decrease the volume of the
audio system.
Page 202 of 494

Black plate (22,1)Cadillac Escalade EXT Owner Manual - 2012
7-22 Infotainment System
Audio:Press to display the audio
options. Select the audio options
that best improve sound quality.
This is not available on all DVDs or
when the DVD is stopped. This
button is not available for DVD
audio.
Subtitle: Press to playback the
video with subtitles. This is not
available on all DVDs or when the
DVD is stopped. This button is not
available for DVD audio.
Angle: Press to adjust the viewing
angle of the DVD. Repeatedly press
this button to toggle through the
angles. This is not available on all
DVDs or when the DVD is stopped.
This button is not available for DVD
audio.
Search: Press to display the
search screen. Select Title or
Chapter Search for DVD video and
Group or Track for DVD audio. The
keyboard allows you to type in the
title/chapter/group/track number that you would like to watch or listen to.
This button does not work when the
DVD is stopped.
Setup:
Press to display the DVD
Setup screen. This button is only
available when the DVD is not
playing. The DVD Setup screen
allows you to change the
brightness, contrast, and mode,
change the viewing on the monitor
and to change the initial settings;
language, parental level, and
aspect.
!(Brightness): Press the up or
down screen arrows to increase or
decrease the brightness of the
navigation screen.
_(Contrast): Press the up or
down screen arrows to increase or
decrease the contrast of the
navigation screen.
Auto (Automatic): Press so the
system can automatically adjust the
navigation screen background
depending on exterior lighting
conditions. Night:
Press to make the
navigation screen background
brighten.
Day: Press to make the navigation
screen background darken.
Monitor: From the DVD Setup
screen, press to adjust the viewing
angle of the DVD on the navigation
screen. This is not available on all
DVDs. This button is not available
for DVD audio
Press
eto close the screen in from
the left and right sides.
Press
Jto fill the screen on the
left and right sides.
Press
dto fill the screen on the
top and bottom.
Settings: From the DVD Setup
screen, press to change the
default audio, subtitle, and menu
languages, parental level, audio,
and to view the aspect of the DVD.
These settings are not available on
all DVDs. This button is not
available for DVD audio.