2012 BMW Z4 SDRIVE35I wheel
[x] Cancel search: wheelPage 5 of 220

ContentsThe fastest way to find information on a partic‐
ular topic or item is by using the index, refer to
page 208.6Notes
At a glance
12Cockpit
Controls
20Opening and closing36Adjusting43Transporting children safely45Driving60Displays68Lamps73Safety81Driving stability control systems85Driving comfort89Climate96Interior equipment103Storage compartments
Driving tips
108Things to remember when driving
Entertainment
116Professional Radio
Communication
134Telephone145ConnectedDriveMobility152Refueling154Fuel155Wheels and tires163Engine compartment168Maintenance170Replacing components176Breakdown assistance182Care186Indicator/warning lamps
Reference
202Technical data208Everything from A to Z
Online Edition for Part no. 01 40 2 609 184 - 09 11 500
Page 7 of 220

ing to BMW repair procedures with appropri‐
ately trained personnel.
If this work is not carried out properly, there is
the danger of subsequent damage and related
safety hazards.
Parts and accessories
For your own safety, use genuine parts and ac‐
cessories approved by BMW. When you pur‐
chase accessories tested and approved by
BMW and Genuine BMW Parts, you simultane‐
ously acquire the assurance that they have been
thoroughly tested by BMW to ensure optimum
performance when installed on your vehicle.
BMW warrants these parts to be free from de‐
fects in material and workmanship. BMW will not
accept any liability for damage resulting from in‐
stallation of parts and accessories not approved
by BMW. BMW cannot test every product made
by other manufacturers to verify if it can be used
on a BMW safely and without risk to either the
vehicle, its operation, or its occupants. Genuine
BMW Parts, BMW Accessories and other prod‐
ucts approved by BMW, together with profes‐
sional advice on using these items, are available
from all BMW centers. Installation and operation
of non-BMW approved accessories such as
alarms, radios, amplifiers, radar detectors,
wheels, suspension components, brake dust
shields, telephones, including operation of any
mobile phone from within the vehicle without
using an externally mounted antenna, or trans‐
ceiver equipment, for instance, CBs, walkie-
talkies, ham radios or similar accessories, may
cause extensive damage to the vehicle, com‐
promise its safety, interfere with the vehicle's
electrical system or affect the validity of the
BMW Limited Warranty. See your BMW center
for additional information. Maintenance, re‐
placement, or repair of the emission control de‐
vices and systems may be performed by any au‐
tomotive repair establishment or individual
using any certified automotive part.California Proposition 65 Warning
California laws require us to state the following
warning:
Engine exhaust and a wide variety of automobile
components and parts, including components
found in the interior furnishings in a vehicle, con‐
tain or emit chemicals known to the State of Cal‐
ifornia to cause cancer and birth defects and re‐
productive harm. In addition, certain fluids
contained in vehicles and certain products of
component wear contain or emit chemicals
known to the State of California to cause cancer
and birth defects or other reproductive harm.
Battery posts, terminals and related accessories
contain lead and lead compounds. Wash your
hands after handling. Used engine oil contains
chemicals that have caused cancer in laboratory
animals. Always protect your skin by washing
thoroughly with soap and water.
Service and warranty
We recommend that you read this publication
thoroughly. Your vehicle is covered by the fol‐
lowing warranties:▷New Vehicle Limited Warranty▷Rust Perforation Limited Warranty▷Federal Emissions System Defect Warranty▷Federal Emissions Performance Warranty▷California Emission Control System Limited
Warranty
Detailed information about these warranties is
listed in the Service and Warranty Information
Booklet for US models or in the Warranty and
Service Guide Booklet for Canadian models.
Your vehicle has been specifically adapted and
designed to meet the particular operating con‐
ditions and homologation requirements in your
country and continental region in order to deliver
the full driving pleasure while the vehicle is op‐
erated under those conditions. If you wish to op‐
erate your vehicle in another country or region,
you may be required to adapt your vehicle to
meet different prevailing operating conditions
and homologation requirements. You should
Seite 7Notes7
Online Edition for Part no. 01 40 2 609 184 - 09 11 500
Page 12 of 220

CockpitVehicle equipment
This chapter describes all series equipment as
well as country-specific and special equipment
offered for this model series.Therefore, it alsodescribes equipment that may not be found in
your vehicle, for instance due to the selected
special equipment or the country version. This
also applies to safety-related functions and sys‐
tems.
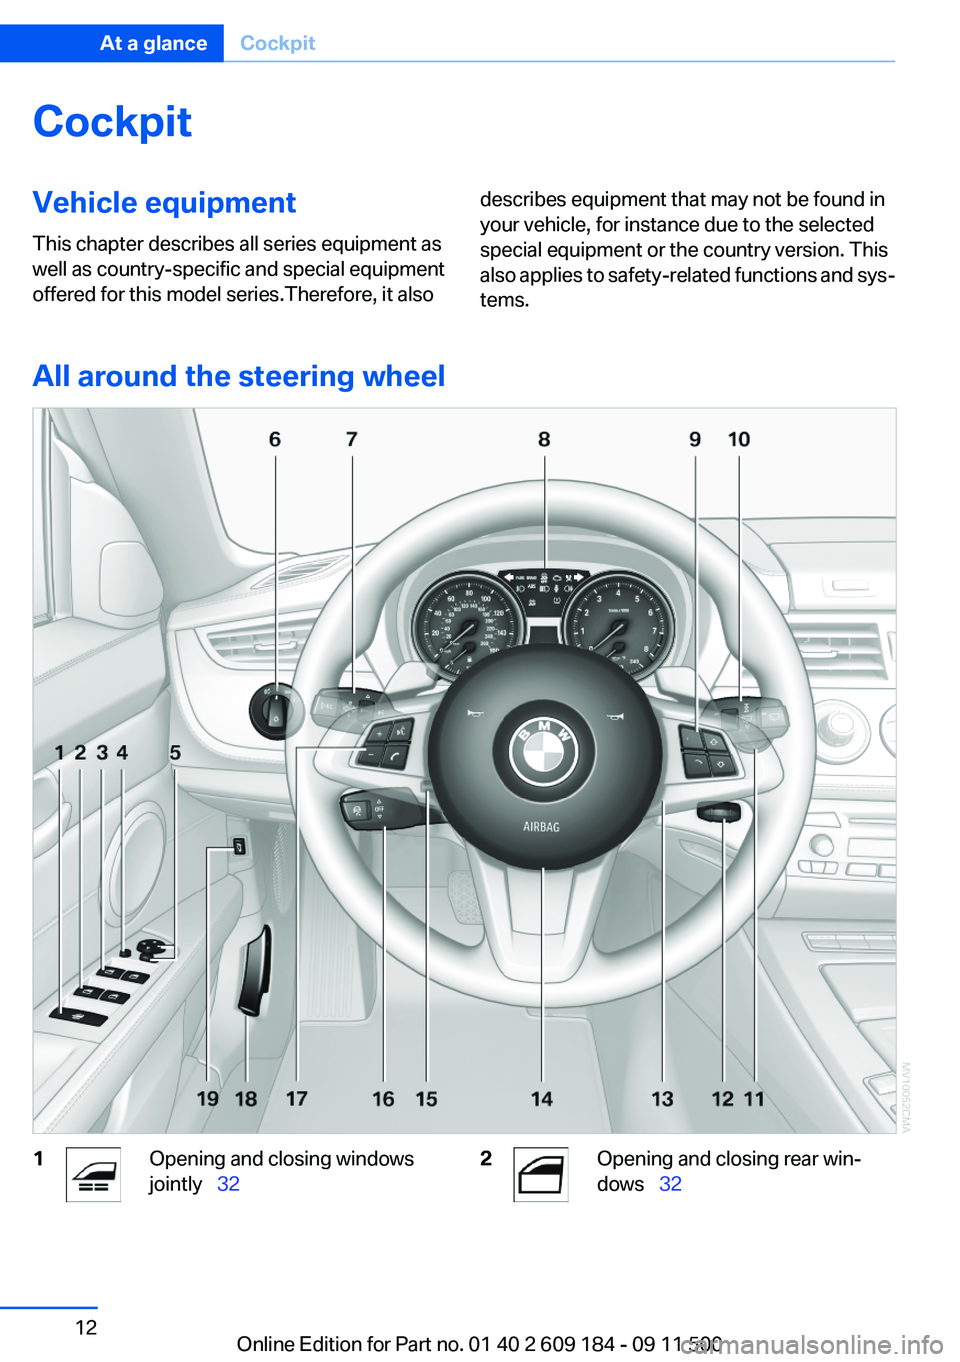
All around the steering wheel
1Opening and closing windows
jointly 322Opening and closing rear win‐
dows 32Seite 12At a glanceCockpit12
Online Edition for Part no. 01 40 2 609 184 - 09 11 500
Page 13 of 220

3Opening and closing front win‐
dows 324Exterior mirrors, folding in and out 405Adjust the exterior mirrors, Automatic Curb
Monitor 406Parking lamps 68Low beams 68Automatic headlamp con‐
trol 69
Adaptive light control 70
High-beam Assistant 717Turn signal 50High beams, head‐
lamp flasher 70High-beam Assistant 71Roadside parking lamps 70Computer 62Settings and information about
the vehicle 628Instrument cluster 149Buttons on the steering wheelChange the radio station
Select a music track
Leaf through the phone book and
through lists with stored phone
numbersNext entertainment sourceRecirculated air mode 9410Windshield wipers 51Rain sensor 5111Start/stop the engine and switch
the ignition on/off 4512Ignition lock 4513Steering wheel heating 4214Horn, the entire surface15Adjust the steering wheel 4216Cruise control 8517Buttons on the steering wheelTelephone 134VolumeVoice operation of the tele‐
phone 14118Releasing the hood 16419Open the trunk lid 27Seite 13CockpitAt a glance13
Online Edition for Part no. 01 40 2 609 184 - 09 11 500
Page 30 of 220

Replacing the battery
The remote control for Comfort Access con‐
tains a battery that will need to be replaced from
time to time.1.Take the integrated key out of the remote
control, refer to page 20.2.Remove the cover.3.Insert a battery of the same type with the
positive side facing upwards.4.Press the cover closed.
Return used battery to a recycling collec‐
tion point or to your service center.
Alarm system
The concept
The vehicle alarm system responds to:
▷Opening of a door, the hood or the trunk lid.▷Movements in the vehicle: interior motion
sensor, refer to page 31.▷When the car's inclination changes, for in‐
stance if an attempt is made to jack it up and
steal the wheels or to raise it prior to towing
away.▷Interruptions in battery voltage.
The alarm system signals unauthorized entry
attempts for a short time by means of:
▷By sounding an acoustic alarm.▷By switching on the hazard warning system.▷By flashing the high beams.Arming and disarming the alarm
system
When you lock or unlock the vehicle, either with
the remote control or at the door lock, the alarm
system is armed or disarmed at the same time.
Trunk lid and armed alarm system
The trunk lid can be opened using the remote
control, even if the alarm system is armed.
Press the button on the remote control for
approx. one second.
Note the opening height of the trunk lid
During opening, the trunk lid pivots back
and up. Ensure that there is sufficient clearance
when the trunk lid opens; otherwise, damage
may result.◀
After the lid is closed, it is locked and monitored
again by the alarm system.
Panic mode
You can trigger the alarm system if you find
yourself in a dangerous situation.
Press the button on the remote control for at
least three seconds.
To switch off the alarm: press any button.
Switching off the alarm
▷Unlock the vehicle using the remote control,
refer to page 22.▷Insert the remote control all the way into the
ignition lock.Seite 30ControlsOpening and closing30
Online Edition for Part no. 01 40 2 609 184 - 09 11 500
Page 31 of 220

Indicator lamp on the interior rearview
mirror▷The indicator lamp flashes briefly every
2 seconds:
The system is armed.▷The indicator lamp flashes after locking:
The doors, hood or trunk lid is not closed
properly, but the rest of the vehicle is se‐
cured.
The indicator lamp flashes continuously af‐
ter approx. 10 seconds. The interior motion
sensor and tilt alarm sensor are not active.▷The indicator lamp goes out after unlocking:
The vehicle has not been tampered with.▷If the indicator lamp flashes after unlocking
until the remote control is inserted in the ig‐
nition, but for no longer than approx. 5 mi‐
nutes:
An alarm has been triggered.
Tilt alarm sensor
The tilt of the vehicle is monitored.
The alarm system responds in situations such
as attempts to steal a wheel or tow the car.
Interior motion sensor
The interior of the car is monitored up to the
height of the seat cushions. Thus the alarm sys‐
tem is activated together with the interior motion
sensor even if the hardtop is open. An alarm can
be triggered unintentionally by falling objects
such as leaves, refer to Avoiding unintentional
alarms.
Avoiding unintentional alarms
The tilt alarm sensor and interior motion sensor
can be switched off together, such as in the fol‐
lowing situations:▷In duplex garages.▷During transport on car-carrying trains, at
sea or on a trailer.▷When animals are to remain in the vehicle.
Switching off the tilt alarm sensor and
interior motion sensor
Press the remote control button again
within 10 seconds after the vehicle is locked.
The indicator lamp lights up for approx. 2 sec‐
onds and then continues flashing.
The tilt alarm sensor and interior motion sensor
remain switched off until the vehicle is locked
again.
Power windows
General information Take the remote control with you
Take the remote control with you when
leaving the vehicle so that children, for example,
cannot operate the power windows and injure
themselves.◀
Danger of pinching
Monitor the closing process and make
sure that the closing path of the window is clear;
otherwise, injuries may result.◀
Seite 31Opening and closingControls31
Online Edition for Part no. 01 40 2 609 184 - 09 11 500
Page 39 of 220

Buckling the belt
Make sure you hear the latch plate engage in the
belt buckle.
Unbuckling the belt
1.Hold the belt firmly.2.Press the red button in the belt buckle.3.Guide the belt back into its reel.
Safety belt reminder for driver and
passenger
The indicator lamp lights up and a sig‐
nal sounds. Check whether the safety
belt has been fastened correctly.
The safety belt reminder is active at speeds
above approx. 5 mph/8 km/h. It can also be ac‐
tivated if objects are placed on the front pas‐
senger seat.
Damage to safety belts
In the case of strain caused by accidents or
damage:
Have the safety belts, including the safety belt
tensioners, replaced and have the belt anchors
checked.
Checking and replacing safety belts
Have the work performed only by your
service center; otherwise, it cannot be ensured
that this safety feature will function properly.◀
Seat and mirror memory
General information
Two different driver's seat and exterior mirror
positions can be stored and retrieved for each
remote control.
Settings for the backrest width and lumbar sup‐
port are not stored.
Storing
1.Switch on the radio ready state or the igni‐
tion, refer to page 45.2.Adjust the seat and exterior mirrors to the
desired positions.3. Press the button. The LED in the
button lights up.4.Press the desired memory button 1 or 2: the
LED goes out.
If the M button is pressed accidentally:
Press the button again. The LED goes
out.
Calling up settings Do not retrieve the memory setting while
driving
Do not retrieve the memory setting while driving,
as an unexpected movement of the seat or
steering wheel could result in an accident.◀
Seite 39AdjustingControls39
Online Edition for Part no. 01 40 2 609 184 - 09 11 500
Page 42 of 220

Steering wheel
General information Do not adjust while driving
Do not adjust the steering wheel while
driving; otherwise, an unexpected movement
could result in an accident.◀
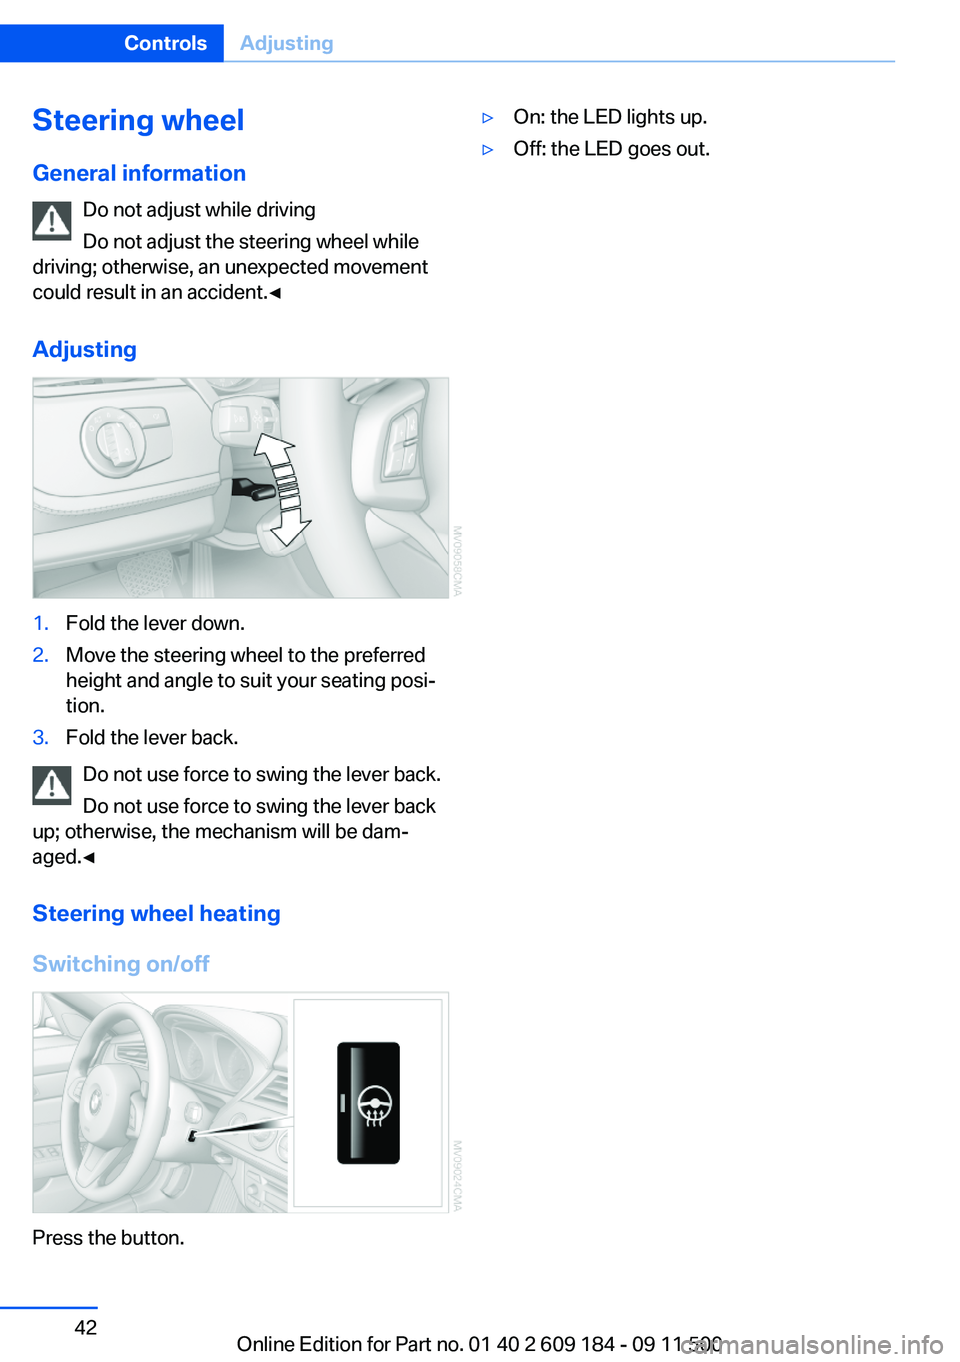
Adjusting1.Fold the lever down.2.Move the steering wheel to the preferred
height and angle to suit your seating posi‐
tion.3.Fold the lever back.
Do not use force to swing the lever back.
Do not use force to swing the lever back
up; otherwise, the mechanism will be dam‐
aged.◀
Steering wheel heating
Switching on/off
Press the button.
▷On: the LED lights up.▷Off: the LED goes out.Seite 42ControlsAdjusting42
Online Edition for Part no. 01 40 2 609 184 - 09 11 500