2012 BMW Z4 SDRIVE35I buttons
[x] Cancel search: buttonsPage 134 of 220
TelephoneVehicle equipment
This chapter describes all series equipment as
well as country-specific and special equipment
offered for this model series.Therefore, it also
describes equipment that may not be found in
your vehicle, for instance due to the selected
special equipment or the country version. This
also applies to safety-related functions and sys‐
tems.
At a glance
Note
Equipment version with the full preparation
package mobile phone or a hands-free system.
The concept
Mobile phones can be connected with the vehi‐
cle via Bluetooth.
After these devices are paired once, they are
recognized automatically when the ignition is
switched on as soon as they are in the vehicle
and can then be operated via the radio, the but‐
tons on the steering wheel, and via voice acti‐
vation.
After a suitable mobile phone is paired with the
vehicle once, you can operate the mobile phone
via the radio, the buttons on the steering wheel,
and via voice activation.
Bluetooth® is a registered trademark of Blue‐
tooth® SIG, Inc.
Using the mobile phone while driving
Make entries only when traffic and road
conditions allow. Do not hold the mobile phone
in your hand while you are driving; use the
hands-free system instead. If you do not ob‐
serve this precaution, you can endanger the ve‐
hicle occupants and other road users.◀Snap-in adapter
The snap-in adapter is used to:▷Hold the mobile phone.▷Recharge the battery.▷Connect the mobile phone to an outside an‐
tenna of the vehicle.
This provides for better network reception
and consistent sound quality.
Avoid operating a mobile phone that has been
detected by the vehicle on the keypad of the
mobile phone, as this may lead to malfunctions.
Approved mobile phones
Details on which mobile phones and external
devices with a Bluetooth interface are sup‐
ported by the mobile phone preparation pack‐
age can be obtained at www.bmwusa.com/blue‐
tooth.
Notes
At high temperatures, the charging function of
the mobile phone may be limited and functions
may not be executed.
Playing music from the mobile phone
Depending on your mobile phone and the vehi‐
cle equipment, you can play the music data of
the mobile phone in the vehicle.
Seite 134CommunicationTelephone134
Online Edition for Part no. 01 40 2 609 184 - 09 11 500
Page 135 of 220
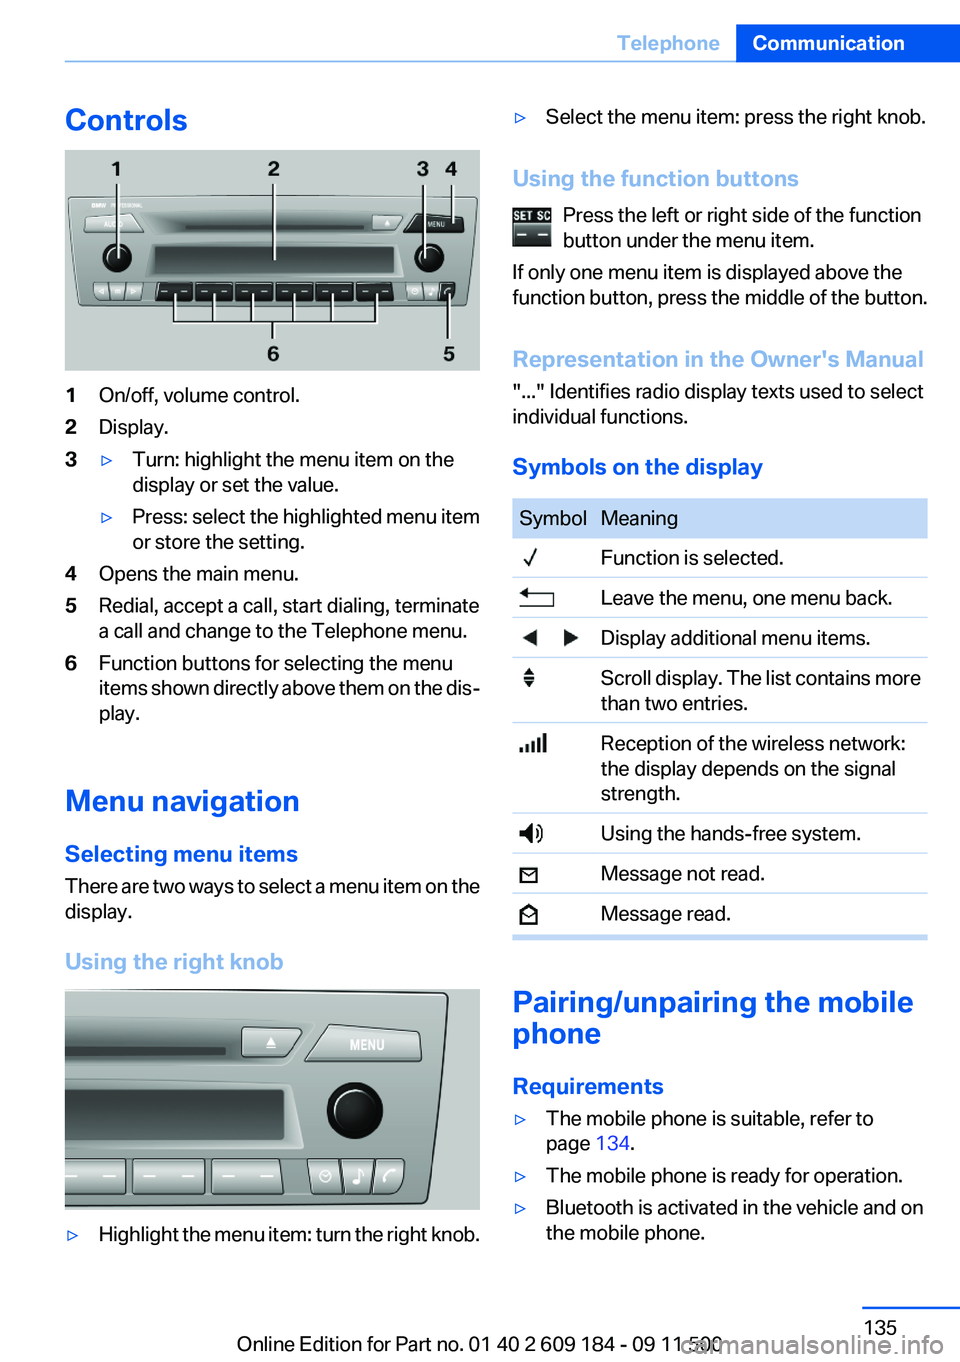
Controls1On/off, volume control.2Display.3▷Turn: highlight the menu item on the
display or set the value.▷Press: select the highlighted menu item
or store the setting.4Opens the main menu.5Redial, accept a call, start dialing, terminate
a call and change to the Telephone menu.6Function buttons for selecting the menu
items shown directly above them on the dis‐
play.
Menu navigation
Selecting menu items
There are two ways to select a menu item on the
display.
Using the right knob
▷Highlight the menu item: turn the right knob.▷Select the menu item: press the right knob.
Using the function buttons Press the left or right side of the function
button under the menu item.
If only one menu item is displayed above the
function button, press the middle of the button.
Representation in the Owner's Manual
"..." Identifies radio display texts used to select
individual functions.
Symbols on the display
SymbolMeaning Function is selected. Leave the menu, one menu back. Display additional menu items. Scroll display. The list contains more
than two entries. Reception of the wireless network:
the display depends on the signal
strength. Using the hands-free system. Message not read. Message read.
Pairing/unpairing the mobile
phone
Requirements
▷The mobile phone is suitable, refer to
page 134.▷The mobile phone is ready for operation.▷Bluetooth is activated in the vehicle and on
the mobile phone.Seite 135TelephoneCommunication135
Online Edition for Part no. 01 40 2 609 184 - 09 11 500
Page 136 of 220
▷Bluetooth presettings may need to be made
on the mobile phone, e.g., for a connection
without confirmation or visibility, refer to the
mobile phone operating instructions.▷A number with at least four and a maximum
of 16 digits was defined as the Bluetooth
passkey. It is only required once for pairing.▷The ignition is switched on.
Activating/deactivating Bluetooth
Bluetooth is not permitted everywhere. Comply
with all safety guidelines and regulations.
To activate the connection:
1.Switch on the radio ready state or the igni‐
tion.2. Press the button.3."PHONE"4."BT-ON"
To deactivate the connection again:
1."BT"2."BT-OFF"3."YES"
Pairing and connecting
Pairing the mobile phone
To avoid becoming distracted and posing
an unnecessary hazard both to your own vehi‐
cle's occupants and to other road users, only
pair the mobile phone while the vehicle is sta‐
tionary.◀
1.Switch on the radio ready state or the igni‐
tion.2. Press the button.3."PHONE"4."BT"5."PAIR"
Turn the right knob to display the Bluetooth
name of your vehicle.6.To perform additional steps on the mobile
phone, refer to the mobile phone operating
instructions: for instance, search for or con‐
nect the Bluetooth device or a new device.
The Bluetooth name of the vehicle appears
on the mobile phone display.7.Select the Bluetooth name of the vehicle on
the mobile phone display.
You are prompted by the radio or mobile
phone to enter the same Bluetooth passkey.8.Enter the passkey on the mobile phone and
confirm it.9."ADD"10.Enter the same passkey on the radio using
the function buttons and confirm it.
To delete the last digit: "DELETE"11."OK"
Press twice if necessary.
If pairing was successful, the mobile phone ap‐
pears on the radio display.
Four mobile phones can be paired with the ve‐
hicle at once.
If pairing was unsuccessful: What to do if..., refer
to page 137.
Repeating the pairing procedure/help
If pairing failed:
1."REPEAT"2.Repeat steps 6 to 10.
To display the Customer Relations phone num‐
ber: "CALLS"
Turn the right knob to display the Customer Re‐
lations phone number and information needed
for pairing.
Following the initial pairing
▷The mobile phone is detected/connected in
the vehicle within a short period of time
when the engine is running or the ignition is
switched on.Seite 136CommunicationTelephone136
Online Edition for Part no. 01 40 2 609 184 - 09 11 500
Page 140 of 220
Press the button on the steering
wheel or radio to dial the number.
The phone number is dialed.
Editing and dialing a phone number
from the phone book
You can edit the phone number of an entry be‐
fore making a call. This change is not stored in
the phone book.
1.Selecting an entry.2."EDIT"3.To delete a digit: "DEL"4.Enter additional digits on the buttons 0–9.5.Press the right knob to dial the phone num‐
ber.
Dialing a phone number from the phone
book using the buttons on the steering
wheel
1. Press and hold the button to display
the Telephone menu.2.Press the arrow buttons on the steering
wheel to leaf through the phone book.3. Press the button to dial the phone
number.
Dialing a phone number stored in a list
To select an entry and establish a connection:
1.Switch on the radio ready state or the igni‐
tion.2. Press the button.3."PHONE"4.Select a list, for instance "TOP8"5.Turn the right knob to select an entry and
press the knob to dial the phone number.
Deleting an individual entry
1.Select an entry from the list.2."DEL"
DTMF suffix dialing
DTMF suffix dialing can be used for gaining ac‐
cess to network services or for controlling devi‐
ces, e.g., to make a remote inquiry of an answer‐
ing machine. The DTMF code is needed for this
purpose.
This function is only available if a connection ex‐
ists and if the hands-free system is being used.
1."Keypad"2.Enter the DTMF code on the buttons 0–9.3.If necessary, press and hold the function
button on the right or left to enter special
characters.
Displaying the call duration
During a call:
"DURAT"
Hands-free system
General information
Calls that are being made on the hands-free
system can be continued on the mobile phone
and vice versa.
From the mobile phone to the hands-
free system
Calls that were begun outside of the Bluetooth
range of the vehicle can be continued on the
hands-free system with the ignition switched
on.
Depending on the mobile phone, the system au‐
tomatically switches to the hands-free system.
If the system does not switch over automatically,
follow the instructions on the mobile phone dis‐
play; refer also to the mobile phone operating
instructions.
Seite 140CommunicationTelephone140
Online Edition for Part no. 01 40 2 609 184 - 09 11 500
Page 144 of 220
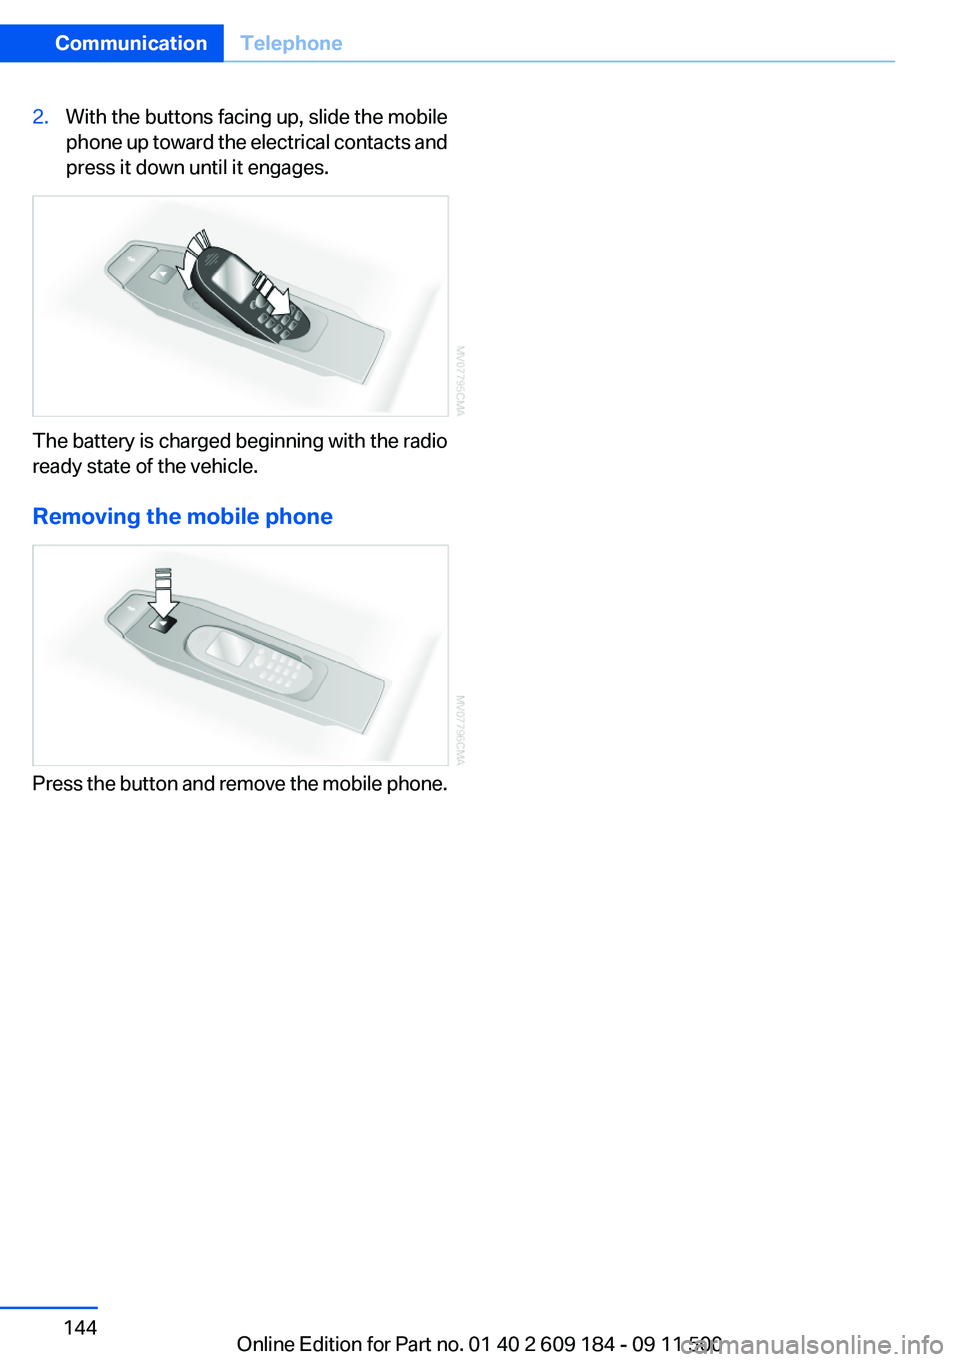
2.With the buttons facing up, slide the mobile
phone up toward the electrical contacts and
press it down until it engages.
The battery is charged beginning with the radio
ready state of the vehicle.
Removing the mobile phone
Press the button and remove the mobile phone.
Seite 144CommunicationTelephone144
Online Edition for Part no. 01 40 2 609 184 - 09 11 500
Page 209 of 220
Band-aids, refer to First aidkit 177
Bar, refer to Towing meth‐ ods 180
Battery– Disposal 30, 175– Power failure 174– Remote control 20– Replacement in the remote
control 30– Replacement, vehicle bat‐
tery 174– Vehicle 174
Before entering the car
wash 182
Being towed 179
Belts, refer to Safety belts 38
Belt tensioners, refer to Safety belts 38
Beverage holder, refer to Cu‐ pholder 105
Blower, refer to Air flow rate 90, 93
BMW Assist 145
BMW Assist, refer to Connec‐ tedDrive 145
BMW EfficientDynamics, refer to Saving fuel 112
BMW homepage 6
BMW Internet page 6
BMW Maintenance Sys‐ tem 168
Bottle holder, refer to Cu‐ pholder 105
Brake assistant, refer to Dy‐ namic Brake Control 81
Brake discs, breaking in 108
Brake force display 80
Brake force distribution, elec‐ tronic 81
Brake lamps
– Brake force display 80– Bulb replacement 172, 173
Brake lights, adaptive 80
Brake pads, breaking in 108
Brakes
– ABS 81Braking– Notes 109– Parking brake 49
Braking safely 109
Breakdown assistance 177
Breaking in 108
Bulbs, replacing, refer to Lamps and bulbs 170
Button for starting the engine, refer to Start/Stop button 45
Buttons on the steering wheel 12
Bypassing, see Starting aid 177
C
California Proposition 65 Warning 7
Camera, care 185
Can holder, refer to Cu‐ pholder 105
Capacities
– Cargo area, refer to
Weights 204– Fuel tank, refer to Filling ca‐
pacities 206
Car battery 174
Car care products 183
Care 182
Care, displays 185
Care, vehicle 183
Cargo 110
Cargo area
– Capacity 204– Lamp, refer to Interior
lamps 72– Opening from the inside 27– Opening from the out‐
side 27
Cargo, securing 101
Cargo straps, securing cargo 112
Car key, refer to Integrated key/remote control 20
Carpet, care 184
Car phone– Installation location, refer to
Center armrest 103
Car vacuum cleaner, connect‐
ing, refer to Connecting elec‐
trical devices 100
Car wash 182
Car wash
– With Comfort Access 29
Catalytic converter, refer to
Hot exhaust system 109
CBS Condition Based Serv‐ ice 168
CD/DVD changer 124
CD/DVD notes 126
Cell phone, installation loca‐ tion, refer to Center arm‐
rest 103
Center armrest 103
Center brake lamp
– Bulb replacement 173
Center console, refer to
Around the center con‐
sole 15
Central locking
– Comfort Access 28– From the inside 26– Setting the unlocking char‐
acteristics 22
Central locking system
– From the outside 21– Principle 21
Changes, technical, refer to
Safety 6
Changing wheels/tires 161
Chassis number, refer to En‐ gine compartment 163
Check Control 66
Children, transporting safely 43
Child restraint fixing sys‐ tem 43
Child seats, refer to Transport‐ ing children safely 43
Chrome parts, care 184
Circulation of air, refer to Re‐ circulated air mode 90, 94
Seite 209Everything from A to ZReference209
Online Edition for Part no. 01 40 2 609 184 - 09 11 500
Page 213 of 220
Interior equipment 96
Interior lamps 72
Interior lamps– Remote control 23
Interior rearview mirror 41
Interior rearview mirror
– Automatic dimming 41– Compass 98
Interior temperature, setting,
refer to Air conditioner 90
Interior temperature, setting, refer to Automatic climate
control 92
Intermittent wipe 51
Internet page 6
Interval display, service re‐ quirements 65
iPod/iPhone 128
J
Jacking points 174
K
Keyless Go, refer to Comfort Access 28
Keyless opening and closing, refer to Comfort Access 28
Key Memory, refer to Personal Profile 20
Key, refer to Integrated key/re‐ mote control 20
Kick-down
– 7-gear automatic transmis‐
sion 56– 8-gear automatic transmis‐
sion 53
Knee airbag 73
L
Lamps and bulbs, bulb re‐ placement 170
Lamps, replacing, refer to Lamps and bulbs 170
Lap-and-shoulder belt, refer to
Safety belts 38
Lashing eyes, securing cargo 112
Launch Control, acceleration assistant 58
Leather, care 183
LED, light-emitting di‐ odes 171
Length, refer to Dimen‐ sions 203
License plate lamp, bulb re‐ placement 173
Light 68
Light-alloy wheels, care 184
Light control 70
Light-emitting diodes LED 171
Lighter– Connecting electrical devi‐
ces 100
Lighting
– Instruments 71– Lamps and bulbs 170
Light switch 68
Load 111
Loading 110
Lockable lug bolts, refer to Lug bolt lock 174
Lock buttons, doors, refer to Locking 27
Locking
– From the inside 27– From the outside 23– Setting the confirmation sig‐
nals 24– Without remote control, refer
to Comfort Access 28
Locking the vehicle
– From the inside 26– From the outside 22
Low beams 68
Low beams, automatic, refer to High-beam Assistant 71
Lower back support, refer to Lumbar support 37
Lug bolt lock 174
Lumbar support 37
M
M/S, automatic transmission– 7-gear 57– 8-gear 54
Maintenance 168
Maintenance require‐ ments 168
Maintenance, service require‐ ments 65
Maintenance system, BMW 168
Malfunction
– Door lock 26– Fuel filler flap 152– Parking brake 50
Malfunction warnings, refer to
Check Control 66
Manual air distribution 90
Manual mode
– 7-gear automatic transmis‐
sion 57– 8-gear automatic transmis‐
sion 54
Manual operation
– Door lock 26– Driver's door 26– Fuel filler flap 152– Transmission lock 58
Manual transmission 52
Marking on approved tires 161
Marking, run-flat tires 161
Master key, refer to Remote control with integrated
key 20
Maximum cooling 93
Maximum speed, winter tires 162
Medical kit, refer to First aid kit 177
Memory, refer to Seat and mir‐ ror memory 39
Microfilter
– For air conditioner 91– With automatic climate con‐
trol 95Seite 213Everything from A to ZReference213
Online Edition for Part no. 01 40 2 609 184 - 09 11 500
Page 216 of 220

SPORT+ program, DynamicDriving Control 83
Sport program– 7-gear automatic transmis‐
sion 57– 8-gear automatic transmis‐
sion 54
SPORT program, Dynamic
Driving Control 83
Spray nozzles, refer to Clean‐ ing the windshield and head‐
lamps 51
Stability control systems 81
Start/Stop button
– Starting the engine 46– Switching off the engine 46
Starting aid 177
Status of Owner's Manual 6
Steam jets 182
Steering wheel
– Adjusting 42– Buttons on the steering
wheel 12– Lock 45
Stopping
– Engine 46
Storage compartments 104
Storage nets 100
Storage, tires 162
Storing the seat position, refer to Seat and mirror mem‐
ory 39
Storing the vehicle 185
Summer tires, refer to Wheels and tires 155
Summer tires, tread 160
Suspension settings 82
Switches, refer to Cockpit 12
Switch for Dynamic Driving Control 82
Switching off
– Engine 46– Vehicle 46
Symbols 6
T
Tachometer 61
Tailgate, opening from the in‐
side 27
Tailgate, refer to Trunk lid 27
Tail lamps 172
Tail lamps– Bulb replacement 172, 173
Tank display 61
Technical changes, refer to Safety 6
Technical data 202, 203
Telephone, installation loca‐ tion, refer to Center arm‐
rest 103
TeleService 146
Temperature, air condi‐ tioner 91
Temperature, automatic cli‐ mate control 92
Temperature, coolant 61
Temperature display
– External temperature 60– External temperature warn‐
ing 60– Setting the units 63
Temperature, engine oil 61
Theft alarm system, refer to Alarm system 30
Thigh support adjustment 37
Third brake lamp, refer to Cen‐ ter brake lamp 173
Through-loading opening with integrated transport bag 101
Tilting the passenger side mir‐ ror 40
Time
– Setting the time 64
Tire age 159
Tire damage 160
Tire identification marks 158
Tire pressure monitoring, refer to FTM 75
Tire Pressure Monitor TPM 77
Tire Pressure Monitor TPM
– Resetting the system 78– System limitations 77– Warning lamp 78Tire Quality Grading 159
Tires, changing 161
Tires, flat tire 174
Tire size 158
Tires, pressure loss 78
Tires, pressure monitoring, re‐ fer to Tire Pressure Monitor
TPM 77
Tires, run-flat tires 161
Tire tread 160
Tool kit, refer to Onboard ve‐ hicle tool kit 170
Tools, refer to Onboard vehicle tool kit 170
Torque, refer to Engine data 202
Tow bar 180
Tow fitting– Screw thread 179
Tow fittings
– For tow-starting and tow‐
ing 179
Towing 179
Towing methods 180
Tow rope 180
Tow-starting 179, 181
TPM, refer to Tire Pressure Monitor TPM 77
Traction control 82
TRACTION program, Dynamic Driving Control 83
Transmission
– 7-gear automatic transmis‐
sion with dual clutch 55– 8-gear automatic transmis‐
sion 53– Manual transmission 52– Unlocking transmission lock
manually, for 7-gear auto‐
matic transmission 58
Transmission lock, unlocking
manually 58
Transmission lock, unlocking manually, with 7-gear auto‐
matic transmission 58
Seite 216ReferenceEverything from A to Z216
Online Edition for Part no. 01 40 2 609 184 - 09 11 500