2012 BMW Z4 SDRIVE35I manual transmission
[x] Cancel search: manual transmissionPage 57 of 220
Sport program and manual mode M/S
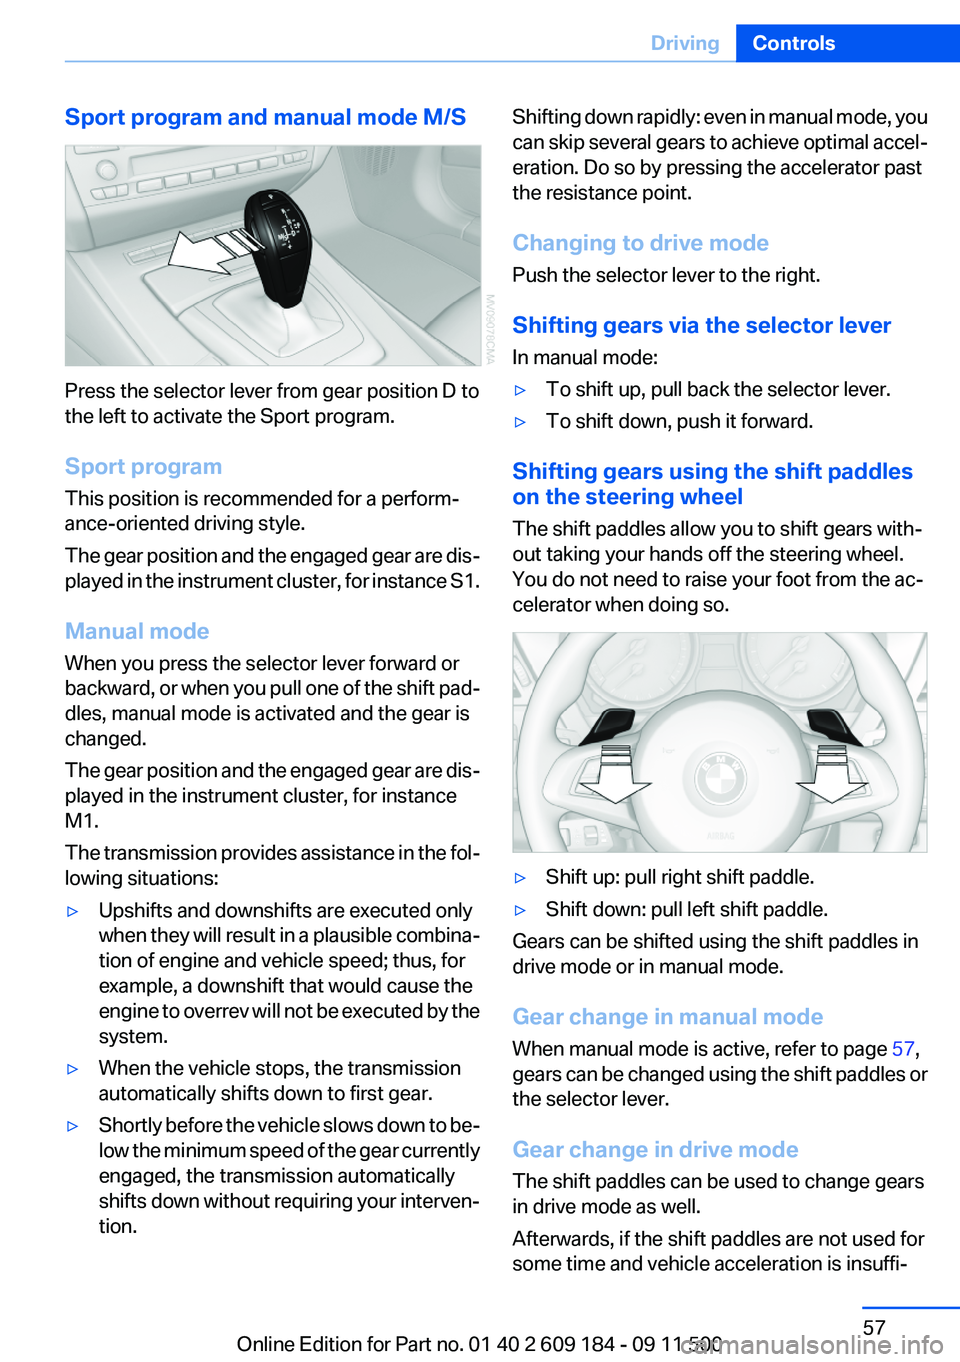
Press the selector lever from gear position D to
the left to activate the Sport program.
Sport program
This position is recommended for a perform‐
ance-oriented driving style.
The gear position and the engaged gear are dis‐
played in the instrument cluster, for instance S1.
Manual mode
When you press the selector lever forward or
backward, or when you pull one of the shift pad‐
dles, manual mode is activated and the gear is
changed.
The gear position and the engaged gear are dis‐
played in the instrument cluster, for instance
M1.
The transmission provides assistance in the fol‐
lowing situations:
▷Upshifts and downshifts are executed only
when they will result in a plausible combina‐
tion of engine and vehicle speed; thus, for
example, a downshift that would cause the
engine to overrev will not be executed by the
system.▷When the vehicle stops, the transmission
automatically shifts down to first gear.▷Shortly before the vehicle slows down to be‐
low the minimum speed of the gear currently
engaged, the transmission automatically
shifts down without requiring your interven‐
tion.Shifting down rapidly: even in manual mode, you
can skip several gears to achieve optimal accel‐
eration. Do so by pressing the accelerator past
the resistance point.
Changing to drive mode
Push the selector lever to the right.
Shifting gears via the selector lever
In manual mode:▷To shift up, pull back the selector lever.▷To shift down, push it forward.
Shifting gears using the shift paddles
on the steering wheel
The shift paddles allow you to shift gears with‐
out taking your hands off the steering wheel.
You do not need to raise your foot from the ac‐
celerator when doing so.
▷Shift up: pull right shift paddle.▷Shift down: pull left shift paddle.
Gears can be shifted using the shift paddles in
drive mode or in manual mode.
Gear change in manual mode
When manual mode is active, refer to page 57,
gears can be changed using the shift paddles or
the selector lever.
Gear change in drive mode
The shift paddles can be used to change gears
in drive mode as well.
Afterwards, if the shift paddles are not used for
some time and vehicle acceleration is insuffi‐
Seite 57DrivingControls57
Online Edition for Part no. 01 40 2 609 184 - 09 11 500
Page 58 of 220
cient, the forward gears are changed again au‐
tomatically.
Launch Control
Launch Control enables you to drive off with an
optimal vehicle acceleration on a high grip road
surface.
Do not use Launch Control too often
Do not use Launch Control too often, as
the higher loads on the vehicle lead to premature
component wear.◀
Launch Control is available when the engine is
at operating temperature, i.e., after driving con‐
tinuously for at least 6 miles/10 km.1.With the engine running, depress the brake
pedal with your left foot.2.Activate the SPORT+ program of the Dy‐
namic Driving Control, refer to page 82.3.With the vehicle stationary, activate manual
mode and select first gear.4.Press the accelerator all the way down. The
engine speed when driving off is controlled.
A flag symbol appears in the instrument
cluster.5.The vehicle accelerates when you release
the brake pedal. Keep the accelerator
pressed all the way down.6.The transmission shifts up automatically as
long as the accelerator is pressed all the way
down.
Launch Control only becomes available again
after a certain distance has been driven.
Launch Control can only be used after the
break-in phase, refer to page 108.
To maintain driving stability, activate DSC
whenever possible.
Manually releasing and engaging the
transmission lock
If a power failure occurs, e.g., if the battery is
discharged or disconnected, the transmission
lock must be released manually, otherwise the
rear wheels are blocked and the vehicle cannot
be towed.
Release the transmission lock manually for tow‐
ing only and set the parking brake beforehand to
prevent the vehicle from rolling. After parking
the vehicle, engage the transmission lock again
manually, refer to page 59.
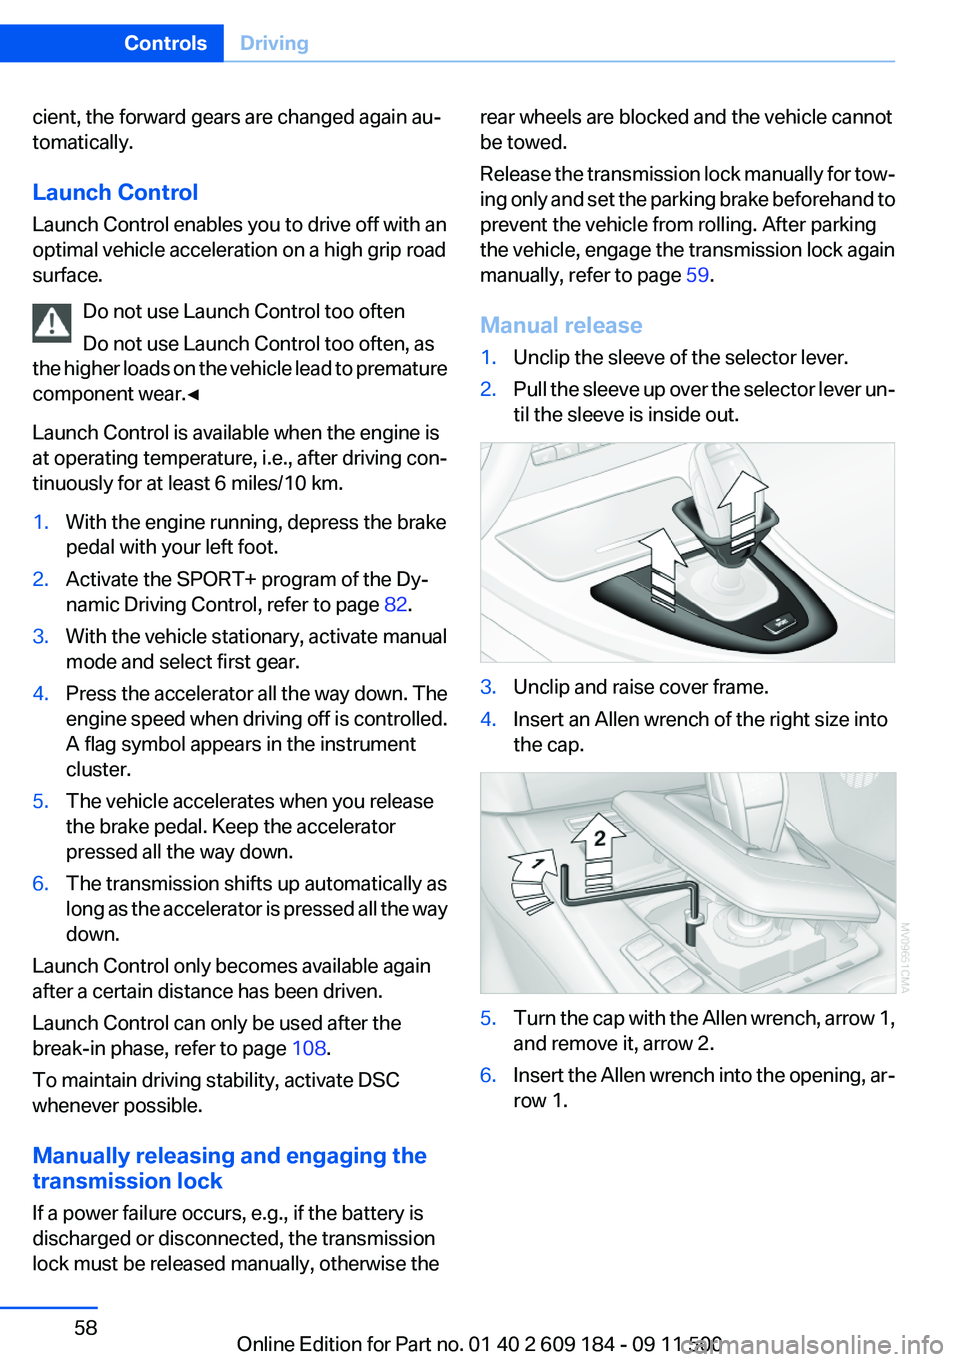
Manual release1.Unclip the sleeve of the selector lever.2.Pull the sleeve up over the selector lever un‐
til the sleeve is inside out.3.Unclip and raise cover frame.4.Insert an Allen wrench of the right size into
the cap.5.Turn the cap with the Allen wrench, arrow 1,
and remove it, arrow 2.6.Insert the Allen wrench into the opening, ar‐
row 1.Seite 58ControlsDriving58
Online Edition for Part no. 01 40 2 609 184 - 09 11 500
Page 59 of 220
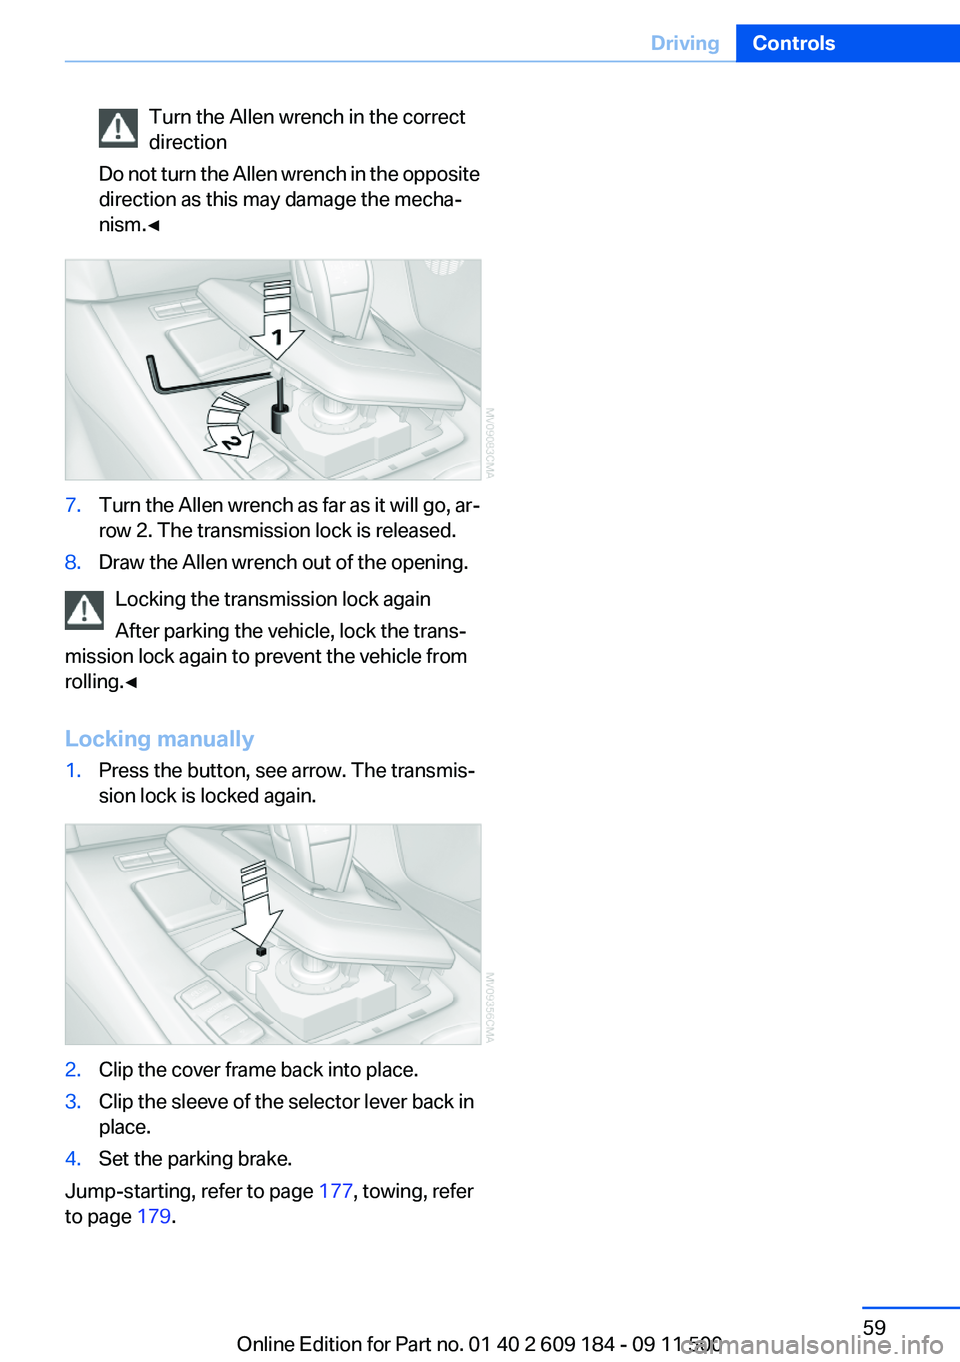
Turn the Allen wrench in the correct
direction
Do not turn the Allen wrench in the opposite
direction as this may damage the mecha‐
nism.◀7.Turn the Allen wrench as far as it will go, ar‐
row 2. The transmission lock is released.8.Draw the Allen wrench out of the opening.
Locking the transmission lock again
After parking the vehicle, lock the trans‐
mission lock again to prevent the vehicle from
rolling.◀
Locking manually
1.Press the button, see arrow. The transmis‐
sion lock is locked again.2.Clip the cover frame back into place.3.Clip the sleeve of the selector lever back in
place.4.Set the parking brake.
Jump-starting, refer to page 177, towing, refer
to page 179.
Seite 59DrivingControls59
Online Edition for Part no. 01 40 2 609 184 - 09 11 500
Page 85 of 220
Driving comfortVehicle equipment
This chapter describes all series equipment as
well as country-specific and special equipment
offered for this model series.Therefore, it also
describes equipment that may not be found in
your vehicle, for instance due to the selected
special equipment or the country version. This
also applies to safety-related functions and sys‐
tems.
Cruise control
The concept
Cruise control is available for use at speeds of
approx. 20 mph/30 km/h and higher. The car
then stores and maintains the speed that you
specify using the lever on the steering column.
In order to maintain the specified speed, the
system brakes the vehicle when the engine
braking effect is insufficient on downhill gradi‐
ents.
Do not use cruise control
Do not use the system if unfavorable con‐
ditions make it impossible to drive at a constant
speed, for instance:▷On curvy roads.▷In heavy traffic.▷On slippery roads, in fog, snow or rain, or on
a loose road surface.
Otherwise, you could lose control of the vehicle
and cause an accident.◀
Manual transmission
You can shift gears while cruise control is acti‐
vated. An indicator lamp notifies you that you
should shift gears when you drive for an ex‐
tended period at very high or very low engine
speeds, or the system is deactivated.
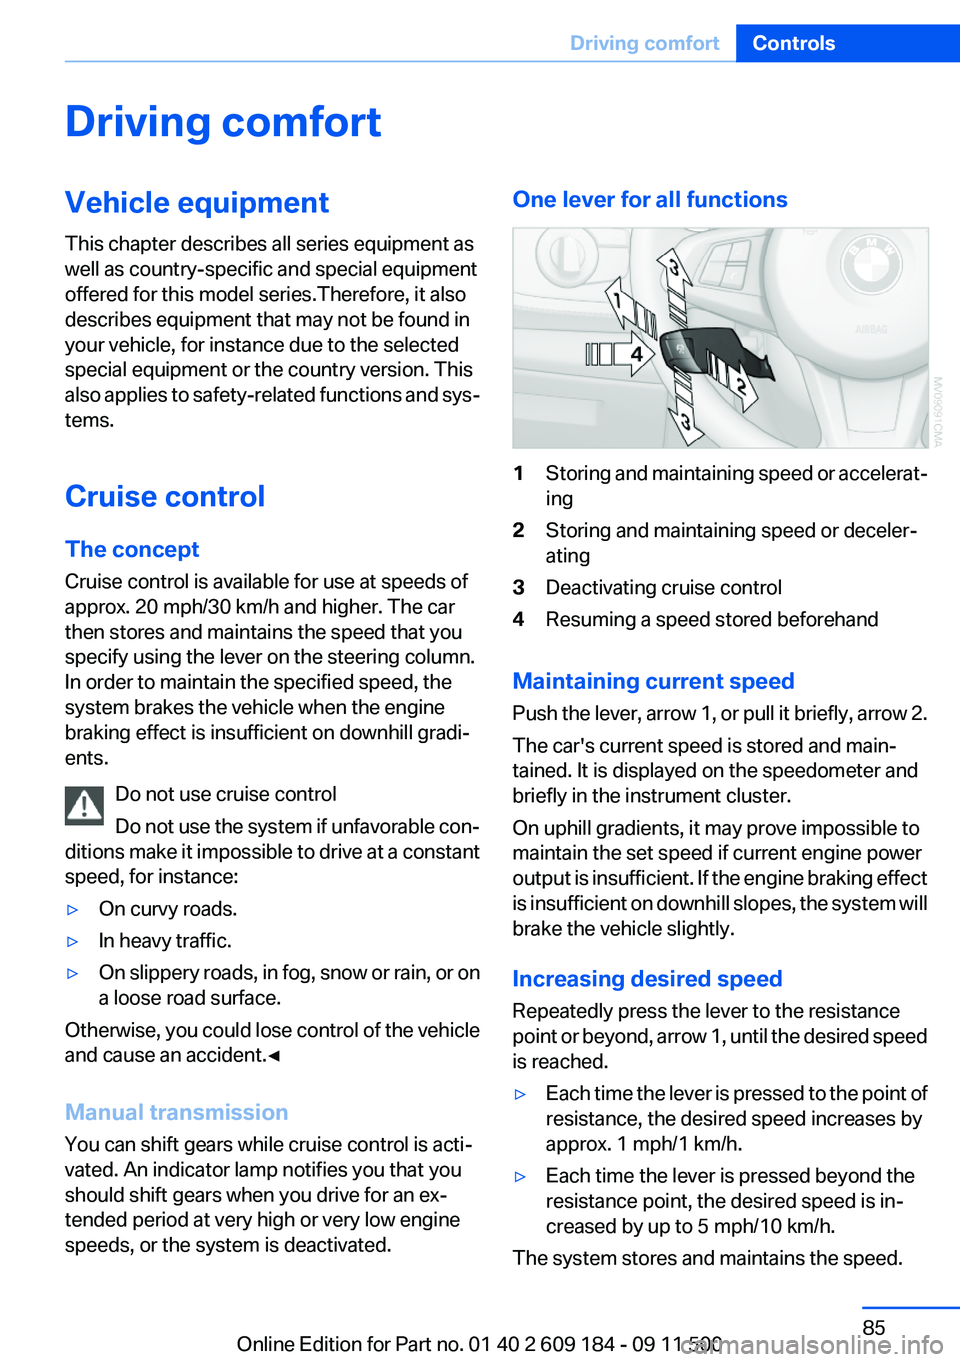
One lever for all functions1Storing and maintaining speed or accelerat‐
ing2Storing and maintaining speed or deceler‐
ating3Deactivating cruise control4Resuming a speed stored beforehand
Maintaining current speed
Push the lever, arrow 1, or pull it briefly, arrow 2.
The car's current speed is stored and main‐
tained. It is displayed on the speedometer and
briefly in the instrument cluster.
On uphill gradients, it may prove impossible to
maintain the set speed if current engine power
output is insufficient. If the engine braking effect
is insufficient on downhill slopes, the system will
brake the vehicle slightly.
Increasing desired speed
Repeatedly press the lever to the resistance
point or beyond, arrow 1, until the desired speed
is reached.
▷Each time the lever is pressed to the point of
resistance, the desired speed increases by
approx. 1 mph/1 km/h.▷Each time the lever is pressed beyond the
resistance point, the desired speed is in‐
creased by up to 5 mph/10 km/h.
The system stores and maintains the speed.
Seite 85Driving comfortControls85
Online Edition for Part no. 01 40 2 609 184 - 09 11 500
Page 86 of 220
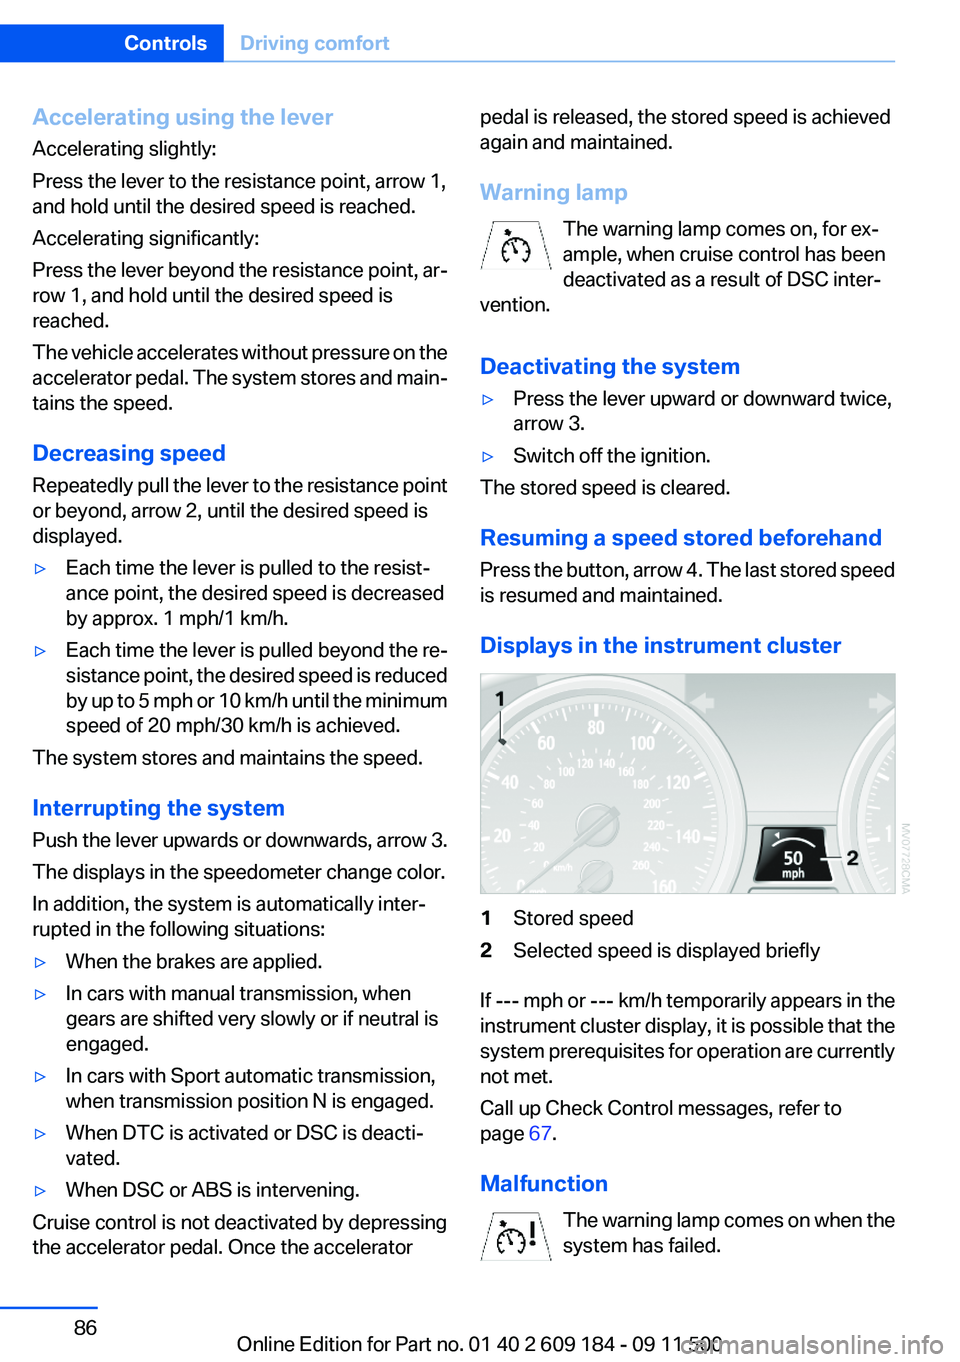
Accelerating using the lever
Accelerating slightly:
Press the lever to the resistance point, arrow 1,
and hold until the desired speed is reached.
Accelerating significantly:
Press the lever beyond the resistance point, ar‐
row 1, and hold until the desired speed is
reached.
The vehicle accelerates without pressure on the
accelerator pedal. The system stores and main‐
tains the speed.
Decreasing speed
Repeatedly pull the lever to the resistance point
or beyond, arrow 2, until the desired speed is
displayed.▷Each time the lever is pulled to the resist‐
ance point, the desired speed is decreased
by approx. 1 mph/1 km/h.▷Each time the lever is pulled beyond the re‐
sistance point, the desired speed is reduced
by up to 5 mph or 10 km/h until the minimum
speed of 20 mph/30 km/h is achieved.
The system stores and maintains the speed.
Interrupting the system
Push the lever upwards or downwards, arrow 3.
The displays in the speedometer change color.
In addition, the system is automatically inter‐
rupted in the following situations:
▷When the brakes are applied.▷In cars with manual transmission, when
gears are shifted very slowly or if neutral is
engaged.▷In cars with Sport automatic transmission,
when transmission position N is engaged.▷When DTC is activated or DSC is deacti‐
vated.▷When DSC or ABS is intervening.
Cruise control is not deactivated by depressing
the accelerator pedal. Once the accelerator
pedal is released, the stored speed is achieved
again and maintained.
Warning lamp The warning lamp comes on, for ex‐
ample, when cruise control has been
deactivated as a result of DSC inter‐
vention.
Deactivating the system▷Press the lever upward or downward twice,
arrow 3.▷Switch off the ignition.
The stored speed is cleared.
Resuming a speed stored beforehand
Press the button, arrow 4. The last stored speed
is resumed and maintained.
Displays in the instrument cluster
1Stored speed2Selected speed is displayed briefly
If --- mph or --- km/h temporarily appears in the
instrument cluster display, it is possible that the
system prerequisites for operation are currently
not met.
Call up Check Control messages, refer to
page 67.
Malfunction The warning lamp comes on when the
system has failed.
Seite 86ControlsDriving comfort86
Online Edition for Part no. 01 40 2 609 184 - 09 11 500
Page 110 of 220
Ensure that the floor mats are securely fastened
again when they are returned after being re‐
moved, such as for cleaning.◀
Driving in wet conditions
When roads are wet or there is heavy rain, briefly
exert gentle pressure on the brake pedal every
few miles.
Ensure that this action does not endanger other
road users.
The heat generated in this process helps dry the
brake discs and pads.
In this way braking efficiency will be available
when you need it.
Hills
Drive long or steep downhill gradients in the gear
in which the least braking is required. Otherwise,
the brake system may overheat, resulting in a
reduction in the brake system efficiency.
You can increase the engine's braking effect by
shifting down, going all the way to first gear, if
necessary.
Downshifting in manual mode of the 8-gear
Sport automatic transmission, refer to page 54.
Downshifting in manual mode of the 7-gear
Sport automatic transmission with dual clutch,
refer to page 57.
Avoid load on the brakes
Avoid placing excessive load on the brake
system. Light but consistent brake pressure can
lead to high temperatures, brake wear and pos‐
sibly even brake failure.◀
Do not drive in neutral
Never drive with the transmission in neu‐
tral, with the engine switched off or with the
clutch depressed; otherwise, you will have nei‐
ther the braking action of the engine or nor its
power assistance when braking or steering.◀Brake disc corrosion
Corrosion on the brake discs and contamination
on the brake pads are furthered by:▷Low mileage.▷Extended periods when the vehicle is not
used at all.▷Infrequent use of the brakes.
Corrosion occurs when the minimum pressure
that must be exerted by the pads during brake
applications to clean the discs is not reached.
Should corrosion form on the brake discs, the
brakes will tend to respond with a pulsating ef‐
fect that generally cannot be corrected.
Condensation under the parked vehicle
When using the automatic climate control, con‐
densation water develops that exits underneath
the vehicle.
Therefore, traces of condensed water under the
vehicle are normal.
Loading Overloading the vehicle
To avoid exceeding the approved carrying
capacity of the tires, never overload the vehicle.
Overloading can lead to overheating and in‐
creases the rate at which damage develops in‐
side the tires. This could result in a sudden loss
of tire inflation pressure.◀
Secure heavy objects
Never transport unsecured heavy or hard
objects in the passenger compartment, as they
could be thrown around and pose a safety haz‐
ard to the vehicle's occupants during abrupt
braking or evasive maneuvers.◀
No fluids in the cargo area
Make sure that fluids do not leak into the
cargo area; otherwise, the vehicle may be dam‐
aged.◀
Seite 110Driving tipsThings to remember when driving110
Online Edition for Part no. 01 40 2 609 184 - 09 11 500
Page 179 of 220
Tow-starting and towing
Tow fitting
The screw-in tow fitting should always be car‐
ried in the vehicle. It can be screwed in at the
front or rear of the BMW.
It is stored in the onboard vehicle tool kit under
the floor panel in the trunk, refer to page 170.
Tow fitting, information on use▷Use only the tow fitting provided with
the vehicle and screw it all the way in.▷Use the tow fitting for towing on paved roads
only.▷Avoid lateral loading of the tow fitting, e.g.,
do not lift the vehicle by the tow fitting.
Otherwise, damage to the tow fitting and the ve‐
hicle can occur.◀
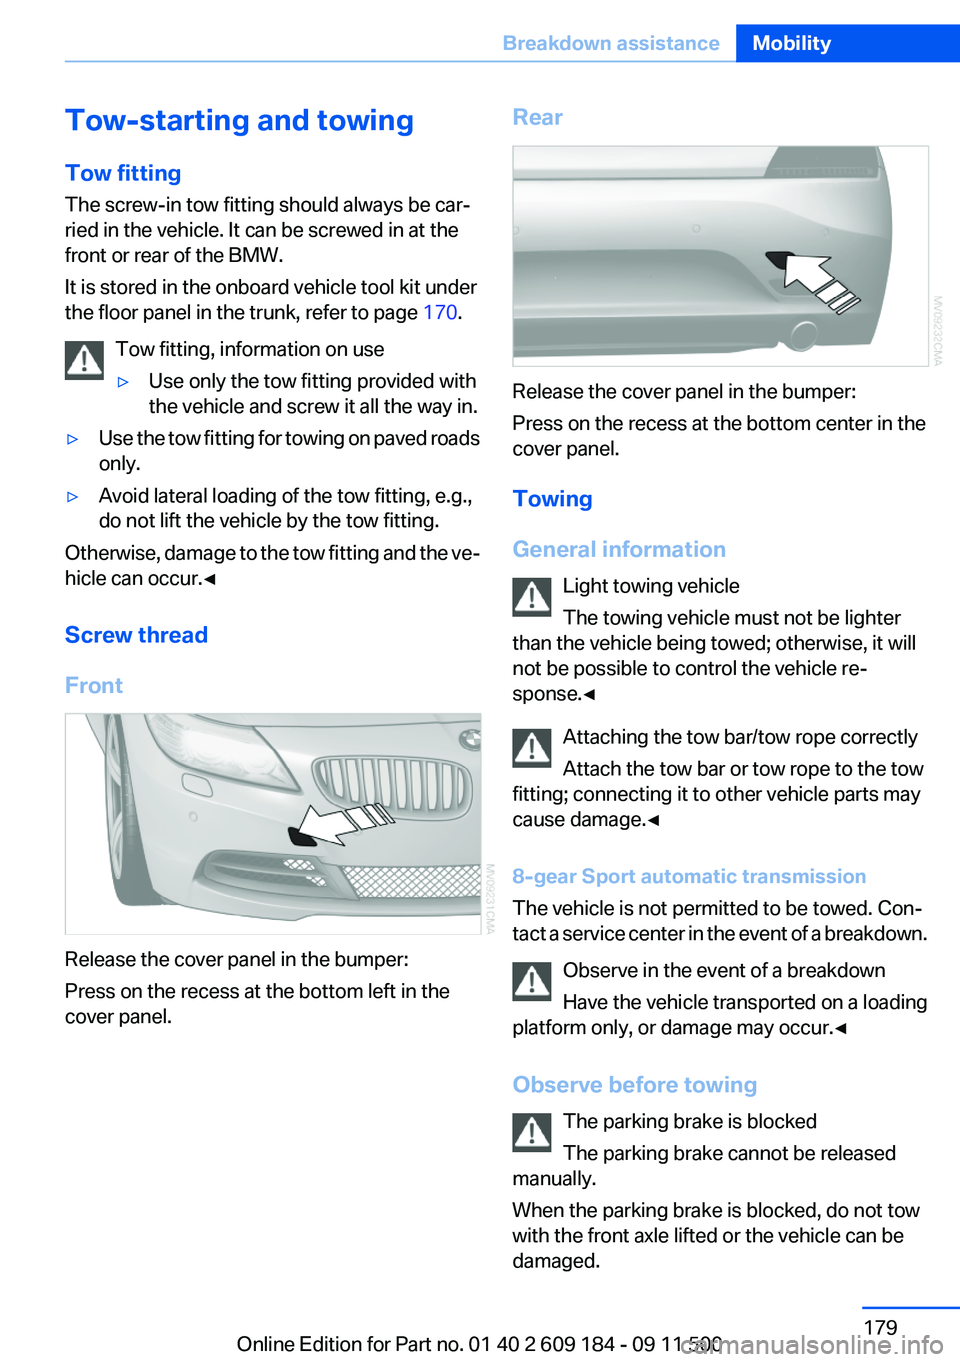
Screw thread
Front
Release the cover panel in the bumper:
Press on the recess at the bottom left in the
cover panel.
Rear
Release the cover panel in the bumper:
Press on the recess at the bottom center in the
cover panel.
Towing
General information Light towing vehicle
The towing vehicle must not be lighter
than the vehicle being towed; otherwise, it will
not be possible to control the vehicle re‐
sponse.◀
Attaching the tow bar/tow rope correctly
Attach the tow bar or tow rope to the tow
fitting; connecting it to other vehicle parts may
cause damage.◀
8-gear Sport automatic transmission
The vehicle is not permitted to be towed. Con‐
tact a service center in the event of a breakdown.
Observe in the event of a breakdown
Have the vehicle transported on a loading
platform only, or damage may occur.◀
Observe before towing The parking brake is blocked
The parking brake cannot be released
manually.
When the parking brake is blocked, do not tow
with the front axle lifted or the vehicle can be
damaged.
Seite 179Breakdown assistanceMobility179
Online Edition for Part no. 01 40 2 609 184 - 09 11 500
Page 180 of 220

Contact your service center.◀
Manual transmission
Gearshift lever in neutral position.
7-gear Sport automatic transmission Manually release the transmission lock
Manually release the transmission lock,
even if there is no malfunction involving the
transmission. Otherwise, there is the danger
that the transmission lock will be engaged au‐
tomatically during towing.◀
Manually release the transmission lock, refer to
page 58.
Adhere to the towing speed and distance
Do not exceed a towing speed of 30 mph/
50 km/h and a towing distance of 30 miles/50 km
or damage to the transmission can occur.◀
Observe during towing Observe the notes on towing
Observe all notes on towing or vehicle
damage or accidents can occur.◀▷Make sure that the ignition is switched on;
otherwise, the low beams, tail lamps, turn
signals, and windshield wipers may be un‐
available.▷When the engine is stopped, there is no
power assist. Consequently, more force
needs to be applied when braking and steer‐
ing.▷Larger steering wheel movements are re‐
quired.▷Switch on the hazard warning system, de‐
pending on local regulations.▷If the electrical system has failed, clearly
identify the vehicle being towed by placing
a sign or a warning triangle in the rear win‐
dow.▷Do not tow the vehicle with the rear axle
tilted, as the front wheels could turn.Towing methods
Do not lift the vehicle
Do not lift the vehicle by the tow fitting or
body and chassis parts; otherwise, damage may
result.◀
Tow bar
The tow fittings used should be on the same
side on both vehicles.
Should it prove impossible to avoid mounting
the tow bar at an offset angle, please observe
the following:▷Clearance and maneuvering capability will
be sharply limited during cornering.▷The tow bar will generate lateral forces if it
is attached offset.
Tow rope
When starting to tow the vehicle, make sure that
the tow rope is taut.
To avoid jerking and the associated stresses on
the vehicle components when towing, always
use nylon ropes or nylon straps.
Attaching the tow rope correctly
Only secure the tow rope on the tow fit‐
ting; otherwise, damage can occur when it is se‐
cured on other parts of the vehicle.◀
Tow truck Do not lift the vehicle
Do not lift the vehicle by the tow fitting or
body and chassis parts; otherwise, damage may
result.◀
Secure the vehicle against rolling off
Apply the parking brake after towing and
secure the vehicle against rolling off if neces‐
sary.
Have the operability of transmission position P
checked by the service center.◀
Seite 180MobilityBreakdown assistance180
Online Edition for Part no. 01 40 2 609 184 - 09 11 500